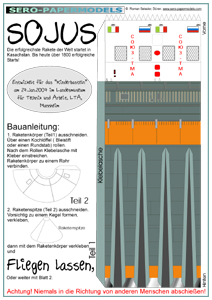
While rooting around the 'Net for cardstock rockets to fiddle with, I came across the "Sojus Kinder Rakete" on a couple of different download sites. It's a cardstock stomp rocket which appears to have been produced for a children's program at the Landesmuseum fuer Technik und Arbeit in Mannheim, Germany. (The designer's site is
here--he makes some very nice card models of WWI biplanes, but doesn't have the "Kinder Rakete" hosted on his own site. I've attached the PDF to this post so you don't have to go rooting around the search engines to find it.)
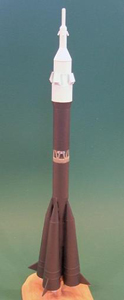
The rocket is just slightly larger than a BT-50, which gave me the idea to make a flying model out of it by wrapping the body around a BT-50.
View attachment 118837
Here's how to do it:
The PDF has two pages: the first page has the body and nose cone, the "boosters" (fins, actually) and escape tower on the second page. You need to print two copies of both pages: one on cardstock and one on plain paper. We're going to wrap the plain paper copy of the body tube around the BT-50, use the cardstock copy for the booster/fins and nose cone, and wrap the paper escape tower around a 3/16 launch lug.
1. Set your printer so that the printed copy of the body tube is 78mm wide exclusive of the glue tab, which is the circumference of a BT-50. (Actually, it's 77.911497809026872313873555905332mm, but why be picky?) That translated to 90% on my printer, but you should double check that on your own machine.
2. Cut an 8 1/2" length of BT-50 and draw a single straight guideline on the tube.
3. Cut out the body tube from the paper copy--just the detail part, not the glue tab ("Klebelasche"). Lay one side against the guideline and wrap it around the tube using the adhesive of your choice.
4. Cut out the fins from the cardstock copy, score and fold them, and glue them on the tube as shown in the PDF's assembly instructions.
5. Cut a short strip of green from one of the fins on the paper copy and wrap it around a 1/8" launch lug, then glue to the body. I put mine on the seam of the paper wrap.
View attachment 118839
6. Add the engine mount of your choice. I used a short piece of BT-5 with an engine block in two 5-50 centering rings.
View attachment 118840
7. Cut out the cardstock nose cone and glue it together.
8. To stiffen mine, I glued two cardboard discs inside the cone--the center "punch-out" piece from a BT-5 centering ring, and another from a BT-20 centering ring, with a little bit of nose weight between them. Punch a small hole in the center of the BT-20 disc
9. Coat the threads of an eye screw in glue and screwed it into the BT-20 disc to provide a shock cord anchor, then clip on a snap swivel.
10. To make the nose cone shoulder, I used one of those thick adapters Estes sells for fitting a D engine in an E-engine mount. A plain old BT-50 tube coupler would probably work just as well.
View attachment 118841
11. Wrap the escape tower print around a 3/16" launch lug, cut it to length, and glue it to the BT-5 disc in the nose cone.
12. Add shock cord and streamer.
I haven't had the chance to fly mine yet, but with the heavy components I used on the nose cone and the small engine in the tail, it should be nice and stable.
Post copied to gallery with permission


")