Wildman Blackhawk 38mm Build thread

The Rocketry Forum

Help Support The Rocketry Forum:

This site may earn a commission from merchant affiliate links, including eBay, Amazon, and others.
I might as well share mine.

RmIQR.jpg


jU9rs.jpg


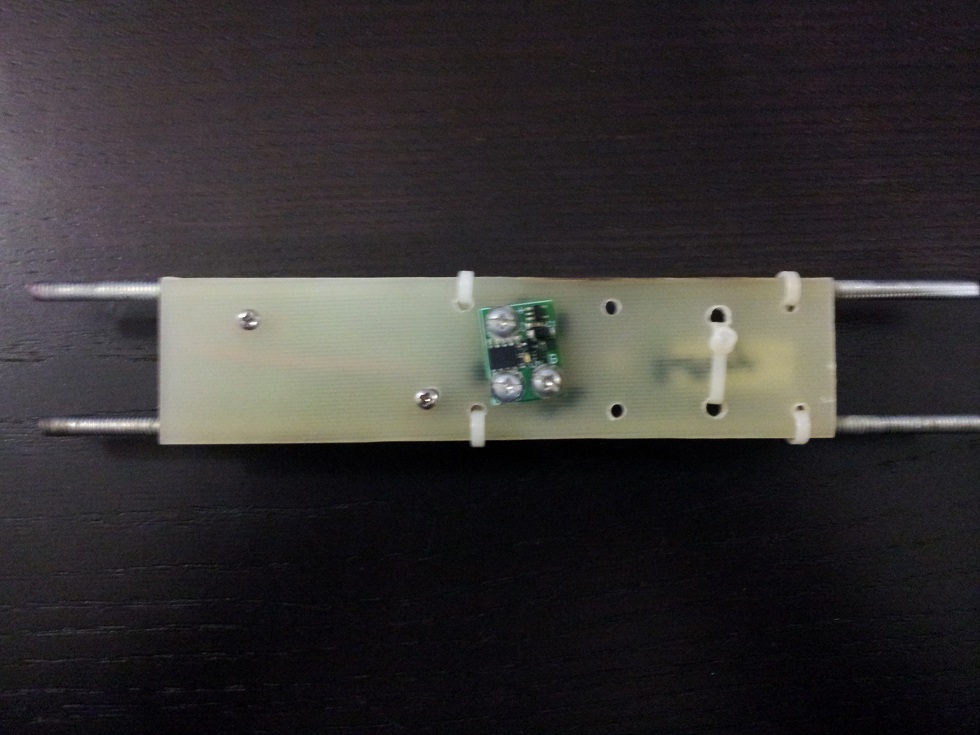
Mine is really simple, I have a raven connected to the magnetic switch with a simple LIPO.

Then one of the screws is the output to the ejection charges. When I install the top bulkhead I will attach the wires directly to the screw and the altimeter. Then I have a simple hole in the bulkhead where the wires will run from the charges to the board.

Then when I install the bottom bulkplate, I will have a spare wire running from the output of the switch that will be wired to the charges. Then the Raven will be facing down so I can install the last two charges into the raven directly.

Any questions?

I forgot to add I finally set a date for launch it will be February 23rd.

February is coming up quick! Cant wait to hear how the flight and bay operation go.

Not her to curtique, but personally like your liberal use of nylon ties !

Kenny
 
February is coming up quick! Cant wait to hear how the flight and bay operation go.

Not her to curtique, but personally like your liberal use of nylon ties !

Kenny

You are totally right February is coming quickly, I decided to propose to my girlfriend soon so I figured I better launch before we have to do all that wedding planning.
 
You are totally right February is coming quickly, I decided to propose to my girlfriend soon so I figured I better launch before we have to do all that wedding planning.

Congrats!

As far as wedding planning... ask her what time you need to be there. That is the extent of your input anyway!

Looking forward to a flight report. My BH-29 may have crashed a 3rd time by then!

To the poster considering a BH-38 as a first DD and Level 2 bird... Run a sim to make sure you are comfortable with the altitude you'll achieve. Are you planning on having a tracking device installed?
 
Thanks for the more detailed exposition! I may be biting off more than I should be doing a dual deploy, min diameter AND L2 cert at the same time!
 
Sorry for the Hijack...

Thanks for the more detailed exposition! I may be biting off more than I should be doing a dual deploy, min diameter AND L2 cert at the same time!

Not trying to discourage... Just make sure you are comfortable with the flight parameters (including your field's altitude limits!). And be confident you can find her after the flight!

A lot depends on where you fly... where are you located?
 
Last edited:
Thanks for the more detailed exposition! I may be biting off more than I should be doing a dual deploy, min diameter AND L2 cert at the same time!

If it makes you feel more comfortable. I am using this as my L1 cert, first minimum diameter, and first dual deploy. I plan on flying really high in the future, so there is no need for me to make my L1 bird a slow and low flying bird.

You can do it, just do a lot of reading and ask questions. It is always best to have the materials on hand to help plan things. At least for me it is easier.
 
BTW, does it come with schematics and full instructions? I've seen the build walkthrough, but its far from a detailed diagram of where stuff needs to be glue, attached, drilled, etc?
I have to say the rear coupler seems like a really weak point, but I'm no expert - there was a previous comment about having to make a slot and tie the kevlar around it and glue it in? The instructions seem to suggest just gluing inside the coupler, and the putting 2 rivets to block its forward movement on ejection of the drogue?

I'm also a little baffled by various comments about rivets, shearpins and so on. I have the HPR rocketry book, and havent gotten to the DD section yet, so maybe I'll figure it out myself.

https://www.wildmanrocketry.com/pdf/Kits/Wildman/Instructions/BlackHawk38_Ins.pdf

Also, there's no obvious retainer? Would a slimline (I think thats the brand I've heard mentioned on MD rockets) work on it? or would that just spoil it's lines?

W
 
Last edited:
Sorry for the Hijack...
Not trying to discourage... Just make sure you are comfortable with the flight parameters (including your field's altitude limits!). And be confident you can find her after the flight!
A lot depends on where you fly... where are you located?

Northern CA - probably at Snow Ranch, 15k waiver, but I'm getting discouraging noises about how hard it can be to find a min dia there, even with a tracker (due to iron ore in hills). Plus its impassable except on foot in most places. Maybe better to wait till Blackrock comes around.
 
Ok, one more dumb question -- with the 38 do people use dual deploy with both ejections controlled by the altimeter, or do they use engine ejection for the first deploy? If they use it, what stops the engine from being ejected, instead of the motor tube? Is there a bulk head in there forward of the motor but aft of the attachment? Ugh, so many questions, sorry!

Winton
 
Dual deploy just gives you better control over apogee chute deployment. Using the motors' delay grain instead
will probably be ok too but personally I wouldn't do it. As for the motor retention there is no room for a slimline
retainer without making the back end look real clunky. Plans specify a couple wraps of tape about 1" from the motor
nozzle end press fit snug into the body tube, then several wraps of duct tape over the end of the body tube and over
the motor stop/retainer. You could also drill & tap the end of the motor case for bolts thru the body to hold it in place,
bolts would have to end flush inside the motor case.
 
Nice setup my only criticism would be to put some physical stop at the end of the battery.
It would be a real drag if acceleration force caused the battery to unplug itself. And these
birds do accelerate rather quickly.
 
Couple of followups:

1) Ok, thanks - duct tape over the end sounds like it would have as much drag than a Slimline retainer though?

2) I can't tell from any of the build writeups of the 38 - is the forward payload airframe RIVETTED/ATTACHED to the AV bay (acting as a coupler?). If so, then is just the nose cone ejected? It seems to me in my limited wisdom, that this would be (a) superhard/impossible to get the ejection charge in down that long thin tube and (b) cause the ejection charge gasesto have to fill the entire airframe and nose cone before it ejected? My proposal would be to put a bulkhead somewgere in the top to middle of that tube (sufficient so that it could hold the shockcord and parachute), and then shear pin the nose cone on to that (so it could hold a RDF device). The second deployment EC would then only have to fill a smaller amount of tube. and it would be trivial to fit the EC in. The only downside here, is that there would need to be sheer pins into the AV bay coupler?

Cheers,
W

I did get you PM, I will answer it tonight afterwork.
 
Sorry to rehash an old thread just thought I would give everyone an update.


In regards to that post, where I was discussing the way to attach the Kevlar to the nose cone/coupler in the lower half of the rocket. I decided to use two washers and an all thread then sandwich them on the couplers.

As more time has become available I have been getting ready for my Level 1 attempt. I decided to visit Az_Ron a local rocketeer and discuss my rocket and make some improvements. His only issue was the attachment of the shock cord, this was also something I was debating and working to resolve in my mind. Awhile back I thought of a new method to attach the shock cord with less stress on the cord if it is a violent deployment. This method was incredible simple, and something I plan on using for all my minimum diameter builds in the future.

I visited Home Depot and bought, 1/8" Steel Rod. Then I cut a length of 40mm, this was little bit longer then the coupler it self I planned on placing it in. Which help provided a surface to hammer it through, and then to sand clean to fit flush to the coupler.

Pictures:

20130118_171155.jpgcoupler resize.jpg

To attach kevlar all you have to do is loop it around the rod, this method is very simple but I see it being incredibly strong. We will find out on Feb 23rd.
 
Do you plan to JB Weld it into place?

Not at all, that's the beauty of the design. I drilled the hole slightly smaller then the size of the rod. I had to tap the rod into one hole, then into the other. This took about 45 minutes of hammering the rod, the fiberglass was not willing to accept the rod. But with patience and persistence, it is in there. I also took an awl, and tried to hammer it out. It was extremely difficult, plus with the rod being completely smooth the kevlar will slide on the rod not gaining any purchase and trying to slip the rod out of place.
 
Really cool idea. I'd be nervous with only friction fit as well. The risk is it will loosen over repeated flights,... and if it fails it'll do so at deploy. I'd vote for some JB weld as well just for security.
 
Hey, revisiting this thread now I have my Blackhawk 38 kit in hand. I'm planning ahead, and trying to figure out what size charge will be needed to eject the main, if I have a couple of 2-56 nylon screws.
I was using the https://www.info-central.org/?article=303 calculator, and this suggest 0.5 grams would be sufficient for 4 x 2-56 nylon sheer screws. How much ultimate force gets put on the nose cone and shock cord with this much charge. It's a really small nose cone - I'm afraid it's going to come out of that like a rocket (literally, with 3-400 lbf of thrust). But it has drag from the chute being pulled out I guess, and it will lose energy snapping the sheers.

Anyone care to comment? There's less need to have drogue sheer pins, correct?

Shear pins, not sheer. They are sheared by the tubes. Just so you know.

In any case, the reason shear pins are used instead of friction is that they don't actually take much energy to snap, just a lot of force. That way you can use only enough black powder to snap the pins, and then the rest of it comes out easily.

In your case, though, 4 shear pins is way too many. One would be easily enough.

In my case (my minimum-diameter 38mm rocket), though, one 0.5 g charge was sufficient to separate the (friction-fit) joint without too much excess energy. I wouldn't worry about the end flying off at a ridiculous speed.
 
Last edited:
I have tested mine with 0.85 grams of FFFg black powder. And the nose cone separated under control, with all the laundry leaving the body.

Forgot to mention that is with 2 shear pins. (2-56 nylon)
 
Last edited:
Thanks!!

Gradually getting the stuff I need delivered.

My three current gray areas are:

1) Will the AV Bay work with 2 eyebolts (1/4"-20, one 4", one 2") connected by a coupling nut.
(a) will the DDC22 and Battery fit in the < 3/4" segment thats created by having these two bolts run down the middle .
(b) Will the coupling nut survive separation forces.

2) Nose cone attachement - for the motor tube I'm using one of GLR's 38mm aluminum shock cord hard point attachment with rivets. But I'm dubious that epoxying the shock cord to the interior of the nose cone is sufficient. I want the minimum amount of machine tools involved (as all I have is a low quality electric drill :)).

In my thread I go over two methods of attachement. I will link them later, as I am currently at work and cannot spend much time replying.

For the fin can I used the 1.5" coupler and sandwiched two washers with an all thread. Then I used an eyebolt to secure the shock cord. That is not aoutlined in the thread but a change I made recently, then I secured that coupler using 3 plastic rivets.

For the nosecone I used a little steel rod that was friction fitted to the coupler, which I then tied the shock cord to.

These will be linked later, but I did include the nosecone attachement in the attachments.

20130118_171155.jpg

coupler resize.jpg
 
So today was the maiden flight of my Blackhawk.

As you can tell from the attachment, it was met with spectacular failure.

I booted up the Raven to my computer, the beeper does not function and the flights on the raven are of no help.

So I was having trouble arming the Raven originally, but eventually me and my brother did get the Raven armed. We even heard the beep confirming continuity. Then the continuous beep, so we thought we were all ready to go.

It went up and came down lawn darting into the desert floor. As you can see in the picture even the bulkheads where destroyed.

I do have plans on rebuilding it, I plan on getting a new upper section body tube, coupler and nosecone. I also plan on shorting the lower section and increasing the upper section with the same length taken away probably around an inch. I want plenty of room for my parachute and recovery.

Also there will be a new paint job, seeing how I am taking away from the original design and original parts of the Blackhawk it needs some new paint.

I do not know when this will happen as I am in the process of planning a wedding and saving money.

Lastly when I get the flight pictures from my father I will post them here also. That part was beautiful!

ohno.jpg
 
We even heard the beep confirming continuity. Then the continuous beep, so we thought we were all ready to go.

What 'continuous beep'? It should just keep beeping out continuity until you launch.
 
That's why I no longer fly WM kits :grin:

Still, sad to see a well built rocket be returned to kit form.
 
I do have plans on rebuilding it, I plan on getting a new upper section body tube, coupler and nosecone. I also plan on shorting the lower section and increasing the upper section with the same length taken away probably around an inch. I want plenty of room for my parachute and recovery.

Are those parts destroyed? They all look usable [if cleaned up] in the pics.

How about the fincan...don't see it?

What's seems amazing to me is that after a hit like that, buried that deep, you can even recognize them, The only thing I see totally destroyed are all the BP's and bay parts.

So all that stuff in the pics is...totally damaged beyond repair?

Sorry about you loss....you did such a nice job. Would have been cool to get at least one good flight out of.

Was that the first flight of the Raven?
 
Back
Top