You are using an out of date browser. It may not display this or other websites correctly.
You should upgrade or use an alternative browser.
You should upgrade or use an alternative browser.
My L3 build - Performance Rocketry Competitor 6
- Thread starter SynergyAero
- Start date


Help Support The Rocketry Forum:
This site may earn a commission from merchant affiliate
links, including eBay, Amazon, and others.
")
SynergyAero
Well-Known Member
- Joined
- Feb 23, 2010
- Messages
- 235
- Reaction score
- 0
Thanks for the kind words, Peter!
Well... So far I have completed 4 ground tests... Not such great results at first, but I learned some valuable lessons and made the necessary changes. Here are the results:
Ground Test #1: Unsuccessful
Although the weight of the nosecone would have probably pulled the deployment bag and pilot out, I don't want to take the chance. So I re-fitted my avionics bay with mounts for larger CO2 charges. I moved the 25g charge to become my new drogue charge, and ordered a 38g system for the main.
Ground Test #2: Unsuccessful
Ground Test #3: Success!
Ground Test #4: Success again!
Here is a video of Ground Test #3:
<embed width="448" height="361" type="application/x-shockwave-flash" wmode="transparent" src="https://s124.photobucket.com/flash/player.swf?file=https://vid124.photobucket.com/albums/p10/GatorFanFL/L3 build - Competitor 6/l3groundtest.flv"></embed>
I plan to ground test one more time before the L3 cert attempt. The final test will be performed after the rocket is painted.
Cris
Well... So far I have completed 4 ground tests... Not such great results at first, but I learned some valuable lessons and made the necessary changes. Here are the results:
Ground Test #1: Unsuccessful
Drogue charge (16g CO2) went off, broke shear pins and deployed drogue
Main charge (25g CO2) went off, broke shear pins, popped nose cone, but did not manage to fully eject deployment bag from upper payload section.
Main charge (25g CO2) went off, broke shear pins, popped nose cone, but did not manage to fully eject deployment bag from upper payload section.
Although the weight of the nosecone would have probably pulled the deployment bag and pilot out, I don't want to take the chance. So I re-fitted my avionics bay with mounts for larger CO2 charges. I moved the 25g charge to become my new drogue charge, and ordered a 38g system for the main.
Ground Test #2: Unsuccessful
Upon igniting the e-matches, nothing happened. I heard the e-matches fire, but no black powder pop. I'm glad this test failed, because I learned a valuable lesson. DO NOT load BP charges (even the small amount used for the Rouse Tech setup) too far ahead of time, especially in a humid state like Florida! When I inspected the CD-3 cannisters, I found that the e-matches had indeed fired. However, the black powder had turned to "black goo" in the Florida humidity (and thus didn't ignite)!! I'm glad I now know this =)
Ground Test #3: Success!
Drogue charge (25g CO2) went off, broke shear pins, and deployed drogue 'chute
Main charge (38g CO2) went off, broke shear pins, and fully deployed pilot and d-bag with main 'chute
Main charge (38g CO2) went off, broke shear pins, and fully deployed pilot and d-bag with main 'chute
Ground Test #4: Success again!
Same results as above!
Here is a video of Ground Test #3:
<embed width="448" height="361" type="application/x-shockwave-flash" wmode="transparent" src="https://s124.photobucket.com/flash/player.swf?file=https://vid124.photobucket.com/albums/p10/GatorFanFL/L3 build - Competitor 6/l3groundtest.flv"></embed>
I plan to ground test one more time before the L3 cert attempt. The final test will be performed after the rocket is painted.
Cris
SynergyAero
Well-Known Member
- Joined
- Feb 23, 2010
- Messages
- 235
- Reaction score
- 0
Well I haven't posted for quite some time now... thats because I have been busy priming, wet sanding, painting, wet sanding some more, masking, painting graphics, wet sanding some more... you get the idea!
In the past, I simply wore latex gloves, and held the parts with one hand while I sprayed them with the other.
Since this rocket is so much larger than anything I have built in the past, I spent about $20 in the Home Depot plumbing department and made this stand:
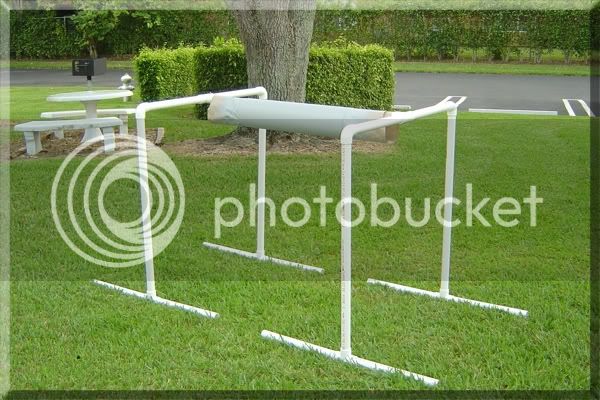
I was able to freely rotate the sections of airframe (Booster, Payload bays, etc) while spraying primer & paint.
After about 7 consecutive days of painting various parts and various colors, she is FINALLY done!!!
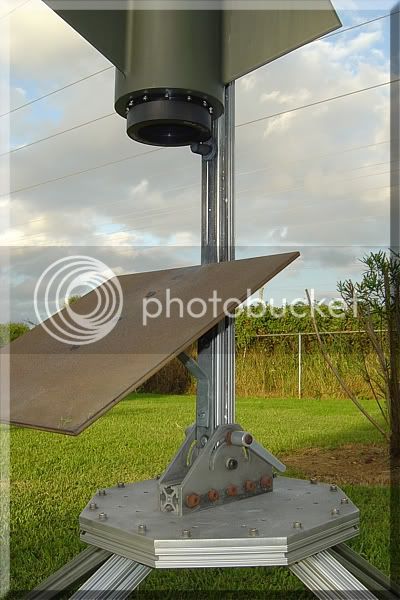
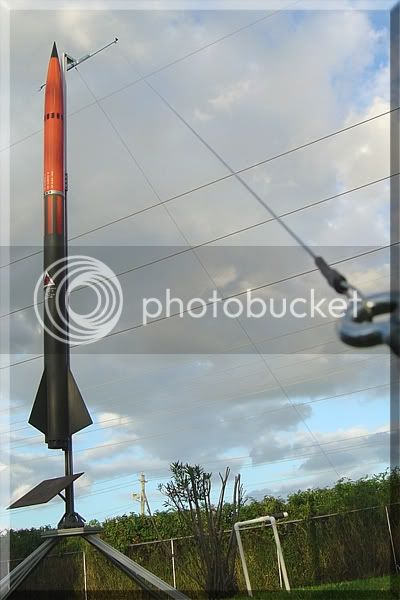
I went ahead and assembled my home-made launch pad, and installed the rocket onto the launch rail. Many modifications had to be made to my pad, in order to support the extra weight and the longer launch rail:

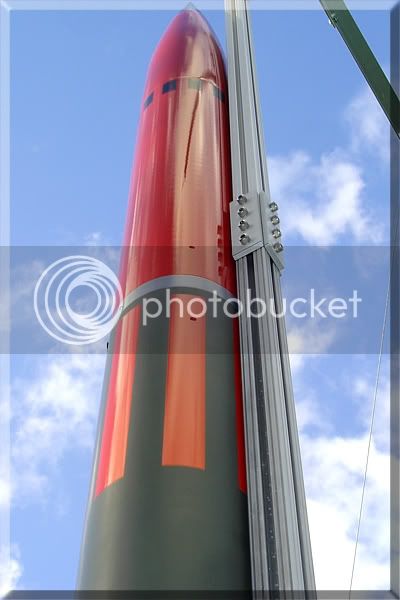
The first modification I made to my pad was to add another 4' section of 1515 rail. I used 4 aluminum plates, along with stainless steel cap head screws to secure the extension to the main (8') rail:
Now that the rail is so tall (12'), I noticed it was swaying about 6-8" side to side. So, I constructed an aluminum "T"-frame, and attached it to the top of the rail. This provides 3 points of attachment for some braided steel "stays" which hold the rail steady,even in strong wind like we had today:
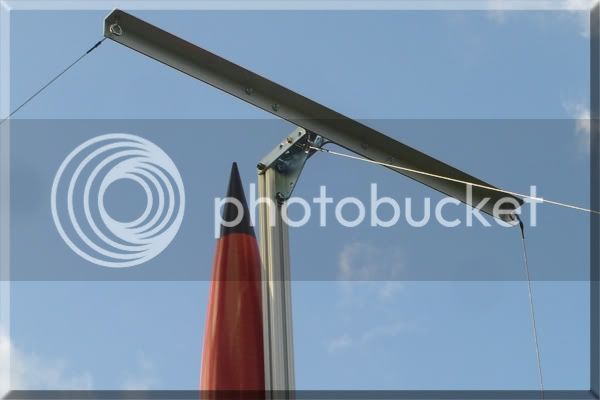
The "T"-frame allows the rocket to launch without the fins striking the stays as it leavs the rail.
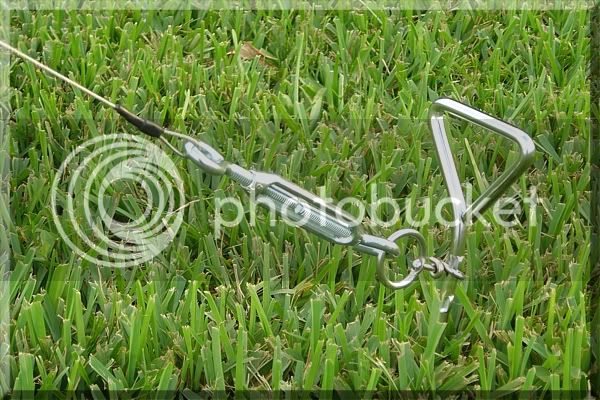
Each of the three stays is secured to a spiral-threaded tie-down stake, complete with turnbuckles for getting the stays nice and tight:
And finally, I reinforced the 1/4" plate steel blast deflector to handle the extra thrust of M and N motors:
Here are a couple more photos...

It came out pretty darn close to the original conceptual artwork:

Now its time to launch this baby!! The fateful day is this coming Saturday October 25th, @ Tripoli West Palm Beach. I have checked and re-checked everything 15 times, but I'm still so nervous! I can't wait till they hit the launch button =)
I will try to get some HD video footage, and post it on here after the launch. I don't want to take the video though, because I wan't to see the launch first-hand, not through an LCD screen! So I'll have to find a volunteer to take the footage, possibly my fiancee'.
Wish me luck, I'm going to need it!!
Cris
In the past, I simply wore latex gloves, and held the parts with one hand while I sprayed them with the other.
Since this rocket is so much larger than anything I have built in the past, I spent about $20 in the Home Depot plumbing department and made this stand:
I was able to freely rotate the sections of airframe (Booster, Payload bays, etc) while spraying primer & paint.
After about 7 consecutive days of painting various parts and various colors, she is FINALLY done!!!
I went ahead and assembled my home-made launch pad, and installed the rocket onto the launch rail. Many modifications had to be made to my pad, in order to support the extra weight and the longer launch rail:
The first modification I made to my pad was to add another 4' section of 1515 rail. I used 4 aluminum plates, along with stainless steel cap head screws to secure the extension to the main (8') rail:
Now that the rail is so tall (12'), I noticed it was swaying about 6-8" side to side. So, I constructed an aluminum "T"-frame, and attached it to the top of the rail. This provides 3 points of attachment for some braided steel "stays" which hold the rail steady,even in strong wind like we had today:
The "T"-frame allows the rocket to launch without the fins striking the stays as it leavs the rail.
Each of the three stays is secured to a spiral-threaded tie-down stake, complete with turnbuckles for getting the stays nice and tight:
And finally, I reinforced the 1/4" plate steel blast deflector to handle the extra thrust of M and N motors:
Here are a couple more photos...
It came out pretty darn close to the original conceptual artwork:
Now its time to launch this baby!! The fateful day is this coming Saturday October 25th, @ Tripoli West Palm Beach. I have checked and re-checked everything 15 times, but I'm still so nervous! I can't wait till they hit the launch button =)
I will try to get some HD video footage, and post it on here after the launch. I don't want to take the video though, because I wan't to see the launch first-hand, not through an LCD screen! So I'll have to find a volunteer to take the footage, possibly my fiancee'.
Wish me luck, I'm going to need it!!
Cris
talkin Monkey
Well-Known Member
- Joined
- Jan 17, 2009
- Messages
- 481
- Reaction score
- 0
An absolutely top notch rocket and build thread you got going here Cris.
Nice work dude!
Scott
Nice work dude!
Scott
Pantherjon
Well-Known Member
- Joined
- Jan 19, 2009
- Messages
- 7,434
- Reaction score
- 9
Awesome looking rocket Chris!
Good luck on the launch!
Good luck on the launch!
gosborn87466
Active Member
- Joined
- Jan 18, 2008
- Messages
- 34
- Reaction score
- 0
So how did the L3 flight go?
JDcluster
Well-Known Member
Very nice job !
Please post pics of the flight regardless of outcome.
JD
Please post pics of the flight regardless of outcome.
JD
SynergyAero
Well-Known Member
- Joined
- Feb 23, 2010
- Messages
- 235
- Reaction score
- 0
Sorry, I have been off the computer for some time =(
It was a weekend of highs and lows..
First there was all the excitement and anticipation of the upcoming launch... but then the excitement subsided, as the weather forecast showed that it would be rainy all day =(
But then we woke up on Saturday morning, and checked the weather outside. It was beautiful! - clear blue skies, nice and dry and a little cool. Woohoo!
So Niki packed up the BBQ grille, and I packed all the rocketrey paraphanalia onto the truck and we headed out to the field. Got everything set up, started grilling some hotdogs, and the clouds moved in =(
I kept prepping the rocket, just in case it cleared. Got the motor assembled, prepped the avionics bay, and packed the chutes.
This is the only picture I have from the launch... I think Peter took this one, as I was stuffing my main's shroud lines into the deployment bag:

Just as I completed the motor assembly, the clouds totally broke loose. We all scrambled to get our rockets and tools under cover. We braved the rain for a little while, in hopes it would pass. But eventually it started raining so hard, it looked like that scene in Forrest Gump!
So we broke everything down, got the truck packed up, and headed home totally drenched!
I just read all the kind words you guys have posted! I really appreciate them and the encouragement. I can't wait until the next launch. It will be on November 22nd - lets hope for better weather this time!!
Cris
It was a weekend of highs and lows..
First there was all the excitement and anticipation of the upcoming launch... but then the excitement subsided, as the weather forecast showed that it would be rainy all day =(
But then we woke up on Saturday morning, and checked the weather outside. It was beautiful! - clear blue skies, nice and dry and a little cool. Woohoo!
So Niki packed up the BBQ grille, and I packed all the rocketrey paraphanalia onto the truck and we headed out to the field. Got everything set up, started grilling some hotdogs, and the clouds moved in =(
I kept prepping the rocket, just in case it cleared. Got the motor assembled, prepped the avionics bay, and packed the chutes.
This is the only picture I have from the launch... I think Peter took this one, as I was stuffing my main's shroud lines into the deployment bag:
Just as I completed the motor assembly, the clouds totally broke loose. We all scrambled to get our rockets and tools under cover. We braved the rain for a little while, in hopes it would pass. But eventually it started raining so hard, it looked like that scene in Forrest Gump!
So we broke everything down, got the truck packed up, and headed home totally drenched!
I just read all the kind words you guys have posted! I really appreciate them and the encouragement. I can't wait until the next launch. It will be on November 22nd - lets hope for better weather this time!!
Cris
MarkM
Well-Known Member
- Joined
- Jan 18, 2009
- Messages
- 2,215
- Reaction score
- 1
I can't wait until the next launch. It will be on November 22nd - lets hope for better weather this time!!
Cris
Should be quite a launch the 22nd as I'm also going for my L3 that day on that same field!
Launching a 6" scratch-build Estes Astron Bandit upscale on an AMW 1350WW. Should be fun day....but I'm getting nervous already!
Hi, your rocket looks amazing. We are also making a rocket as a undergraduate capstone design. I am just wondering how do you get the composite cylinder. I mean you order from somewhere or you make this composite cylinder by yourself? Thanks in advance.
Similar threads
- Replies
- 1
- Views
- 1K
- Replies
- 154
- Views
- 16K
- Replies
- 29
- Views
- 6K