You are using an out of date browser. It may not display this or other websites correctly.
You should upgrade or use an alternative browser.
You should upgrade or use an alternative browser.
Estes Dark Energy #7219
- Thread starter ECayemberg
- Start date


Help Support The Rocketry Forum:
This site may earn a commission from merchant affiliate
links, including eBay, Amazon, and others.
georgeb
Well-Known Member
- Joined
- Jan 27, 2012
- Messages
- 211
- Reaction score
- 0
Wow!! Kellym88,those upscale rockets are awesome. I love the Photon disruptor,someday I want to build a high power one too.Umm... draggy designs look awesome bigger.... View attachment 94493
Nice build.... now how to upscale that NC.....
ECayemberg
Well-Known Member
- Joined
- Jan 21, 2009
- Messages
- 2,877
- Reaction score
- 850
Umm... draggy designs look awesome bigger.... View attachment 94493
Nice build.... now how to upscale that NC.....
That'd be a challenge for sure; lots of different surfaces on that piece of plastic!
Love the upscales; I have the decals for a 4" Photon Disruptor, just need to find the time
") .
.ECayemberg
Well-Known Member
- Joined
- Jan 21, 2009
- Messages
- 2,877
- Reaction score
- 850
Thanks Paul! I always enjoy your builds (and photos of your shop!!!).
This is a quick build, so don't go expecting the fine finish you put on your birds; simply not going to happen in this build thread
This is a quick build, so don't go expecting the fine finish you put on your birds; simply not going to happen in this build thread
ECayemberg
Well-Known Member
- Joined
- Jan 21, 2009
- Messages
- 2,877
- Reaction score
- 850
Our paths would have crossed on Saturday, but United cancelled by Friday PM flight out of town. The next flight oppertunity didn't get me to Muskegon until 6PM on Saturday, just in time for the NAR dinner meeting. Sunday was NAR meetings all day, so I didn't get out the flying field until Monday. Are you going to make it to NARAM 55?
John
Bummer on the delays! Probably won't make NARAM 55; I've been trying to get to Black Rock for 2 decades now; I'm hoping 2013 is the year (whether LDRS or Balls).
-Eric-
ECayemberg
Well-Known Member
- Joined
- Jan 21, 2009
- Messages
- 2,877
- Reaction score
- 850
+1 for Hobby Lobby. I haven't checked lately but it wouldn't surprise me. Walmart got out of the rocket business some years back, and most Micheals around the country tends to carry just Ready to Fly and a few starter sets, though as noted some don't carry rocket stuff at all.
I'm hoping Hobby Lobby adds some of the new offerings from Estes in the near future. I was in the local HobLob yesterday and they were in the process of re-setting the aisles storewide; it appeared that the rocket section had shrunk if anything. I haven't seen any *new* Estes offerings at this particular store since the arrival of the Pro Series II goods.
Here's to hoping!
-Eric-
ECayemberg
Well-Known Member
- Joined
- Jan 21, 2009
- Messages
- 2,877
- Reaction score
- 850
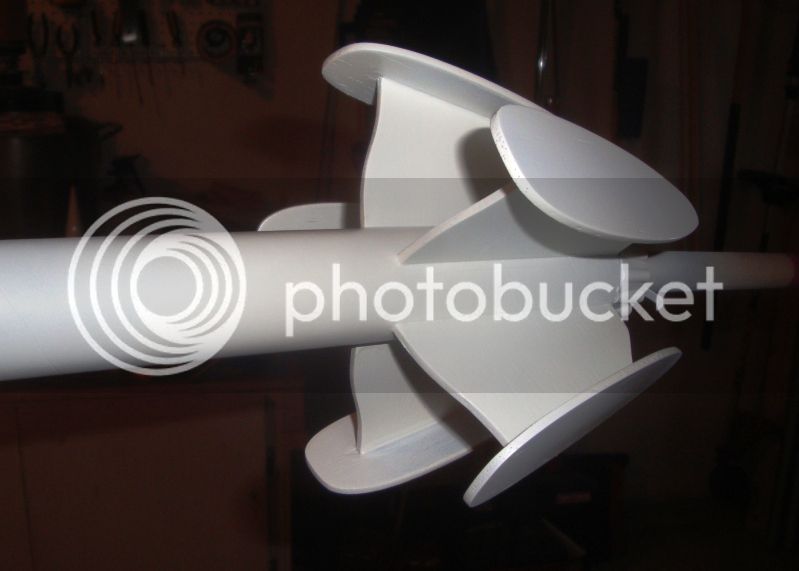
Alright, getting closer to launch day. After a few rounds of sanding, final white primer turned the Dark Energy into this:

No rounds of Fill N' Finish were applied to the fin surfaces (only a bit to fill in the fin tab voids). Just a few rounds of sanding and priming for this model, as it'll be a "flyer", not a hangar queen. Yep, lots of flaws if you're looking for them!
Fins as good as they're going to get in white primer:
This takes us to last evening, where two coats of Plasti-Kote "Bumper Chrome" were applied to the nose and tail cones. Additionally, two coats of Rusto 2X Gloss White were applied to the remainder of the rocket. The trusty Chrome went on smooth as silk, despite being a 15 year old can. The white went wacko however. Using the same technique I've used in the past with the same primer, same paint, same application technique and schedule, it wrinkled in a few spots and bubbled in other spots. I'm not sure the reason, but I find it odd! Something changed in order to make this not work!
So today, the wrinkled white has been wet sanded, leaving much of the color, but removing much of the wrinkling and bubbling. We'll try again with a white top coat this evening, after the 24 hour recoat wait time per the instructions on the can.
At the same time, I've mentioned there is plenty of detail opportunity with the nose cone. With limited time and ambition, I've decided to explore the opportunity in modest terms by painting much of the raised portion a second color while leaving the lower surfaces chrome. Therefore, the lower surfaces were taped off using Great Planes 1/8" EZ-Mask tape, green painters tape, and plain white masking tape where it wouldn't directly contact the chrome basecoat.
All taped up, one side of the cone looked like this:
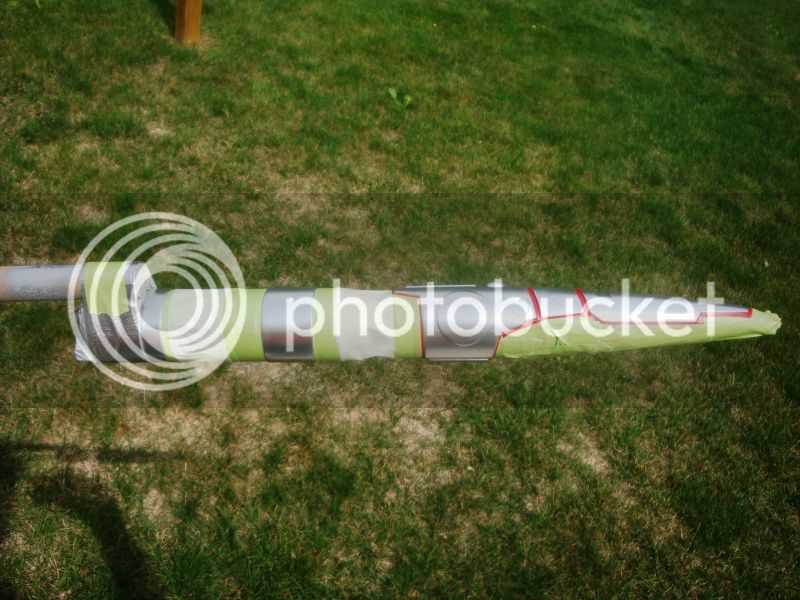
...while the other side looked like this:
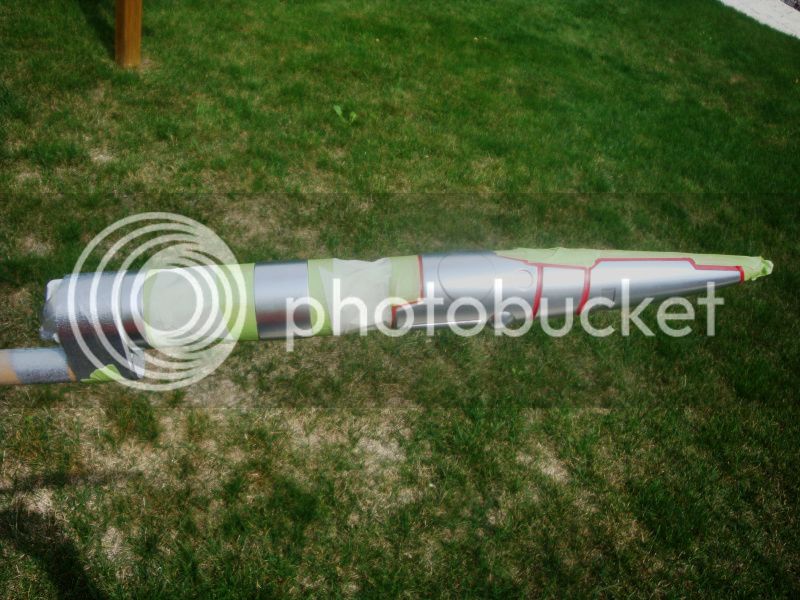
Two light coats of Bumper Chrome were sprayed on the taped up nose to seal the edges of the tape, and shortly thereafter two coats of Duplicolor Anodized Red were sprayed on the cone. We'll see how it looks after the tape is removed later today.
The re-spray of gloss white will take place this evening, then on to decaling and flight prep tomorrow. She flies on Saturday morning!
-Eric-
No rounds of Fill N' Finish were applied to the fin surfaces (only a bit to fill in the fin tab voids). Just a few rounds of sanding and priming for this model, as it'll be a "flyer", not a hangar queen. Yep, lots of flaws if you're looking for them!
Fins as good as they're going to get in white primer:
This takes us to last evening, where two coats of Plasti-Kote "Bumper Chrome" were applied to the nose and tail cones. Additionally, two coats of Rusto 2X Gloss White were applied to the remainder of the rocket. The trusty Chrome went on smooth as silk, despite being a 15 year old can. The white went wacko however. Using the same technique I've used in the past with the same primer, same paint, same application technique and schedule, it wrinkled in a few spots and bubbled in other spots. I'm not sure the reason, but I find it odd! Something changed in order to make this not work!
So today, the wrinkled white has been wet sanded, leaving much of the color, but removing much of the wrinkling and bubbling. We'll try again with a white top coat this evening, after the 24 hour recoat wait time per the instructions on the can.
At the same time, I've mentioned there is plenty of detail opportunity with the nose cone. With limited time and ambition, I've decided to explore the opportunity in modest terms by painting much of the raised portion a second color while leaving the lower surfaces chrome. Therefore, the lower surfaces were taped off using Great Planes 1/8" EZ-Mask tape, green painters tape, and plain white masking tape where it wouldn't directly contact the chrome basecoat.
All taped up, one side of the cone looked like this:
...while the other side looked like this:
Two light coats of Bumper Chrome were sprayed on the taped up nose to seal the edges of the tape, and shortly thereafter two coats of Duplicolor Anodized Red were sprayed on the cone. We'll see how it looks after the tape is removed later today.
The re-spray of gloss white will take place this evening, then on to decaling and flight prep tomorrow. She flies on Saturday morning!
-Eric-
isobig
Well-Known Member
- Joined
- Nov 26, 2011
- Messages
- 731
- Reaction score
- 1
Found a local hobby shop that carried quite an assortment of rockets, even Aerotech! He will get in PML even but special order only. He didn't have the Dark Energy or the Nike Smoke but says he is expecting them in next week, at least according to his computer system. So I will be checking back there in a week or 2 and see if he's got them.
sodmeister
Well-Known Member
- Joined
- Aug 1, 2009
- Messages
- 6,963
- Reaction score
- 36
Thanks Paul! I always enjoy your builds (and photos of your shop!!!).
This is a quick build, so don't go expecting the fine finish you put on your birds; simply not going to happen in this build thread
Looks great ,and guess what ,I just ordered a Dark Energy today (as well as a few others)
These build threads are costing me a fortune LOL
Take care
paul T
ECayemberg
Well-Known Member
- Joined
- Jan 21, 2009
- Messages
- 2,877
- Reaction score
- 850
The Dark Energy has been completed and took to the skies for the first time on Saturday, Aug. 25th!
Since the last post, the main airframe was painted white, this time Valspar Gloss White was used since my faith in the Rusto 2X Gloss White has temporarily? faded. No issues there; it was then given 24 hours to gas out before decals were applied.
The nosecone was indeed painted with the Anodized Red, which turned out fairly well. The edges came out clean and the red provided good contrast with the Chrome. Not quite satisfied yet, three coats of Model Master Enamel were brushed on carefully; I went with some light brown earthy color, possibly a skin tone, that I had sitting on the shelf from plastic modeling. Aside from the somewhat noticeable brush strokes, it turned out fairly well. A three color exotic nose certainly beats out a uni-color version!
With the paint still fresh, but mostly cured, it was time for decals. Sorry, no photos of the application process; I'll just note that they went on well and were of typical high quality. The fin decals were applied in the prescribed locations, while the nose decals were moved around a bit. I did find the body wrap odd, as it stretched and even seemed a bit elastic....not used to that with waterslides! Without wrinkling or tearing, it distorted near the ends and took quite a bit of effort to "pull" back to the intended rectangular shape with corners/sides 90 degrees to one another. While it turned out fine, this did surprise me!
On to final finishing, I cut a 6" or 8" spill hole in the provided 18" chute; as I like to get my rockets back in the general vicinity! I ended up doubling the length of shock cord, simply to cure my angst about the really long cone; probably unnecessary, but it made me feel better anyhow!
Then to the field. We had a small club launch on Saturday; the field is a nice 1250' square, with corn and other crops around the perimeter. A steady 10-12mph wind out of the South was present for the launch. A C6-3 was chosen for the first flight; the rocket was prepped and placed on the pad. On command, the Dark Energy majestically rose off the pad with a slight arc into the steady breeze. It climbed slowly but steadily to an estimated apogee of around 500' where it arced over and deployed the 18" chute just past apogee. A gentle descent into the pits area made for a "closest to the pad" flight. The rocket received lots of interest and compliments at the launch; a compliment to Estes on one of their many cool new releases!
Rocket-buddy Russ may have taken some launch photos; if so, I'll post them as soon as possible. In the meantime, here are a pair of photos of the Dark Energy awaiting ignition:
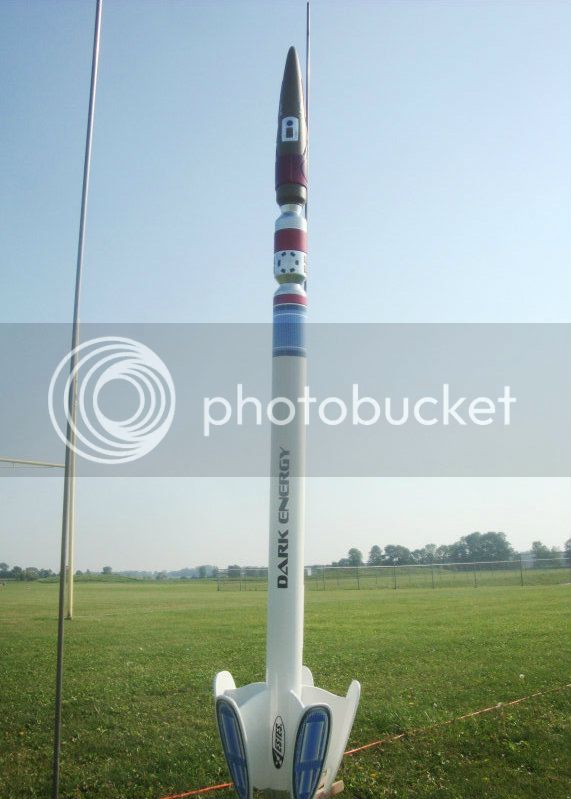
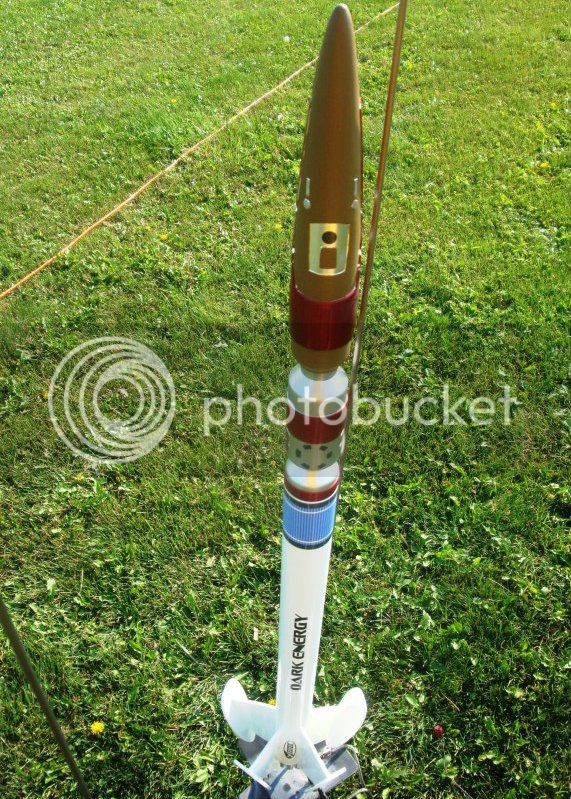
-Eric-
Since the last post, the main airframe was painted white, this time Valspar Gloss White was used since my faith in the Rusto 2X Gloss White has temporarily? faded. No issues there; it was then given 24 hours to gas out before decals were applied.
The nosecone was indeed painted with the Anodized Red, which turned out fairly well. The edges came out clean and the red provided good contrast with the Chrome. Not quite satisfied yet, three coats of Model Master Enamel were brushed on carefully; I went with some light brown earthy color, possibly a skin tone, that I had sitting on the shelf from plastic modeling. Aside from the somewhat noticeable brush strokes, it turned out fairly well. A three color exotic nose certainly beats out a uni-color version!
With the paint still fresh, but mostly cured, it was time for decals. Sorry, no photos of the application process; I'll just note that they went on well and were of typical high quality. The fin decals were applied in the prescribed locations, while the nose decals were moved around a bit. I did find the body wrap odd, as it stretched and even seemed a bit elastic....not used to that with waterslides! Without wrinkling or tearing, it distorted near the ends and took quite a bit of effort to "pull" back to the intended rectangular shape with corners/sides 90 degrees to one another. While it turned out fine, this did surprise me!
On to final finishing, I cut a 6" or 8" spill hole in the provided 18" chute; as I like to get my rockets back in the general vicinity! I ended up doubling the length of shock cord, simply to cure my angst about the really long cone; probably unnecessary, but it made me feel better anyhow!
Then to the field. We had a small club launch on Saturday; the field is a nice 1250' square, with corn and other crops around the perimeter. A steady 10-12mph wind out of the South was present for the launch. A C6-3 was chosen for the first flight; the rocket was prepped and placed on the pad. On command, the Dark Energy majestically rose off the pad with a slight arc into the steady breeze. It climbed slowly but steadily to an estimated apogee of around 500' where it arced over and deployed the 18" chute just past apogee. A gentle descent into the pits area made for a "closest to the pad" flight. The rocket received lots of interest and compliments at the launch; a compliment to Estes on one of their many cool new releases!
Rocket-buddy Russ may have taken some launch photos; if so, I'll post them as soon as possible. In the meantime, here are a pair of photos of the Dark Energy awaiting ignition:
-Eric-
- Joined
- Aug 27, 2011
- Messages
- 11,638
- Reaction score
- 6,288
Very nice!
Sounds like the draggy looking fins still gave you a very decent flight on the C6. I'm wondering if they act a little like tube fins, in that they provide a lot of stability without as much tendency to weathercock, since they don't add much to the silhouette from a lateral projection.
Sounds like the draggy looking fins still gave you a very decent flight on the C6. I'm wondering if they act a little like tube fins, in that they provide a lot of stability without as much tendency to weathercock, since they don't add much to the silhouette from a lateral projection.
sodmeister
Well-Known Member
- Joined
- Aug 1, 2009
- Messages
- 6,963
- Reaction score
- 36
Nice ,very nice build and glad you mentioned the decals ,as i was going to ask you what you thought of them.I just finished the Estes Interceptor E and brother are there a lot of decals !!!!!! but ,I was happy with the way they handled for the most part ,as there were a few that did not want to slide off of the backing paper. I like the way you painted the nosecone ,turned out pretty nice I must say.
OBTW ,guess what I got in the mail today :wink: Looks like I have a nice little build to start this week.
Take care and good work !
paul T
OBTW ,guess what I got in the mail today :wink: Looks like I have a nice little build to start this week.
Take care and good work !
paul T
ECayemberg
Well-Known Member
- Joined
- Jan 21, 2009
- Messages
- 2,877
- Reaction score
- 850
Very nice!
Sounds like the draggy looking fins still gave you a very decent flight on the C6. I'm wondering if they act a little like tube fins, in that they provide a lot of stability without as much tendency to weathercock, since they don't add much to the silhouette from a lateral projection.
Thanks! Thanks also DM1975!
The drag from the fins was very apparent; this rocket flies low and slow! It would be a great platform for photographing in flight for this reason! The rocket also weighs enough....while it could certainly use a 24mm mount, I like it that this bird stays low to the ground.
Estes does not recommend a B6-4; nor would I. I would be nervous with a B6-2 or B4-2, unless it was a very calm day. C6-3 was just right for my tastes!
-Eric-
ECayemberg
Well-Known Member
- Joined
- Jan 21, 2009
- Messages
- 2,877
- Reaction score
- 850
Nice ,very nice build and glad you mentioned the decals ,as i was going to ask you what you thought of them.I just finished the Estes Interceptor E and brother are there a lot of decals !!!!!! but ,I was happy with the way they handled for the most part ,as there were a few that did not want to slide off of the backing paper. I like the way you painted the nosecone ,turned out pretty nice I must say.
OBTW ,guess what I got in the mail today :wink: Looks like I have a nice little build to start this week.
Take care and good work !
paul T
Thanks Paul; can't wait to see your rendition!!!
Yes, the wrap acted in a similar fashion, it didn't slide freely from the backing paper. When slid onto the airframe, I was surprised to see it distorted! I had enough water underneath the decal that I was able to shift it around until satisfied.
-Eric-
ECayemberg
Well-Known Member
- Joined
- Jan 21, 2009
- Messages
- 2,877
- Reaction score
- 850
Thanks Jeff!
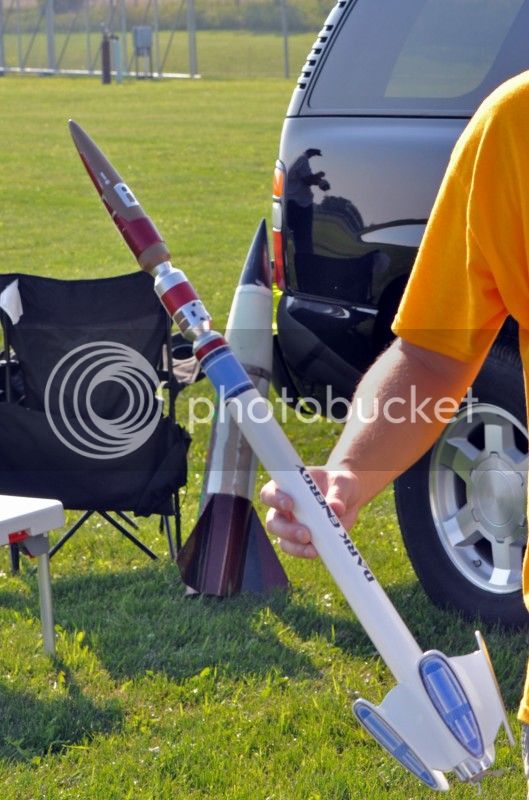
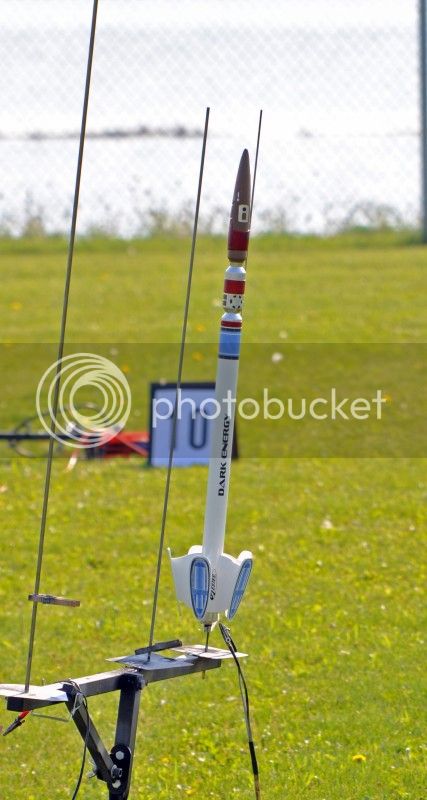
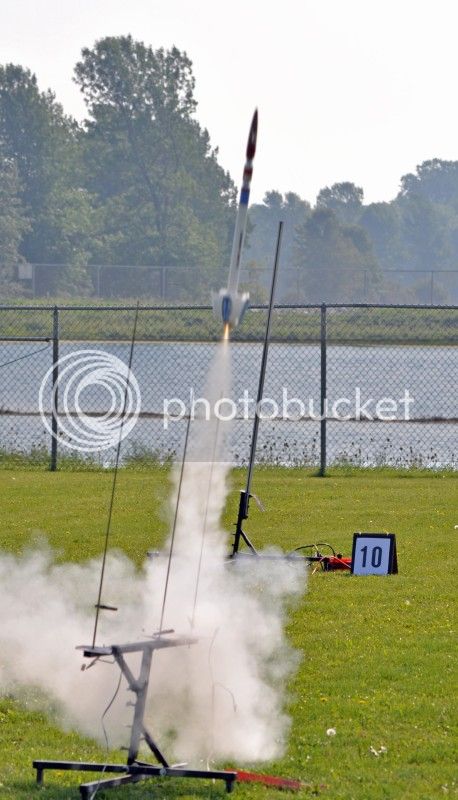
Here are a few more photos from the maiden flight on Saturday. Photos taken by Russ O., a much better photographer than I!!! Thanks Russ!
Big bird shows off the new ride:

Another static photo:
On the pad:
Taking to the skies:
Under chute drifting over the crowd:

'Till next time....
-Eric-
Here are a few more photos from the maiden flight on Saturday. Photos taken by Russ O., a much better photographer than I!!! Thanks Russ!
Big bird shows off the new ride:
Another static photo:
On the pad:
Taking to the skies:
Under chute drifting over the crowd:
'Till next time....
-Eric-
sodmeister
Well-Known Member
- Joined
- Aug 1, 2009
- Messages
- 6,963
- Reaction score
- 36
Those pictures sure do show the nice paint work you did on the nosecone ,looks great !
I`m building mine now :wink:
Paul T
I`m building mine now :wink:
Paul T
- Joined
- Aug 27, 2011
- Messages
- 11,638
- Reaction score
- 6,288
Thanks Jeff!
Under chute drifting over the crowd:
'Till next time....
-Eric-
Really like the chute shot centered nose right over spill hole!
ECayemberg
Well-Known Member
- Joined
- Jan 21, 2009
- Messages
- 2,877
- Reaction score
- 850
Great job Eric! This one seems a good candidate for some D composites. Is that nose cone one of Estes' old nose cone/transition/tailcone all in one mold deals? A creative resurrection if so.
Thanks for all the comments, gents! Much appreciated...this is really quite a simple rocket; goes together quickly and easily!
Chad, yes, the composite 18's would work great here. Or if you know someone with a large stash of most excellent C5-3's, they might work well too
. Note that the C5's had a much higher initial thrust than C6's, which made them ideal for heavy and/or draggy models. For surely, if you want significant altitude out of this design, either "upgrade" to a 24mm mount, or fly the 18mm Aerotech. That said, I'm content using this as a low n' slow bird; it turns in a sufficiently impressive performance *only* with a C6 or equivalent!The nose cone with all the transitions, bumps, hills, ridges, and detail is all one finely molded piece of plastic. My understanding is that it is a new mold based largely on the old Rigel 3/Odyssey cone from days of yesteryear. The provided tailcone is also very nicely done; it needed no trimming, only paint!
-Eric-
ECayemberg
Well-Known Member
- Joined
- Jan 21, 2009
- Messages
- 2,877
- Reaction score
- 850
Beautiful build! Nice action photos! Great landing pond?
Yes, like most launch sites, this one has a hazard or two. All rockets stayed dry at this particular launch, however I am experienced at water recovery from that pond (and other lakes/ponds too) unfortunately.
-Eric-
dixontj93060
Well-Known Member
- Joined
- Feb 19, 2009
- Messages
- 13,083
- Reaction score
- 45
Cool chute! (and nice build)
Boosterdude
Well-Known Member
- Joined
- Jan 17, 2009
- Messages
- 1,664
- Reaction score
- 29
Nice job Eric, looks great. Just started mine tonight.
sodmeister
Well-Known Member
- Joined
- Aug 1, 2009
- Messages
- 6,963
- Reaction score
- 36
Nice job Eric, looks great. Just started mine tonight.
Me too
Paul T
Similar threads
- Replies
- 15
- Views
- 412
- Replies
- 7
- Views
- 304
- Replies
- 27
- Views
- 794