


Table of Contents
This tutorial has gotten to be fairly comprehensive (not so quick and incomplete anymore), so here's a table of contents to help find all the bits and pieces.
The Simple, Straightforward Approach to doing Decals
Deep Dive: Really understanding the Appearance Tab Controls
Extras
The Simple, Straightforward Approach to doing Decals, part 1: Introduction
I amstill no longer an OpenRocket newbie, and I seem to have figured out the way it handles decals. Here's a quick tutorial showing the way I do it; it's by no means the only way (or even the best), but it enables me to do what I need without going insane.
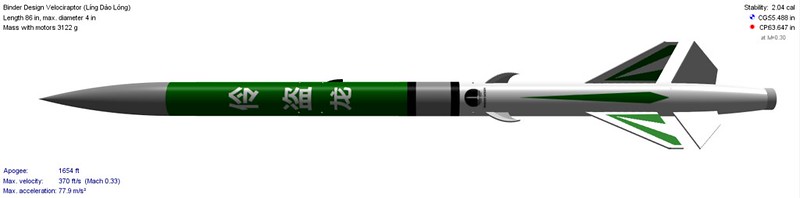
Here's the simple little design we'll use:
View attachment decal_test.ork
Which, when we're finished, looks like this:

Everything here derives from a single simple principle:
In general, larger decal images will produce better quality. I've used some really small ones here to keep the file sizes small. As far as I can tell, OpenRocket embeds the images you use in the ORK file, so large images will directly affect the size of the ORK file. However, I admit that I haven't totally figured out the way OpenRocket manages texture files. As long as you pick the right aspect ratio, you can make the images as large or small as you want.
The base color of the part will show through the transparent parts of the decal image, so it simulates the paint color. You could also just forget the base color because we'll be using images that completely cover the parts, but I still like to really simulate a decal with transparent background over paint [NOTE: This has changed; see later note].
I'll cover body wraps and fins only here, haven't tried decaling any other kinds of parts yet.
Coming next: Body Wraps, and then Fins.
This tutorial has gotten to be fairly comprehensive (not so quick and incomplete anymore), so here's a table of contents to help find all the bits and pieces.
The Simple, Straightforward Approach to doing Decals
- Part 1: Introduction (this post)
- Part 2: Body Wraps
- Part 3: Fins
- Part 4: Split Fins (and other multi-piece designs)
- Part 5: Text on Fins, and tail rings
Deep Dive: Really understanding the Appearance Tab Controls
Extras
The Simple, Straightforward Approach to doing Decals, part 1: Introduction
I am
Here's the simple little design we'll use:
View attachment decal_test.ork
Which, when we're finished, looks like this:
Everything here derives from a single simple principle:
Use the decal controls in OpenRocket as little as possible.
In other words, do all the hard work in your image editor, so the decal will drop into OpenRocket and look correct immediately without further fiddling. The controls in OpenRocket seem to derive from properties you can directly manipulate in the textures in their 3D package, and they do not behave in a human-friendly way. Fortunately, it is (relatively) easy to avoid the need to use them, and once you get the knack it's not too hard. So pick an image editor you like. On PC, I use Paint.net.In general, larger decal images will produce better quality. I've used some really small ones here to keep the file sizes small. As far as I can tell, OpenRocket embeds the images you use in the ORK file, so large images will directly affect the size of the ORK file. However, I admit that I haven't totally figured out the way OpenRocket manages texture files. As long as you pick the right aspect ratio, you can make the images as large or small as you want.
The base color of the part will show through the transparent parts of the decal image, so it simulates the paint color. You could also just forget the base color because we'll be using images that completely cover the parts, but I still like to really simulate a decal with transparent background over paint [NOTE: This has changed; see later note].
I'll cover body wraps and fins only here, haven't tried decaling any other kinds of parts yet.
Coming next: Body Wraps, and then Fins.
Last edited:


")


