Alcubierre Build Thread

The Rocketry Forum

Help Support The Rocketry Forum:

This site may earn a commission from merchant affiliate links, including eBay, Amazon, and others.
Thank you Neil. I was about to throw a tomato at SNRKL. I have a bunch of em also. I did try it out and it does work and it seems to do well with the foam. I did struggle with the saw getting it through the paper though. Makes a slightly rough cut. Maybe you'll have better luck with it.
 
OK, let's talk about the wings, which have been the big project of this build. I apologize in advance for my long-windedness.

I had two major concerns:

1) Dealing with the very long sharp points on the front
The issue is straightforward: in my experience, very long sharp points like this a greatly subject to damage from handling, particular while papering. So I ultimately decided to make the leading part of the wings out of two pieces, one balsa and one basswood, like so:
Wings-1.jpg

Sanding the basswood tip to shape was a pain, at least compared to the extreme ease of sanding balsa, but the resulting piece was extremely strong and seemingly impervious to any punishment I could throw at it. This seemed good.

2) Strength of supporting the pods
As already discussed, I split the ring in half to improve strength. Here's the thought process. I spent *way* too much time thinking about this, to be sure, but I think the result is good (I can almost hear Gary snickering from here).

My fear was that having the pods simply attached to the outside of the complete ring would not be enough to keep them intact after a landing, given a mere 1" of root. So instead, by cutting the ring in half, I can have the wings extend all the way out to the pods. Good, except I already proved that I could snap 1/8" papered balsa on a hard landing (*cough*APRO Lander II*cough*). So I decided that the core piece that extended out to the pods would be basswood. Fortunately I had some 1/8" x 1" basswood stock leftover from... well, I'm not sure what. But it would be perfect for the core pieces. Then I also got the idea from Bruiser to add tabs to the wings, purely for alignment purposes. All I needed to do was extend the core pieces below the rest. And for good measure I put some small tabs at the tip for connection to the pods, which will probably accomplish nothing. So here they are:
Wings-3.jpg

Here are the not-quite-completed 6-piece wing assemblies:
Wings-4.jpg

Note that to create the flared tips of the wings where they join the pods, I added two small triangular pieces on either side of the core piece and sanded them to shape.

So far so good. Next, paper. Initially I was not sure if I trusted myself to paper these; the long sharp points scared me a bit. But after my excellent success with the fins, I decided to give it a go. At over 12" long, the wings were too long for a single piece of label, but that was OK because I didn't want to paper all the way out to the point anyway. Also, I only papered up to the mark on the core pieces indicating where the rings would join; I want the rings to be glued wood-to-wood, not wood-to-paper:
Wings-5.jpg
Using my new-improved technique, I got the paper to go cleanly within about an inch of the points:
Wings-6.jpg
I CWF'ed the points, to smooth over the edge of the paper.

So far so good.

Next, as also previously discussed, the ring pieces will need to be squeezed a bit to achieve the desired geometry. And so I borrowed a technique from the Avalon (there are many parallels between these builds) and put some small pieces of 1/8" basswood angle on the "outside" edge of where the ring would join. The result looks like this:
Wings-7.jpg
In theory, these little guys will help hold the ring in place while the glue sets, and also provide some extra strength to the finished joint. Here's an edge-on view in case it's not clear from the above pic:
Wings-8.jpg

Oh, and I CWFed the tip areas, no point trying to paper around those pieces (even I have my limits).

And so there it is. Each wing assembly is made from a total of 8 pieces. I believe the core basswood construction will be just about as strong as it can possibly be; whatever damage this rocket may endure, I do not expect breakage of the pylons supporting the pods to be part of it.

Next up is getting some filler/primer on those wing, and then they'll be ready to glue on.

Finally, I do still expect the ring halves to give me trouble when I glue them on, but I don't think I can be any better prepared than I am at this point.
 
The fin set looks like the Covenant energy sword from HALO


When you install the ring, I'm sure you'll be putting both on at once so the tension of one doesn't bend the pylons?
 
The fin set looks like the Covenant energy sword from HALO
I noticed that it had an interesting look when I just put them down on the table. Would be possible to make a rocket even more closely inspired by that energy sword I think.
When you install the ring, I'm sure you'll be putting both on at once so the tension of one doesn't bend the pylons?
Umm......

I think I will *try* to, although it might be necessary to let the first one dry before I do the second one if I need to do too much hand-holding with the first one to keep it in place while drying. A few minutes of imbalance shouldn't have any noticeable deleterious effect. I'm actually not convinced that even if I only connected one half of the ring and left it that way (some good design possibilities there BTW) that it would bend the 1/8" basswood pylons. Those suckers are really strong.

Gluing on the ring halves will be nerve-racking, no doubt. What's *really* stressing me out is the paint sequence. Once I get more assembly finished, I'll be soliciting some opinions.
 
Happiness.
Finished-rings-1.jpg
Gap on the inside of the ring is for gluing to the fins. Note also a bit of space left on the ends.

I realized after that I never applied CA to the wood. Oh well, I don't think it'll matter much if at all.

I spent some time admiring these, and then..... back to the stockade!
Finished-rings-2.jpg
 
I have to wonder why Rusto never did a glossy version of that. It's a nice color too. I have some. Drop over and I'll let you borrow it....hehehe
Hrmph.

If anyone could explain to me how they decide which finishes to offer in which colors, I'd love to hear it.
 
Last edited:
Well, it turns out that a sharp blade is quite a useful thing. Who knew! :rolleyes:

Second fin guide cut to shape very quickly and cleanly with a fresh blade. I used @snrkl's suggested cut sequence and that seemed to work very well. I will have no fear of making these things in the future.
Newjig-1.jpg

So I slid it onto the rocket, and confirmed that the problem was with one of the fin slots. I trimmed out edge out a bit, and now everything lines up nicely.
Newjig-2.jpg

The slot will be a bit loose, but (a) it doesn't matter, and (b) I might shove a sliver of wood or cardstock in there to tighten it up just because.
 
Hrmph.

If anyone could explain to me how they decide which finishes to offer in which colors, I'd love to hear it.

Product managers decide. You can blame me, as the self appointed TRF delegate from product-managementhood... I’ll take one for the team... [emoji12]
 
Hand-painted the interior of the pods flat black. I'm glad I put those bulkheads in; painting 1" into the tube was fine, wouldn't have wanted to go much further.
podtails.JPG

I still feel like there was/is something more interesting to do back there, but black will do for now.
 
Unhappiness.
View attachment 363826
No Satin Magenta for me today!
For paints not available in satin/matte, I finish the rocket with an available glossy color, then protect it with a satin/matte clear coat. But BEWARE! The color coat needs to be fully dry/cured before the protective/final coat is placed. And even then, use multiple light (very light) passes. I've ruined many finishes (crackle/crazing) with non-light sprays.
 
For paints not available in satin/matte, I finish the rocket with an available glossy color, then protect it with a satin/matte clear coat. But BEWARE! The color coat needs to be fully dry/cured before the protective/final coat is placed. And even then, use multiple light (very light) passes. I've ruined many finishes (crackle/crazing) with non-light sprays.
In this case it's the Magenta I'm looking for, and satin just happens to be the only available finish. I'd prefer gloss if it were available.

What I should really do is just change to a different color that's available in gloss (or available at all, for that matter). I've just become attached to that color after staring at the renders for so long. Not sure what I'd switch to.
This is the very reason I started using auto colors. I figured having an airbrush already I'd also have gazillions of shades to pick from. Not to mention that the silvers & pewters and such would go on with a nice shiny finish. You have to use the "wet look" hardener for these.
 
I'd rather stick with the 2x since I'm comfortable with it and it has plenty of colors for me.

I've found some other places in the area where I can get the Satin Magenta if I choose to stick with it. Figured I'd at least audition another color or two to see if it turns out I actually prefer something else.

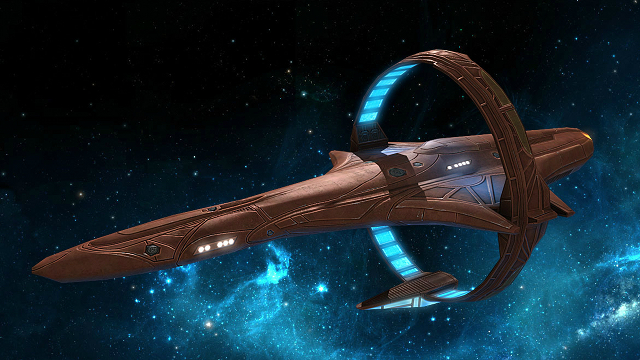
BTW here once again is the image that inspired this design, which also pushed me towards the magenta. Although now that I look at this, it's more of a brick or burnt orange color than magenta.
186icholf7galjpg.JPG
 
I think that's a Vulcan ship. If you are as picky as I am, (and I'm fairly certain you are) I'd print that pic off and take it to a NAPA parts store and look through the acrylic enamel color swatches. I can give you the formulas for mixing. And a cheap airbrush will do a great job of laying down base coats and finishing coats. Look HEREhttps://www.amazon.com/gp/product/B002MMQEZY/?tag=skimlinks_replacement-20
 
Last edited by a moderator:
Wow, you are correct, that is a Vulcan ship. When I originally grabbed it I thought it was a random piece of concept art. In any case, my rocket is, shall we say, "loosely inspired" by it, I feel no obligation to precisely replicate the color or any other detail.

Airbrushes are great but not an option for me. For better or for worse, it's rattle cans or bust. If I wanted to get closer to that color there is Satin Paprika which I'd say is in the ballpark.

Now that you've pointed out the origin of this image, I've gone Googling for images of Vulcan ships and there are a lot of variations on this theme, with the big ring in back. Lots of eye candy. May have to head back to my Half-Baked thread and noodle around some more....
 
If you want to get really cute, you could use some retroreflective film to do the glowing inner band, and/or give it a paint job using some glow in the dark paint... A little black light (or a few blue LEDs) and a night launch...
 
Lights in the ring would look *very* *cool*. Not gonna happen for this rocket, but someone oughta build an upscale (or something similar) and put the lights in.

I should go back and play some more with blue glowing engine decals for the ring interior. They won't actually glow though....
 
Awe come on, the batteries could fit in the pods. Just a little re-designing :) and you'll be in there. It's not too late :) :) :)

-Bob
 
There's always electroluminescent films... Which would be what the show's model builders would have likely used for the model... IF a practical model was used. Be forewarned it deteriorates over time though.
 
Back
Top