I tried searching but couldn't find much of what I was looking for, likely because I may not know the terminology. I'm nearing the end of building an Apogee Zephyr, and I'm thinking about paint options. Still have more research to do but am leaning towards automotive spray cans (duplicolor) and 2k clear. My question is mainly around prepping the body and fins. I've seen standard practice is to spray a few coats of duplicolor high build primer and sand smooth. But what about the fins? Do I need to do anything to "seal" the 1/4" plywood fins or is the high build primer enough?
You are using an out of date browser. It may not display this or other websites correctly.
You should upgrade or use an alternative browser.
You should upgrade or use an alternative browser.
Prepping rocket for paint
- Thread starter danielhv
- Start date


Help Support The Rocketry Forum:
This site may earn a commission from merchant affiliate
links, including eBay, Amazon, and others.
High build primer is probably enough. If the grain isn't sufficiently filled after the first pass, just do another coat and repeat (and repeat again, if needed and you're really looking for perfection). Or stop when you get tired of sanding and live with a bit of visible grain.
There are plenty of ways to seal the grain that are easier to do prior to assembly, but not impossible post-assembly. Applying a wood filler would probably be practical, although I don't know if plywood fins would warp (I haven't tried wood filler on plywood myself).
There are plenty of ways to seal the grain that are easier to do prior to assembly, but not impossible post-assembly. Applying a wood filler would probably be practical, although I don't know if plywood fins would warp (I haven't tried wood filler on plywood myself).
- Joined
- Aug 6, 2022
- Messages
- 3,272
- Reaction score
- 2,969
I typically use one coat of DAP brand wood filler on the fins and and spirals or low spots body tube before priming. Duplicolor makes great products so you are on the right track there.
Two to three coats of high build primer. Allow to cure for a few hour hours before sanding. Your final sanding should be with 600-800 grit paper. Wait a day and you can spray on your choice of colors. Duplicolor paints dry extremely fast so you could do the next color within a few hours depending on how thick you painted on the first color. Generally I wait a day between colors when using this brand.
Two to three coats of high build primer. Allow to cure for a few hour hours before sanding. Your final sanding should be with 600-800 grit paper. Wait a day and you can spray on your choice of colors. Duplicolor paints dry extremely fast so you could do the next color within a few hours depending on how thick you painted on the first color. Generally I wait a day between colors when using this brand.
Ok, on this question I might be of some help.
I use thin 1/4" baltic birch plywood for my veneer projects. The burl veneers, and curly veneers, are prone to warping plywood as they dry. The process is soak veneer with super soft, roll water based cold bond veneer glue onto one side of the plywood, apply veneer, flip panel, roll glue on other side, apply veneer, place on platen covered in wax paper, wax paper on top, then top platen, insert in vacuum press bag, pull vacuum for one hour, then remove panels. Then they try to dry and warp all to heck.
If you take some of those cheap plastic squeeze clamps and hang them up so air can get to all sides at the same time they dont warp!
When I have been filling the grain on the balsa fins I have been using water thinned Timbermate wood filler. I promise it is the very best wood filler you will ever use. As soon as I get it painted on thick, I hang the fins up to dry. The only fins that have warped, have been the baby bertha fins that I did not use that method on.
I found this thread, looking for infomation on the Zephyr. What do you guys use for adhesion promoter?
The nose cone says the type of plastic is hard to paint to stay attached to it.
https://www.amazon.com/SEM-39863-Plastic-Adhesion-Promoter/dp/B007VTSRZ8I found this thread, looking for infomation on the Zephyr. What do you guys use for adhesion promoter?
The nose cone says the type of plastic is hard to paint to stay attached to it.
Perfect! Thank you again!
Found this video on the Timbermate grain fillerWhen I have been filling the grain on the balsa fins I have been using water thinned Timbermate wood filler. I promise it is the very best wood filler you will ever use. As soon as I get it painted on thick, I hang the fins up to dry. The only fins that have warped, have been the baby bertha fins that I did not use that method on.
Man I love that stuff. One really cool thing you can do with it is fill dark open grained woods with a bright cherry, or maple filler. It looks amazing, accentuates the grain, but is totally smooth like closed grain wood. You can do the opposite with light open grained woods like oak or sassafras.
I will stop, I should not take threads off topic.
I will stop, I should not take threads off topic.
be cautious about going to that fine of grit. Auto body standards go to 400, as you want something for the paint to "grab to"Your final sanding should be with 600-800 grit paper.
mh9162013
Well-Known Member
The problem with sticking with 200-400 grit before your final color coat is that depending on how you paint with the color coat (and what paint you're using, ie gloss versus satin versus matte and if you're going to use a final clear coat or not), you may not get the smoothest finish possible (you can see some sanding line beneath the color coat).be cautious about going to that fine of grit. Auto body standards go to 400, as you want something for the paint to "grab to"
Agreed but a lot of the paints that we use are considerably thinner that what you would get in the automotive world and they show imperfections and scratches from 400 grit. If I'm using Krylon or one of the other household brands that is thick then 400 is fine. If I'm doing a Duplicolor or Tamiya then I'll go to 600 / 800. I've never had an issue with chipping or peeling.be cautious about going to that fine of grit. Auto body standards go to 400, as you want something for the paint to "grab to"
quality paint job from someone on here
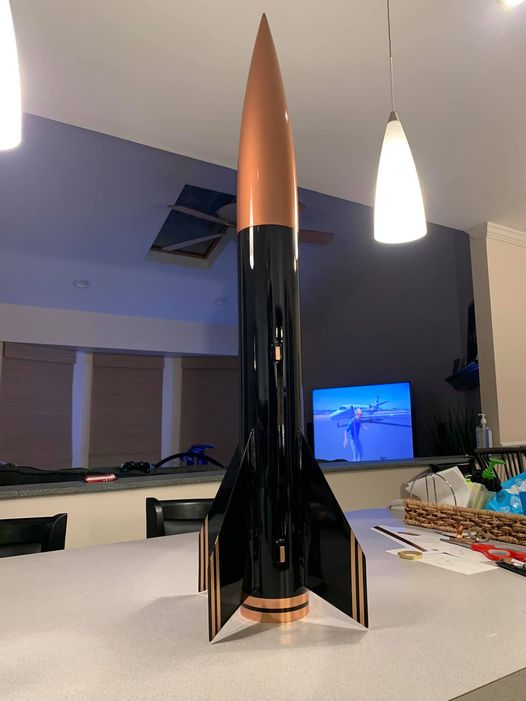
That is sweet.quality paint job from someone on here
I'll use Krylon auto primer for filling on bare wood, several coats and sanding. I have used glass cloth on bare wood to seal and strengthen, then prime and paint. I have used sanding sealer, but prefer primer. My last sanding before paint is with a maroon scotchbrite pad, it is equivalent to 600 grit.
Angel_of_the_Skies
Well-Known Member
I used to seal my fins with CWF (Carpenters Wood Filler), however I do not any more.LBut what about the fins? Do I need to do anything to "seal" the 1/4" plywood fins or is the high build primer enough?
I have used Duplicolo hi build primer from the get go with great success.
I simply sand my fins from 220 to 400 grit, get them glued on my rocket, use CWF to make my fillets a little more aesthetically pleasing (not necessary at all), then I’ll proceed to spraying my filler primer.
First do about 3-4 coats. You may see that either on the body tube or the fins, the grain or spirals on the tube, are visible under the filler
Don’t be fooled, lots of times the grain or filler have been FILLED already, but are taking the shape of what you filled. Sand the filler primer with anything from 220 - 400, you can choose, and sand enough to turn the dark gray primer into a light gray color, that’s enough. If after sanding your rocket you see imperfections still, add a couple more coats and sand again
If you can fill in spirals with CWF before the filler primer stage, it shouldn’t take you much coats to have a smooth surface
Found this video on the Timbermate grain filler
Have you used it?
It came recommended by @Wrightme43Have you used it?
@Wrightme43 How do you apply it to fins? Do you thin it?It came recommended by @Wrightme43
- Joined
- Aug 6, 2022
- Messages
- 3,272
- Reaction score
- 2,969
I used to seal my fins with CWF (Carpenters Wood Filler), however I do not any more.
I have used Duplicolo hi build primer from the get go with great success.
I simply sand my fins from 220 to 400 grit, get them glued on my rocket, use CWF to make my fillets a little more aesthetically pleasing (not necessary at all), then I’ll proceed to spraying my filler primer.
First do about 3-4 coats. You may see that either on the body tube or the fins, the grain or spirals on the tube, are visible under the filler
Don’t be fooled, lots of times the grain or filler have been FILLED already, but are taking the shape of what you filled. Sand the filler primer with anything from 220 - 400, you can choose, and sand enough to turn the dark gray primer into a light gray color, that’s enough. If after sanding your rocket you see imperfections still, add a couple more coats and sand again
If you can fill in spirals with CWF before the filler primer stage, it shouldn’t take you much coats to have a smooth surface
That's a recipe for a very heavy rocket. I want the minimum amount of paint possible on my rocket that provides a good finish.
It's surprisingly easy for a few layers of primer and paint to double the weight of a cardboard LPR tube, such as BT-55 or BT-60.
Yes, just thin with water.
It is used for grain filling in woodworking. It makes for a glass smooth finish on natual wood, even open grained woods like oak.
It is used for grain filling in woodworking. It makes for a glass smooth finish on natual wood, even open grained woods like oak.
Thanks. I am going to give it a try.Yes, just thin with water.
It is used for grain filling in woodworking. It makes for a glass smooth finish on natual wood, even open grained woods like oak.


Nice little helper.You will be very happy with it.
It is water soluble and removable untill it is coated with paint or finish.
Angel_of_the_Skies
Well-Known Member
Agreed. I don’t launch rockets too high at the moment but yes if height is your goal, I would sand down to the substrate.That's a recipe for a very heavy rocket. I want the minimum amount of paint possible on my rocket that provides a good finish.
It's surprisingly easy for a few layers of primer and paint to double the weight of a cardboard LPR tube, such as BT-55 or BT-60.
For a beginner, including myself, I find it easier to sand down until the dark gray turns into a light gray, indicating the area has been sand or smoothed out
Similar threads
- Replies
- 5
- Views
- 328
- Replies
- 12
- Views
- 833