Drill + Insulation = Nice Nose Cones

The Rocketry Forum

Help Support The Rocketry Forum:

This site may earn a commission from merchant affiliate links, including eBay, Amazon, and others.

plasticpaul

Well-Known Member
Joined
Jun 27, 2006
Messages
1,145
Reaction score
0
If this has been discussed recently I appologize.

Since I like to roll my own tubes and basically build everyhting from scratch I have been playing around with different ways of making a nice cone. I believe what I am currently doing is ideal. I am not sure if this is an original idea or not but I wanted to share what I am doing.

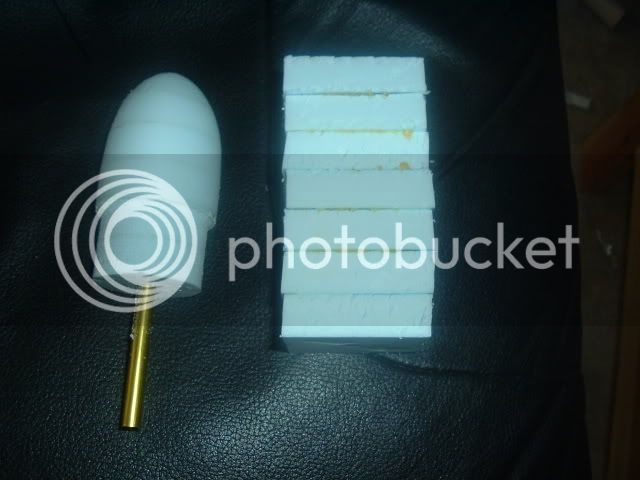
I am using the sheet foam you can get at the home improvement store. I am using the foam but the fink will work as well. Cut a bunch of sqaures a little larger than the OD of your tube. You need enough squares so that when you stack then they are at least as tall as the cone you want plus the shoulder.

I use Spray Adhesive from 3M to bond them together but you could use any glue that will not eat the foam (check this). Bond your stack together and let it sit for a bit to set up well.

Once that is set up pretty good you will need to glue a dowel into the center of one end of your stack/blank. For smaller cones a 1/4" dowel is fine. I am doing a bigger cone right now (over 3") and I have glued in a 1/2" dowel. There are a couple of wayd to get the dowel fixed in the block. I would heat up a bolt or something similar and melt a hole down into the block. You can then either hot glue or epoxy your dowel into the block. The hot glue will melt into the block a little bit but that's okay.

Now it's time to start shaping your cone. I use a wood rasp for my rough shaping. If you don't have a wood rasp course sand paper glued to a wood block will work well.

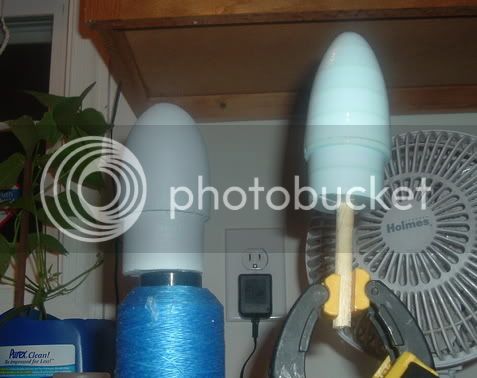
I do mine by holding my drill in one hand and shaping with the other hand but if you have done a great deal of wood turning I would suggest clamping your drill to a solid surface. Shape your blank into a relatively round piece beofre you focus on any one area. I like to reduce the diameter on the tip (part away from the drill) rather quickly to reduce vibration.

Now that your blank is pretty round go ahead and shape the shoulder. Once you think you are close check it frequently. Once it is close, finish it with 220 sand paper. Once you have the should to where you want it go ahead and shape the rest.

When you have the cone you want take it off the drill and dip in or paint it with epoxy. This is to fill the poors of the foam and give you a nice hard surface so you can get a nice finish. It also protects the foam from any finishes you may want to use including primer, because they may eat the foam.

If you want a really hard cone do the epoxt thing more than once but make your original turning slightly small because the epoxy will add size. Once you are done with the epoxy and all finishing cut off the dowel and put a screw eye in there to hold your shock cord.

I will post some pics when I get a chance but I can tell you it is real easy to make nice nose cones for pennies. I paid something like 10 or 11 dollars for a 1/2" 4'x8' sheet of foam.
 
Here is a 7.5" nc on my scratch Honest John made out of foam. Only I hotwire cut the rough shape then sand to final. The olgive and tranisition are foam with fiberglass.
 
That's a nice looking bird !!! I grew up in Syracuse. What are the two rockets in the background?
 
I got to get a better picture.

Behind the clutter of bikes and miscellaneous garbage cans..

The yellow is a scratch built 2.8 diam which I fly mainly on Skyripper 38mm.

The silver one is a PML AMRAAM3.

These fly regularly at Geneseo. The Honest John is currently building and hasn't flown yet. First flight will probably be on a Loki J525.

John
 
Seems like there is something missing at the end of the original post. I would be interested in what is cut off.

I have been investigating this procedure, but it seems that what I have read says that the epoxy coating is not a very durable finish.
 
Epoxy willl give a paintable surface but the surface would not be very durable.

At first I had a 6oz layer of glass on mine and it dented pretty easily. Even finger pressure could create a dimple in the cone. Two layers of 6oz glass made the surface durable enough for my taste.

John
 
I have done some with just elmers glue painted on them and then painted. For smaller rockets they should work very well. On a larger bird I would suggest a little glass under the epoxy. I am also using the blue foam and I believe it is a little tougher than the pink. It is very much like the Fan-Fold foam many folks are using to build RC airplanes. Ideallly your cone shouldn't get any hard hits......

I strongly suggest that you play around with this and develop ideas fron it. This was intended as more of a primer that we can develope ideas from.
 
Here are some photos of a blank, a turned cone, one with a nice gloss coat of epoxy and one with one coat of primer. The one was turned on an old arrow I had laying around and the other was done on a 3/8" dowel. Both were done with a rasp, sand paper and my cordless drill.

DSCF0772.jpg


DSCF0773.jpg
 
There's something I don't understand about this process. When I played with styrofoam as a kid, it crumbled. Yet you guys get such nice smooth surfaces. Is this related to the choice of foam, or the use of a "hotwire", whatever that is (photo??).

G
 
Different kind of foam. If you think of it in wood working terms. The stuff you are talking about has a very course grain and likes to basically blow up when you turn it. This stuff is very dense and has a very fine grain so it sands up very nicely.
 
This foam is different it is not the packing foam that you get around computers it is very smooth and as far as getting ripped in half or creased the stuff is very durable.
 
Goef:
The difference is the "styrofoam" you crumbled is a differnt form, called close cell, which forms the foam into small spheres that are loosely jointed by hot contact, when you break or cut it with a knife the cell walls tend to help individual "balls" seperate in fall off.
Both Pink and Blue SM type Styrofoam insulation is an Open Cell monlithic foam. which remains pretty much solid with pretty consistant open cell "holes" thoughout. Knife cutting of this materal leaves a faily clean edge with almost sand like grains if you rub them off.
I use both types for cutting ejection plugs but the SM make must better plugs and is the only stuff to use for turning larger styrofoam Nosecone and transitions.

There is another type that can be used for turning called HIGH Density Foam, Sometimes referred to as "SignFoam" which is a name brand. This stuff is considerably denser then Styrofoam, coming in a number of lbs/cubic ft densities, somthing like 12 to 22 lbs/cuft in 2lb increments. I like the 18 & 22 lb material for Nose cones as it's tough as nails, you can't crush 22lb between your fingers no matter how hard you try. I can be dented with a hammer. This stuff acts a lot like wood. can be covered with epoxy and holds detals fairly well. We sandblast, route and Carve the stuff in the sign business:) It's the Yellowish/beige color meterial in the photo below. The big draw back is it's kind of expensive and you can only get it throught sign supply or Art supply shops in 4x8 sheets. Does come 1/2" to 3" thick:D

homemade lathe-f1-sm_6 mounted turning materials_01-04-04.jpg
 
I can get 2" 4'x8' SM blue styrofoam for 24.00 per sheet big dif!!!

EXACTLY!!!;)

I will continue to go to Lowe's and buy their foam
 
How about the dark green "floral" foam?
could that be used for small and midpower sized cones?
 
I haven't tried that stuff because it looked kind of coarse to me. The blue and pink stuff is a lot cheaper as well.
 
Yes any it can be turned, it is coarser material and don't fill with a darn, but in a pinch if it was all you had available it can be used. I found tissuing with elmer's carpenters glue was about the only way to "Fill" the stuff before sanding:D
Stick with the PINK or Blue insulation board, it's much nicer to work with.
 
Paul,

I appreciate this post. Have on the drawing board (although a way's out) a 12" scratch beast made totally from Home Depot purchases. Foam nosecone of course. Thanks for the info.

-Tim
 
I tried balsa foam once.

The cone snapped in half as I was carrieing(sp) it.

Maybe Balsa Foam ll has more structure.
 
Whomever....

What type of epoxy (brand name) and what procedure do you use to dip the nose cones?

-= Frank =-
 
Originally posted by Micromeister
for "Small" cones .246" dia to BT-101 size I use Devcon 5 or 30minute (2-ton) epoxy. only use 1/4oz glass with the same epxoy on things larger than 30mm.

Micro,
I may try a 4" (BT101) cone, for a lite-weight project.
I have never glassed anything, except My 70 Javelin headliner backer !

Others have posted that epoxy without glass cloth is to fragile,
How would You wrap a cone with glass cloth? spiral wind it ?
Brush on the epoxy, then wrap the cloth into the wet epoxy ?

Any tips or idea's are welcome :)

Slack
 
I did one the other day and i wet the cone and then spiral wrapped as you said with a fairly narrow piece of cloth. You can then wet down any areas where the epoxy didn't completely soak the cloth.
 
what is the best glue for joining the foam? Elmers or Epoxy? I was working on a Nike Smoke cone using the Liquid Nails foam glue. It isn't very hard. I was going to drill 4 holes, about 1/2" in from desired dia, in 2, 1/4" pieces of ply. Then epoxy in 4 dowels about 4" long into the holes. Then epoxy the dowels in the foam and the wood onto the blank. Then screw the Bowl turning attachment of my lathe on to the blank with some Hefty 3-1/2" screws :). I need to make a 3" Nike Smoke cone, 29mm Deuce cone and some others. I might make one good one coat it with 2oz fiberglass and make a mold of it to make fiberglass cones.

thanx, Ben
 
Paul, those cones look great. And, what a great write up of this technique. I’m working on my 7th cone right now. There are a few things that I have done differently that I thought I’d share.

I make my blank by cutting rectangles that are the length that I want to start with, so basically the “grain” runs length-wise. I do them that way so there are fewer pieces to cut and glue. I always use an even number of layers and then use my dremel tool to make a space in the two center pieces to lay a dowel in. I do the gluing for the middle joint separately so I can use epoxy to glue the dowel in and while I’m at it I use the epoxy to glue the foam instead of the Super77.

I have a Craftsman drill that has a threaded hole in the back where you are supposed to attach an extra handle. I found a bolt that fit in there and used it with a bracket that I had laying around to attach the drill to a piece of wood that I can clamp to my bench. I used plastic zip ties to hold the front of the drill down. I also made a support for the other side with two pieces of wood by just drilling a hole in on at the same height of the drill’s chuck and clamping that to my bench so the whole set up is like a little lathe.

For the shoulder (the part that slides into the body tube) I use a sliced section of body tube to make a coupler and then turn the foam to fit inside it. I do this to make a much more stable interface with the body tube and you have a little more tolerance to work with on the foam.

I use a section of body tube for the base of the cone. I like to do this because it makes the transition to the body tube much cleaner. I also found that if I get that part of the cone done first it provides a great size reference for the rest of the cone. Since I have a dowel coming out of the tip of the cone I make it pretty blunt while turning it and then finish the tip off with the belt sander.

For the surface of the cone I use a combination of glue for hardness and vinyl spackle for smoothness. I’ve used both wood glue and Elmer’s Ultimate polyurethane glue. I get a surface that is hard but not too brittle. I can still dent it with my thumb. Ultimate glue is better, but since it foams up you get a lot of pores to fill when you sand it. I occasionally suffer some slight damage from hard landings and I just fill those with more glue and spackle.

I’ll post two pictures. This first one is the cone that I’m working right now….
 
Back
Top