You are using an out of date browser. It may not display this or other websites correctly.
You should upgrade or use an alternative browser.
You should upgrade or use an alternative browser.
BSD 38 Special DD build thread
- Thread starter hazegry
- Start date


Help Support The Rocketry Forum:
This site may earn a commission from merchant affiliate
links, including eBay, Amazon, and others.
Pantherjon
Well-Known Member
- Joined
- Jan 19, 2009
- Messages
- 7,434
- Reaction score
- 9
well I go for my L1 tomorrow.
Best of luck to you! Pictures are a MUST, video optional but desired too!
") Will be trying for mine next weekend(if mother nature cooperates- long range forecast right now doesn't look good)..
Will be trying for mine next weekend(if mother nature cooperates- long range forecast right now doesn't look good)..Go get it!
Pantherjon
Well-Known Member
- Joined
- Jan 19, 2009
- Messages
- 7,434
- Reaction score
- 9
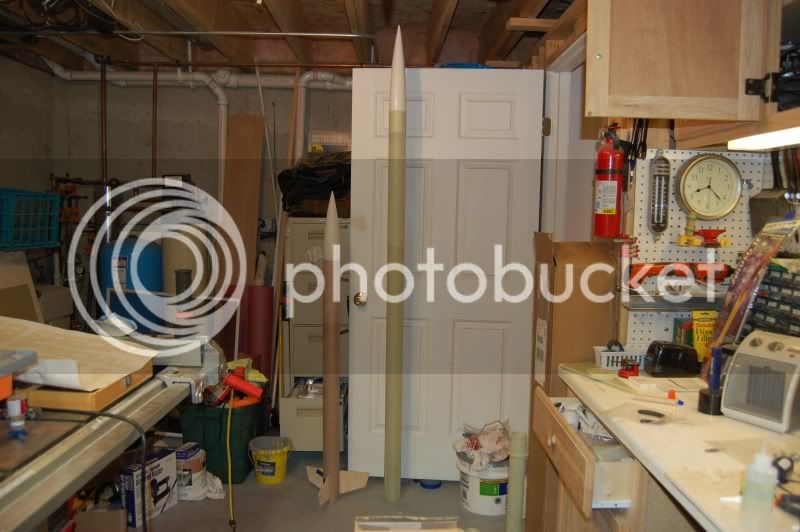
Did some more 'tinkering' on my 38 Special this morning..Mainly installing the threaded nylon in the upper section and attaching the main parachute..I also added the 'accent' stripes to the upper section and marked the 'no motor' CG location..Then it was on to the scale..:surprised:Weighs in at ALMOST 3 pounds! 46.8oz to be exact..sheesh..Then went into RockSim to put the numbers in for mass override as it was showing it weighing a light weight of 28.something oz...Here is the picture-my house is a bit crooked:lol: and the RS file if anyone cares to take a gander at it and see if I messed up...
Also: What is a 'decent' velocity for the main to deploy? I increased the drogue chute to 18" as before with a 12" RS was showing the velocity at main deployment as 95fps..Or just ignore those numbers as it will be actually going a lot slower since it is in 2 pieces already and creating a bunch of drag from that? I tend to lean towards the latter...

View attachment MY bsd_38specialDD.rkt
Also: What is a 'decent' velocity for the main to deploy? I increased the drogue chute to 18" as before with a 12" RS was showing the velocity at main deployment as 95fps..Or just ignore those numbers as it will be actually going a lot slower since it is in 2 pieces already and creating a bunch of drag from that? I tend to lean towards the latter...
View attachment MY bsd_38specialDD.rkt
L1 success going out for l2 at appoge right now forgot my paperwork at home
congrats and good luck man!! know you can fly with the big boys at MDRA!!
Ben
Gym_Class_Hero
Well-Known Member
- Joined
- Jan 17, 2009
- Messages
- 1,081
- Reaction score
- 0
I got some 30 minute today from HL with a coupon (oddly 25% off, not 40%). I plan on doing all of the main glueing today. I'm not filleting until I get my ballon filler.
BTW congrats hazegry!
BTW congrats hazegry!
Gym_Class_Hero
Well-Known Member
- Joined
- Jan 17, 2009
- Messages
- 1,081
- Reaction score
- 0
Pic with it's bigger bro the Competitor 3.
BTW Jon: I'm no genius on DD, but I think you should make your chutes interchangable depending on the wind. If it is calm, go ahead and use the 18", but if it is a bit breezy and you wan't to get it down faster, use the 12".
BTW Jon: I'm no genius on DD, but I think you should make your chutes interchangable depending on the wind. If it is calm, go ahead and use the 18", but if it is a bit breezy and you wan't to get it down faster, use the 12".
Pantherjon
Well-Known Member
- Joined
- Jan 19, 2009
- Messages
- 7,434
- Reaction score
- 9
Lookin good GCH! Or I could just go 'sans' drogue..I have seen that done before and the rockets didn't seem to be going too terribly fast when the main deployed at 400 feet..
Hazegry: Congrats:congrats: on the L1!
Hazegry: Congrats:congrats: on the L1!
Pantherjon
Well-Known Member
- Joined
- Jan 19, 2009
- Messages
- 7,434
- Reaction score
- 9
Cool deal Hazegry! I will then be going drogueless!:lol:As opposed to going in drag:rotflol:


Pantherjon
Well-Known Member
- Joined
- Jan 19, 2009
- Messages
- 7,434
- Reaction score
- 9
Awesome pictures Hazegry!:congrats:
Hopefully I will be able to get some shots as good this weekend when I go for my L1! May just give the camera to someone there as I want to take the flight in 100% and not have to watch it thru the viewfinder..lol..Looks as tho it didn't drift very far at all!
Hopefully I will be able to get some shots as good this weekend when I go for my L1! May just give the camera to someone there as I want to take the flight in 100% and not have to watch it thru the viewfinder..lol..Looks as tho it didn't drift very far at all!

yea it came right back down. I have some R/C stuff for sale and if it goes I am going to buy some more HPR kits. When those are built and I get the approval of the guys in my club that are L3 I am going to start on a Horizon 5.5 for my L3. help I am addicted lol
Pantherjon
Well-Known Member
- Joined
- Jan 19, 2009
- Messages
- 7,434
- Reaction score
- 9
Not to beat around the bush, my L1 attempt failed miserably Was a pretty gusty windy day yesterday-which may have contributed some to it..It looked beautiful on the way up-even made a sharp whistling sound..Then it arched over..Ok, the apogee charge should fire..When will it fire?..It's coming down..Ok, the altitude charge should fire the main about now...Whistling sound..Not good coming down..Dang ground got in the way..Was not pretty..I will let the pictures and video speak for themselves(video only captures the liftoff as I wanted to see the whole flight-wish I hadn't)..Sigh...
<embed width="448" height="361" type="application/x-shockwave-flash" wmode="transparent" src="https://i156.photobucket.com/player.swf?file=https://vid156.photobucket.com/albums/t21/Pantherjon/38%20Special/0209launch007.flv">
On the ground

A planted nose cone

One munched tube
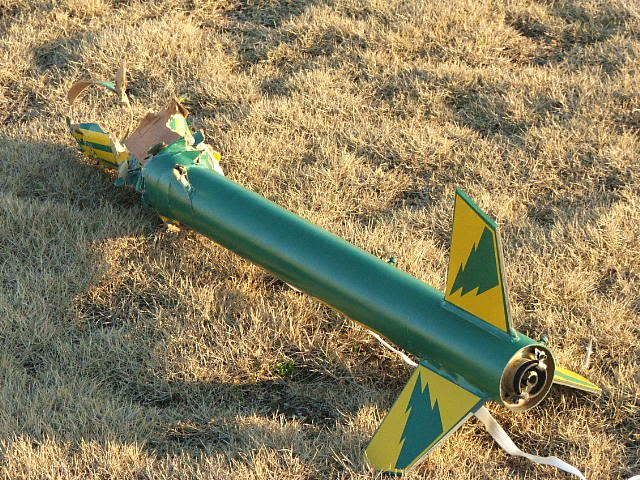
When I state the wind may have been a factor, it weathercocked quite a bit and I think my vent holes for my altimeter were not quite the optimal size..Altimeter got 'confused' and didn't fire the main charge..The drogue charge DID fire, but failed to separate the rocket(I don't think I used enough BP) Also don't know if me using 3 'F' BP instead of the preferred 4 'F' BP played a factor in that or not..Oh well..Did visit with Dennis of RocketryZone prior to leaving the launch site and got a BSD 3" Thor kit:lol:..Yeah I am looney!
Oh, and the altimeter still works!..I guess my altitude on the flight was 'supposedly' 1224', as that is what it beeped out when I powered it back up when I got home..And I still have the casing too! So, wasn't a TOTAL loss..Motor used BTW was an H123..
Was a pretty gusty windy day yesterday-which may have contributed some to it..It looked beautiful on the way up-even made a sharp whistling sound..Then it arched over..Ok, the apogee charge should fire..When will it fire?..It's coming down..Ok, the altitude charge should fire the main about now...Whistling sound..Not good coming down..Dang ground got in the way..Was not pretty..I will let the pictures and video speak for themselves(video only captures the liftoff as I wanted to see the whole flight-wish I hadn't)..Sigh...<embed width="448" height="361" type="application/x-shockwave-flash" wmode="transparent" src="https://i156.photobucket.com/player.swf?file=https://vid156.photobucket.com/albums/t21/Pantherjon/38%20Special/0209launch007.flv">
On the ground
A planted nose cone
One munched tube
When I state the wind may have been a factor, it weathercocked quite a bit and I think my vent holes for my altimeter were not quite the optimal size..Altimeter got 'confused' and didn't fire the main charge..The drogue charge DID fire, but failed to separate the rocket(I don't think I used enough BP)
Also don't know if me using 3 'F' BP instead of the preferred 4 'F' BP played a factor in that or not..Oh well..Did visit with Dennis of RocketryZone prior to leaving the launch site and got a BSD 3" Thor kit:lol:..Yeah I am looney!Oh, and the altimeter still works!..I guess my altitude on the flight was 'supposedly' 1224', as that is what it beeped out when I powered it back up when I got home..And I still have the casing too! So, wasn't a TOTAL loss..Motor used BTW was an H123..
that sucks man rebuild it and make it do a successful flight show it whos boss
you could rebuild it easily what did it weigh? it must have weather cocked alot on a h100 sparky I got around 2300 ft and mine weighed 4lbs. I am glad you bought another kit hate to see you give up after putting all that work into this one it was a great looking rocket.
you could rebuild it easily what did it weigh? it must have weather cocked alot on a h100 sparky I got around 2300 ft and mine weighed 4lbs. I am glad you bought another kit hate to see you give up after putting all that work into this one it was a great looking rocket.
Just a couple of thoughts on your failure. I noticed in the previous pics that you have the HA 45K hooked up to what looks like a AA battery for power. Did you use that or did you use the recommended 9v? What ematches did you use? Both 3f and 4f work well for deployments so you are okay there. Did you ground test? That will tell you a lot about how much BP to use. For a 3" bird I use anywhere between 1.4 and 2.2 grams of BP depending on the size of the bay. You may also try using an actual switch next time as well. G forces play hell with wires and connections. I am not positive but the twist and tuck method I believe is not endorsed by the NAR safety code. One other thing I noticed is your vent holes looked a bit ragged. Sand them with a fine grit of sandpaper. Perfectflite's hole calculator doesn't seem to agree with others I use. Try Vern Knowles web site www.vernk.com he has a great calculator on there and all the math to back it up.
Hope this helps!
Hope this helps!
SpartaChris
Well-Known Member
- Joined
- Feb 8, 2009
- Messages
- 2,733
- Reaction score
- 0
I'm sorry about the demise of your rocket. Hopefully you will rebuild it!
To answer some questions: Absolutely 3F vs 4F plays a factor. The 4F burns much faster, which creates a lot more pressure for the same volume of BP. Put another way, if you used 1 gram of both 3F and 4F, the 4F will generate more pressure than the 3F due to burning more rapidly.
Next- A standard rule of thumb for ANY dual deploy rocket should be to GROUND TEST! Basically, prep the rocket like you would for flight, sans loaded motor of course. This means pack the chutes, nomex, dog barf, install shear pins.. Basically, get the rocket ready the same exact way you are planning for it's flight. Prep your charges the same way, connect the shock cords the same way.. You get the idea.
This also means that you need to load (and fire) the charges you think you are going to need for deployment. For a 3" rocket, I would start with 1 gram and then work my way up in .5 gram increments if the ejection charges fail to deploy.
Seriously, ground testing should really be done prior to any flight of a new rocket. The idea is that if you can get it to work on the ground, then you increase the probability of success of the flight working in the air.
It's a harsh lesson to learn in the manner that you did, but hopefully you'll be able to learn from it in the future. And remember that nothing is 100% fool proof. The idea is that you are simply trying to increase the probability of success by testing your set up while it's on the ground rather than in the air.
Also, I attached a zip file with an excel spreadsheet based on Vern K's formula on his website. My buddy Tim Scott and I created it, so hopefully you will find that useful as well!
View attachment e-bay_port_sizing.zip
BayouRat
Well-Known Member
:cry:Ouch! That one hurt. I hope you go at it again. You may want to go for motor and/or redundant apogee deployment for your cert. flight. Less to go wrong. More redundancy is better.
Look at it from the glass half full prospective. At least you got the up part right.
What were your charge sizes? My motto is "Blow it out or Blow it up".:surprised:
Don't skimp on the BP it's cheap.
You seem to have the right attitude for this hobby. If I would have quit after each failure I would have been done years ago. Needless to say I have boxes of crumpled body tubes and broken parts acquired over the years. When I bust one up I just build the next one bigger and better.
Hope to see you at a launch one day soon,
Pantherjon
Well-Known Member
- Joined
- Jan 19, 2009
- Messages
- 7,434
- Reaction score
- 9
that sucks man rebuild it and make it do a successful flight show it whos boss
you could rebuild it easily what did it weigh? it must have weather cocked alot on a h100 sparky I got around 2300 ft and mine weighed 4lbs. I am glad you bought another kit hate to see you give up after putting all that work into this one it was a great looking rocket.
Yeah it weathercocked a whole lot more then I thought it would..in the video I posted you can hear the wind pick up as the LCO was doing the countdown..I almost waved it off..Mine didn't weigh quite as much as yours..Tipped the scale at 46.5oz without a motor..No rebuilding the remains tho
I tried cutting off the damaged section of the tube, didn't go well..Thought well it doesn't have to be perfectly straight, peel off a part of the coupler, get another coupler and tube and fill the gap..Well, I had set it aside and went to do something, then coming back out to the 'rocket garage' I stepped right on the fin can!:cry: Such a klutz! Oh well, maybe Dennis of RocketryZone will have a 38 Special next month and I will buy another kit from him then...Pantherjon
Well-Known Member
- Joined
- Jan 19, 2009
- Messages
- 7,434
- Reaction score
- 9
Just a couple of thoughts on your failure. I noticed in the previous pics that you have the HA 45K hooked up to what looks like a AA battery for power. Did you use that or did you use the recommended 9v? What ematches did you use? Both 3f and 4f work well for deployments so you are okay there. Did you ground test? That will tell you a lot about how much BP to use. For a 3" bird I use anywhere between 1.4 and 2.2 grams of BP depending on the size of the bay. You may also try using an actual switch next time as well. G forces play hell with wires and connections. I am not positive but the twist and tuck method I believe is not endorsed by the NAR safety code. One other thing I noticed is your vent holes looked a bit ragged. Sand them with a fine grit of sandpaper. Perfectflite's hole calculator doesn't seem to agree with others I use. Try Vern Knowles web site www.vernk.com he has a great calculator on there and all the math to back it up.
Hope this helps!
The battery I used was actually a 12v battery...I am thinking I did not use nearly as much BP as I needed to use..I kind of backed myself into a corner with my wanting to do this on Saturday..I hadn't gotten around to getting the BP til Friday so I didn't have an opportunity to do any ground tests..The e-matches were given to me and for the life of me I can't recall who he said made them..I used cut sections of a drinking straw to hold the BP(about 1.5" long)..And in hindsight, I should have gone ahead and put the motor ejection charge in as a backup-had the delay grain in for the tracking smoke..
Was a good lesson, expensive one, but a good one nonetheless..
Pantherjon
Well-Known Member
- Joined
- Jan 19, 2009
- Messages
- 7,434
- Reaction score
- 9
And the bad part is I KNEW that rule of thumb too! And yet, I didn't do it..I procrastinated on getting the BP and when I did get it(Friday) I didn't have time to do one..When I got home Saturday night I took the charge I had made for the main outside and when I hooked it up to a 9v battery it just went poof, not like the loud flash and BANG that I saw when I tested a charge at Jim's(Blackjack) place the week or so prior..So, yeah the 3F stuff just doesn't have the punch I needed..
Thanks for the file! I am sure it will come in handy!
Thanks for the file! I am sure it will come in handy!
I'm sorry about the demise of your rocket. Hopefully you will rebuild it!
To answer some questions: Absolutely 3F vs 4F plays a factor. The 4F burns much faster, which creates a lot more pressure for the same volume of BP. Put another way, if you used 1 gram of both 3F and 4F, the 4F will generate more pressure than the 3F due to burning more rapidly.
Next- A standard rule of thumb for ANY dual deploy rocket should be to GROUND TEST! Basically, prep the rocket like you would for flight, sans loaded motor of course. This means pack the chutes, nomex, dog barf, install shear pins.. Basically, get the rocket ready the same exact way you are planning for it's flight. Prep your charges the same way, connect the shock cords the same way.. You get the idea.
This also means that you need to load (and fire) the charges you think you are going to need for deployment. For a 3" rocket, I would start with 1 gram and then work my way up in .5 gram increments if the ejection charges fail to deploy.
Seriously, ground testing should really be done prior to any flight of a new rocket. The idea is that if you can get it to work on the ground, then you increase the probability of success of the flight working in the air.
It's a harsh lesson to learn in the manner that you did, but hopefully you'll be able to learn from it in the future. And remember that nothing is 100% fool proof. The idea is that you are simply trying to increase the probability of success by testing your set up while it's on the ground rather than in the air.
Also, I attached a zip file with an excel spreadsheet based on Vern K's formula on his website. My buddy Tim Scott and I created it, so hopefully you will find that useful as well!
Pantherjon
Well-Known Member
- Joined
- Jan 19, 2009
- Messages
- 7,434
- Reaction score
- 9
Oh I will go at it again! Will try for L1 in March! And , yeah,I thought about loading the motor e-charge but didn't..At least it would have caused the rocket to break open and it wouldn't have come in ballistic..
I guessed on the charge sizes..I think they were about 1.5grams each..Drinking straw section about 1.5" long filled..
Will try for L1 in March! And , yeah,I thought about loading the motor e-charge but didn't..At least it would have caused the rocket to break open and it wouldn't have come in ballistic..I guessed on the charge sizes..I think they were about 1.5grams each..Drinking straw section about 1.5" long filled..
:cry:Ouch! That one hurt. I hope you go at it again. You may want to go for motor and/or redundant apogee deployment for your cert. flight. Less to go wrong. More redundancy is better.
Look at it from the glass half full prospective. At least you got the up part right.
What were your charge sizes? My motto is "Blow it out or Blow it up".:surprised:
Don't skimp on the BP it's cheap.
You seem to have the right attitude for this hobby. If I would have quit after each failure I would have been done years ago. Needless to say I have boxes of crumpled body tubes and broken parts acquired over the years. When I bust one up I just build the next one bigger and better.
Hope to see you at a launch one day soon,
Pantherjon
Well-Known Member
- Joined
- Jan 19, 2009
- Messages
- 7,434
- Reaction score
- 9
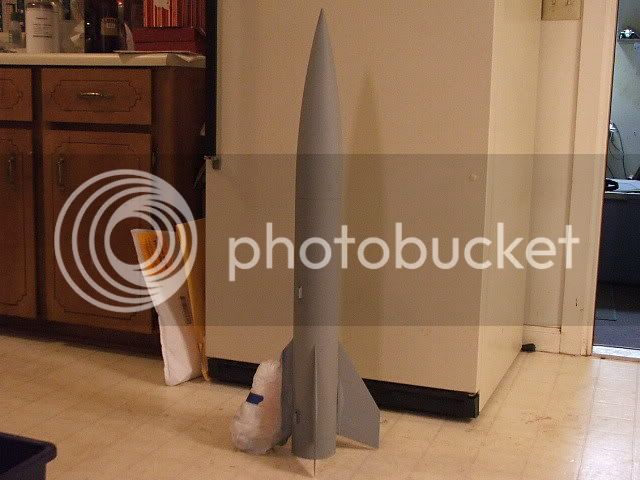
Since I guess I am in the posting frenzy:lol: I will post what my next L1 attempt rocket is going to be...I just built it tonight and was a quick fun build..Almost too quick..It is an Aerotech Sumo..Here is a picture of it in primer..The plastic bag is over a fin that had already been painted yellow, not sure if I will paint the other fins yellow or not..Going to use motor eject on this one!:lol: I should be able to squeeze an H250G in there!:rotflol:
Similar threads
- Replies
- 18
- Views
- 999
- Replies
- 27
- Views
- 1K