You are using an out of date browser. It may not display this or other websites correctly.
You should upgrade or use an alternative browser.
You should upgrade or use an alternative browser.
The new 4" MAC Performance VTS-6 missile build thread
- Thread starter Nick@JET
- Start date


Help Support The Rocketry Forum:
This site may earn a commission from merchant affiliate
links, including eBay, Amazon, and others.


Looks awesome

- Joined
- Mar 27, 2013
- Messages
- 22,537
- Reaction score
- 14,953
I've worked up this *VERY* crude QCC Explorer OR file. It is in no way up to my usual standard for accuracy. The intakes on this thing are far beyond OR's ability to simulate accurately for flight performance and appearance. I wasn't able to print the fins for measurements. So, they're suspect (at best).
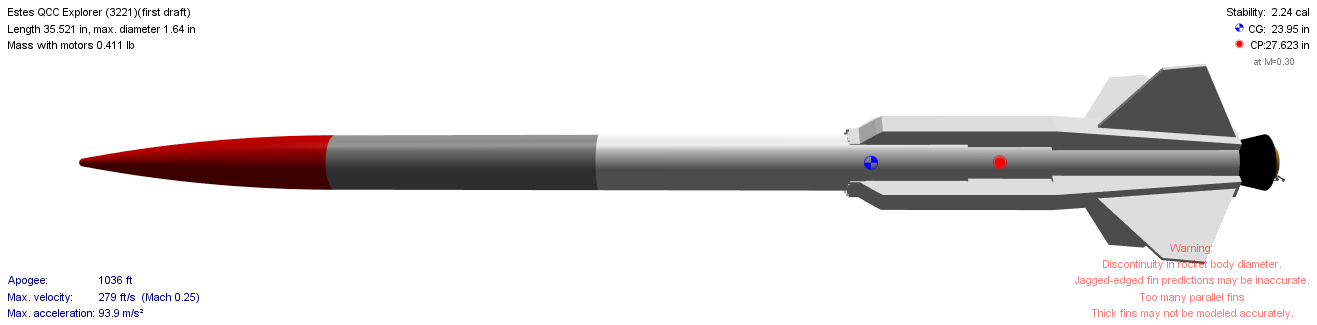
Anyway, I hope it helps.
View attachment Estes QCC Explorer (3221)(first draft).ork
Anyway, I hope it helps.
View attachment Estes QCC Explorer (3221)(first draft).ork
Nick@JET
Well-Known Member
- Joined
- Sep 1, 2011
- Messages
- 1,693
- Reaction score
- 20
Wow Jim,
thank you! Your worst of OR files puts my best to complete shame, lol. This is a BIG help and allows me to scale from there for my possible L3 in a 5.5 or 7.5". I Really appreciate it. Hope you can get back to the states and launch some rockets some day.
thank you! Your worst of OR files puts my best to complete shame, lol. This is a BIG help and allows me to scale from there for my possible L3 in a 5.5 or 7.5". I Really appreciate it. Hope you can get back to the states and launch some rockets some day.
- Joined
- Mar 27, 2013
- Messages
- 22,537
- Reaction score
- 14,953
Thanks Nick!
I'm glad you like it. I hope I'll be able to launch from here in China soon. I also wouldn't be adverse to launching from Australia since I'm this close.
I'm glad you like it. I hope I'll be able to launch from here in China soon. I also wouldn't be adverse to launching from Australia since I'm this close.
Nick@JET
Well-Known Member
- Joined
- Sep 1, 2011
- Messages
- 1,693
- Reaction score
- 20
Worked on the AV bay - installed MAC Performance charge canisters and terminal strips - set up for dual altimeter circuits - completely redundant. Kinda prepping for the L3 build too, but not with this rocket.
Marked 4 rows for
- (8) Vent holes 3/32"
- (4) shear pins for booster and NC ( I should mention that i intend to use only 2 holes - but with a 4 fin - I wanted to keep everything symmetrical and the option of using 4 unless the 54mm M fits, i don't see that ever happening insert clever, funny tongue in cheek emoji thing)
- (4) rivets above AV bay
- (2) rail button holes


The 3 shallow holes are not holes just something I've been using for location holes for me so I don't put the AV bay in backwards, and all my holes stay oriented.

Started on the long process of sanding - it's amazing what nastiness shows up when you shoot a coat of primer on it -
Marked 4 rows for
- (8) Vent holes 3/32"
- (4) shear pins for booster and NC ( I should mention that i intend to use only 2 holes - but with a 4 fin - I wanted to keep everything symmetrical and the option of using 4 unless the 54mm M fits, i don't see that ever happening insert clever, funny tongue in cheek emoji thing)
- (4) rivets above AV bay
- (2) rail button holes
The 3 shallow holes are not holes just something I've been using for location holes for me so I don't put the AV bay in backwards, and all my holes stay oriented.
Started on the long process of sanding - it's amazing what nastiness shows up when you shoot a coat of primer on it -
Last edited:
MostafaAwad
Well-Known Member
- Joined
- Mar 31, 2016
- Messages
- 54
- Reaction score
- 0
WOW ")
dixontj93060
Well-Known Member
- Joined
- Feb 19, 2009
- Messages
- 13,083
- Reaction score
- 45
- it's amazing what nastiness shows up when you shoot a coat of primer on it -
Ain't that the truth!
Nick@JET
Well-Known Member
- Joined
- Sep 1, 2011
- Messages
- 1,693
- Reaction score
- 20
Today was a good day, able to
- install rail buttons (1010 w/ 8-32 screws
- installed Camera shroud
- drill for 110/220 switch
- cut the NC shoulder off in prep for tracker bay installation
- 400 grit sanded
- then 600 wet sanded and ready for another coat of primer

- install rail buttons (1010 w/ 8-32 screws
- installed Camera shroud
- drill for 110/220 switch
- cut the NC shoulder off in prep for tracker bay installation
- 400 grit sanded
- then 600 wet sanded and ready for another coat of primer
Nick@JET
Well-Known Member
- Joined
- Sep 1, 2011
- Messages
- 1,693
- Reaction score
- 20
Primed, still some more love on the fillets and the intakes. I was thinking this one will have to earn its strips- not sure I can complete for a shake down flight before the launch Windows close around here.
Based on this - Next is to complete the AV Bay and recovery system in hopes of a first flight in the next month.


Based on this - Next is to complete the AV Bay and recovery system in hopes of a first flight in the next month.
That is going to look fantastic.
RocketGeekInFL
Well-Known Member
- Joined
- Nov 22, 2013
- Messages
- 3,283
- Reaction score
- 2,984
I take it there is plenty of clearance in the tailcone for the retainer?
Any chance of a close up shot of that?
Any chance of a close up shot of that?
- Joined
- Mar 27, 2013
- Messages
- 22,537
- Reaction score
- 14,953
Primed, still some more love on the fillets and the intakes. I was thinking this one will have to earn its strips- not sure I can complete for a shake down flight before the launch Windows close around here.
Based on this - Next is to complete the AV Bay and recovery system in hopes of a first flight in the next month.
View attachment 291282
View attachment 291283
I love the paint rack you've got there... Gonna have to copy that with a mod to allow it to spin like a rotisserie while I paint.
- Joined
- Mar 27, 2013
- Messages
- 22,537
- Reaction score
- 14,953
I love the paint rack you've got there... Gonna have to copy that with a mod to allow it to spin like a rotisserie while I paint.
Nick@JET
Well-Known Member
- Joined
- Sep 1, 2011
- Messages
- 1,693
- Reaction score
- 20
I take it there is plenty of clearance in the tailcone for the retainer?
Any chance of a close up shot of that?
Hi Rocket - I exposed the motor tube 0.506" which is the lip on the inside of the retainer body. So once the retainer is on, yes it is exposed so when you stand the rocket up, it is actually sitting on the retainer. Ill get a close up pic once I get back home - which will be a little bit.
Nick@JET
Well-Known Member
- Joined
- Sep 1, 2011
- Messages
- 1,693
- Reaction score
- 20
Jim,
Yea thanks - I really like the ability to paint in any weather! But I still paint outside of the weather is good.
I haven't come up with a rotisserie yet, that's would be a great idea, and I need another dedicated light.
The booth is just to see if it would work, and is a huge double wall cardboard box with a Dayton 110V squirrel cage exhaust fan that I have ported out the window. Takes up
Most of the table, but I can close the box and pull the vent when I don't use it. Big and bulky but works pretty well.
There are still some fumes - but not near as bad and no over spray dust on my floor. Could really use a little
more CFM or close off better.
- Joined
- Mar 27, 2013
- Messages
- 22,537
- Reaction score
- 14,953
Jim,
Yea thanks - I really like the ability to paint in any weather! But I still paint outside of the weather is good.
I haven't come up with a rotisserie yet, that's would be a great idea, and I need another dedicated light.
The booth is just to see if it would work, and is a huge double wall cardboard box with a Dayton 110V squirrel cage exhaust fan that I have ported out the window. Takes up
Most of the table, but I can close the box and pull the vent when I don't use it. Big and bulky but works pretty well.
There are still some fumes - but not near as bad and no over spray dust on my floor. Could really use a little
more CFM or close off better.
I have this image of inserting a balloon inside the body tube, blowing it up to hold the walls. Then attaching it to a stick (like what you can get at restaurants like Red Robin), feeding that through the PVC pipe. Twist that, the whole thing spins.
Then again, with a 4" rocket like yours, that might be a little unrealistic.
Last edited:
- Joined
- Jan 30, 2016
- Messages
- 8,993
- Reaction score
- 3,518
Kickball
rfjustin
Well-Known Member
Looking good! Keep the pics and updates coming.
RocketGeekInFL
Well-Known Member
- Joined
- Nov 22, 2013
- Messages
- 3,283
- Reaction score
- 2,984
The 3 shallow holes are not holes just something I've been using for location holes for me so I don't put the AV bay in backwards, and all my holes stay oriented.
View attachment 291194
This is a great idea!! Mind if I borrow it?
Nick@JET
Well-Known Member
- Joined
- Sep 1, 2011
- Messages
- 1,693
- Reaction score
- 20
Was able to start the painting process today and wouldn't you know it - my last coat on the NC - a gust of wind knocked it over while it was still wet ...argh. Knocked over my booster too - at least it was only final primer coat on the booster, so no worries there. NOTE TO SELF....keep the garage door closed.


So I have some sanding to do.
So I have some sanding to do.
Tim51
Well-Known Member
Still looking very good indeed - despite the mishap.
Nick@JET
Well-Known Member
- Joined
- Sep 1, 2011
- Messages
- 1,693
- Reaction score
- 20
Thanks Tim, it wasn't all that bad and forced me to wet sand my NC and the final finish prior to clear is much smoother.
I shot the NC and Booster with
Duplicolor White primer first so the top coat would pop.

The payload I primed Duplicolor grey
Then the 3 main colors are 2 that I really like - Duplicolor BGM0398 Bright Red and BHY1805 Powder Pearl White. Not real crazy on the BFM 0383 Silver Metallic. When I shot that it looked very Un even - however once it laid for 10 minutes or so it looks much more even

With the Pearl White - this really is a thin color with the coating being more metallic - bleeds the bottom coat through really bad, so you really need to lay down a white base prior to the Pearl or your looking at 6-8 coats.

I shot the NC and Booster with
Duplicolor White primer first so the top coat would pop.
The payload I primed Duplicolor grey
Then the 3 main colors are 2 that I really like - Duplicolor BGM0398 Bright Red and BHY1805 Powder Pearl White. Not real crazy on the BFM 0383 Silver Metallic. When I shot that it looked very Un even - however once it laid for 10 minutes or so it looks much more even
With the Pearl White - this really is a thin color with the coating being more metallic - bleeds the bottom coat through really bad, so you really need to lay down a white base prior to the Pearl or your looking at 6-8 coats.

Holy cow that looks awesome. I love the pearl paint, gonna have to try that sometime.
Damn that is a beauty.
Similar threads
- Replies
- 8
- Views
- 867
- Replies
- 110
- Views
- 5K
- Replies
- 21
- Views
- 2K
- Replies
- 22
- Views
- 1K