The new 4" MAC Performance VTS-6 missile build thread

The Rocketry Forum

Help Support The Rocketry Forum:

This site may earn a commission from merchant affiliate links, including eBay, Amazon, and others.
AV BAY - setup for Dual Altimters , both circuit are independent (each has own battery, Switch Alt, wiring, terminal strips and charge wells

Primary
- RRC2, set to apogee and 500'
- 2S LIPO 240mAh Hyperion
- 110/220 Switch

Backup
- RRC2, set to Apogee+1 sec & 300'
- 2S LIPO 240mAh Hyperion
- Missleworks screw switch

Issues that I had:
- I drilled for the switches and forgot to make sure the sled was clocked properly as to line up the switches and not interfere with the rivets / shear pins. So I had to rotate the sled just alittle bit, unfortunately AFTER I drilled for the screw switch access hole, argh.
ImageUploadedByRocketry Forum1464147079.741623.jpg
ImageUploadedByRocketry Forum1464146797.301196.jpg
ImageUploadedByRocketry Forum1464146810.212100.jpg
ImageUploadedByRocketry Forum1464146838.225749.jpg
ImageUploadedByRocketry Forum1464146852.614228.jpg
 

Attachments

  • ImageUploadedByRocketry Forum1464146771.764256.jpg
    ImageUploadedByRocketry Forum1464146771.764256.jpg
    92.3 KB · Views: 99
Completed the AV bay tonight
- changed to Stainless Locknuts
- sealed the wire holes
- Cut Fuel tubing to center the sled which lines up my screw switch and snub and quick motions of the sled
- checked to make sure glove tip ejection charge method will fit in MAC charge well and the fit perfect
- checked tightness in everything.

Ready for my BP calculation which means I'm starting at 2 grams and will test downward to 1.5 :). Why? Cause and extra .1gr is too small a change for me. I'll make at least .2-.3 gr per change. But really - I will plug the numbers into the BP Calc and see where the suggested start is.
 
ImageUploadedByRocketry Forum1464231409.619815.jpgImageUploadedByRocketry Forum1464231507.900717.jpg
 

Attachments

  • ImageUploadedByRocketry Forum1464231434.039930.jpg
    ImageUploadedByRocketry Forum1464231434.039930.jpg
    88.5 KB · Views: 90
Mark @ Stickershock provided the graphics
ImageUploadedByRocketry Forum1464300395.799973.jpg
ImageUploadedByRocketry Forum1464300407.441825.jpg

Unfortunately will have to build another Estes, since I flew it into the ground but good for size comparison
 
Looks good... but... ummm... I think your "control surfaces" are upside down. :blush:

attachment.php


IINM it's supposed to simulate the gaps that a rudder would have (and the notches for the hinges) Like you see on boosterdude's QCC:

DSC00390.jpg


Shame about the original one's damage. Do you think it can be salvaged?
 
Last edited:
Oh dang it K'Tesh - good catch , I was just looking at my little trashed QCC.
The little one carried the ignite whip with it the first 15' then the whip cocked the QCC so the trajectory was about 60 degrees and eject happened about 5' before it lawn darted

Oh Mark....

Well I'll have to redo that before I clear coat
ImageUploadedByRocketry Forum1464306696.930226.jpg
ImageUploadedByRocketry Forum1464306712.240087.jpg
ImageUploadedByRocketry Forum1464306722.664223.jpg
 
That thing is a museum piece. :eyepop:

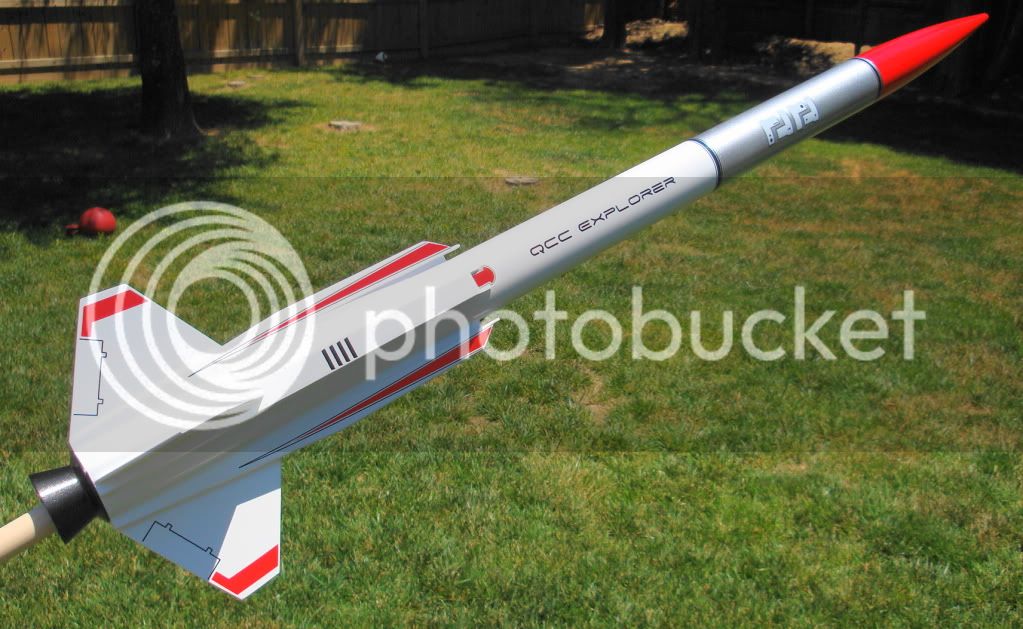
I had never realized the QCC Explorer was so closely modeled after a real rocket, but that's pretty much a dead ringer.
 
Thanks guys - yes modeled right from a VTS-6!

The polished turned out pretty well but the silver and pearl white doesn't shine like the red unless you get it in the right light. Thanks to what I learn on TRF with Nathan and a friend of mine VonMoses on the finish, otherwise I'm not a body guy, but starting to learn

Now for ejection charge testing.
 
Had an issue with my primary Altimeter - so here is the backup RRC2 circuit.
Mike from MAC flew his VTS this weekend on a K360 to 2800' and used 1.5 grams - so thanks to his info - i decided to start there.

Used Crazy Jim's glove tip method so I already had a few 1.5 gram charges ready to go. I just dropped them in the MAC Performance Alum charge canisters and a piece of masking tape. I wanted to test the function of the RRC2 - so decided to use the vacuum method - which I have never done before. Really need to build a vacuum test instrument to test the electronics / circuits - however for now, just used a vacuum cleaner on the switch hole.

1.5 gram glove tip method - using 2 shear pins - this is drogue test - 3 sets of 5 loops (3 small rubber bands per set). It showed to be the most powerful 1.5 gram test i've had to date. In this test - I also installed an ematch in the backup main - but no powder, just to make sure the main fired as well (not shown in the video)

[youtube]Eok8oMQ4MDA[/youtube]
 
Last edited:
Thanks Chris!

Next is the nose cone bay - I elected for the 54mm bay since I use a Astro tracker - so I won't use the the tubing until I change the tracker type.

ImageUploadedByRocketry Forum1464752675.201573.jpg
ImageUploadedByRocketry Forum1464752685.287371.jpg
ImageUploadedByRocketry Forum1464752695.399528.jpg
ImageUploadedByRocketry Forum1464752716.713986.jpg
ImageUploadedByRocketry Forum1464752735.917809.jpg

Also noticed when pushed the NC in the payload tube that it was compressing some air - forgot to drill my payload vent - put that in the todo list, and should be ready to test the main charge - even though I'm confident with 1.5gr.
 

Attachments

  • ImageUploadedByRocketry Forum1464752705.269810.jpg
    ImageUploadedByRocketry Forum1464752705.269810.jpg
    39.3 KB · Views: 53
Had an issue with my primary Altimeter - so here is the backup RRC2 circuit.
Mike from MAC flew his VTS this weekend on a K360 to 2800' and used 1.5 grams - so thanks to his info - i decided to start there.

Used Crazy Jim's glove tip method so I already had a few 1.5 gram charges ready to go. I just dropped them in the MAC Performance Alum charge canisters and a piece of masking tape. I wanted to test the function of the RRC2 - so decided to use the vacuum method - which I have never done before. Really need to build a vacuum test instrument to test the electronics / circuits - however for now, just used a vacuum cleaner on the switch hole.

1.5 gram glove tip method - using 2 shear pins - this is drogue test - 3 sets of 5 loops (3 small rubber bands per set). It showed to be the most powerful 1.5 gram test i've had to date. In this test - I also installed an ematch in the backup main - but no powder, just to make sure the main fired as well (not shown in the video)

[youtube]Eok8oMQ4MDA[/youtube]

Never thought of doing testing with the actual altimeter in the bay... Pulling the vacuum and all... Works pretty well.
 
Thanks guys , a lot of little things to tie up but getting close.
 
Here is the Nose Cone bay - which Mike pointed out the my lower plastic bay threaded peice should've been epoxied from the inside not sliding up from the bottom. Unfortunately I don't honk I can remove this without cutting at least 1.5" of the NC shoulder. I think it will hold but I post this so you don't make the same mistake... Might help if I use my own advice RTFM ...read the freaking manual, which of course I did not. Thanks for noticing Mike.

Mine ...wrong way

ImageUploadedByRocketry Forum1464879593.297924.jpg
ImageUploadedByRocketry Forum1464879655.300904.jpg

Mike's ....correct

ImageUploadedByRocketry Forum1464879619.935099.jpg
ImageUploadedByRocketry Forum1464879638.401308.jpg
 
TO DO LIST
1. drill vent holes in the payload tube
2. Test payload ejection charge
3. Test glove tip method to make sure primary doesn't blow backup charge
4. Final weight - order chute for correct decent rate - likely 5'
5. CP & CG stickers
6. Fix lower flap stickers
7. Clear coat and polish
8. Final install of rail buttons
9. Fly the thing!
 
TO DO LIST
1. DONEdrill vent holes in the payload tube
2. DONETest payload ejection charge
3. DONE Test glove tip method to make sure primary doesn't blow backup charge
4. Final weight - order chute for correct decent rate - likely 5'
5. CP & CG stickers
6. Fix lower flap stickers
7. Clear coat and polish
8. Final install of rail buttons
9. Fly the thing

here is the glove tip method I used
image1.JPG
image2.JPG
image3.JPG
image4.JPG

This was a good test as far as the charge worked and the backup charge was isolated enough so it didn't ignite - but to me this didn't look very energetic - it popped the NC off, pulled out the laundry and extended the shock cord but the weight of the NC did not undo the shock cord loops. So I'm open to suggestions - maybe I need to rethink the way I pack it. instead of using nomex - i just used an old shop towel and also using my 6' shoot from my LOC Magnum just for testing - I will likely order a 5' chute and may packup alittle looser which may help.

[youtube]aSsw3qYexCg[/youtube]

Final weight and order chute. This will likely be my last info post until i fly it. Thanks for following along and being interested, this is definitely a very high quality rocket - the build has been super smooth. The way everything fits together made it a very straight forward easy build. Can't wait to fly it!

Planned flight will be June 11 at ROCI in Muncie if they allow the motor.

Planned first flight will be CTI 54mm 3 Grain - J449 (2700') or J380 (2300') so everything is visible.
 
Picked up a 54mm-3gr J380 for this flight on Sat - for an est altitude of 2250' and thrust ratio of 6:1.

Ordered a 5' rocketman chute today from MAC Performance.

TO DO LIST
1. DONE drill vent holes in the payload tube
2. DONE Test payload ejection charge
3. DONE Test glove tip method to make sure primary doesn't blow backup charge
4. Final weight - DONE order chute for correct decent rate - likely 5'
5. DONE CP & CG stickers
6. Fix lower flap stickers
7. Clear coat and polish
8. DONE Final install of rail buttons
9. Fly the thing
 
Last edited:
Great shake down flight today on a J380SS 54mm - 3gr to 2340'.
I'll post details once I get them, flew beautiful and straight. Very excited to fly this rocket for many reasons - my favorite rocket is a QCC which was the "gateway drug" of sorts that actually opened my eyes to anything more than mod rockets - the E9 in a QCC - that's what really started this for me. And I think it would be fitting to upscale this even further for an L3 certification. More to come on this.

So thank you to Mike at MAC Performance for making this and allowing me to change the name and call it a QCC even though it is actually the VTS-6 by Vought. I had originally posted I would do an upscale scratch and wanted to by Mac Performance Canvas airframe, and his response was "if you wait just a bit I'm doing an upscale already for that" which became this build. So thanks Mike for making my dream a reality and taking the design burden! Great job.

And now I'll have to impatiently wait for fall to really send it up.

Thanks for following the thread to all you who found this interesting, I'll post pic and very short video of the boost tonight.

ImageUploadedByRocketry Forum1465665722.591136.jpg
 
Last edited:
Sorry for the crappy video - that may be something i work on in the future. My ride along HD camera was not on record. There was some fin damage on the landing which i'll get fixed up. Dual deploy worked great - motor backup and apogee was spot on as we saw to puffs at apogee within 1/2 second of each other - main set 300'. I had an issue with my primary altimeter that i had to send back - so was running the backup only and that was the reason main was set so low. I may move to a larger chute (6') if I plan on flying on a hard landing launch site.

IMG_9274.JPG

Snapshot 1 (6-12-2016 8-03 AM).png


[youtube]WnBraMWILBc[/youtube]
 
Woah, sorry about the fin. Do you know how it happened? How fast was descent?
 
Woah, sorry about the fin. Do you know how it happened? How fast was descent?

It landed pretty hard - RRC2 so no graph in decent, but looked pretty fast , had 5' chute and should've gone with a 6' or 7'.
I also no wonder if fillets are large enough (I had small double
Fillets - double butter technique on fin to motor tube, small
Fillet external against body tube (under intake) then the one you see on the intake itself. This is a lot of torque when it landed kinda on the side of the fin with the last gust of wind instead of landing on the end of the motor nozzle.

This was built with Bob Smith 15 min and I think I'll stick with Rocketpoxy and west on my next build.

IMG_9279.JPG


Also really impressed with this reload - no burn through - best one I've seen yet.
IMG_9280.JPG

Also I use a 2S 240mAH battery - charged it this morning and interesting that it charged back HALF of the available (122maH) however both batteries in my MAC firestick only used 20mah on both primary and backup circuits - same altimeter, same igniters. Ive been very happy with the hyperion 240mah LIPO.

imagebat.JPG
 
Last edited:
This weekend I sanded away the old fillet and was able to re-fillet the fin - air intake connection with RocketPoxy, and primed. Also installed the fin flap decals on the correct orientation - thanks to Mark at Stickershock for getting those to me.

RocketPoxy has been tricky to work with. Mix up on a plate - spread to let D-bubble and then the wait game until it is solid enough not to self level, which is challenging. It feels stiff enough 20min later to do a fillet only to come back 10 min later and it has self leveled and dripping off the side. I stuck with it this weekend and waited until it was very squishy clay consistency and then did the fillet - this was about 40 minutes in. It still self leveled for about 10 min - so I alcoholed my gloved finger and kept working it. It was almost to the point of Fix it epoxy clay that it held its shape. Once it gets to that clay consistency you can shape it nicely - which is great for leading and trailing edge. I hope to learn the tricks of it since it feels very strong.

No pictures since I spent the majority of my time managing the kids 4-H rocket completion.

ImageUploadedByRocketry Forum1468867990.332496.jpg

Hoping to pearl and clear coat next weekend - not in a hurry since my only flight planned at this time would be leading up to my possible L3 flight (not with this rocket - but I want to fly this the day of and prior to my L3 attempt).
 
Back
Top