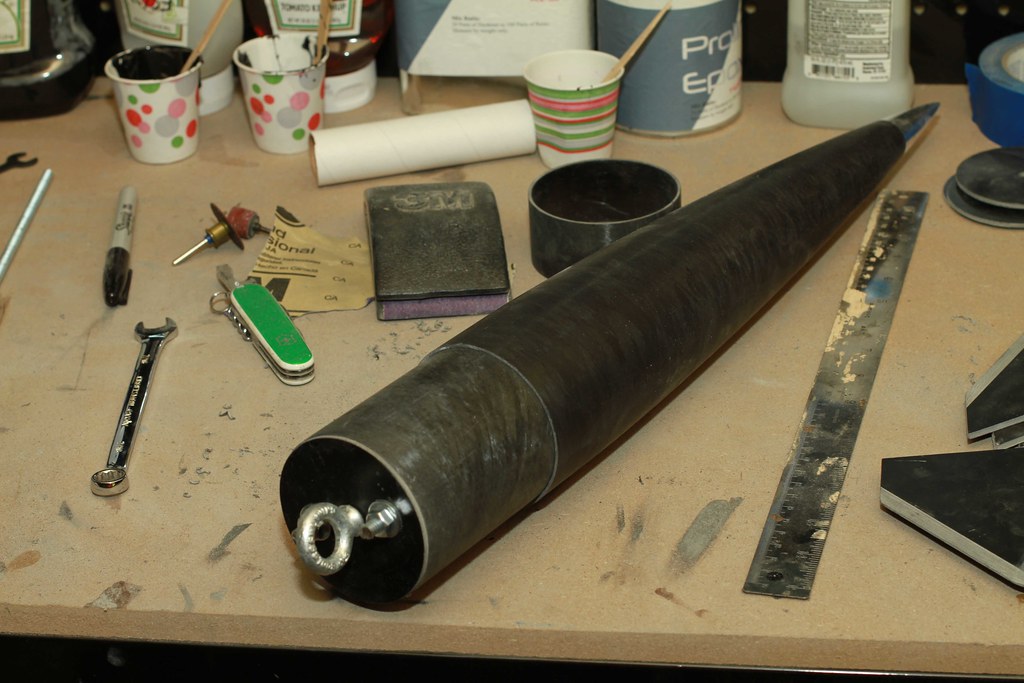
Standard operating procedure for attaching a shock cord to a HPR fiberglass nc?

The Rocketry Forum

Help Support The Rocketry Forum:

This site may earn a commission from merchant affiliate links, including eBay, Amazon, and others.
Here's what I did, but I wouldn't recommend it.

I sanded down a bulkhead and epoxied it as deep up into the NC cavity as I could. Before doing that, I attached a long piece of allthread. Nylon locking washer on the other side, epoxied on.

The allthread stuck out of the opening. I cut it off so that it fit nicely thru another, slightly larger bulkhead, and used a fender washer and eyenut to hold it together.

Here's the rough idea:
nose-build.JPG

The reason I wouldn't recommend is that I had a shock cord mishap. The shock cord got knotted up inside the payload tube, and when the nose blew, there wasn't enough length to absorb the shock. So the force of the ejection broke the epoxy joint on the inner coupler and pulled the whole thing out.

I threw it away and bought a glue-free, filament wound NC.
 
Personally, I set a length of all thread into the tip of the nose cone with epoxy so I can then use a stepped lid to be able to access the NC for space (tracker, altimeter) as needed.

I then use a decent sized u bolt on the stepped lid where i attach the shock cord. I have also used a forged eye nut attached to the allthread with a little locktite.

Some people put in longer eye nuts epoxied into the tip and just don't bother trying to claim the space in there.

Hope this helps!
 
I prefer the method John Coker uses for conversion of plastic nose cones to a Electronics Bay, it involves a centering ring and a bulkhead that will attach to the centering ring. Centering ring is glued into the nose cone before the coupler is put in, then the coupler is glued or attached with screws/rivets into the nose cone. The bulkhead has the eyebolt attached and the bulkhead attaches to the centering ring with screws.


These pictures are actually from two different NCs but you probably get the idea. I use a well nut as the pass through for my ejection ematch. The brass pin in the second pictures CR is a indexing pin.
CrayonRocketDay7Pic1.jpgL2project9-3.jpg
 
RHarsh,

I'm sure I'm in the minority, but I used this exact method in a Level 1 rocket and the epoxy failed on me. Due to the amount of noseweight I had the NC came in pretty much ballistic. Right in the middle of camp. So understandably, that was enough of a bad experience to turn me off of that method with those particular materials. I'm thinking there will be a much stronger bond with this type of setup in a fiberglass NC.
 
I use John Coker's method with some modifications.

If I am using shear pins to keep the nosecone in place then I will also epoxy some self-clenching nuts into the bottom of the nosecone coupler about 1.25" in, which I can then epoxy the attachment ring as per John Coker's method above it. This gives me a reliable shear pin method as well as a very strong and reliable method for keeping the mounting ring in place when I screw the bulkhead in place. I have also moved away from using a u or eye-bolt in the nosecone and prefer a short bit of Kevlar.

I have moved toward this method for several reasons, it is very strong, reliable and it also mitigates the use of metal in the nosecone as well as moves whatever metal used aft for mitigating RF interference with my trackers.
 
RHarsh,

I'm sure I'm in the minority, but I used this exact method in a Level 1 rocket and the epoxy failed on me. Due to the amount of noseweight I had the NC came in pretty much ballistic. Right in the middle of camp. So understandably, that was enough of a bad experience to turn me off of that method with those particular materials. I'm thinking there will be a much stronger bond with this type of setup in a fiberglass NC.

I always make sure I have a mechanical block below the CR so it cant pull straight back out, if the NC coupler is glued in behind the CR then either the CR or the coupler hss to break. My nose weight is always pinned and epoxied into the tip.
 
RHarsh,

I'm sure I'm in the minority, but I used this exact method in a Level 1 rocket and the epoxy failed on me. Due to the amount of noseweight I had the NC came in pretty much ballistic. Right in the middle of camp. So understandably, that was enough of a bad experience to turn me off of that method with those particular materials. I'm thinking there will be a much stronger bond with this type of setup in a fiberglass NC.

It could have been the epoxy and nose cone material that caused an issue. If it was Bob smith 5 minute epoxy and a plastic nose cone, that would most likely be the cause of failure.

Something more substantial like Rocketpoxy or West Systems in a FG nose cone is a very different, much stronger setup.

How much weight are you planning to add to the FG nose cone?

This particular rocket will have no additional weight in the NC. Possibly a tracker a some point, but I've got plenty of stability. My intent was to use BSI 30 minute epoxy. You think I need to upgrade epoxies for this product? The rest of the rocket is cardboard and ply, I've used titebond everywhere else. This is gonna be a 16lb non-machbusting rocket.
 
This is the nosecone of my RW X-Celerator. Similar set-up to what others have posted above. The wood ring is Rocketpoxied in and the FG bulkplate screws into t-nuts to hold my tracker in. it gets a pretty good tug when the main ejection charge fires and it's still pretty solid.

20150211_071338.jpg

I don't have any experience with 30 minute epoxy, but I know Bat-Mite used it on his X-Celerator. Maybe he can provide more info (I'm not sure if it's his X-celerator he's talking about in his post above).
 
Last edited:
Parts
1. Epoxy - Choose your favorite
2. Allthread
3. Bulkhead
4. Lead Shot (optional)'

Drill several small holes in the nose cone about 3/4 inch from the top. If possible angle the holes upwards, however of the wall is fairly thin this may not matter. Sand the inside of the NC near the top as good as you can to rough it up and give something for the epoxy to hold.

Tape the holes and pour epoxy into the nose. At this time also add any lead shot that will be required to weight the nose and insert a piece of all-thread into the center of the epoxy and place the bulkhead in the base (no need to epoxy in yet, it's just there to hold the althread straight, you can glue it in later.

After the epoxy has cured, remove the tape and sand the outside of the NC smooth where the holes were drilled. These will help hold the epoxy in the nose.
If you really need a good hold use JB-Weld however it's fairly stiff to work with (and expensive) for this work. I usually just use regular 20 minute epoxy and let it cure for several days. I have not done of lot of these but I've never had one come loose.
 
can build in an avbay....

9575144838_6e38c483d8_b.jpg
 
https://www.rocketryforum.com/showthread.php?37382-Sprite-6-quot-and-a-baby-O&p=349921#post349921

Some pictures of my nosecone from my L3 rocket, before foaming in the tube through the holes left left for the purpose.

In particular, note the extra fiberglass ring which is epoxied into place inside the coupler region. This pretty well removes the possibility of the rear bulkhead stripping out without ripping it apart. There is also allthread connecting the rear bulkhead to provide additional anchoring.

The bay is the auxiliary electronics bay. It was only used once, for carrying some experimental electronics for somebody at one of the launches.

This 6" diameter nosecone was very solid, and weighed 9 pounds.

Gerald
 
I don't have any experience with 30 minute epoxy, but I know Bat-Mite used it on his X-Celerator. Maybe he can provide more info (I'm not sure if it's his X-celerator he's talking about in his post above).

Yes and yes. I only have built with 30-min epoxy so far in life. I trust it for just about everything, except things that get hot, whereas I use JB Weld.

The problem with my nose cone was that the shock cord got knotted. Had that not happened, everything would have been fine. Since then, I've started accordion-folding and rubberbanding my shock cords.

So my method is cheap and requires no tools but a hacksaw and a sander. And you just have to buy two bulkheads, an allthread, and some nuts and bolts. But, if you do have a shock cord mishap, just a warning that it could break the epoxy seal in the NC.
 
Choose your adhesive well! Many of the laminating resins make poor adhesives. You want toughness and peel strength. Something like 3m DP460 or DP190. I never use a laminating resin for an adhesive.

Mike K
 
Use Rocketpoxy. It's easy to work with, doesn't smell horrible and/or make you get a rash, and it will glue anything to anything as long as they're clean. I gave up on the hardware store epoxies (except for slow JB Weld for motor mounts) when I had a shock cord pull right out of a Jart on an H133.
 
You know how you can glue a shock V-bridle to a motor mount and it is strong enough to catch the whole back end of the rocket? Well it turns out the forces at the other end of the shock cord are the same!
I just invert a V-bridle and epoxy it to the inside of the nosecone. To make it extra stuck I have added patches of glass cloth. You can then add rings and bulkheads to reclaim the volume for electronics or just leave it open. Size your bridal and patch bond area to your nose cone mass.
 
Back
Top