Rocket Poxy Review

The Rocketry Forum

Help Support The Rocketry Forum:

This site may earn a commission from merchant affiliate links, including eBay, Amazon, and others.
Haha, I always like to hear stories like that. Have you tried sanding it off? I always clean whatever tool I use before it decides to harden on me.

I just cut off the glue coated end. Usually I do clean them, heck this ones 4 yrs old. The phone rang just as I was finishing up, and I totally forgot about it. There was too much to sand off, would have changed the profile or made flat spots on tube.

I use PVC because I have 5 sizes for different size airframes & thus different size fillets for what I'm doing.

The point I was making was not about the tool and my goof ......but how well that Rocketpoxy sticks to plastic. Better than anything I have ever used, except LOC tights glue made JUST for plastic.

Anyone used it on plastic NC's yet? How did that fin to PVC joint hold up, did you try to rip it off?

I know that your point was about how well it stuck to the PVC. I must say that sucks about the phone distracting you from the curing epoxy lol. Yes I did try to rip it off and I did it by hand too. I did manage to break it off, but I ended up hurting myself in the process since it was big time stuck on there. Cracked right through the middle. Perhaps it was, because I used 5 minute epoxy for the root attachment and made it more easier to remove. I will remove the epoxy and re-bond the fin with just the Rocket Poxy. Was still tough to break so I can already imagine how much difficult it would be to break a pure Rocket Poxy bond. I will remove the epoxy tomorrow and bond it with the Rocket Poxy. Then the next day I will make the fillets and wait for another day and try to break the fin off.
 
I found that Teflon V-packing seals work great for pulling the most perfect smooth fillets, they have a nice radius surface on one end that pulls easy and leaves a perfect smooth radius finish. They come in every size diameter. Easy to clean because they are Teflon. I have a bunch of them around here because my company uses them in piston packing sets for the machines we manufacture but they can be found at places like Motion Industries, Mcmaster-Carr, Grainger, and any company that carries seals. I just dip in isopropyl alcohol and run along the fin fillets, what’s nice is the low friction Teflon slides evenly and smoothly on the fin and airframe tube contact points making this very easy to get great results, make sure to keep the seal perpendicular to the airframe as you pull the epoxy, I usually pull it over the fin fillet twice, the first time to get all the large excess off, wipe the epoxy off the seals, then pull over again again for a nice evenly smooth fillet.

PTFE-V-Packing.jpgPTFE-V-Packing1.jpg
Various size Teflon V-packing seals

RP_F150FILLET_BLUE.jpg F150_BLUEFILLETS.jpg
Photo of my Rocketry Warehouse Formula 150 blue FW tube with black G10 fins, the fillets are Rocketpoxy with blue pigment mixed in.

FP_ORANGEFILLETS.jpg F75_YELLOWFILLETS.jpg
Also my Flying Pumpkin with Rocketpoxy with orange pigment and RW Formula 75 Rocketpoxy with yellow pigment
 
Last edited:
That is just so cool with the color pigments. Is there any chance for a chrome color pigment? It would be neat to have aluminum looking fillets. I have never seen those types of seals before. Never the less I'm better off with a dowel, because I end up with those pointy radius on the leading and aft end of the fin.
 
Last edited:
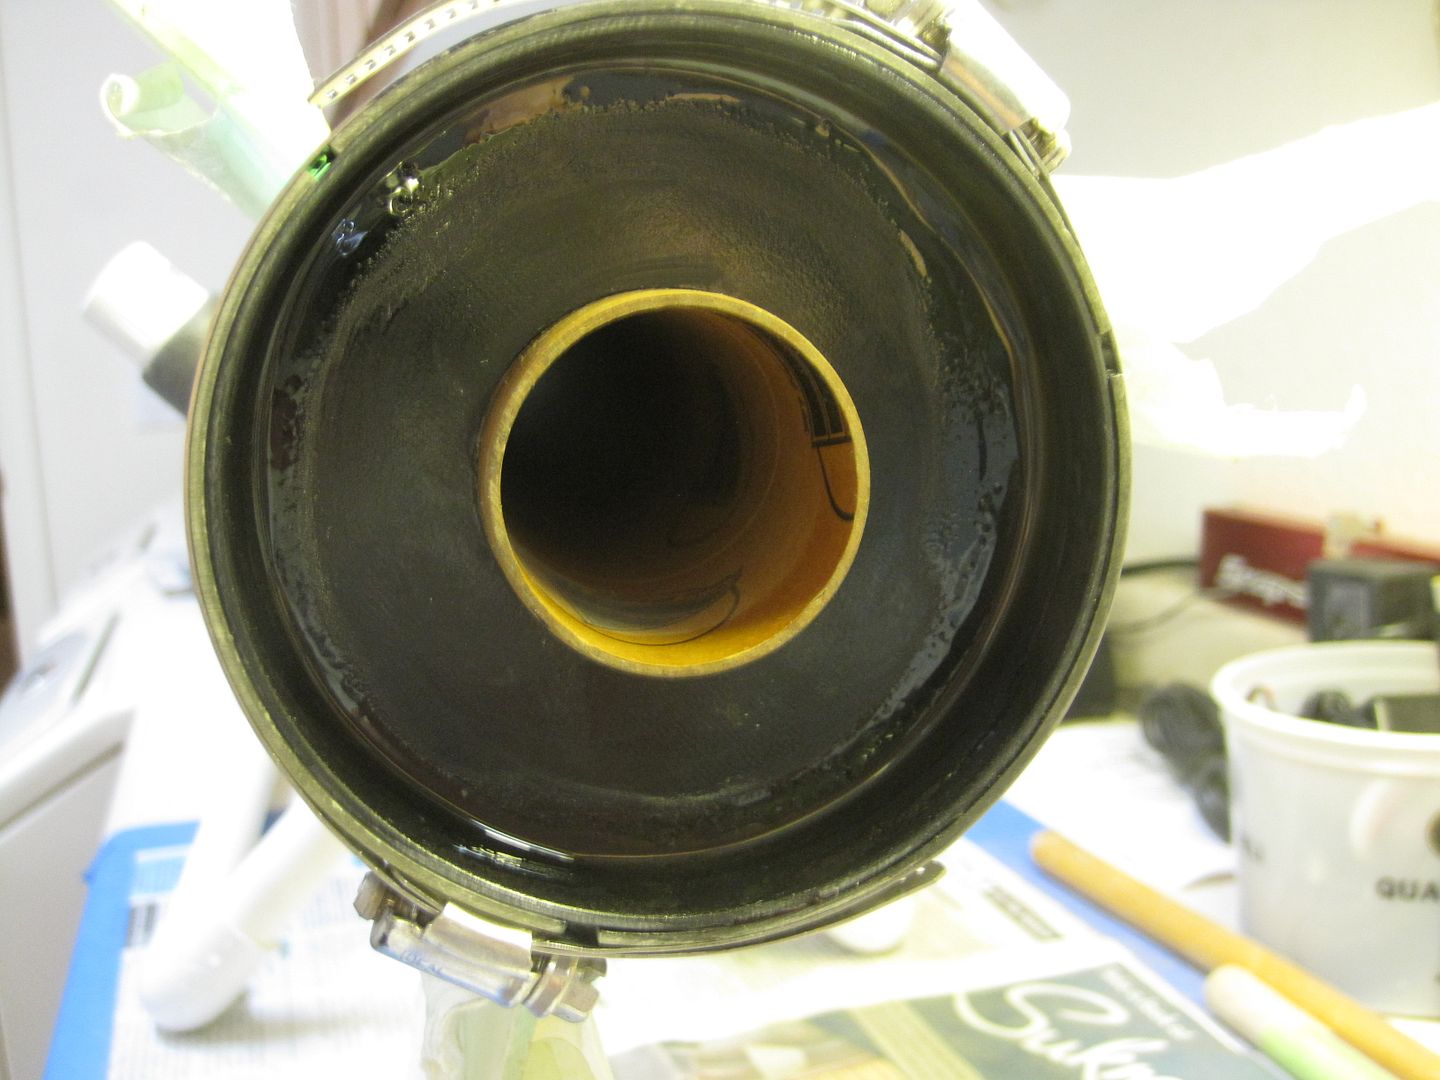
Quick comment on injection, I personally don't like drilling injection holes in my FW tubes (making stress concentration holes right next to the slots doesn't do it for me) also trying to make sure everything inside is "leak proof" you know where every part has to be butted up together so no epoxy leaking though the motor centering rings can occur is difficult, tedious and time consuming and do not find any advantages to using the “injection" method, also I like to be able to see the internal fillets when finished, with injection method using black or colored FW tube this is not possible. I think this was originally developed because it was basically the only way you could do it when using the thin runny epoxies, I find it much easier to simply use a 1/8” to ¼” diameter wooden dowel to build my internal fin fillets laying the rocket horizontal and going in through the bottom and attaching the motor mount rear ring on afterwards, really this is pretty fast once you get the hang of it, you simply just dip the end of the dowel into the mixed rocketpoxy twirl it a little to build up on the dowel, then go in the aft side of the rocket and twirl the Rocketpoxy into the fillet locations, you can see the internal fillets when finished and make them exactly how thick you want them, no guessing. I have even done minimum diameter rockets this way as well. I do four fillets per 120 degree rotation (for a 3 fin rocket), the two internal fillets on the bottom single fin, and the top two internal fillets on the two top fins per rotation, (or if you really want to speed things up and are quite coordinated you can also do the two external top fin fillets as well at this time). Do this three times and you done with the most unbelievable rocket strength, no drill holes, I don’t need any stinking holes, See photo.

INTERNAL_FILLETS_RP.jpg

With that being said yes you can inject Rocketpoxy and it will flow. The Rocketpoxy was designed to give you about three viscosities to work within a single epoxy product. From the time you first mix it for about the first 0 to 20 minutes it will flow freely and self level pretty well and can be poured directly from a cup or put into a syringe with a decent size dispense spout and injected quite well, especially if you have a larger size opening (1/8”diameter or more) or very easy if using a pneumatic dispenser, with this device a piston is forced by air pressure down into the syringe to push out the product, you can easily do very thick materials this way. If you want it to be a little flowable but really with no sags or runs but still trowels well and smooth (such as when doing a fin fillet) use it from about 30 to 45 minutes later after mixing, if you want to use it like a very thick epoxy putty wait after about 45 to 60 minutes and dip you fingers in isopropyl alcohol and you can pinch out an amount and roll into a ball or any shape and press into threads or a hole to repair. You can use up to 1 hour after mixing. Keep in mind the above is approximately and your exact conditions may need to be adjusted slightly, the temperature the epoxy is mixed at and the amount mixed will affect this (will cure faster in a 90 Degree F shop then a 60 degree F shop and will cure faster if mixing a very larger amount).

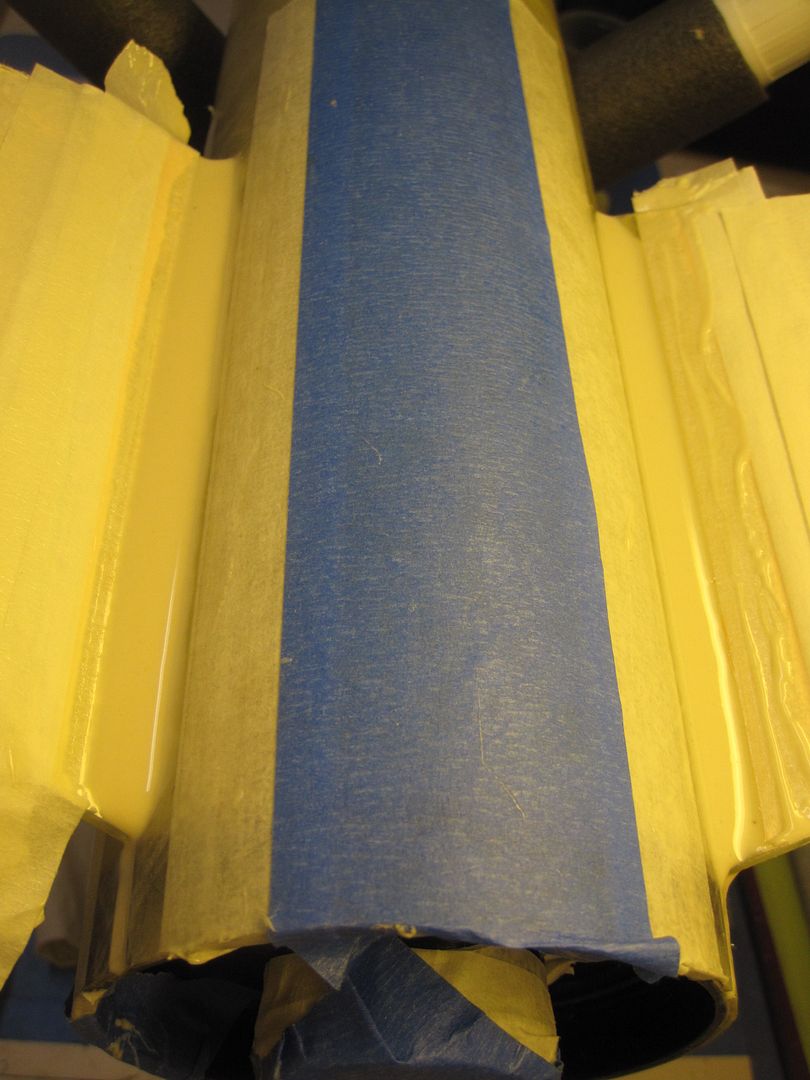
I am blessed that I have lots of different adhesive dispensing equipment at my location to play with, for example I have some pneumatic syringe epoxy bench top dispensers that luckily we manufacturer that work great for this. I have even rigged up a 12 inch long piece of 1/8” ID tube that I connect to as 55 cc syringe that I fill with mixed Rocketpoxy that I can use to place internal and external fillets on really big rockets in no time at all and very accurate and consistent. I have also put into a dual cartridge holder using a pneumatic dual cartridge gun with a static mix tube nozzle on the end, this way you don’t even have to mix it, it comes out fully mixed and ready to use. If there is some interest to do it this way we could also pack Rocketpoxy in dual cartridges. See photos below. The 2nd photo is a pretty inexpensive way to make a pneumatic syringe dispenser, all you need is a simple pneumatic foot switch and a 0 to 100 psi regulator w/gauge and hook up a couple of pieces of tubing with a syringe holder, all you need is a simple air compressor to connect to it, usually about 20 to 30 PSI will dispense the Rocketpoxy very easily. If interested my company also sells the completed assembly or for the do it yourself types any of the parts you would need to make this simple syringe dispenser.


DUALGUN3.jpg INJECTOR1.jpg INJECTOR2.jpg INJECTOR3.jpg

Glenmarc Industries, Inc.
 
Last edited:
There you have it halcro1 :). John, three working viscosities you say? That is most impressive. Cool gagdets you have, I should get me some.
 
So I am preparing to make another set of fillets since Jim was curious if the G10 fin was stuck on good to the PVC pipe. Unfortunately I did break it off, but I am assuming, because I had attached the root fin with 5 minute epoxy, therefore making the bond weak. This time it is going to be pure Rocket Poxy to give it a more proper test. Oh yeah, I thick CAed the fin I broke and I can not seem to break it. I managed to pop off another fin that was attached with 15 minute epoxy. By the looks of it the 15 minute epoxy did not bond well to the PVC nor the G10 fiberglass fin. Either way I decided heck I will glue it with the rocket poxy for my test.

image.jpg
 
I've stopped tacking fins on. It's 100% worth the time needed to glue them all in separately, if you don't have to deal with the cruddy stuff underneath.
 
I've stopped tacking fins on. It's 100% worth the time needed to glue them all in separately, if you don't have to deal with the cruddy stuff underneath.

I agree, that is why I like my rockets to have Dado slots. Its perfect for getting the fins on straight and since they don't go all the way through, you dont have to worry about the cruddy stuff underneath.
 
I agree, that is why I like my rockets to have Dado slots. Its perfect for getting the fins on straight and since they don't go all the way through, you dont have to worry about the cruddy stuff underneath.

By "cruddy stuff underneath", I meant lesser adhesives like CA and 5-minute epoxy which, once covered up, do little aside from take up valuable bond area.

Dado slots are convenient, but a good fin guide does the same thing without compromising the tube's strength. And you need a fin guide anyway for dado slots to keep them perpendicular.

My bad, either way dado slots still are great. I see in no way how it compromises the strength of the airframe. Especially on a minimum diameter rocket since the engine acts like a reinforcing coupler. If dado slots are that bad, is all the way through the wall fin slots even worse?
 
My bad, either way dado slots still are great. I see in no way how it compromises the strength of the airframe. Especially on a minimum diameter rocket since the engine acts like a reinforcing coupler. If dado slots are that bad, is all the way through the wall fin slots even worse?

It depends. Sometimes the additional lever arm inside the rocket is nice (when the MMT is much smaller than the body tube), but other times the integrity of the airframe is more beneficial than a miniscule little lever arm (2.5" rocket, 2" MMT, or 5" rocket, 4" MMT, for example).

On paper-based tubes, dado slots just provide a mechanism for easier delamination.
 
Sorry to de-rail, but is that stuff the aluminized G10 fin stock that PML and Giant Leap have been promising to sell for years? Prism-Plate or some such?

Yes that is Giant Leap's G-10 Reflective film sheet. Very cool in my opinion. I still have this 3/32" thick, 12"x7.875" sheet that I have no use for. I wonder if anyone would want it?

You can clearly see me as I am taking the picture with my Iphone.
image.jpg
 
I have used this for internal injection inside the airframe and they make great internal fillets. Just with the motor mount and internal airframe to fin fillets, the fins are not going anywhere.

I don't know. To me seems way too thick to inject.
 
24 hours have passed and I tried to break the reflective G10 fin off. I bent the fin and I could go further, but I was afraid that either the G10 would snap or the fillets would break and either way I would end up getting hurt in the process. So to answer your question Jim, yes the G10 fin is bonded pretty good to the PVC pipe. That fin is going no where unless wacked with a hammer maybe I don't know lol.
 
But like Jim asked, anyone used it on plastic or polypropelene NC's yet?
 
I have some enroute from Wildman and that is going to be one of my first tries is on a polypro nosecone...
 
Love this stuff, so far. Super easy to use, even for and idiot like me!

Now if I can just remember to clean off the Popsicle stick, after using it to scoop out one part, before I use it to scoop out the other part.....
 
Love this stuff, so far. Super easy to use, even for and idiot like me!

Now if I can just remember to clean off the Popsicle stick, after using it to scoop out one part, before I use it to scoop out the other part.....

I just grab 2 popsicle sticks out of the bag and put one on top of each can before I put my gloves on. Problem solved.

I will agree that this is some good stuff.
 
Love this stuff, so far. Super easy to use, even for and idiot like me!

Now if I can just remember to clean off the Popsicle stick, after using it to scoop out one part, before I use it to scoop out the other part.....

I cut a stick in 1/2 with tin snips , clean 1/2 for each part dipping


Agree really liking this stuff :)
 
I've stopped tacking fins on. It's 100% worth the time needed to glue them all in separately, if you don't have to deal with the cruddy stuff underneath.

I've been using Aeropoxy 6209 for my fin "tacking". Yes, it does take longer, but I like the good bond underneath.

Then I extend the slots to the rear of the tube, slide the fins/MMT out, and add decent fillets. Not sure if this would work with FW tubes, though. I've always used glassed paper tubes.
 
Just did my first fincan with "Rocketpoxy". First, I like the way it mixes, 1 to 1 ratio makes it easy, and you can see the colors blend together. Peanut butter like consistency makes it easy to spread, and if you wait a while it gets thicker. I did some centering rings and the internal bond to GLR's "Groove-lok" adapter first:
064.jpg

Probably the strongest bond I have ever experienced. Granted, I'm a relative newbee to HPR and have only done a few builds with various epoxies.
Next, I slid the MMT and fins into the body tube and slid a ring of black coupler in after it. Since I had some left over Proline from my 3" Darkstar build, I used it to bond the ring to the aft black centering ring. Used a couple of hose clamps to hold it all together:
0062.jpg


Now I'm ready for my first external fillets. Mixed up 60 grams of Rocketpoxy since I planned on doing the entire fincan in one go like it was suggested at the start of this thread. Waited 30 minutes and started running fillets. Went on really nice and ran out smooth for the first set, so I turned the tube over and did another. Same results, just a little harder to run them out because it was getting thicker. Before I did the last set, I went back and looked at the first set.
:y: Huge curtain running down the side of the tube. Almost an hour after mixing, and it was still too runny to hold its position on the tube.
I messed with it for a while and finally stripped one set off, no way would it stay in place while working on the next set of fillets. Even an hour and a half after mixing it was still too runny to stay in place.
I used a scale to mix the 1:1 ratio and the temperature in the room was 75*. My suggestion is to do one set at a time and wait at least two hours before you rotate to the next set.
I did get some pretty nice fillets after all the drama:
0102.jpg

 
Great to see some magnificent photos of the use of Rocket Poxy. Great job Wayco, is that a GLR Solar Eclipse?
 
Back
Top