I really should have started this thread BEFORE this point, but you know how you can't stop something once you get started...
I just wanted to pass along a few tips on building this kit. These are the things you realize after completing the steps as described in the instructions.
1. Rear Wing...... Leave it off until after painting. There is ABSOLUTELY no way to properly paint the underside of that wing with the BT-5 engine tubes and rudders on there.
2. Take the lead disks and cut them up into little pieces. Instead of using the entire length of dowel in the underside of the nose cone, cut it down to 3/8" long and pack the extra space with the lead. Then glue the dowel on there. (I did )
3. Shoot the decals with a clear coat or clear decal film from the Testors decal printing kit before trying to apply them. Mine were FRAGILE.
4. Dress up the canopy with a marker. The one I got was a crappy photo enlargement and the edges of the black windscreen were fuzzy and pixelated. Grab a fine sharpy and even things out. (going to do that)
5. The parachute material on mine was a bit heavy. It's thick textured black plastic and does not fold or deploy well in a 6" parachute. I was trying ot figure out what material it was made from until I went to party supply store. The NEAV parachute looks like black plastic table cover material! I guess there was a clearance on "Over the Hill" party supplies at the carnival supply store near Cygnus. Try cutting a new one from an easier-to-see material... like anything but black.
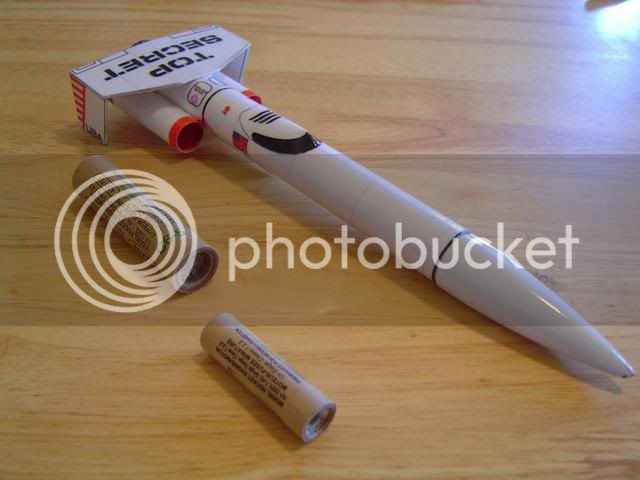
Other than that, no major problems. It's actually a clone of a "Plan of the Month" from the mid-70s. Used to be called "Top Secret". Anyone else have experience they'd like to share?
I just wanted to pass along a few tips on building this kit. These are the things you realize after completing the steps as described in the instructions.
1. Rear Wing...... Leave it off until after painting. There is ABSOLUTELY no way to properly paint the underside of that wing with the BT-5 engine tubes and rudders on there.
2. Take the lead disks and cut them up into little pieces. Instead of using the entire length of dowel in the underside of the nose cone, cut it down to 3/8" long and pack the extra space with the lead. Then glue the dowel on there. (I did
)3. Shoot the decals with a clear coat or clear decal film from the Testors decal printing kit before trying to apply them. Mine were FRAGILE.
4. Dress up the canopy with a marker. The one I got was a crappy photo enlargement and the edges of the black windscreen were fuzzy and pixelated. Grab a fine sharpy and even things out. (going to do that)
5. The parachute material on mine was a bit heavy. It's thick textured black plastic and does not fold or deploy well in a 6" parachute. I was trying ot figure out what material it was made from until I went to party supply store. The NEAV parachute looks like black plastic table cover material! I guess there was a clearance on "Over the Hill" party supplies at the carnival supply store near Cygnus. Try cutting a new one from an easier-to-see material... like anything but black.
Other than that, no major problems. It's actually a clone of a "Plan of the Month" from the mid-70s. Used to be called "Top Secret". Anyone else have experience they'd like to share?