Blackhawk 38 Build Thread

The Rocketry Forum

Help Support The Rocketry Forum:

This site may earn a commission from merchant affiliate links, including eBay, Amazon, and others.

RocketHunter

Well-Known Member
Joined
Jun 15, 2013
Messages
390
Reaction score
3
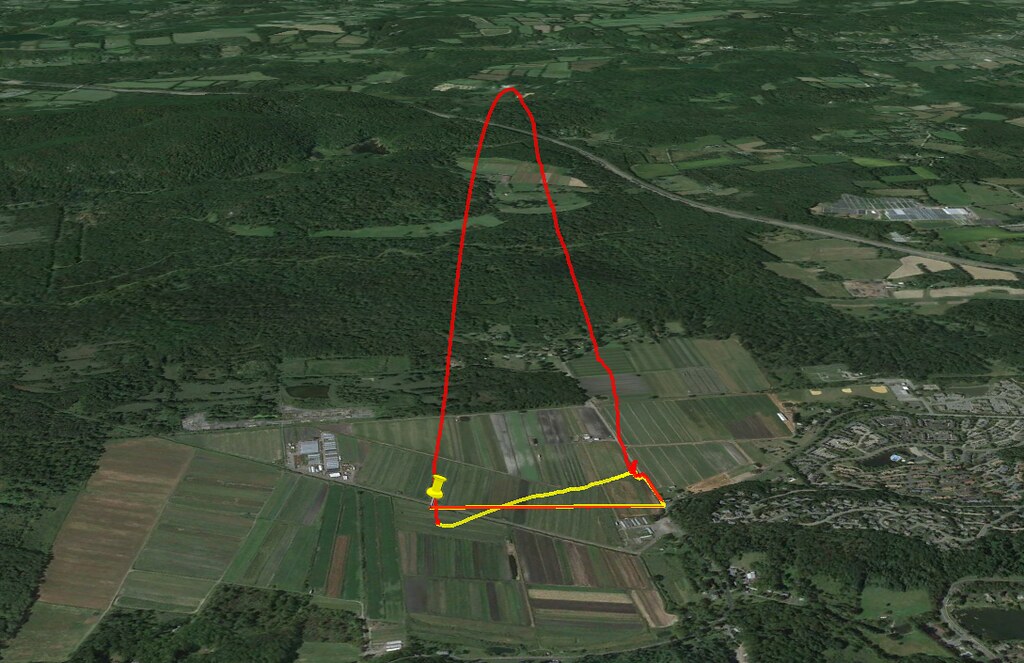
For a while now I have been looking into options for a fiberglass rocket that is both very durable but still light/efficient enough to get close to our 5,000' waiver on level 1 motors. With crops and large ditches, our field is not exactly ideal, so tracking and dual-deploy is a must.

For a while, I considered scratch-building my own 54mm rocket with a 38mm hole, or converting a formula 54 to dual deploy and 38mm MMT. Both these options, however, ended up being pretty costly after I factored in the parts necessary to make the conversions, along with recovery components which are not included in the kit. FWFG is not cheap!

I then, at first just for fun, looked at the wildman blackhawk 38. It is a bit of an extreme performer, but with a slimline retainer on the back and the added weight of dual deploy and tracking, openrocket predicts it will stay under 5,000' on small-to mid I's, and comfortably reach 1-2,000 on midsize H motors. Being fiberglass, durability of course is superb. What really pushed me into buying it was the completeness of the kit - kevlar shock cord, parachute, av-bay lids, beveled fins, fin guides, proline epoxy for gluing everything, and filament wound everything. Assembling these parts individually not only would have taken much more work, but cost much more as well. It really is a great kit.


Everything laid out. The beveled fins are a work of art, super strong too at an 1/8''.

Photo Jun 09, 7 07 16 PM.jpg

With the fin guides, attaching the fins all at once is as easy as pie, and they are guaranteed to be perfectly straight. After roughing up the body tube and fins with 80 grit sandpaper, I cleaned them off with acetone and glued the fins on with the included proline. I wrapped a rubber band around the fins to hold them all securely down at once, and it worked well.

Next up was fillets. I absolutely love the Proline for doing fillets. The thick, gloopy epoxy pulls out and settles into a nice fillet surprisingly easily, yet holds its position and never drips. Additionally, it dries very quickly, solidifying enough to move on to the next set of fillets in under two hours, meaning it is easy to get all three sets done in a single day.

All taped up, I used a 3/4'' tube to form the fillet radius.

Photo Jun 10, 8 39 50 PM.jpg

I pull the tape off immediately after shaping the fillet, as the small edge left by the tape then settles down on its own and you're left with a very smooth edge.

Photo Jun 11, 3 35 12 PM.jpg

I will be deviating from the build instructions in two ways, First, I am going to try doing a tip-to-tip layup with 3k twill carbon fiber and aeropoxy laminating resin. The extra strength is completely unnecessary, but it is a skill I would like to learn. Second, I am going to be trying a unique av-bay design to hopefully allow me to accommodate an AIM XTRA for GPS tracking and dual deployment duties, along with either an AIM USB or RRC2+ for backup. More on that later.
 
The first round of tip-to-tip went relatively well, without many major mishaps. I did get a few good lumps, but thankfully they were just glue and not the cloth so a bit of sanding removed most of them. I used release cloth from soller composites, and it worked well, leaving a nice texture behind that shouldn't be too hard to get a nice shine from after a bit of sanding. I think I may have actually used too much epoxy, leading to the ridges of epoxy that were left behind. Next time I will use a bit less and see how it goes.


After a bit of sanding, it looks pretty good for my first attempt. Two more tries to improve my technique!

Photo Jun 16, 8 46 26 PM.jpg
 
Just to let you know, I have flown a Blackhack 38 twice. Both times have ended in a broken rocket, but my last attempt I pulled 3,700 feet on an H120. I feel like you can break your waiver with this rocket with a mid to high H motor.

I have photos and video on my website below, under the "Blackhawk 38" and "Type II" flight vehicles.
 
Smokin rocket Coleman,,,
As usual,, smokin build as well,,,,
I plan on buying the same rocket......
Very cool.......

Teddy
 
Just to let you know, I have flown a Blackhack 38 twice. Both times have ended in a broken rocket, but my last attempt I pulled 3,700 feet on an H120. I feel like you can break your waiver with this rocket with a mid to high H motor.

I have photos and video on my website below, under the "Blackhawk 38" and "Type II" flight vehicles.

Wow yours must have been pretty light and very smooth!
Mine will have a slimline motor retainer stuck on the end, which adds quite a bit of drag. Also, with the added tip-to-tip and what will probably be a heavy av-bay, mine should end up on the heavy side, between 2 and 2.5 lbs. Openrocket seems predicts that it will hit 3,500-4,500 on 38mm 3 grain CTI I motors with these inputs. We'll see, more impulse just means more money so its alright if its a bit more efficient than I expected!

I am at work but will check my sims when I get home to give you an idea of my final weight.

I really love the Blackhawk and really look forward to seeing yours be built and flying. I hope you have better luck then I have had :)
 
Smokin rocket Coleman,,,
As usual,, smokin build as well,,,,
I plan on buying the same rocket......
Very cool.......

Teddy

Thank you teddy! Don't you have that really nice scratch built 38mm minimum diameter already though?
 
Nice thread; I didn't know that the blackhawks came with a Al tip NC…
 
I just finished mine and it was a fun build. I will be watching.
 
Those t2t bumps may have been caused by wrinkles in your peel ply. Did you iron it first?

Good looking build so far.

Alex
 
Thank you teddy! Don't you have that really nice scratch built 38mm minimum diameter already though?

Yes Coleman,,,
I guess you don't know,,,
Do you remember giving me 3 --- 38mm blue CTI propellant grains ???
I've used those in every motor I've burned since,,, to help light them,,,
I put a chunk of the blue propellant in the top grain when assembling the motors...
I cut the chunk in the shape of a wedge,, so the ignitor gets pushed up into the small space between the core wall and the wedge of blue,,,,
works great,,, all 38 mm and 54 mm motors,,,, well on that beautiful 38 mm minimum D Hyper Velocity I went to fly it on a 29 mm motor.....
I put a chunk in that the same way when I built it,,, I had my very first C.A.T.O....... The airframe was damaged a bit down low,, from the bottom to a few inches up...
My intentions with that rocket were for some great fights with great impulse in it... I didn't want to risk that with a compromised airframe ,,, so i totaled the rocket.......
Since I like the idea of a 38 mm minimum D because you cane get to 3 K on an H or about,,, I thought I would give the Blackhawk 38 a try.........
I also think it's a great bang for the buck,,, and a great design.......

Teddy

I totally remember giving you those grains after I myself had a CATO, glad you've put them to good use! That must have been some explosion to break the FWFG, too bad that was a sweet rocket! The Blackhawk 38 kit really is a great value, especially since nearly everything is included. Maybe we'll be able to drag race some time if you end up getting one, along with nate's blackhawk 24! ;)

Today I started the 2nd tip2tip layup. I used a bit less epoxy this time, and it seems to have helped. We will see how it comes out!

Everything set out for the layup.

Photo Jun 17, 10 43 47 AM.jpg

Saturated with peel-ply laid on. I will go back tonight to cut the excess cloth off when the aeropoxy reaches its gel stage. Definitely glad I know to do this from other peoples threads here on the forum, trying to cut/sand the excess after it had cured would have been a nightmare! :)

Photo Jun 17, 11 17 37 AM.jpg
 
I totally remember giving you those grains after I myself had a CATO, glad you've put them to good use! That must have been some explosion to break the FWFG, too bad that was a sweet rocket! The Blackhawk 38 kit really is a great value, especially since nearly everything is included. Maybe we'll be able to drag race some time if you end up getting one, along with nate's blackhawk 24! ;)

Today I started the 2nd tip2tip layup. I used a bit less epoxy this time, and it seems to have helped. We will see how it comes out!

Everything set out for the layup.

View attachment 174819

Saturated with peel-ply laid on. I will go back tonight to cut the excess cloth off when the aeropoxy reaches its gel stage. Definitely glad I know to do this from other peoples threads here on the forum, trying to cut/sand the excess after it had cured would have been a nightmare! :)

View attachment 174817


I'm not drag racing either one of you...
You know Jimmy calls me Teddy Tank...
I build em tough and heavy,,
and moma didn't raise a fool...
I am not drag racing either one of you whipper snappers.............. lol

Teddy

Man is that lay up coming out nice Coleman,,,
I can't wait to see that....
 
Was able to work on the beginnings of the av-bay today. In order to house both an AIM XTRA and a second backup dual-deploy altimeter, along with batteries and switches, it will 12'' long. Yup, a whole foot! And, I did not order an extra parts to build it...


Here it is:

Photo Jun 17, 5 49 29 PM.jpg

The idea is that why use a full length coupler if you don't need too? all you need is 2.5'' on one end to act as a 'coupler' to the fincan, and a very short coupler on the forward section to seal that end. By eliminating the full length of the coupler, not only is it much easier to access, but I gain ~2mm in volume as the sled is now inside an airframe, not a coupler. The sled is mechanically attached with little L-brackets and 4-40 screws. The entire sled will be held in place with a few radial 4-40 screws through threaded holes in the fiberglass (I've found FWFG drills and taps very nicely and quite strongly).
 
Last edited:
Well.... this has been a terrible build thread. It seems I enjoy building much more than documenting :facepalm: 
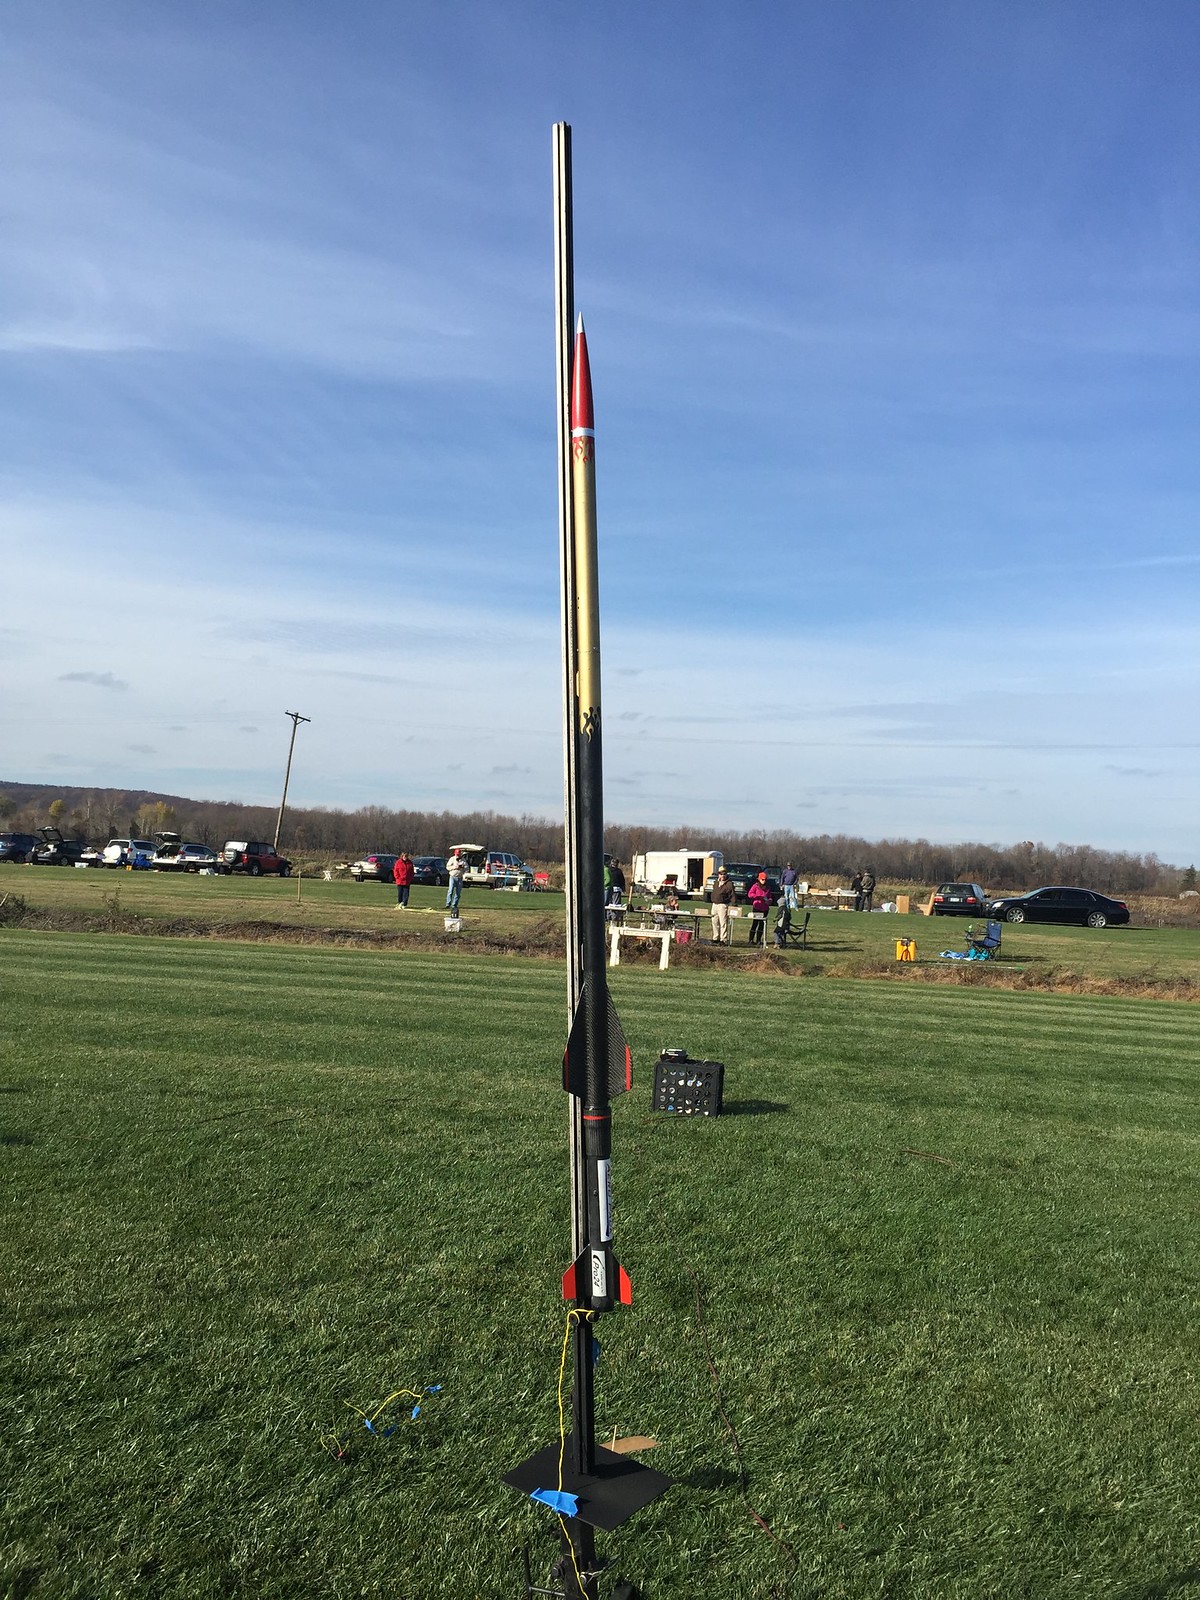
Skipping to the ending, here it is, nearly 100% complete and painted:


Photo Jul 09, 5 00 06 PM.jpg

Photo Jul 09, 2 34 10 PM.jpg

Photo Jul 09, 5 01 02 PM.jpg


Now, a bit of background:

To make the flame transitions, I printed out the a flame outline, and with a x-acto knife used it to cut out the shape from a 24'' wide roll of this clear plastic tape material, similar to scotch tape but a little less sticky (probably due to age, but a good thing here!). Though not perfect, the flames turned out well.

The electronics bay took quite a bit off work to pull off. Here are the electronics I managed to fit in there, an AIM USB on backup dual-deploy duty, and an AIM XTRA GPS flight computer doing primary dual-deploy and tracking/telemetry duty.

Photo Jul 03, 5 20 42 PM.jpg

Unfortunately I have not yet taken any pictures of the completed e-bay, but I will give a brief description. I used a 3.7v 1s 600mah Li-PO for the AIM XTRA, good for ~4.5 hours. For the AIM USB, I opted to use the miniature 12v A23 battery, which is roughly the size of a AAA battery, since I had them on hand and have used them before. For switches I used featherweight screw switches, which I really like, cheap and simple but very effective. My unique e-bay design i posted above was critical; there would have been no way everything would have fit inside a coupler, the extra space gained by only having to fit inside the airframe was a huge help.

With extremely little real estate on the BPS's for dual altimeter hook-ups, I copied the technique used on featherweight e-bays, using 4-40 hardware to attach the igniter wires.

Photo Jun 22, 8 34 24 PM.jpg

I did run into a bit of a scare when testing the continuity of my binding posts, finding that on one side there was always continuity. I realized this was because one of the BP's that came with the kit had been made of carbon fiber, which conducts electricity, and so was shorting out the posts. Somehow i just completely forgot that when I constructed them :sigh: Luckily, of the 3-4 hole saws I could find, one was nearly an exact match to make a replacement, and surprisingly easily I created a new BP. Problem solved! :clap:

Photo Jul 03, 7 38 36 PM.jpg:no:


The XTRA is, simply put, awesome! :D The host of real time data you get - GPS plotted realtime on google earth, accelerometers, gyros, baro, and a bunch of flight state info - is unbelievable, watching the live data is almost as cool as the launch itself! The only downside (for some) is that it requires a HAM license to operate. A few months ago I took about a dozen online practice test and by then knew most of the questions, and took the test a few days later and easily got my technician's license - KD2FKQ. No need for perfection or a deep understanding in this case, if i ever pursue further into real HAM stuff I will go back and learn more, but for this basic usage it is enough.

As a little test of the GPS tracking capability, I set up my laptop just outside my house and put the AIM BASE receiver about a meter off the ground (not ideal but it was just a quick test). I then had my father take the upper section of the rocket, set up the same way as would be a real flight, and carry it out into the fields (I live on a small farm with ~30 acres) and hide it in the tall grass somewhere. After he returned, I looked at the GPS plot on the computer, and it felt like cheating. I could see the paths he walked, even what side of them, and saw that the track terminated about 1,000 feet away at the edge of a path next to a small bush. At that distance, I still had good connection to the AIM XTRA, despite it being located up a decent hill and behind thick woods. I entered in the current coordinates into my phone, with a cool app that allow me to directly input the GPS coordinates and get a distance and heading:

Photo Jul 05, 8 37 32 PM.jpg

I took my bike, and followed the paths until my phone showed I had arrived at the target position. Sure enough, there was the bush I had seen in the satellite images. I quickly searched around the bush, and in less than a minute found the small black airframe hidden in the tall grass underneath the bush! All told, it took less than 5 minutes to "recover" it - and with a basic RF tracker, at least for me, it probably would have taken near an hour to find. For once accuracy is better than stated; the GPS got me within 5 feet of it, despite a stated accuracy of 10m! I have no doubt that as long as the GPS stays operational, recovery no matter where it lands (even trees, in total the recovery harness is over 40', so it will have to be a very tall tree for me not to reach it) I will be able to easily find it.

Photo Jul 05, 8 40 32 PM.jpg(standing up right where it had been hidden in the grass, where I parked by bike is where the GPS put it)


The maiden flight will be this weekend at The Radical Rocketeers launch in great meadows NJ. The first flight will be on a Loki H100 spitfire to ~2,000'. If all goes well, I am also planning a follow up flight to ~4,500' on a Loki I316 Spitfire, or an aerotech I140W if it is really windy.

 
Wow did that come out smokin Coleman...
The whole rocket came out fantastic
and the GPS seems to be working on the money...
I love the flame paint job and I know how
much work a paint job can be....

I thought the beginning of this was really funny,,,
Hey,,, lets start a build thread,,,
here's all the parts,,,


it's all done.... lol

Coleman you are going to have the most coolest,, bestest,,, smokinest flight there has ever been....

Congrats on a gorgeous rocket Coleman...

Teddy

Thank you teddy! yeah, its a bit like reading the first page of a book, then skipping all the way to the ending to see what happens! :lol:
 
Thank you teddy! yeah, its a bit like reading the first page of a book, then skipping all the way to the ending to see what happens! :lol:

LOL,,,LOL,,,LOL,,,

Man did I get a chuckle off of that one....
From someone in school no less.....
Coleman,, I don't think you're supposed to be skipping to the back of the book..... lol

Teddy
 
Rockethunter,
Could you do me a favor and tell me the weight of the components of your rocket before you built it if you have them? if you don't can you tell me the weight of the sustainer, and the nosecone? Let me know what all is included in the weight, like the motor ratainer, and the so on. I could also use your full up weight minus engine. I would like to figure out how much the Blackhawk parts weigh and compare it to designs I have.
Thanks

disclaimer: my scale is extremely inaccurate so these are rough numbers...

Hmmm... all packed w/ electronics, parachutes etc. mine weighs 2 lbs 6 oz. The nosecone is ~90 grams with the coupler and metal point. If you build it bare stock, i.e. no retainer, light av-bay, no hardpoint, single altimeter, no eye bolts or quick links, etc., I would say the minimum weight achievable would be just over 2 lbs. If I recall correctly, the bare parts weighed in at around ~1.5 lbs. My fincan is ~1lb and upper section ~1.3lb.

Also note that the blackhawk is much larger than need be. The 1/8'' fins are overkill and larger than necessary, the upper section is unnecessary (with a smaller 18'' chute and a short length of kevlar, just use HED like in the larger rockets and stuff it all in the NC). The Blackhawk is a great way to get an easy introduction into high performance, but if you are looking for true altitude and weight savings scratch building something much smaller/more optimized is the way to go. I have been working on a "flying case" designed around a CTI I540, and all told it will be between 8-14oz and a bit over 2 ft tall, simming to over mach 2 and twice the altitude my blackhawk will reach....


*also* not sure if this is normal, but the tubing that my Blackhawk came with was pretty thin walled, a hair under 1mm. Compared to a regular RW filament wound tube that is 1.5mm wall thickness. The ID was a pretty sloppy fit for both the couplers and motor cases, requiring quite a few wraps of blue tape to get even a decent fit; I measured it at a bit over 39mm....
 
Last edited:
Rockethunter,
Interesting that you settled on the I540. I was looking at a Loki J1000 as the biggest 38mm for a bare-midrif rocket weighing in at 1 lb without motor. I sim at Mach 2.3 and 3 miles altitude.

How did you go about picking the I540? Is there a way to determine if a particular motor is a standout in terms of performance?
Thanks
Tom

Nothing complicated - its simply the most powerful Level 1 motor!

The J1000 is a great choice if you are looking for maximum performance. Loki Research may even be coming out with a more powerful 38/1200 baby K/full J in the next few months for that same case!
 
The CTI I540 will get you the highest velocity for an I motor, but the CTI I216 will have a higher apogee in an optimized rocket.

Bob
 
With the spare channels available to me on the XTRA, I decided I wanted to try to convert my Blackhawk 38 into a simple 2-stage rocket. Since this rocket will realistically only ever be flying here in NJ with our 5,000' waiver, there was no need to make the booster very complicated or large, or have the ability to take bigger motors.

I designed the booster around the CTI 38mm 1 grain G185-vmax, boosting to a number of mid-to full H motors for flights to between 3,500 and 4,700'. Since the booster will only reach about 600-700', it is single deploy using the motor charge, and can consequently only be 12'' long. The upper stage motor will be lit by the XTRA.

Untitled.jpg

The tricky part is the interstage coupler. Since the upper stage is minimum diameter, the coupler must be on the outside. Additionally, the upper stage has a slimline retainer, so the coupler must adapt from the slimline to the OD of your standard FW airframe.

The coupler is about 4'' long, and made up of 4 layers of soller composites biaxial carbon sleeve. (the NC makes the sleeves easier to slide onto the tube)

Photo Oct 25, 6 47 36 PM.jpg

After wetting out the sleeves with Aeropoxy, I slid on the Soller composites shrink tube and hit it with a heat gun on low. It should be finished curing in a few hours, hopefully it turns out well! (I did this all last night)

Photo Oct 25, 7 21 21 PM.jpg
 
Wow,,
Very cool Coleman............
So simple for a booster stage.......
No electronics at all......
Very,, very cool.........
Simplicity ( usually ) equals a high likelihood of success....

Teddy
 
Well, I got it done in time and I flew it last weekend at the Radical Rocketeers November launch :D My 2-stage flight is at 2:06.


[video=youtube_share;Bscl1EAQMM8]https://youtu.be/Bscl1EAQMM8?t=2m6s[/video]


It was very successful flight, staging from the G185-vmax to an H87-imax at 500 ft AGL. The lower stage did not drag separate (which surprised me considering if I held the upper stage the lower stage would fall right off), but it was only lightly toasted when it was forced off by the motor lighting, leaving only a bit of residue on the interstage coupler. The booster stages delay was spot on, and the lower stage softly landed less than 200 ft from the pads, right near the launch area.

The first stage propelled it to 190.9 mph, accelerating at 8.9 g's. It then separated as the upper motor lit at around 600 ft. The second stage then accelerated at a peak of 7.5 g's, reaching a maximum speed of 337.5 mph, and ultimately reaching 3,387 ft. It fell drogue-less from apogee until 500 ft when it deployed the 24'' main.

15611309577_60d16ff6df_h.jpg


15611623230_91ab95d6c5_b.jpg
 
That was a complex and difficult flight Coleman....
And it went off flawlessly.....
That,,, was a flight to be proud of for sure......
My greatest congratulations.............

What a video Coleman....
You are the man.....

Teddy
 
Last edited:
That was a beautiful flight Coleman, congrats!
How did you wire from the electronics (which I assume aret in the standard electronics bay?) to the upper stage motor igniter?

Nate
 
That was a beautiful flight Coleman, congrats!
How did you wire from the electronics (which I assume aret in the standard electronics bay?) to the upper stage motor igniter?

Nate

Thanks! Yes, the altimeter in the AV bay was used to light the upper stage motor. I used an aeropack 29-38mm adapter, and using a dremel cut small notches in the sides to feed the igniter wire through. The igniter leads were screwed into terminals attached to a longer section of thicker wire that ran through the body of the rocket up to the AV bay. This wire was cut in the middle, twisted together and duct taped to provide a break point so that the rocket could separate fully at apogee (saw this on the forum somewhere).
 
Back
Top