Painting help!

The Rocketry Forum

Help Support The Rocketry Forum:

This site may earn a commission from merchant affiliate links, including eBay, Amazon, and others.

Odo

Well-Known Member
Joined
Jul 24, 2013
Messages
623
Reaction score
2
So I've decided to purchase myself an SLS from Dr Zooch (https://www.unclemikesrocketshack.com/Dr_Zooch/SLS/SLS.html)
And the only problem I'm seeing is painting. I've literally never painted anything in my life except for watercolors when I was a little kid :facepalm:
So I didnt know if anyone could give me some wisdom on the subject, I dont have any fancy airbrushes or anything Id prefer to just paint this by hand and I have no idea where to start with the gloss and primer and all that fancy smancy stuff Ive heard talked about. I probably have bitten off more then I can chew but that wont stop me from trying!
My blessing to anyone who replies.
 
Odo,

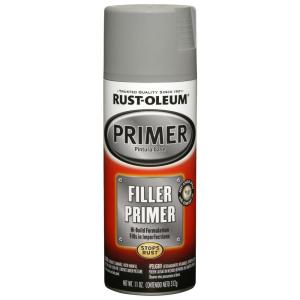
For my best results, I am using Rustoleum Filler Primer as a basecoat (I'd suggest you pick a brand, and stay with it, as X may go over Y, but Y might not go over X). Filler Primer is extra thick, and fills those spirals that are formed when the tubes are wound. Get yourself some 220, 320, 400, and 600 grit *WET/DRY* sandpaper. When normal sandpaper gets clogged, it's finished. With wet/dry, you can "wash" out the clog (I like to use a nail brush, or an old toothbrush), and reuse it. I cut my paper into 8 pieces, and I like to do most of the 5 sheet pack. When one piece gets clogged, grab a fresh one, when that gets clogged, grab a fresh one... no more fresh sheets? Rinse and repeat. I save one sheet of the 320 for my sanding block.

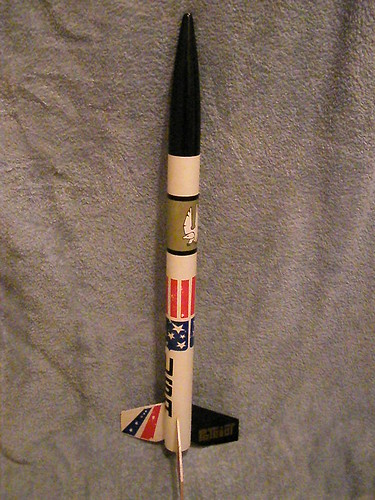
I sand my (Estes blowmolded) plastic nosecones lightly with 220 to get rid of the seam, then do the entire exposed nosecone until I can't see any gloss. I next go over it with 320. I usually start at the seam where the shockcord/parachute attachment point is, and work clockwise around the cone. Next, it's 400 grit, and last comes the 600 grit. I like to polish the nosecone off with some toothpaste (if nothing else, I get that nice minty flavored nosecone).

For my best results, I paper my fins. I take the shaped balsa fins, and draw an outline of it onto some printer paper. I give the printer paper a heavy coat of Avery permanent glue stick glue (available at office supply stores). Then put the fin down, and cut it out. A thin coat of glue may not stick well, and you get bubbles under the paper (get that, and you need to remove it and try again (it won't be pretty, but patience and sanding sealer should get things 'acceptable'). I push out the wrinkles and then do the opposite side immediately (prevents them from warping). Seal the edges with thin CA glue (except for the root).

After gluing on the fins, filleting them (go with epoxy and save yourself some grief), and allowing them to dry/cure, it's time for primer. Go and spray the primer on with a heavy coat. You need the heavy coat to fill the spirals. The primer will also expose any areas that you need to fix before you put on your color coat. Allow the paint to dry, and sand until it's smooth (seems like 320 grit's a good one for this). Recoat the rocket as necessary to get the spirals filled, and sand until you're happy with the look. Apply a base color primer (I recommend flat white). Don't forget to use a damp lint free cloth to get the dust off between coats.

If your body tube is the same color as the nose cone (other than a really dark color like black or midnight blue), I recommend that you prime the nosecone with the filler primer too, as this will help you find/fill any imperfections you may have missed (eg. tiny holes). After sanding the nosecone down too, a base coat of primer goes on.

You must read your paint instructions... if it says top coat can be applied within 20 minutes, or after 24 hours, they really do mean it. After my SNAFU with one of my builds, I like to wait at least 48 hours after the white primer before I paint again. If it's cold out, and the paint is cold too it can come out 'sandy/gritty'. You can warm it by filling a large cup (say a 7-11 Double gulp) with hot water, and float the paint (nozzle end up) for a few minutes (dry it carefully). Windy? Wait for a calm day, or go into the garage when the car isn't there, and paint while the door is open.

A 7/8" dowel does a nice job as a paint wand (D/E engines), for 18mm engined rockets, I glue an old 18mm engine to a 1/2" dowel . I don't like rolled newspaper, as it can "break" and allow the model to droop into something and mess up a perfectly good paint job.

Paint in long strokes, and lightly. Your first passes should be barely visible, don't try to get the final color in one pass, you'll get drips/runs. Using the paint wand slowly spin the rocket to keep things even. Then find a place where you can set the wand down and not have the rocket get bumped until it's dry.

Flat colors look smooth, but have a texture to them that will prevent your decals from properly adhering to them, so use gloss colors, or a glossy coat (future/pledge floor 'wax') to get the best from your decals. Then seal them after they dry. I've heard that Krylon now has a "hot" formula which isn't the best to go over decals. I'm avoiding it, and I'd recommend that you do as well.

I know that this seems like a lot of steps, and actually there are more needed to get that $100 paint job, but this should get you started. Search painting techniques and you'll see some really stunning work out there

All the Best!
Jim
.
 
Last edited:
1- Use the same brand of primer and paint different brands don't mix well, and remember garbage in garbage out.
2- At least two coats of primer sand between each, and clean thoroughly.
3- Let it dry in between coats.
4- Practice makes all the difference, don't expect your first paint job to look awesome.
5- Light multiple coats of paint are better than one heavy.
6- Let it dry for at least three days before you mask off for another color or apply decals.
7- Take your time its not a race.
8- Don't paint in direct sun or heat, also it should be between 90 deg & 55 deg temp to paint.
9- Bugs WILL land in it, don't try to get them out till the paint is dry.
10- In fact do not attempt to fix any paint mishaps until pant is dry, you will make it worse if you do.
11- Practice on a flat upright piece of wood.
12- Invest in good masking tape even cheap blue painters tape will peel your paint off.
13- Your rocket will look like crap after a few launches anyway so don't stress the paint to much.
14- And remember paint is a foul temptress of the devil it respects no one!


TA
 
So I start by sandpapering everything Im going to paint, then go over it with primer, then let the primer dry, and paint it with whatever color I want (should this be spray paint or by brush?) Also after the paint is dry dont I have to go over it with something so its glossy...?
Also any suggestions as to paint brands etc. would be great help Im sort of out of my comfort zone here

Primer first, then sand (except for shaping fins, shape first, then seal (or paper), next primer and sand)

Typically the best is achieved with an airbrush or spraypaint, unless you spend a fortune on brushes, and have the patience of a saint, (except for small details) brushes will only give you mediocre results.

If your paint is a gloss paint, no, you don't need to go over it until AFTER you put on your decals (flat/matt/semigloss, yes you will need to give it a gloss coat before decals). Once the decals are on, then you want to seal them (that's where the Future/Pledge floor wax comes in).

I'm pretty happy with Rustoleum Painter's touch (Home Depot). But be real careful with the white primer... It's not like the grey filler primer... when they say wait, they mean it.

Oh, another thing about gloss colors... they *MAY* "be dry to the touch" in X minutes... l recommend waiting at least 24 hours before handling them, longer if possible. Some paints (for plastic) reach maximum hardness in a week. You handle the stuff too soon, and you get fingerprints.

A word about paint wands... Straws SUCK (literally and figuratively)... they may seem to be fine for supporting a small nosecone on, but they aren't. Dowels are the way to go.

Don't be afraid to practice on scraps before going out and tackling a build. take a toilet paper tube, glue some "fins" to it, and get a feel for what you are doing first.

This is why I recommended that you start with something like a Cherokee D. It's a 3FNC (three fins and a nosecone). Red nosecone (I still have problems matching the decals to the nosecone), solid gloss white body. Fortunately for you... we now have the internet. You can glean information that has taken us years to build up. Your rockets are going to kick our first attempts a**es.
 
Last edited:
DuPont Imron at $200 a gallon and DuPont CorLar primer, it's slightly cheaper at $175 a gallon....I kidd :D I have been gravitating to Rustoleum 2x like other have said here. I'm impressed as to the coverage. To start all you need is the paint. The colors are glossy enough by themselves to start.

One of the tricks to painting is never stop your spraying motion on the rocket . Start to spray just before the rocket and carry through past, don't just hose the rocket down. If you stop you will have runs and sags, if those happen you can wipe them off and try again. Spray outside, the vapors and paint suspended in the air are completly not good for you. Stand so any breeze comes from your back to keep you out of the cloud.

There are many threads on filling, sanding , painting, and all the rest. Look around, there's gobs of information on how to do this :)
 
Last edited:
Odo, here's is one of my early rockets... It is an Estes Patriot. Later, the U.S. Military created a Patriot missile. So, we usually call this the Citation Patriot, as it was part of a line of rockets that Estes called their "Citation Series".


I was 13ish when I built it (that's 31 years ago)

I've modified it, so don't be surprised by the additional payload section you see in other photos.

I didn't fillet it well. Fins broke off from its single launch
I didn't primer it... Spirals are visible
I didn't seal (or paper the edges) the fins... they sucked paint like a sponge before I got the fins to look as good as they do now
I glued the black fin on AFTER painting the white (I didn't understand how to mask fins well)... any guess which fin broke off?
I didn't use gloss paint (I didn't understand there was a difference)... The Decals silvered
I didn't seal the rocket after decals... They are flaking off.
I didn't have the internet to pull from... You do.

All the best!
Jim
 
Would this primer work for both colors above?
https://www.stuff4painting.com/whit...2-ounces-ptuc249-058.html?CAWELAID=1519202357

Or would I need a gray version of that primer for the orange :/

Filler primer is grey, after you get all the seams filled (and defects fixed), then go for a white primer, then your orange.

https://www.homedepot.com/p/Rust-Ol...ray-spray-paint-249279/202097276#.UfK5B_lQGSo

6fb00e7a-558b-46ed-a57f-06758d6b74d0_300.jpg
 
At home depot, they have plastic signs (like keep off the grass/no smoking/for sale) that are white on the back side for about a buck.

Take your various undercoat colors (filler primer, grey primer, white primer, rust brown primer, black primer, silver) and spray them in strips down the length of the sign. Leave a strip of "raw" unpainted plastic. Mask off a strip across all the primers, and paint your color coat over them. Label for brand and color (e.g. Rustoleum Painters Touch Pumpkin Orange). This will give you an idea of what your rocket's true color will be based on your primer color choice. Your undercoat can affect the final color in surprising ways.

Use one sign for each color (yellows, oranges, reds, etc) so you can best match your decals.
 
Okay sooo, use gray primer let dry, sand it down so its smooth, repeat if needed, then once you are pleased with the gray primer use white primer, once that has dried use your orange paint, once that has dried go over it again with white primer?

Filler primer, sand, repeat as needed
base color* primer, allow to dry, you might need to lightly sand.
Color Coat (if you want to get fancy, polish)
Decals
Clear (again, if you want to get fancy, polish)
Launch
Pray!

*read post below
 
Last edited:
Also as for that specific brand I couldnt find it anywhere, where I could actually order it, its said to be a in store exclusive, so I was wondering if this would work just as well, or if it would conflict because of the mis matching brands:
https://www.stuff4painting.com/grey-sandable-primer-aerosol-12-ounces-1318.html?CAWELAID=600773700

Can you get to a Home Depot? their prices are better.

BTW Not everything should have white primer under its color coat...

Remember how the Space Shuttle's fuel tank looked? That was the color of the naked foam used to cover it... It was only painted white for the very first launch. NASA dropped the final paint due to the additional weight (it took a lot of primer to make that rust color disappear and get the white color to "pop")

There can be subtle differences obtained by how your primer and final color look. If I'm going for a white, yellow, or other light/bright color, then a white primer is needed. But colors like silver, dark blue, or dark green might not need the white primer, and I can go with my color coat directly over the (sanded) filler coat.

Your orange probably will need white, but try that sign trick I posted above, you may find it looks best over rust.
 
Last edited:
Can you get to a Home Depot? their prices are better.
I think theres a Home Depot near me. It might be Lowes. Not sure. I didnt think 5 dollars per can was that bad?
Also when you say Clear coat, is that primer or actual clear paint
 
If you can pick up the same thing for $3.95 or even $4.98, and not have to wait for shipping, or if the color doesn't match get it exchanged... Lowes carries Valspar, and I don't have any experience with that product.

Clear paint... paint without pigment.

However, it can mess up decals, thus a lot of people like the Future/Pledge floor 'wax'

https://modelismomx.com/modelistas/futurefloorpolish/
 
Last edited:
If you can pick up the same thing for $3.95 or even $4.98, and not have to wait for shipping, or if the color doesn't match get it exchanged... Lowes carries Valspar, and I don't have any experience with that product.

Clear paint... paint without pigment.

However, it can mess up decals, thus a lot of people like the Future/Pledge floor 'wax'

https://modelismomx.com/modelistas/futurefloorpolish/

Ah okay
 
ALL of these tips are really good. I will add:

+1 on the Rustoleum 2X.

I paint in an empty garage and use a lightweight mask that will handle organic vapors. 3M has a mask that uses the 2097 filters. The 2097 is a P100 rated filter that you can also use when sanding. It is not the BEST for organic vapors but is lightweight. I have a couple of other masks that have better OV filter cartridges that I use when I want to really get lost in a paint fog.

Be careful about painting outside - bugs and other airborne debris. I sometimes paint inside the garage with the garage door open when it is not windy and that seems to work.

I would also make a note of what paint you used on what rocket. I have re-painted rockets that were over 2 years old and "krinkled" the finish when shooting primer on top of the old paint.

I also grab a scrap piece of material (like a PVC pipe) and paint it as a test piece using the same paint in the same sequence while I am painting my actual rocket. That way, when I shoot colors over each other (or over primer) I test it on the test piece FIRST to see if I get any weird reactions. If the test piece works okay, I proceed with the rocket. This is good when you plan on using clear coats to see whether or not you like the final effect. Some metallics look worse with a clear coat.

I have been gravitating to Rustoleum 2x like other have said here. I'm impressed as to the coverage.

Spray outside, the vapors and paint suspended in the air are completely not good for you.
 
Make sure you always sand the final coat of primer. I painted a rocket with gloss Rustoleum 2X over the Rustoleum filler primer and the finish had a very fine sand texture to it. I never got this with Plastikote Filler Primer (which is also good but a little harder to find).

Okay sooo, use gray primer let dry, sand it down so its smooth, repeat if needed, then once you are pleased with the gray primer use white primer, once that has dried use your orange paint, once that has dried go over it again with white primer?
 
Oh I almost forgot!

15- do not use newspaper to mask off you rockets it will leave the news print behind in nice dirty black smudges.


TA
 
Oh, another thing about gloss colors... they *MAY* "be dry to the touch" in X minutes... l recommend waiting at least 24 hours before handling them, longer if possible. Some paints (for plastic) reach maximum hardness in a week. You handle the stuff too soon, and you get fingerprints.

Metallic or chrome type paints are the worst, I have a chrome gloss that needs a week before handling. Every time I touch it before a week is up it leaves finger prints in the paint. You can touch it it feels dry but if you hold it for any amount of time its ruined.


Woot 11 D hundredth post!

TA
 
Rustolium 2x is not for the amateur. It comes out like a fire hose and unless you have had some time behind the can I wouldn't recommend it.

Valspar, Krylon all have there moments and none of them play well together. I get good results most of the time from the Ace hardware brand, however is absolutely incompatible with other paint brands. Most of the paint out there is good stuff it just takes some time getting used to it. Just don't buy your paint from the dollar store and you will be OK.


TA

g17000.jpg
 
I'll add another :2: to the conversation, by the time we're done it will be worth 20 cents ;) WalMart has the Rustoleum 2x paints under $4. I had been using the WalMart store brand at .98 a can but they have cheaped out, there are less solids in the mix than before. I tried KMart brand, better but no cigar. I'm going with the Rustoleum first then Krylon for colors(like purple) that Rustoleum doesn't have.

Saftey: not mentioned here, yet. If nothing else, meaning a dust mask or whatever, at least wear an old T-shirt pulled up to cover your nose and mouth. Without anything if you smell the paint you have inhailed it. Get enough and the inside your nose will start to feel...sticky. Wear a hat to keep it out of your hair and off your face.

I worked as an industrial steel painter, you would not believe some of the garb I had to wear. Tyvek overalls, head sock and resperator with massive double filters and prefilters. The most distastful part was Vasolene on the exposed parts of the face and eyes so the paint didn't stick :p
 
After the paint is "dry" I put the rocket in the garage and use a fan to keep a nice flow of air over the surface. This helps the paint cure faster (in my experience).

Metallic or chrome type paints are the worst, I have a chrome gloss that needs a week before handling. Every time I touch it before a week is up it leaves finger prints in the paint. You can touch it it feels dry but if you hold it for any amount of time its ruined.
 
I forgot to add...

After cutting your sandpaper into smaller pieces, make sure that you mark any that don't clearly show the grit with the grit. I hate it when I'm wondering if this is 320, or 400, when a second with a Sharpie would have eliminated all doubt.
 
The OLD Krylon was good before they changed the formula. The new and less improved formula comes in a can with a rounded dome cap. Something you will also notice is that the old formula said "Recoat any time" while the new formula says "Recoat within one hour or after 24 (or 48, I forget) hours." The Rustoleum metallics say "Recoat any time" and I like the way they perform versus the other "Recoat within one hour or after 24 hours" variety. Anyone else notice this too?
 
So I've decided to purchase myself an SLS from Dr Zooch (https://www.unclemikesrocketshack.com/Dr_Zooch/SLS/SLS.html)
And the only problem I'm seeing is painting. I've literally never painted anything in my life except for watercolors when I was a little kid :facepalm:
So I didnt know if anyone could give me some wisdom on the subject, I dont have any fancy airbrushes or anything Id prefer to just paint this by hand and I have no idea where to start with the gloss and primer and all that fancy smancy stuff Ive heard talked about. I probably have bitten off more then I can chew but that wont stop me from trying!
My blessing to anyone who replies.

Odo--let us back up a bit---as in slow down!!! Fact-your not gonna get the perfect finish the first time! Smart move--do not even go for it--not gonna happen! Your on a learning curve and your at the bottom of the curve-but- all is not lost!! Slow the process down a bit. If it were me--been there -done that--figure out the paint part first. Get a piece of foam board and spray some paint on it. Do it a few times and figure out what works for you and what does not. Build a rocket and paint it and be done with it !! Your gonna look back at it and say--That looks like %^$# !! What can I do to make it better? Then comes the fun part,time to figure out the rest. There is no silver bullet to a nice paint job, just trial and error. ALL the tips you have recieved are great but can be a bit overwhelming for the novice. Back up and take it one step at a time. You need to fail---hmmmm- bad choice of words---not be happy with your results, you need to learn the tools of the trade. No one here is an expert on everything everytime --but--- they do have a world of experience to draw from. Build, prime , sand, paint--it's all just stuff. you'll figure out how to put it all together, just not overnight! Above all , just remember, It's not a competition here and no one on this forum will judge your work! Heck, we're harder on ourselfs than each other. One step at a time bud and you'll be just fine. Looking forward to your builds in the future--your already an artist now it's time to fly!!!---H
 
A few random things i'll add -

You're gonna mess up a lot of rockets before you nail one perfectly. Don't let it get you down. Read enough here and you'll see even the best trashing paint jobs and crashing rockets.

that said.....

watch humidity.... It's the #1 thing that's killed my paintjobs. And don't rush. it took me 12 coats of primer and sanding and primer and sanding before I was ready to lay down 4 coats of color on my Optima. And then on it's second flight I smashed the tube into asphalt and dug through every layer and hit tube. Life of a rocketeer :)

Get a ton of sandpaper and sanding sponges.

watch humidity? FANTASTIC! Cause its humid every single day where I live :D like insane amounts of humidity.
Wish I didnt live in Tenessee sometimes.
 
Back
Top