L1 Scratch Build - First Draft

The Rocketry Forum

Help Support The Rocketry Forum:

This site may earn a commission from merchant affiliate links, including eBay, Amazon, and others.

Off Grid Gecko

Well-Known Member
Joined
Mar 23, 2020
Messages
443
Reaction score
212
Location
Southern Missouri
Okay. I think I have most of the pieces and a few building skills developed. Turns out you lose a lot of build knowledge over the years. Had a heck of a time getting the shock cord mounted inside the tube of my little LPR build, so, being wiser now, I'll eliminate that problem before I come to it next time.

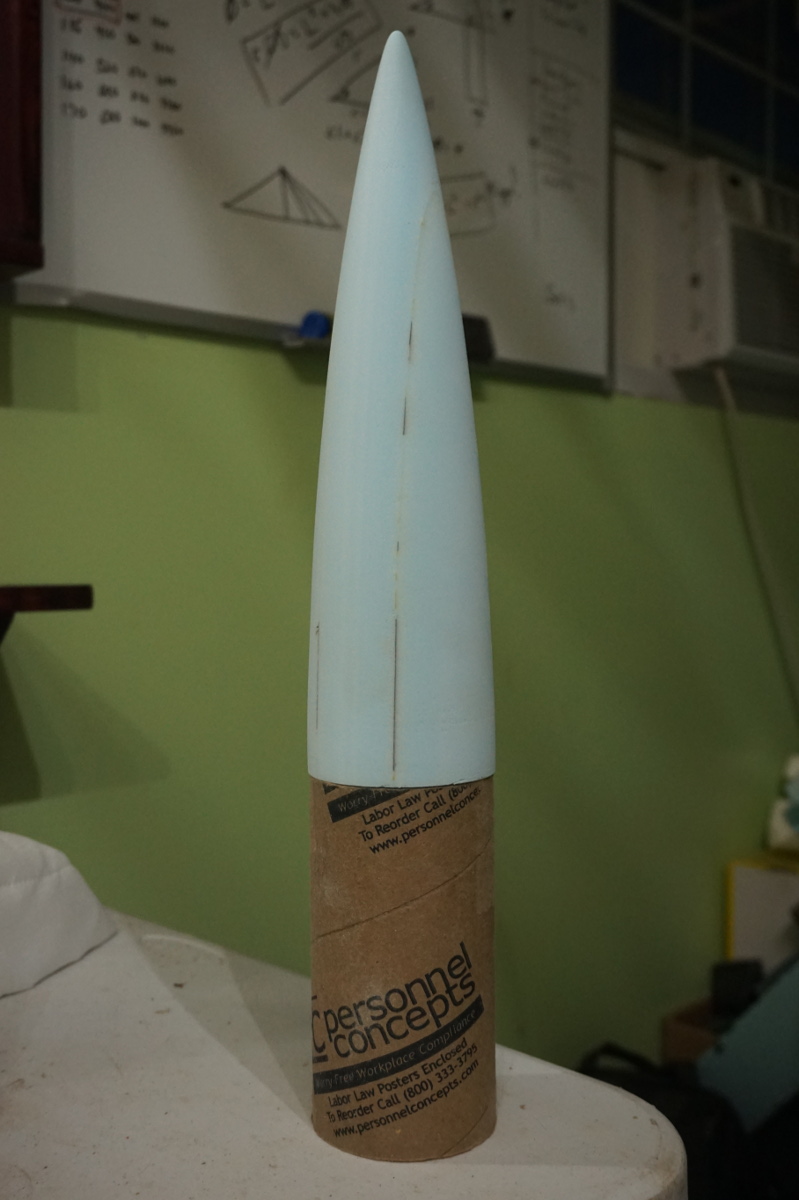
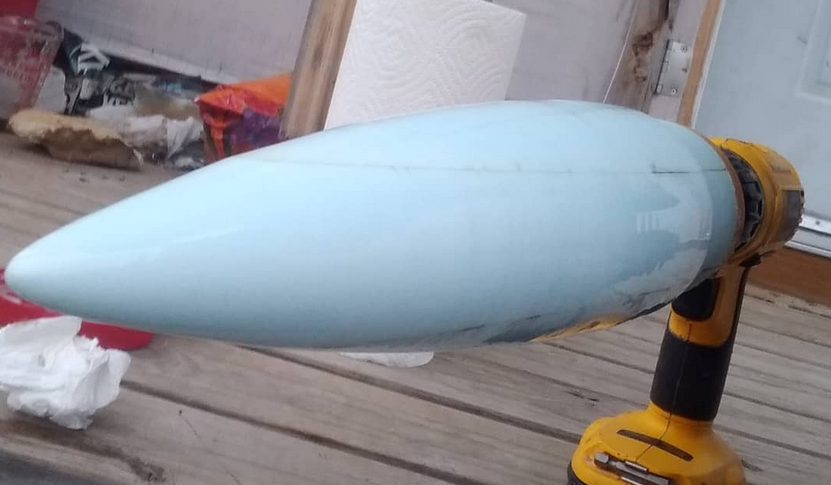
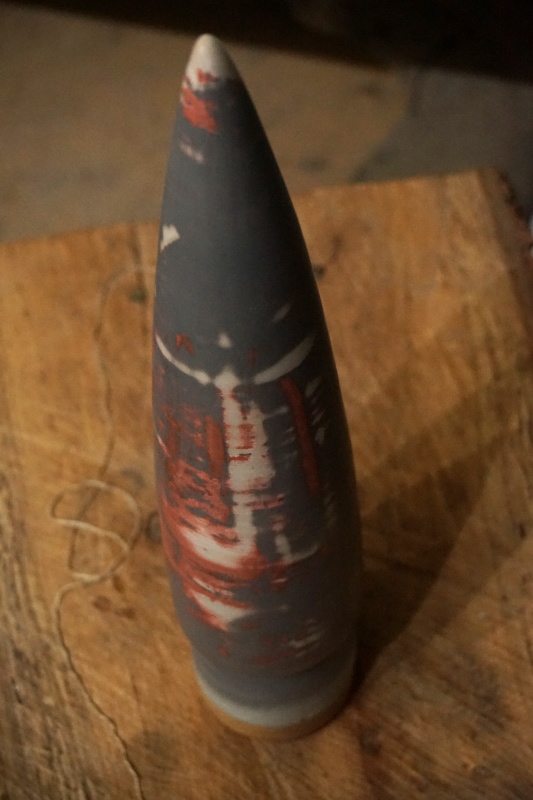
Moving on. I have the nose cone crafted from foam. It's a 3x13" ogive with a tip radius of around 1/8". My thinking is that a coat of 30 minute epoxy will be enough to fix the foam and give me a paintable surface. I'll be using Zap Z-poxy PT-39 for the coating. I don't have microballoons and I don't really want to fiberglass the cone. I was thinking about adding grog (cured ceramic powder) to the mix to make the surface more sandable. There is some precedent in the science journals I read, but I haven't seen this particular formulation used in hobby stuff by anyone. I've been told I will have issues sanding epoxy, so if anyone has input that would be great. I might study a few fiberglass cone layups for technique, but if I add cloth it will likely be cotton rather than glass, as I have plenty of that on hand.

My other thoughts lay on the motor assembly. I would ideally like to do a detachable fin can, as I can't stuff my meat hooks down a 3" tube. Wondering if there's a good way to go about this, or if I'd be creating more problems than I need, vs simply mounting the lower shock cord assembly and then permanently attaching the can via coupler to the main body tube.

While digging about, I found a 29mm motor tube that I was previously planning to use for a minimum diameter F-engine rocket, but that project has been scrapped. Since I have it, I'll go 29 on the motor assembly. I have .75" solid oak rounds cut for centering rings, and I'll be drilling the centers out of them to mate with the tube. I'd like to have a screw-in motor retainer. I remember making one before out of a gatorade bottle, but I'll likely purchase one for this build.

I plan on load testing the motor mount before flying (load testing everything actually) by suspending weights from a thrust ring. Since the max motor for this rocket should be in the I class, I'm trying to figure up the maximum thrust potential of the class. I'm coming up with a test weight of 110 lbs. That would be equivalent to 500N, which should be well over the max thrust this rocket will ever see, unless I've done my math wrong. Working out the numbers really makes you realize what a kick in the pants HPR motors deliver. Most likely, my L1 flight will be designed for 200N (likely somewhere between H90 and H180), so I might test at 60 pounds and then retest before launching larger motors in the rocket, but we'll see. That's a long way off.

The body will be constructed from mailing tubes. I have two sizes. Both are 3" ID, but one is thicker, so I'm thinking about using a piece of the thicker section for the fin can and motor mount, and running the thinner stuff for the main body to the nose cone. Both are quite thick and heavy so I don't forsee any airframe issues. They're quite stiff.

Lastly, this isn't going to be an overnight build. I started on the foam cone a week or so ago, and I plan one thinking through the build a little at a time, so perhaps months before it's ready for flight. By doing this, I'm trying to teach myself a bit more patience with this kind of thing. I have another LPR and an MPR to construct in the meantime that will fill in my desire to "fly something" until I get to the final stages of completion and testing. I might use regular 3-ply construction plywood (1/4") for the fins, as that is easiest to find for me and I'd rather not ship a sheet of plywood, but I'll see what the local lumber companies have available.

Thoughts? Comments? Suggestions? I know this isn't a ton of information to go on, but I don't have the final design frame complete, just a rough-out idea of the shape. 3" od, 60-80 inches OAL, and trapezoidal fins with a long lead-in and short termination. I'm also trying my best to keep the build simple. I'll be adding a payload section to tame down the motor with ballast for my L1 and possibly for mounting some experiments and camera hardware later on. It might be attached permanently to the nose cone.
 
Did a lot of thinking and spec-ing out today, and tube cutting. I have a plan moving forward. OAL for the rocket is 64". I have the tubes cut:
14" for the motor/fin assembly
26" main body
11" payload/electronics and nose-cone mount
The nc is 13" long on the exposed section.
Looked into motors again, and decided that 38mm is a proper size for this bird, as the power range starts right around the minimum thrust level. Should it survive the L1 attempt, it's mission will be to test electronics for telemetry(maybe), altimetry, electronic deployment, flight recording, and possibly some sensor inputs from a raspberry pi. I basically consider this my learning rocket for bigger projects, and I'm hoping she sees a pretty long service life, suffering little upgrades here and there as we move forward together. 38mm will let me step up slowly and test new waters at every flight progressively, barring a cato, water landing, or some other devastating event.

The final weigh-in looks to be over 1kg with motor, but we'll see once glue is involved and the payload bay is constructed. I'm hoping to keep her under the 1500g limit so I can fly her on G motors without a waiver.

I put a layer of epoxy on the nose today, so I'm going to let that rest for a few days to fully cure and then see what happens when I apply a bit of sandpaper. Getting some ideas in my head for a cargo bay setup, but may leave most of that for a later time. The clencher there is a 1/4" threaded rod, a wingnut, and some loctite.
 
Seems like a ton of work for a L1 cert. You can buy a complete kit from Binder Design for less than $50 and build it in a day.
 
Seems like a ton of work for a L1 cert. You can buy a complete kit from Binder Design for less than $50 and build it in a day.
There's always that option. There's something special about doing it all myself though. My last big rocket even had a hand-rolled tube from craft paper, now THAT was a lot of work.
These days I have more time than money. I really want to learn the in's and out's first. I'll likely buy a kit for my L2.
OK. Good for you. Am interested and watching.
 
Throwing some pictures up, these are my profile template and final sanding of the foam billet for the nose cone.
zHQwgzA.jpg

w5s6vLX.jpg

That little bit of tube section was left over from some cuts and made a nice stand to hold the thing. I glued the three pieces together and then epoxied a wooden block to the bottom and attached a ..T-nut, I think, so that I could thread a 1/4" rod through. Chucked it in my cordless drill and went to work with a rasp and some sandpaper.
After the first thin coat of epoxy I noticed that it was about 1mm wider on one axis vs the other, so today I hand sanded it as close to round as I could get it. The fitment is much tighter now. Then I applied a thick coat of epoxy. The result was stunning:
44KDhNz.png

At least to me. This is a canvas I can work with. I'll have to take off the shine with sandpaper as the finish isn't even everywhere, and there are a few spots where it's a little thin and will need to be filled. Surprisingly, I didn't make much of a mess doing this. I smoothed on a thick layer with an old credit card and then turned it every few minutes until it hardened up. Weight at the moment is 107 grams, which is inside of my envelope. I'm not sure of the best way to fill the low spots, but I'm going to try spot putty as I'm not sure another epoxy layer is necessary.
I didn't work on the First Draft today as I had other stuff to do. Chopped some firewood and did some other chores, and I spent a little time working on my next LPR project. The LPR is very close to being a miniature mock-up of this rocket, so I'm putting some extra work into it. I cut the fins and sanded a standard profile into them: round on the front, tapered on the back. I plan to do the same with the big rocket.
I'm looking into parts I need to get my "kit" complete. Plywood, motor retaining ring, 38mm motor tube, chute, shock cord (though I may use 550 cord). I might also toss a CSI motor tube onto the order with the delay drill and a spacer or two, just so I get everything all at once. Hopefully I can get out to do some shopping for the plywood this week. I haven't really left the hill all weekend. If I get that stupid COVID bug I'll be out of work for a while. I think I need to cut one more coupler and then I can start on the centering rings.
Apogee's motor tubes have an OD of 1.635in according to their website. I have several forstner bits. I can drill the holes 1-5/8 and then open them up with sandpaper, but that might be a bit of extra work. Of course, it's only a 1/100th of an inch we're talking about, plus wiggle room. Should be pretty easy I think, assuming the MT dimensions on their website are accurate and pretty close to other vendors should I shop somewhere else. Can't really do too much without the tube, so I might be on hold for a minute while I finish the cone and hopefully the fins. Might also do the cutouts in the fin-can section, just need to triple check all of my measurements.
 
There's always that option. There's something special about doing it all myself though. My last big rocket even had a hand-rolled tube from craft paper, now THAT was a lot of work.

Build it how you want to. Everyone is different, and enjoying the process (ok, keeping in the rules as well) is the only requirement.

Looks good so far!
 
Last edited:
Looking good! There are two main advantages to using microballoons or another filler: They sand smooth a little easier and it's easier to build up low spots. If you don't need either of those, then go with what's been working for you so far. If the spot putty is based on polyester resin, check that it cures on a test piece of epoxy. I have a vague memory from boat repair 25 years ago that you can't put polyester over epoxy, though you can go the other direction.

I hear you on wanting to do a little extra work to make it yours. 3/4" oak is a little heavy in the aft end of the rocket, but you can compensate with a little larger fins.

A 38mm motor mount will be pretty cool with this rocket. You can adapt down to 29mm for park flying and still fly up through J motors. If you can keep the whole shooting match under 1500 grams liftoff weight with a G motor, you can fly it without an FAA waiver as well.

Thanks for your comments. I'll make sure to test it on a scrap piece. Actually, I may have just the thing to try it on. I used epoxy to make the nose on my 1/2 A manilla envelope rocket. After the first flight the tube crinkled a bit, so it's grounded. Might be a perfect test for this, just need to sand off the paint. I might have other testable mediums about as well.
It's odd to me because auto body guys will use regular bondo (which I believe is also polyester based) over fiberglass with no problems. But gel coat might be a different story and all epoxies are not created equal.

Oak is a tad less dense than birch plywood, so yeah, prolly a little chubby in the gluts, ~30g or so per ring, will measure later. You know what's really light? Blue foam. My gears are turning now wondering if a 1.5in thick ring would have the strength to withstand a rocket motor. Wonder if anyone has done that. Some testing might be in order, just as an experiment. If I set up the experiment I'll post some results to see how much weight it takes to break it free, but in any case, think I'm sticking with the hardwood on this one, depends on what kind of fin material I scrounge up and how much I get, probably.

Yes I was looking at the numbers. I can even fly G pellets on a 38mm, and I'm sure one of my "neighbors" would let me use their pasture for a launch. I don't have as much cleared as they do. All of the property owners in my area kind of know each other and we're all pretty friendly. Until corona, most of us eat breakfast in the morning at the same place, so we have little meetups and chit chats about the local stuff. Pretty laid back group of guys.

Thanks so much for your inputs and thought provoking comments.
 
Very very nice!

Scratch building your own robust test bed for a bunch of other fun projects sounds like a good way to go. Lots of possibilities.

Thanks. If all it was worth was the cert, I prolly wouldn't do it. To me, the cert flight is just a test of the rocket, and then I can be more comfortable about launching expensive electronics in it. You're right, there's so much that an L1 payloader can do, I could have a blast with just that rocket class for a long time.
 
On the topic of spot filler over epoxy... it seems to work just fine with the stuff I'm using. Sets up like normal, and TBH, I don't know how that stuff can ever not cure. It dries so fast. It also formed a solid bond with the leftover epoxy on my credit card scraper after a gently sanding with 320. For the nose cone, I went ahead and added a white primer coat before I started filling.
I did find a lead on the theory though, after investigating. I stumbled upon a Corvette forum where one of the members mentioned never putting "the old lacquer spot filler" on fiberglass. I'm wondering if that is perhaps the culprit and the language got mixed up somewhere. Not sure. Just a thought. I've never seen lacquer-based spot filler that I recall.
That said, there are still very different types of epoxy resin out there, so always worthwhile to test it first, as @boatgeek recommended.
Anyway, this morning the boss was delayed and told me to come in an hour later (he does that sometimes when it's just the two of us working), and I got a layer of filler primer on the cone and sanded it down good until I started seeing pink and white.
heqr0ml.jpg

After getting home from work, I added some more spot filler and let it set up and sanded. Most of the rough stuff is now gone, so I'm going to call this good to go until it's time to paint the rest of the rocket. I might hit it again briefly when I permanently attach the cargo/electronics section behind the cone. Planning to make the guts out of whatever I choose as a fin material, and I'll need a nice long 1/4" threaded rod and some loctite before everything is fastened together.
FG4VeZD.jpg

Been thinking about the detachable fin can as well. I realize that the joint strength needs really to stand up to separation rather than thrust (obvious but I wasn't looking at that specifically before) so it doesn't need to be super strong. Just has to hold everything together during the coast section of the flight and deployment. 4 tiny screws into some kind of wooden baffle, or possibly the top centering ring, should be plenty I think. I'm tempted to cut some holes in the frame however and fill the sections near the screw holes with fiberglass or some other strong material that won't rip. Or possibly just soak something into the cardboard to really stiffen it up right there? This will undoubtedly add some drag. Anyone else do detachable fin cans on any of their models? I'm going to do some more research. Another idea is to add some kind of uprights on the fin can that extend into the main body tube and can attach sturdily to an internal ring. I just don't want to end up with a 28" extension on a nut driver, but that might end up being what happens.

Hoping to get fin plywood this week, and if I get more than I need, I'll cut centering rings out of that...possibly. 3/32" is pretty thin, would I need to stack them? In the end they will pass the stress test or they won't, but I'd like to get it right the first time rather than gluing more centering rings. I may actually just cut some small tube sections and do some side-by-side comparisons with different amounts of weight.

Probably won't do much more with the rocket till I get some supplies in, but that's where I'm at today.
 
On the topic of spot filler over epoxy... it seems to work just fine with the stuff I'm using. Sets up like normal, and TBH, I don't know how that stuff can ever not cure. It dries so fast. It also formed a solid bond with the leftover epoxy on my credit card scraper after a gently sanding with 320. For the nose cone, I went ahead and added a white primer coat before I started filling.
I did find a lead on the theory though, after investigating. I stumbled upon a Corvette forum where one of the members mentioned never putting "the old lacquer spot filler" on fiberglass. I'm wondering if that is perhaps the culprit and the language got mixed up somewhere. Not sure. Just a thought. I've never seen lacquer-based spot filler that I recall.
...
Been thinking about the detachable fin can as well. I realize that the joint strength needs really to stand up to separation rather than thrust (obvious but I wasn't looking at that specifically before) so it doesn't need to be super strong. Just has to hold everything together during the coast section of the flight and deployment. 4 tiny screws into some kind of wooden baffle, or possibly the top centering ring, should be plenty I think. I'm tempted to cut some holes in the frame however and fill the sections near the screw holes with fiberglass or some other strong material that won't rip. Or possibly just soak something into the cardboard to really stiffen it up right there? This will undoubtedly add some drag. Anyone else do detachable fin cans on any of their models? I'm going to do some more research. Another idea is to add some kind of uprights on the fin can that extend into the main body tube and can attach sturdily to an internal ring. I just don't want to end up with a 28" extension on a nut driver, but that might end up being what happens.

That looks great! I did a little more research on the polyester over epoxy issue. It appears that the culprit is amine blush, which sometimes forms on epoxy depending on mix and ambient weather. That can prevent the polyester resin from curing. That might also explain the lacquer spot filler issue as well. Proper surface prep removes the amine blush, as long as you do it. :) More info here.

You can harden cardboard tubes with thin CA or thin epoxy, and a few screw heads won't seriously impact your flight performance unless you're going for altitude or speed records. They'll mostly be in the boundary layer. 4 screws through a coupler into a centering ring would be more than enough.
 
I'd be interested in seeing a sim of what you have planned... Have you tackled OpenRocket yet?
 
If you need help with OR, just sing out... Lots of experience here.
 
Last edited:
Th
That looks great! I did a little more research on the polyester over epoxy issue. It appears that the culprit is amine blush, which sometimes forms on epoxy depending on mix and ambient weather. That can prevent the polyester resin from curing. That might also explain the lacquer spot filler issue as well. Proper surface prep removes the amine blush, as long as you do it. :) More info here.

You can harden cardboard tubes with thin CA or thin epoxy, and a few screw heads won't seriously impact your flight performance unless you're going for altitude or speed records. They'll mostly be in the boundary layer. 4 screws through a coupler into a centering ring would be more than enough.
Thanks so much. Interesting article to read on my lunch break. Might start on the body tubes tonight.
After thinking about it some more, the screw heads would be less intrusive than rail buttons, so likely a mute point. Might try ordering some parts tonight an I plan on getting to the hardware store this weekend if I don't catch a day off sooner. Prepping the tubes seems like a good next step, then fin can.
 
Placed my order for chute, rail buttons, 38mm tube, retaining ring, and a nomex cloth. Right at $70. Hit me right in the feels. Still cheaper than flying RC helicopters though. Plus I'm compelled to do this, so it's worth it. Holding off on the motor gear until the rocket is finished. Maybe when I find a club someone will loan me a reload tube, I hear people do that. BTW I'm in southern Missouri. I think the closest club is in Rolla, so if anyone is up that way let me know. Would like to know what's going on with your club and what the launch schedule looks like. Can't seem to find a website and I don't Facebook anymore.
Anyway, that was my night. Priced out the stuff on 2 websites but went with Apogee as I've purchased stuff from them before. Will probably buy my motor stuff somewhere else though, they are spendy on that stuff. That's why I was shopping around, but the grand total came out the same, +/- 15 cents.
 
Drywall rockets... I think I'm in love.

So, I have what is left of a 5-gallon bucket of joint compound from when I put drywall up in my little house. A one gallon tub costs about the same as the smaller tubs, about $6 US, so best to just get a gallon, which will last forever.
It makes spirals disappear in minutes and has the advantage of leaving a dusting of gypsum on the tube, which is quite easily sanded and takes paint really well. Why is nobody doing this?

I applied some to a leftover piece of mailing tube as a test and the result was fantastic. I applied it with a credit card as I didn't want to break out the compound tray and drywall knives. No appreciable weight increase that I can measure, though a longer length of tube will reveal more on that front. Presto-changeo:

gaQCtN4.jpg


I then did the unthinkable. After letting it dry for about 30 minutes (should be plenty of time for this thin of an application, though I'll try again in the morning), I squeezed the tube. The thin layer flexed with it without cracking or falling apart. I can run my finger right over the top without noticing any kind of seam at all after one application (possibly a slight bump but fixable with the first application of primer I would guess), and it is super easy to fill the gap, much easier than doing actual drywall work.

Just thought I would share this. Not waiting till morning to get started on the three primary tubes for my L1. I might make another coupler tonight as well. I would like to try and do it seemlessly. I think I have some wax paper. Going to test epoxy against what I have and see if I can make a seem without adding the scrap of leftover to hold it together. I'd prefer it be smooth inside for the electronics/payload bay.
 
I'd be interested in seeing a sim of what you have planned... Have you tackled OpenRocket yet?
I was using it last year or the year before. Can't seem to get it running on my new Linux Mint install. There's a knockoff of it at cambridge. The sim part doesn't seem to work, but the design software is functional. I have spreadsheets as well.
Actually, I just took this screenshot. It's minimal but for what I need at the moment it works just fine:
dFPZ0ae.png

I finally got a day off and picked up some plywood. Rest of my parts should be here by Monday, I think. I can't really start gluing too much till the motor mount tube arrives. I cut three centering rings today and four fins from 5mm 3-ply birch, and attached a 1/4" eye-bolt to the top ring. Drilled little holes in the others to assist with the build. I'm trying to get a clear step-by-step procedure down in my head for the fin-can to make it simple to work through.
The motor in the above pic is just a 400g dead weight so I can ensure good stability across a range of flight options, and I'll be changing the front section where that coupler diameter runs all the way to the base of the nose cone for my electronics/payload bay. That'll give me an 11" section of roughly 3in diameter tube for testing altimeters, trackers, and the like.
Here are some shots of the fins being cut.
V2ulg4F.jpg

3qxm2oK.jpg

I also cut slots for them in the motor section of the rocket tube and dry fitted them up. I'll be using epoxy for mounting to the MMT as I'm afraid there may be a tiny gap, maybe 1/32nd of an inch between the tabs and the tube.
6NjdeFb.jpg

12-pack included for scale, lol.
 
Update (will post pics later tonight):
The First Draft is quickly increasing in weight as I've added a sled to the payload bay. Together with the nose cone, the upper part of the rocket weighs in at 700g. This has moved the CG from my diagram pretty far forward, and I will have 4 calibers easily, so I'm wondering about doing a chop job on the central tube section, which serves little purpose other than holding the parachute. I can shave 100g by cutting it in half and still have plenty of room for stability. It'll look a bit more stubby.. I don't know. I like slender rockets so I'm keeping it as-is for now. I'm looking to come in with a dry weight of right at 1200-1300g plus propellant. Still light enough to launch on a G without getting a waiver.

I also busted the tip, so I'll have to put another epoxy layer on that. Had it inverted while stuffing the sled closure into the tube with the plan to use it as a clamp for the glue inside. Yeah, bust the top centimeter of the tip. The foam is still there, but I picked off all of the epoxy bits. I must say it took a good bit of weight to break it, just forgot what I was doing till I heard the crunch. So that needs to be fixed.:confused:
 
Okay, picture time. Here is the sled with it's corresponding tube and nose cone (note the blue tip)
XKpU13z.jpg

And another shot to get a better idea of the construction:
qLbKule.jpg

The rectangular plate on the top side is offset to butt against a nut on the nose cone while the sides run to the plate, so long as it's oriented at an angle to the epoxy buildup where the screws were for stabilizing the turning process. So far works great. The threaded rod keeps everything under compression, and the nose cone is now permanently mounted to that tube, so this is all one unit.
I also took a shot of the rocket on my kitchen scale, turned the picture sideways to reduce scrolling.
2yES0nq.jpg

I love that picture. Starting to look like a rocket instead of a pile of tubes and oddly shaped parts.
 
Okay making progress. Between getting a tire fixed and washing some clothes, got my fin can all glued up with 30 minute epoxy. Picked up the package of goodies from the post office this morning. First the fit on the centering rings I had cut from my 1/4" plywood stock:
ZSV98XS.jpg

This must be the first time I can remember building anything rocket related and have stuff just fit. Unfortunately, it means that my fin tabs are going to leave that little gap, and I'm not cutting more fins. The z-poxy stuff says that it's fine for filling gaps and has little effect on shear strength, so I moved forward. Dry fitted everything up.
ZeSo2e2.jpg

That retaining ring is just sexy. I love it. I trimmed up the motor tube so that it wouldn't poke out of the fin can. Love the way these little tubes just cut so nicely, even though my last X-ACTO blade is nearing the end of its usable life.
loCVgig.jpg

You can't really tell from the pic, but I filled the little gap by the motor tube very well. First I put in the centering ring that mounts north of the fins, triple checked my measurements. I epoxied it to the MMT and the BT on the forward side first, inserted the other two rings to hold everything steady. That was about the time I left to get my tire fixed.
After getting home, I started on the fins. The epoxy filled only part of the way on the first application, so I went again, and again. I have most of the gaps filled, so I started the next application on the BT side, making some fillets as clean as I could get them. Not for looks, but to ensure there were no gaps. They did come out rather pretty though, aside from the mess on the BT side. I smothered the backs of the fin tabs and a ring on the BT and another on the MMT and finally inserted the rear centering ring. I turned everything right side up to dry after doing another fillet around the bottom of the CR. My hope is that excess glue will drip down from the fresh application on the fin tabs and complete the weld. Even without it, however, I have several square inches of epoxy between the fins and the MMT, and everything is stuck front to back and along the BT. I would guess at least 6" square not including the fillets, so perhaps 6000 lbs of strength? (Z-poxy claims double that, so that's my engineering safety)
TJZ5A2X.jpg

You might notice I didn't do a central bead of epoxy on the butt end. That will be JB weld filled to attach the motor retainer, but I want to strength test everything first. 200 pounds would be about 1000N right? That would be me swinging from a tree holding onto this tube. In reality, I doubt it'll ever see more than 500N, but something inside me wants to know that this thing can take a good pounding from a motor. I'll attach the ring loose for testing after everything cures fully, that way if there is a failure it isn't permanently stuck to the failed fin tube. Things aren't cheap.

I just did a quick test with 2 of the big concrete blocks from my woodstove surround. They weight about 30 pounds each (I think 32). I stood the fin can on a roll of electrical tape so all the pressure would be on the MMT, and then stacked the blocks on top of the BT. It handled them fine, so I'll trim that number to 50lbs to be safe and go ahead and stamp this guy safe for up to 250N of thrust. More than enough for an H.

You guys with more experience maybe have a feel for what kind of motor this guy might be able to handle? I'll do a little more testing once the glue cures all the way, but for now I'm quite pleased with the strength of this can. My last build was barely in the range of a small H motor and constructed very lightly. Think I'm starting to realize how potent these motors can be though, and I'm kinda happy that it got destroyed before launching it, as I could have easily put too large a motor on that on and had some big problems.
 
I like your attention to detail, thoroughness and testing :),
Why thank you! Frankly, I look at other build threads here and wonder what I'm going to get poked at for forgetting or NOT doing. Which I don't mind, it's always easier to learn from constructive criticism. Or perhaps that's just 10 years in the oilfield talking, where I was scolded for missing ANY detail, even the stuff that wasn't really mine to worry about.
Either way, appreciate the comment and the fact that you're still watching.
Now I just need to find a place to fly her. I might be able to get a local to let me use one of their pastures for a G flight. Heck, they might jump at the opportunity just to see this thing fly. But I'd like to see this through and get my L1 so I can play with bigger motors, even if it means filing my own waivers for a while. Saving up for my NAR membership fee.
 
You have an advantage going with through the wall fins. Follow the flow of force:
Motor thrust-ring to retainer
Retainer butted directly against Ring
Ring butted against fin tabs
fin tabs push against airframe slots
Airframe pushes against nose cone
You have a direct mechanical transmission of force from motor to nosecone. The glue is just keeping everything from falling out of place :cool:

For paper/ply rockets like this, i like to use wood glue since it's lighter than epoxy and I don't have to wear gloves while applying it lol.
If anything, this is a good time to realize that for subsonic flights, the Landing stress is often worse on the rocket than the flight and you want to make sure your fins are strong enough (in their attachment and structure) to bite into the ground or locate that One rock in the middle of the field.

Also to consider is the recovery shock upon deployment. Your rocket is light so you don't have much to worry about (high-power fliers often use 50 Gs and their nosecone weight to get an idea of recovery shocks)
Thanks, I'll need to study your response in depth as this is like a crash course in model rocketry, lol. I've been looking at thrust a lot, but recovery some. The design of my fins, while apparently more familiar than I first thought, was specifically to keep the weak points away from the dirt on a tail-in landing. The fins themselves, I'm not so sure, and I've been looking at them a lot more lately with the realization that they might need some "beefing up."
One thing I have done, barely visible in the last two pics, was to coat the bottom of the tube in epoxy to harden it against landing stresses. I'm thinking of adding a ring of some type to stiffen it further, perhaps just a few layers of "coupler tube" to make it more solid.
The shock cord I haven't given much thought. I plan to use parachute cord (550 cord) because as you said, it's a light rocket. It also has a large 48" chute, so I'll need to walk further to recover it, but should lead to a gentler landing. It doesn't have a spill-hole so I'm thinking about the value of modding it vs. the annoyance of sewing nylon by hand, to give it a straighter path down and cutting the drag a little.
Short of fiberglassing the fins, I'm considering coating them with a layer of epoxy like the nose cone has. This will of course add weight.
Wood glue vs. Epoxy. I chose epoxy for a couple reasons. One, being a little bit of overkill in the strength department. But more importantly, I've cut my rings and fins mostly by hand with simple power tools, and the fit isn't perfect. Epoxy can fill the little nooks and gaps better than wood glue while retaining strength. My mailtubes are also not perfectly round, same problem there. Perhaps laziness on my part. I've been using principally wood glue on my low power rockets and epoxy only to add weight to the nose in some cases. I agree on it's strength, but in this case I needed some minor gap filling as well. Not much of an issue since my CG is so far forward of the CP... overall weight is the only real concern, and it looks to be coming in around 1200-1300g on the finished model. So I am skating that line to keep the weight with motor under 1500, but I can also cut 100g by trimming the overall length if needed as a bailout; I have the room and the needed nose weight.
Thanks so much Nytrunner for bringing these questions to light. I'm going to think some more about them as I move from construction to finishing. Many ways to skin a cat. Might even look into plastidip or flexseal for a fin coating if I can spare the extra weight. Will have to test it first on some scrap ply to get an idea of how much it will add and if the shock resistance is worth the effort.
 
The design of my fins, while apparently more familiar than I first thought, was specifically to keep the weak points away from the dirt on a tail-in landing.

That's the way I like my fins too.

As for plastidip or other extra protection, I suspect it is unnecessary with decent plywood fins.
 
That's the way I like my fins too.

As for plastidip or other extra protection, I suspect it is unnecessary with decent plywood fins.
Quite to the point. I work with a lot of hardwood and a hatchet. Not sure if it's just the nature of 1/4" ply or something specific to this panel, but the 3-ply birch seems to chip and split out far too easily. It has me a little worried as a fin material. My inclination to taper the trailing edge is gone as I fear it will tear out before I can coat it, even sanding the taper. Next time I may go with a heavier but more durable product. Hell, 1/4" hardwood board would be tougher with the right grain orientation. I think maybe they skimped on the glue when making this ply, so anything I can do to toughen it up that's light on the wallet and light on weight would be better than nothing.
 
If you get around to buying kits, youll see that aircraft plywood of the same thickness as "normal" plywood has more thin plies in it. This makes it a little heavier, but also stiffer and more durable.
 
Back
Top