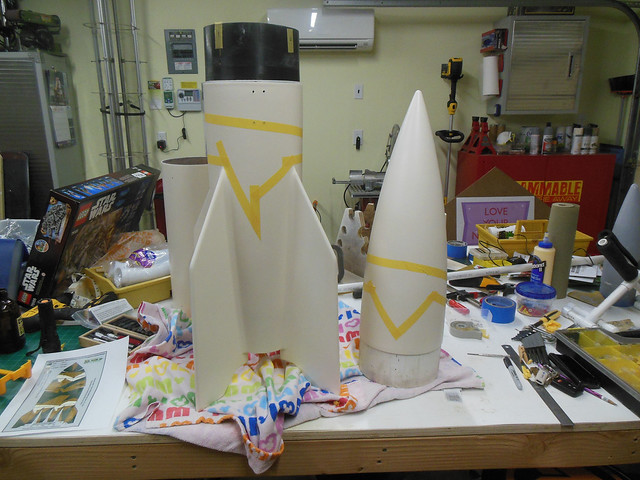
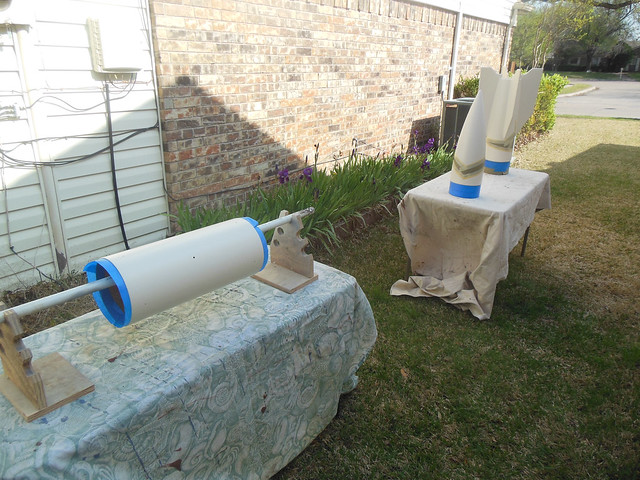
V2 for my L3

The Rocketry Forum

Help Support The Rocketry Forum:

This site may earn a commission from merchant affiliate links, including eBay, Amazon, and others.
I think I understand. I do my normal parachute burritos in a similar manner. The way you have described it doesn't that result in really fast deployment of the main?

Thanks for the advice guys, keep it coming.

The main chutes shrouds are fully extended before the canopy begins to open, yes it opens quickly but that has more to do with it being a d-bag deployment, 300'altitude opening-not a problem. The other reason I like the chute attached to the NC is that as long as the NC comes off, the pilot chute is out and deployment of the main will occur.
 
I will catch up with pictures and videos over the next few days, but progress has been made.

- Recovery is worked out, and it was a cuss. I am going with the Y-harness and nosecone pulls off the deployment bag method as that minimized the amount of shock cord that needed to fit near the bulkhead (this turned out to be the limiting factor).
- Ground Testing is done (video to come)
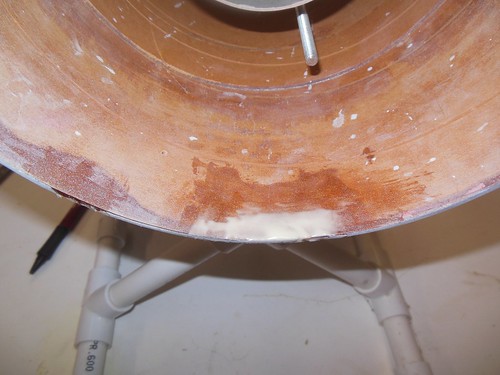
- Some kid inflicted damage to the body tube repaired (could have been worse, but a conversation about the forbidden nature of basketball in the garage was had).
- First paint color (Heirloom White) is applied and curing
 
Like anything that sits within the striking distance of an 8 and 5 year old too long this project got some "hanger rash". Specifically, a young lad without handle had a basketball get loose, and smacked the bt pretty good. Fortunately the damage was manageable, some minor layer delamination in two paces and a small bt crack. I relaminated the layers by forcing some US Composites 635 down into the layers, and clamping with some parchment paper. That worked well, but some damaged material had to be removed so that space was filled in with some Aeropoxy and milled fiberglass. After sanding smooth I'm confident in it structurally and the astetic fix is passable, so no harm no foul, but the basketball has been placed on a higher shelf going forward.


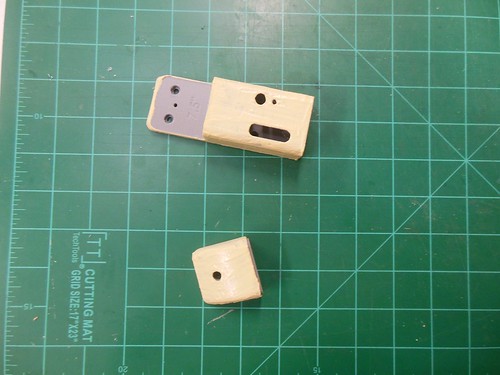
I also filled the printing grooves in the camera shroud with diluted EWF, and sanded that...It worked very well. This part has now been primed and sanded also.

 
- Some kid inflicted damage to the body tube repaired (could have been worse, but a conversation about the forbidden nature of basketball in the garage was had).

I seem to have the same "basketballs vs rockets in the garage" conversation every week! We've had a couple near misses; I'm sure it's only a matter of time until I'm working on a similar repair.
 
I sure hope you get the project done soon. I hate to see the next MJ held back from playing basketball because of a very long rocket building project.
 
I sure hope you get the project done soon. I hate to see the next MJ held back from playing basketball because of a very long rocket building project.

No MJ, I went to Duke...Battier, that's the guy to emulate. We busted into some big Lego kits from Christmas to keep them distracted in the garage. The Millenium Falcon alone should buy me a few weeks protection.

Does make me think I need to add building a plexiglass shield for the 3D printer to the garage to do list. I have about 6 more weeks until it arrives, so probably not a bad idea. Fixing that after a basketball strike would likely be far more difficult and costly.
 
Last edited:
Working out the recovery turned out to be more difficult than I anticipated, and I wasn't expecting easy to begin with. First up I set everything up similar to "Option A" above. Basically a standard recovery train with a deployment bag in the mix. Problem was the main cord had to be loooonnnnngggggg to ensure that the deployment bag couldn't hang in the NC if the shock cord reached full extension, even if all the shroud lines were pulled out. Also, there had to then be enough cord that the NC and BT wouldn't be able to beat each other to death on the way to the ground. All in all, this was a 42' cord...that was a lot of 1/2" kevlar which worked out to a lot of volume to pack in a not very big space. Adding some rubber bands for cord management helped, but only got me so far. Also, this configuration necessitated most of the cord be pack below the parachute, and not in the NC where there is a little extra room. Hard to explain this, but trust me, I packed this many different ways, and the only way that didn't bind any was with as much cord as possible aft. The drogue bay was far more straight forward having sufficient room for the entire mess.

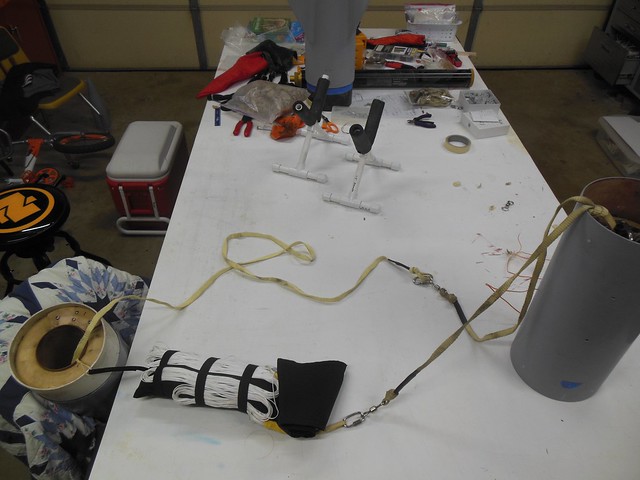
Here is the entire first iteration laid out.


One problem, initially I couldn't come close to getting the nose cone on. It required about 30 minutes of fiddling, twisting, repacking, cursing, etc. to get the NC straining against the shear pins in place...not good. I decided to see how things had shifted as I shimmied everything on, and when I opened it up it was a tangled mess, so much so, that I would not feel comfortable relying on it all to come out cleanly. Variability of packing this way was going to be a problem, so another approach was needed.

I cut up the looonnnggggg cord to make a Y-harness and shorter (22' I believe) cord. The Y-harness attaches to the bulkhead (I added a piece of nomex to cover the charges and ensure I don't blast that expensive chute too). In this setup the NC will hang as it did in "Option B", so there may be a little cosmetic damage at the lip of the BT, but it beats going splat in a field under drogue. Also, I took care that all attachement points in this train would hang off the BT, i.e. only kevlar would be pulled taught against the BT, no swivels or links. I'm also taking the suggestion to have the NC pull off the deployment bag...why not, that is going to be a lot of momentum, so that bag is coming off.
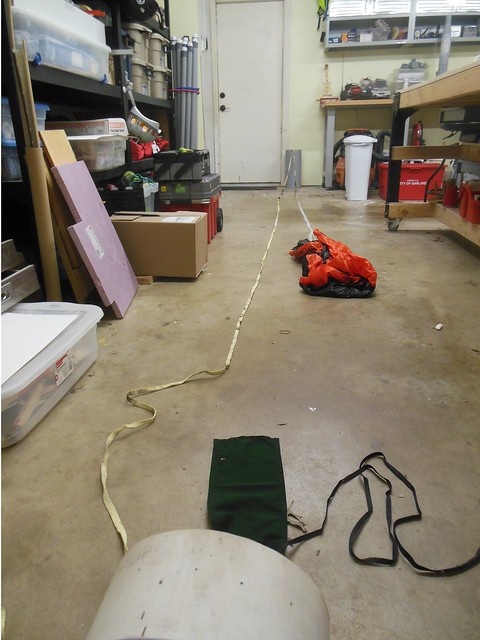


The deployment bag attaching to the NC, solved another problem as well. Specifically how to ensure that the deployment bag doesn't bind sideways if the lines are pulled taught. Getting the pilot chute in the wind first would have required loading the deployment bag with the opening toward the NC tip. This means the lines would want to pull out in that direction too, which is away from the direction of deployment in this case. [Sorry, this is really hard to put into words, but look at the original recovery train picture for an idea of what I'm getting at] However, with the bag attached to the NC I could pack everything "backwards" with the opening in the bag pointed aft, so the lines could be pulled out in that direction. As these lines are pulled out the deployment bag bundle becomes smaller, and more easily to pull out. In fact the bag with just the chute (no lines in the elastic straps) will fall out of the NC if held up. This setup also allows me to pack much of the long shock cord forward of the deployment bag saving me space where I needed it most.

Pictures will do a better job than my explanation:


Once I made it so the bag flap dropped away easily, and wasn't tucked along the inside of the bay everything deployed with only a slight pull. I went to a nearby playground and tested it by holding the the NC and dropping the shock cord with a couple quick links attached and everything came right out, so it worked with way less separation force than a deployment charge is going to impart.

Lastly, a pic of the relatively spacious drogue section, and everything pinned up for ground testing. I'll post some ground testing video in the next day or so, but it was an adventure. To summarize, the aft section went with the calculated amount, but the forward section took about 3 fold the calculated amount for a frisky separation. That would likely be due to the 9 lbs NC and (4) #4 shear pins.

 
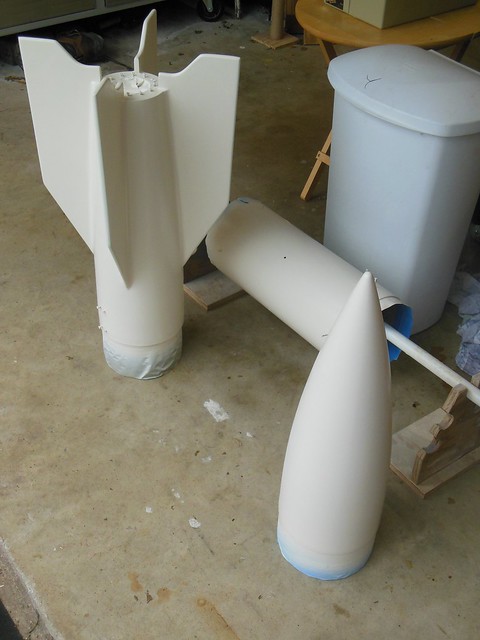
After repairing the cosmetic damage to the BT, and wet sanding the entire rocket the first coat of paint is on. I had three cans of Heirloom White, two were great, one will lead to some sanding of the fin can as it was very inconsistent and I got some runs...more like cascades on one side.

 
Ground testing with 7 lbs of nose weight was a little unnerving, so I made a rudimentary shock absorber for the process by driving two pieces of 1" PVC into the ground, spanning them with a piece of plywood, and covering that with a sheet of foam. The drogue ended up right at the calculated 1.25g, but the main required 2.5g minimum (I liked 2.75g better) to get separation. The difference is likely attributable to the four #4 shear pins holding together the main bay (drogue has four #2 pins). The drogue charge is intentionally not over strong as I don't want the heavy NC to shear loose at apogee and let out that gigantic main at 10k'.

Compilation/Frustration Documentary:

[video=youtube;FqgJI5PGtnU]https://www.youtube.com/watch?v=FqgJI5PGtnU[/video]

The last charge is 2.75g and will be the main charge size. You can see this is going to be more a body tube ejection than a nose cone ejection...inertia always wins.
 
Last edited:
I sanded down the runs in the fin can and sprayed another coat today. It came out well, so the first color is done. I will wait a few days before taping off the part to remain white, and spraying the green.

This brings me up to date. I think I can see the end from here.
 
Last edited:
Your cradle was probably holding it together a little, since one end was on each side of the separation point, don't you think?

With 7 lbs of weight all the way in the nose tip it was a bit of a balancing act. I was stuck because the cradle was just about at the CG. It may have had some effect, but the NC didn't even budge until 1.7g. Even then two of the pins only stretched instead of sheared. I'm not worried about an overly frisky main as I am relying on the momentum of the two parts to pull the main out of the NC. I'm strongly considering sizing up to 3 g for flight.
 
With 7 lbs of weight all the way in the nose tip it was a bit of a balancing act. I was stuck because the cradle was just about at the CG. It may have had some effect, but the NC didn't even budge until 1.7g. Even then two of the pins only stretched instead of sheared. I'm not worried about an overly frisky main as I am relying on the momentum of the two parts to pull the main out of the NC. I'm strongly considering sizing up to 3 g for flight.

I would probably go for 3g for the flight with a 3.5 or 4g back up charge.
 
I would probably go for 3g for the flight with a 3.5 or 4g back up charge.

I like the way you think. I have two backup charges, so they will likely be 3.75 and 4.5. Even if the pins deform and jam on the initial charge I want a chance to blow the thing open.
 
After the white had cured it was time to tape off the areas to remain white. To do this I needed to accurately divide the rocket into 18 equal sections. However, you can't just put a tape measure on it because of the curved surfaces, so I taped a flexible tape to the rocket, and hung a tape measure from the a beam. I then worked out where the lines should be from the scale drawing to the nearest 1/16th and used a level from the hanging tape to the flexible to tape to mark off the increments. The flexible tape is now my reference for the rest of the paint job.


I marked the points of the pattern with pencil, and masked off the inside edges with Tamiya Tape. The inside voids were then filled in with good quality masking paper, and everything hit with Rusto 2X Hunt Club Green Satin. Again, I had 3 cans and the middle one was a disaster. Two of the fins will have to be almost completely sanded down due to extremely uneven spray including chunks. I hate painting.

 
I have sanded down the ugly spots and sprayed another coat of green. Not perfect, but a 5 ft finish...satin covers a lot of sins, gloss paint would have shown these problems so much worse. Last night I spent 1.5 h taping off for the brown coat, and I only got about 1/3 of it done. The prep work is insane on this paint job, and I only have so much patience for finishing work. Weather is to be good ok on Saturday and Sunday, so I will try to get it taped off by then. The end is so close, and I really want this project done and off the bench by the end of the month as we have 3 spring races to time and I need to give the timing equipment a shakedown.
 
Last edited:
Glad you're making headway, You'll get done in plenty of time for AF, but I think you mentioned a shakedown flight. One of the main reason for my first Airfest trip is to watch your L3 rocket so Yea no pressure :). But if not I'll be flying a lot too.
 
Still planning to use the M650? Me suspects your project is going to get up there. Going to use any tracking backup to the EggFinder? Kurt

I'm looking good on pad weight for the M650, so probably sticking with that, and it looks like that should do about 10-11k probably. I will have the same Eggfinder I have flown to 14k in it, and also a BRB 100 mW 70cm RF beakon in the drogue compartment as backup.
 
I'm looking good on pad weight for the M650, so probably sticking with that, and it looks like that should do about 10-11k probably. I will have the same Eggfinder I have flown to 14k in it, and also a BRB 100 mW 70cm RF beakon in the drogue compartment as backup.

You're in great shape! Not that you'll need it but best of luck. You've planned very carefully and deserve the reward. Kurt
 
Lookin' good. You're in the home stretch now, focus man !

Glad you're making headway, You'll get done in plenty of time for AF, but I think you mentioned a shakedown flight. One of the main reason for my first Airfest trip is to watch your L3 rocket so Yea no pressure :). But if not I'll be flying a lot too.

Thanks for the encouragement gents. It is my plan to fly the cert at Airfest. I am still on the fence about a shakedown flight. The purpose of a low shakedown was three fold: 1) make sure the NC wouldn't jar loose at apogee and make the thing drift for miles, 2) Make sure the initial thrust was ok for the flight, 3) Make sure the main would deploy properly. The risk is obviously you may have something silly happen and you never get to make the L3 flight, CATO for instance. I think I have de-risked 1-3 almost as much as possible; 1) After ground testing the NC ain't coming off without a SUBSTANTIAL kick, and even if it does I have added the RF tracker in case I get a really long recovery, 2) I came in at the low weight estimate, so I am at ~10:1 initial thrust:weight which is in the what more could you ask for range, 3) If the main is going to foul on a low flight it will almost certanly be closer to spectators than after a 9k fall under drogue, so it is safer to experience this on a high flight (that will still likely be visible due to the size and relatively low speed of the flight. All these add up to a borderline to unfavorable risk benefit in my eyes for a shakedown flight. That, and it is about $120-150 to just enter into that risk-reward equation. Probably the only way I am doing one is if my L3CC member insists on it. I will do lower flights closer to home down the road though if all goes well at Airfest. Also, the plowed farmland of Airfest is about the most forgiving environment for a rough landing you could ask for. My available sites close to home either involve the potential for runway landings, or at best cow pasture...which is ok, but not tilled farmland.

You really need to come to Airfest this year, Sam.
 
Last edited:
You're in great shape! Not that you'll need it but best of luck. You've planned very carefully and deserve the reward. Kurt

Thanks very much. I've certainly kept a pace with this project that allowed more than enough time to plan.
 
Thanks for the encouragement gents. It is my plan to fly the cert at Airfest. I am still on the fence about a shakedown flight. The purpose of a low shakedown was three fold: 1) make sure the NC wouldn't jar loose at apogee and make the thing drift for miles, 2) Make sure the initial thrust was ok for the flight, 3) Make sure the main would deploy properly. The risk is obviously you may have something silly happen and you never get to make the L3 flight, CATO for instance. I think I have de-risked 1-3 almost as much as possible; 1) After ground testing the NC ain't coming off without a SUBSTANTIAL kick, and even if it does I have added the RF tracker in case I get a really long recovery, 2) I came in at the low weight estimate, so I am at ~10:1 initial thrust:weight which is in the what more could you ask for range, 3) If the main is going to foul on a low flight it will almost certanly be closer to spectators than after a 9k fall under drogue, so it is safer to experience this on a high flight (that will still likely be visible due to the size and relatively low speed of the flight. All these add up to a borderline to unfavorable risk benefit in my eyes for a shakedown flight. That, and it is about $120-150 to just enter into that risk-reward equation. Probably the only way I am doing one is if my L3CC member insists on it. I will do lower flights closer to home down the road though if all goes well at Airfest. Also, the plowed farmland of Airfest is about the most forgiving environment for a rough landing you could ask for. My available sites close to home either involve the potential for runway landings, or at best cow pasture...which is ok, but not tilled farmland.

You really need to come to Airfest this year, Sam.

I agree. Vacations days have been allocated and the idea was not summarily dismissed during exploratory discussions with my housemate. :wink: Initial comment was: "You're takin' the dog, right ?" :p
 
I agree. Vacations days have been allocated and the idea was not summarily dismissed during exploratory discussions with my housemate. :wink: Initial comment was: "You're takin' the dog, right ?" :p

Nice! Any exploratory talks that don't immediately end in the "Are you insane" look are good ones. Maybe you are less prone to suggesting insane things than I am though. We'll have pretty good representation at Airfest if you can make it too...including Monty.
 
Your project is looking great. I have been following from the start and can't wait to see it all come to fruition. Pace yourself and you will reach the finish line.

Former member of the IRS (Integrated Racing System) setup, timing, teardown, and drinking team.

Chas
 
Your project is looking great. I have been following from the start and can't wait to see it all come to fruition. Pace yourself and you will reach the finish line.

Former member of the IRS (Integrated Racing System) setup, timing, teardown, and drinking team.

Chas

Thanks Chas. I plan to bring it to DARS meeting once it is all complete.

Drinking team...I knew we were missing something, but we'll have to keep those in the correct order though. Otherwise, no repeat customers.
 
Nice! Any exploratory talks that don't immediately end in the "Are you insane" look are good ones. Maybe you are less prone to suggesting insane things than I am though. We'll have pretty good representation at Airfest if you can make it too...including Monty.

After 36 wonderful years that question doesn't even come up anymore. :marshmallow:
 
I flew my first V-2 when I was 10 years old. I started back in the Hobby in '99 at 40 years old. Between my brother and I we have flown nearly every size V-2 from 3" to 7.5". Von Braun made an effective weapon. It had advanced motor and guidance technology, was short and fat so mobile launchers could take it it most anywhere to avoid the bombers.
Key words: It's short, fat and unstable compared to my 13' long IRIS.
I looked at the M-650 thrust curve and yes that 1250 newtons is there but only for a brief period. Regardless what the sims may show it will start to layover and look like it's headed to London. That kind of flight profile may have a higher velocity at apogee which you may not want.
I fly V-2s with somewhat flat thrust curves at about 7: 1 wt/avg thrust ratios. You get a nice leap off the pad and after burnout you get a nice , loud whistle near apogee, during that long coasting phase, that will impress the crowd.
If you want to do a test flight in the same case (assuming 6400n) fly it with an L-1170, then do your L3 with an M-1297 (with 1 AT spacer) or go for it with the M-1315.
Great looking build and finish, nice work!
 
Back
Top