Painting - No More Rattle Cans

The Rocketry Forum

Help Support The Rocketry Forum:

This site may earn a commission from merchant affiliate links, including eBay, Amazon, and others.

hball55

Well-Known Member
Joined
Nov 19, 2013
Messages
2,452
Reaction score
621
Location
Oroville, CA
I would like to be done with rattle cans. Krylon has crappy nozzles that dribble and Rustoleum doesn't have the color choices.

I'd like to hear what my alternatives to rattle cans are and what the potential cost would be to change.

Help!
 
Paasche H single action airbrush. They can be had for around $60 and it comes with a few different sized jars for holding the paint. You'll have a bit of a learning curve trying to figure out different paint to thinner ratios but the color choices are unlimited. You would also need an air source. If you don't have a shop compressor, you can get a decent one from you local home improvement store for around $100. I've had my H for almost 20 years and it's still going strong. I only use my more expensive double actions when I need to do fine detail work.
 
I have a Campbell Hausfeld 100 PSI compressor. Would I need to get a water/moisture trap for it? So besides the airbrush you recommend, what else would I need?
 
I long ago gave up on rattlecans after an unpleasant experiance of blistering. The revalation was when I stripped off the paint from my fiberglass rocket- I was AMAZED at the mass of paint to get the job done. We work so hard not to add weight and blow many ounces of paint just to look good. I researched trying to find a solution that had high wear properties, didnt mind heat, and was TOUGH. My work with firearms led me to KG Gun Kote 2400 paint. This stuf is so tough my firearm actions have barely worn through on metal to metal painted surfaces despite thousands of cycles. Painted one minimum diameter rocket with flat black and added bronze accents. Sent it up a bit quick to 10k with a small parachute. NO paint issues. The amout of paint actually on the rocket is tiny. Forget it if your surface isnt good- this is not a filler! Heat- it LOVES heat- it toughens it up! Here is ann example: https://www.midwayusa.com/product/1078112228/kg-gun-kote-2400-series-finish
 
That should do it as long as it has a regulator. A moisture trap is a must, especially if you plan to use oil based paints and live in an area with high humidity. I do both and have two moisture traps. One from the home improvement store would work just fine. Other than that, paint, thinner for said paint, and tools to clean the airbrush are all that you really need. For the most part I use pipe cleaners, Q-tips, old t-shirts, and paper towels for cleaning. If you are going to spray inside, I would seriously look into a spray booth or a minimum a fan, window, and respirator. I bought a custom made spray booth (I also build plastic models), but you can make your own from an old carboard box, a furnace filter, dryer vent hose, dryer vent, and a fan. The fan is going to be the expensive part because you need one that is spark proof to handle the paint fumes. For the longest time though, I got by with spraying into a carboard box in the garage with a respirator on. Even with the paint booth, I still use a respirator. Make sure you get one that can handle organic vapor. They're around $30 and you can get replaceable cartridges for less than $20.
 
I long ago gave up on rattlecans after an unpleasant experiance of blistering. The revalation was when I stripped off the paint from my fiberglass rocket- I was AMAZED at the mass of paint to get the job done. We work so hard not to add weight and blow many ounces of paint just to look good. I researched trying to find a solution that had high wear properties, didnt mind heat, and was TOUGH. My work with firearms led me to KG Gun Kote 2400 paint. This stuf is so tough my firearm actions have barely worn through on metal to metal painted surfaces despite thousands of cycles. Painted one minimum diameter rocket with flat black and added bronze accents. Sent it up a bit quick to 10k with a small parachute. NO paint issues. The amout of paint actually on the rocket is tiny. Forget it if your surface isnt good- this is not a filler! Heat- it LOVES heat- it toughens it up! Here is ann example: https://www.midwayusa.com/product/1078112228/kg-gun-kote-2400-series-finish

Do you actually bake your rockets at 325 deg to cure this paint? I know I couldn't do that to my quantum tube, not sure about phenolic either. Is it hot enough to soften fiberglass?

You know, at first I was considering it, but I think I'll pass. I have also considered leaving all my rockets with just grey primer because it's cheap and easy to coat. Then when I retire the rocket I'd paint it nice. There's somebody in here that says that in his signature, basically once they've flown they earn their paint.
 
That should do it as long as it has a regulator. A moisture trap is a must, especially if you plan to use oil based paints and live in an area with high humidity. I do both and have two moisture traps. One from the home improvement store would work just fine. Other than that, paint, thinner for said paint, and tools to clean the airbrush are all that you really need. For the most part I use pipe cleaners, Q-tips, old t-shirts, and paper towels for cleaning. If you are going to spray inside, I would seriously look into a spray booth or a minimum a fan, window, and respirator. I bought a custom made spray booth (I also build plastic models), but you can make your own from an old carboard box, a furnace filter, dryer vent hose, dryer vent, and a fan. The fan is going to be the expensive part because you need one that is spark proof to handle the paint fumes. For the longest time though, I got by with spraying into a carboard box in the garage with a respirator on. Even with the paint booth, I still use a respirator. Make sure you get one that can handle organic vapor. They're around $30 and you can get replaceable cartridges for less than $20.

Thanks for your help. I have a cheap paint booth outside, basically plastic sheeting hung on three sides and on the ground. I have a 3M respirator I got from work that I currently use with my rattle cans. Got it after dealing with plugged sinuses from breathing rattle can paint.

What I really lack is experience with air brushing/mixing paint with thinner; gotta get that the hard way.
 
I hear ya on the respirator. I used to paint RC car bodies for people while I was in high school and never used a respirator. I permanently damaged my sinuses from that and now I can get a sinus infection at the drop of a hat. I'm lucky that's all it did.

The best thing for figuring out thinning ratios is to practice. I've heard descriptions of the viscosity of skim milk, but that is still a little ambiguous. I use primarily Testors oil based enamels and I'm usually around 50:50 for gloss paints and 30:70 for flats (more paint than thinner). One of the big differences I noticed was the quality of the thinner I was using made a difference. Just straight mineral spirits or brush cleaner didn't do as well as the Testors airbrush thinner. It's a little more expensive but for me it works better. If you do acrylics, rubbing alcohol works pretty good, and it's cheap. The regular 70% stuff works fine.

You can also play around with different thinning ratios and air pressures for different effects. Thinner paint at a higher pressure but lower feed will give you nice fine lines for shading. You can also to paint splatters by spraying heavily onto a tongue depressor and letting the splatter spray onto the painted surface. You can really get into some neat stuff once you start messing around with it. A really cool trick for simulating Carbon Fiber is to paint the surface black, and then use that checker patterned shelf paper (the foam stuff) as a mask. Then you mist a few light coats of silver over it and you have a pretty good simulation of CF.
 
You can skip baking the paint- we get the rocket baked when we fly fast!!! :) Since it cures at high heat - heat is GOOD- backwards of most paint that usually blisters. I have found the air dryed paint plenty hard enough without baking as I do on my firearms. Flying fast INCREASES the paints toughness. As an aside I will admit, however to using a $9.00 Harbor Freight Airbrush to apply my expensive finishes- works just fine for this purpose.
 
Any tip on mixing thinner with paint, like it's better to be too thin than too thick? Or vice versa?

Ah, you were posting the answer before I posted the question;)

How about a clear lacquer coat or wax to protect the paint. I've never done it with my rattle can finishes and probably should have to keep the paint on the rocket longer. I tend to grab two or three rockets together and trade paint a lot. Going to stop doing that.
 
Last edited:
here area few thougths on your endeavor..

The airbrush mentioned is nice, and having an Airbrush setup (or 3) is cool...

however...

any decent sized rocket is going to take a while to paint.
the testors/Tamiya, etc paints are about $3 each, for not a lot of paint.

it is possible to find yourself looking for paint to save money.

to shoot some latex, etc. , paints from the hardware store, you might take a look at the "critter" spray gun.
and someone out there make a gun in between the critter and the Paasche sizes

just remembered...some folks use the craft paints from hobby lobby... have not tried those.


Yes, I hadn't paid attention to mention of testor's. Cost is important. Do a lot of people use latex paint? How about oil-based paints, does the critter handle them?
 
I went the way of using automotive paints where the selection of colors makes Krylon shed buckets of tears. The guys at NAPPA will mix your paint and in affordable amounts. For airbrushing, the paint guy said, "Since you're using acrylic enamels (metal flake included) the ratios are 1 oz of paint, .63 oz reducer and .13 oz hardener. This comes easier to understand as, For a 1 oz paint jar use, 4 tsp paint, 2 tsp reducer & 1/2 tsp of hardener. You just double that amount for the 2 oz jars. Like before mentioned, a single action airbrush is great for this although it does take longer to paint a rocket. It does use a great deal less paint to do the job also.

I bought a single action Badger at a Michael's closeout and an airbrush pump at Horror Freight. Works dandy for me. On the expense side of this note, there's little difference in the long run. Rattle cans are indeed user easy but they will spit a lot of paint on your project. For instance, I painted an upscale Astron Cobra 3' tall and it took 2.5 cans of Duplicolor to get it right. With my DX 3 at nearly 4', I used 3 oz of automotive paint. Judge for yourself.

Cobra Cropped.jpg DX3 finish.jpg
 
Henry, pretty much any airbrush/gun will do any kind of paint , if it is properly thinned.
All in all, getting much into air-spray apinting tends to set a person back a bit.
in the long run it is truly probably cheaper.

if you have a habitat-for humanity re-store locally.....they usually have a bunch of house type paints.

have used latex before, on an RC airplane, and was even able to fuel proof it. But not Fool-proof it, lol.

try searching the forum for "createx" paints I got a lot of hits...and some future reading to do!
 
Don't get me wrong, Testor's paints aren't the only way to go, that is just what I happen to use mostly.

That is the beauty of an airbrush, you can spray just about anything you can thin down in any color you can mix. I've even heard of guys spraying thinned epoxy, although I'm not brave enough to try it.

No it's not easy. Is it cost effective? Probably not as much as you hope. Will it take you longer to paint a rocket, most likely.

But, you can custom mix your own colors, you can easily control the amount of paint you apply (try painting the interior of small tube fins without getting runs from a spray can), and you can do some really fun things beyond one and two color schemes.

For most LPR stuff, the time to paint isn't as big of a deal. If you are into bigger stuff though, you can also look into an HVLP (High Volume Low Pressure) detailing gun. It's what auto body shops use for detail painting. But, detail painting for them is much different than detail painting a model (rocket or otherwise). It's like a spray can with an adjustable nozzle that will spray any color you want. I don't have one, so unfortunately I can't recommend any. Maybe someone else on here could, as I would like to get one myself for some of my bigger projects coming up.

If you like to paint I'd say give an airbrush a try. If not and you just want an easier alternative to "Craft Store" spray paints, try the automotive stuff like what was mentioned earlier. If I'm feeling lazy or I just want to do one or two colors, I will use a rattle can, but I tend to get the automotive stuff. Duplicolor makes a bunch of different colors and it sprays well.

HTH

-Dave
 
Here's another advantage to using an airbrush. My skills using these are pretty lame, but this turned out nicely. Fading works greatly.

Cricket Finish.jpg
 
airbrushes sort of opens up a whole new world to you. so if you've always enjoyed the painting/finishing phase of rocketry i would recommend trying it out. the good news is, for painting rockets the cheapest single action airbrushes will do you just fine.
 
airbrushes sort of opens up a whole new world to you. so if you've always enjoyed the painting/finishing phase of rocketry i would recommend trying it out. the good news is, for painting rockets the cheapest single action airbrushes will do you just fine.

You said a mouth full! My Badger is a Model 200. About as basic as it gets, for the quality of airbrushes. It's what I wanted for total coverage. And it works very well with fading applications.
 
I'm convinced. I've probably bought 50 rattle cans of paint and primer this year. I'm ready to try something better. But I was thinking about a detail HVLP gun, not an airbrush. Like maybe this one: https://www.amazon.com/dp/B001EK8TQC/?tag=skimlinks_replacement-20. What's been holding me back so far is that for a HVLP gun I will need to buy a high CFM compressor which will be at least $500.
 
Last edited by a moderator:
I may go with the old paintbrush next rocket. Sprays are terrible when spirals grooves are involved -- it doesn't like to go into the groove, and the groove acts as a dam causing build-up right next to the groove. May end up with brush marks but at least they won't have a telltale spiral to them.
 
I may go with the old paintbrush next rocket. Sprays are terrible when spirals grooves are involved -- it doesn't like to go into the groove, and the groove acts as a dam causing build-up right next to the groove. May end up with brush marks but at least they won't have a telltale spiral to them.

Have you tried laying down a light mist coat first before putting on the color coats? Wait about 10-15 minutes after spraying on the mist coat before you start building up your color coats. If you try laying down all of the color at once, the paint will pull away from any edges. Basically, you are right at the edge of getting runs.

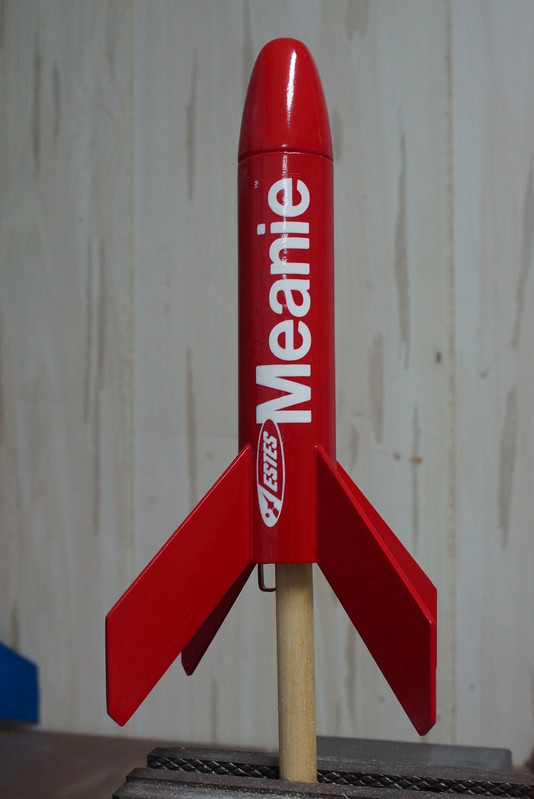
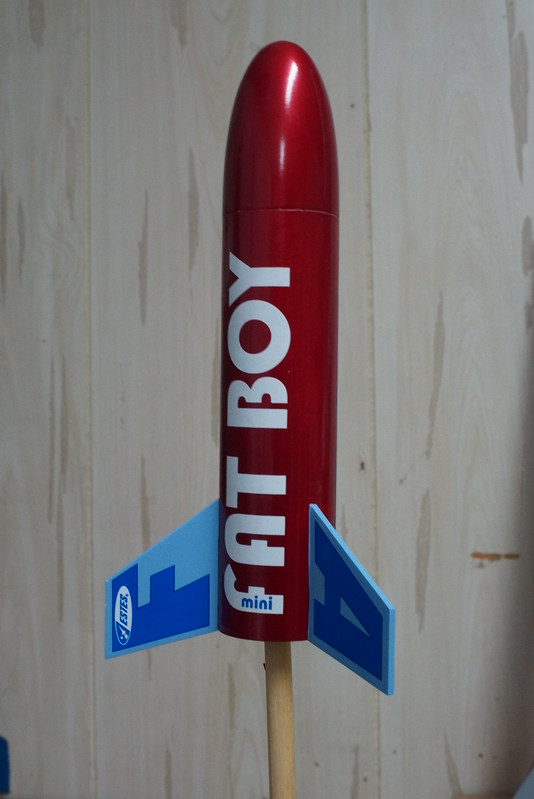
I finished both of these with rattle cans with the same method and I didn't get any pulling from the edges. They both have 3-4 coats of primer that has been sanded, and then a mist coat, 2-3 light coats, and a final heavy gloss coat. Neither of these have any clear on them at this stage.

10583999243_4bb61a33f4_c.jpg


10583998723_115777beb1_c.jpg


-Dave
 
I'm moving to an inexpensive airbrush with Tamiya Acrylic paint. The Tamiyas have a very fine pigment grain that does very well with an airbrush (a little thinner is needed, but not much), and because they are alcohol based, I can use them indoors. Although I have used propellant cans in the past, I bought a nice compressor to use - propellant cans get really cold real fast, and when they do, the pressure drops significantly. Warming the can in hot water helps, but a compressor will let you actually finish the rocket. Oh, and the alcohol based paints dry very quickly, so you can do multiple coats in one session. Not sure how long they have to cure before masking - I'd have to look that up.
 
Yeah, Tamiya paints spray fantastic as well.

Another cool thing you can do is spray the paint from a spray can through the paint brush. All you have to do is spray the paint into the paint jar and it's already thinned perfectly to shoot through the airbrush.

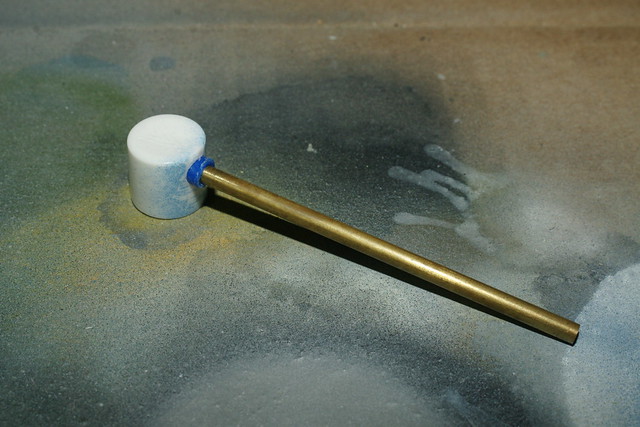
This is a spray can button that I've modified to take a 1/8" brass tube to make it easy to spray.

6537232629_d98af2033f_z.jpg


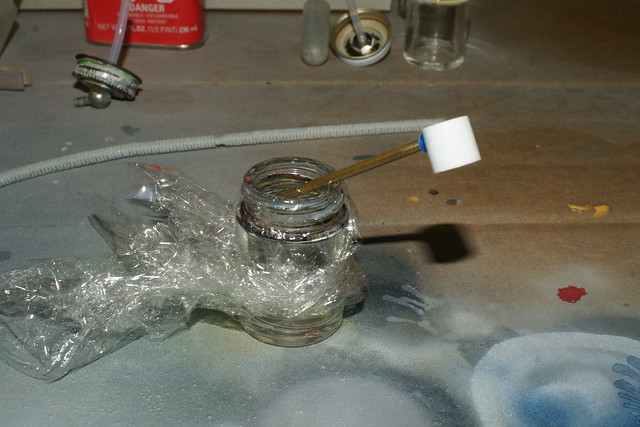
Then I wrap plastic film over the paint jar and poke the brass tubing through it.

6537233571_3873cff874_z.jpg


"Why not just use the spray can?" you ask? Because the airbrush gives you much more control, especially if you are trying to paint hard to reach areas, like the inside of a tube fin, or into the corners of the more complex builds.
 
David, don't you have any problems with the "decanted" spray paint outgassing ?
in the past, it seemed common to decant Tamiya's spray primer, but it could take quite a while to degas.
 
David, don't you have any problems with the "decanted" spray paint outgassing ?
in the past, it seemed common to decant Tamiya's spray primer, but it could take quite a while to degas.

You know, I've heard that from quite a few different places and supposedly it's an issue with all spray cans, not just Tamiya. I've got straight to airbrushing and I've let it set for 10 minutes or so before airbrushing, but I can't tell the difference. Then again, maybe it's the technique I use, because I will still start with a mist coat and wait 15 minutes before starting to lay the heavier coats on. It has always seemed to work well for me. Those pictures were taken while I was painting a 1/24 Tamiya Subaru STi rally car, and I ended up with a nice glossy finish.
 
I've decided to purchase both a critter and an airbrush. The critter will take care of that bulk painting and I'll play with the airbrush til I get it down and then do some special effects.

Maybe I can earn some extra money at the beach, spraying sun tan oil.
 
I've decided to purchase both a critter and an airbrush. The critter will take care of that bulk painting and I'll play with the airbrush til I get it down and then do some special effects.

Maybe I can earn some extra money at the beach, spraying sun tan oil.

Body painting would be the way to go!
 
BTW, if you get an extra "cap" for the paasche (cap and siphon stem), you can cut the siphon shorter, and screw testors bottles directly on.
 
Back
Top