Mounting Switch Bands into the Payload Bay

The Rocketry Forum

Help Support The Rocketry Forum:

This site may earn a commission from merchant affiliate links, including eBay, Amazon, and others.

AlexBruccoleri

Well-Known Member
TRF Supporter
Joined
May 11, 2021
Messages
660
Reaction score
396
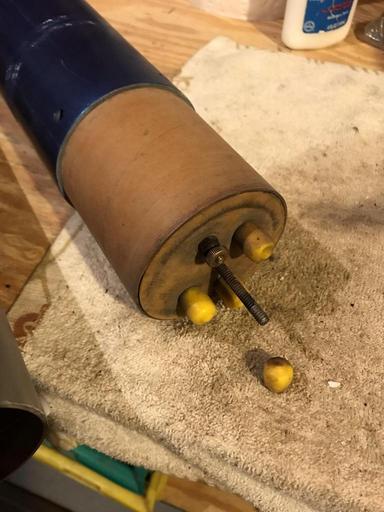
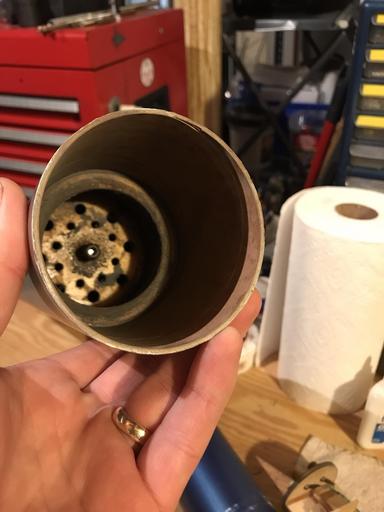
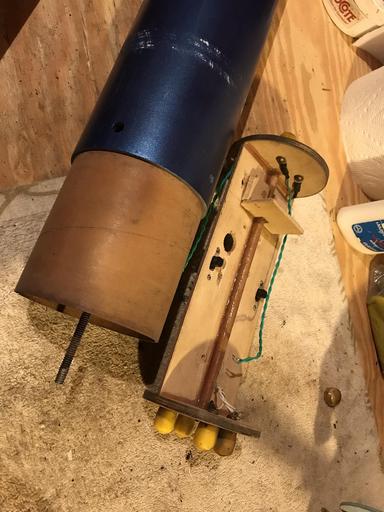
I am looking for some ideas on how to mount switch bands into the payload bay. The conventional wisdom is to put screws through the airframe and coupler to hold it in. I am not a big fan of this since it applies shear to the airframe. I usually mount a centering ring in the payload bay and attach threaded rods to the annulus. I then slide the switch band through the rods and put nuts on it. The upside to my technique is a clean outer airframe and no holes with shear on the airframe. The downside is the need for long rods, sealing around the threaded rods from ejection gases, and it requires a sturdy glue joint for the ring in the payload bay.

Any ideas would be greatly appreciated!
 
Typically a switch band is a 1" long section of airframe material that is glued to the coupler that makes up the altimeter bay and the upper and lower airframes butt against it, with the upper airframe being screwed/plastic riveted to the upper section of the coupler.
Static ports are commonly put in the switch band.

Not sure what you are A) asking and B) what method you use that your describing....pictures really can be worth 1k words.
Apologies my original post was not clear. Attached are some pics. I am looking for alternatives on how to attach the entire altimeter bay into the upper airframe. I do not like the idea of rivets. Below are pics of how I did it on a fiberglass rocket. I put a set of rings in the payload bay and secured two threaded rods. The altimeter bay slides around those rods and can be secured with nuts and tightened. My method worked, but it is a bit complicated.
 

Attachments

  • image1.png
    image1.png
    905 KB · Views: 99
  • image0.png
    image0.png
    695.9 KB · Views: 98
Last edited:
Apologies my original post was not clear. Attached are some pics. I am looking for alternatives on how to attach the entire altimeter bay into the upper airframe. I do not like the idea of rivets. Below are pics of how I did it on a fiberglass rocket. I put a set of rings in the payload bay and secured two threaded rods. The altimeter bay slides around those rods and can be secured with nuts and tightened. My method worked, but it is a bit complicated.
What problem are you solving for by making the threaded rod permanent? Truly curious, not critical.

Best,
 
What problem are you solving for by making the threaded rod permanent? Truly curious, not critical.

Best,
There is no reason the rods need to be permanent. I am posting this thread to grt better ideas. For what it is worth, that rocket was built in a house in Connecticut and I live in Boston. It was somewhat rushed and not as elegant as I would have liked.
 
Are you asking how to secure the electronics bay to the payload bay without using external screws or rivets?

I think you are asking for alternatives to this:

PXL_20201225_220343405.jpg

I think I understand what you did in your photos - you attached some threaded rod to a CR in the payload bay, then thread that all the way through your Ebay and secure it (I assume) with nuts on the lower bulkhead, aft of your Ebay, correct?

If all that is the case, I think you may be over thinking this one. Three PEM nuts in the Ebay coupler and a countersunk flat head screw through the payload bay wall gives you a very secure connection without really compromising the integrity of the fiberglass wall and remains pretty flat.

PXL_20201225_220241508.jpg
 
I'm a little confused as well.. (and your pictures are small & don't really tell anything)

If I understand correctly, you want the AV bay to sit inside the bod tube, and secured in place along the threaded rods. The upper body tube then sits on top of that; teh bottom of the top tube butts against the top of the lower tube, with the AV bay acting as teh coupler between the two. And you don't like the rivet / screw method to hold the AV bay to teh upper tube.

1) What is your worry with rivets? why not a radial pattern of screws (3 or 4) in place of the rivets, and threaded into either a PEM nut or threaded block inside the AV bay? this has been done & works.. Truss head screws.. (As others have shown / suggested)
2) How do you ensure the lower nuts on your threaded rods are at the same height, and are secured / locked in place?
3) are you trying to achieve something / solve an issue that the 'typical way' isn't feasible?

All this is under compression for the ascent. and while you may have some forces, I doubt you have anything that will crush a tube or shear a few bolts..
 
Are you asking how to secure the electronics bay to the payload bay without using external screws or rivets?

I think you are asking for alternatives to this:

View attachment 500683

I think I understand what you did in your photos - you attached some threaded rod to a CR in the payload bay, then thread that all the way through your Ebay and secure it (I assume) with nuts on the lower bulkhead, aft of your Ebay, correct?

If all that is the case, I think you may be over thinking this one. Three PEM nuts in the Ebay coupler and a countersunk flat head screw through the payload bay wall gives you a very secure connection without really compromising the integrity of the fiberglass wall and remains pretty flat.

View attachment 500684
You are correct on my attachment method. Do you have a recommended PEM nut you like? I found the LumaDyne attachment but they are sold out and seem like they are gone for good. I am still not thrilled with going through the side. You have large holes which is good to spread out the load though. The coupler and airframe should be snug with your method once the screws are tightened. In my technique the ebay gets pulled taught against the upper airframe and the rods are under tension. Also how well do the PEM nuts mount into LOC tubing?
 
You are correct on my attachment method. Do you have a recommended PEM nut you like? I found the LumaDyne attachment but they are sold out and seem like they are gone for good. I am still not thrilled with going through the side. You have large holes which is good to spread out the load though. The coupler and airframe should be snug with your method once the screws are tightened. In my technique the ebay gets pulled taught against the upper airframe and the rods are under tension. Also how well do the PEM nuts mount into LOC tubing?

Lumadynes were great, albeit expensive and I agree, it looks like they are gone for good. Too bad, back in the day when you could buy them from the manufacturer, they were not that expensive. I bought a bunch in bulk back then, but most of what I had have been used up. Once Apogee became the sole vendor (I think they just had a large inventory on hand that lasted a long time - I would bet they haven't gotten new ones in years), the LumaDynes were just too expensive.

I would love to find a true LumaDyne replacement, but, as of yet, have not. I have been thinking about trying to mill my own, but have not gotten that far yet either.

For now, I have fallen back on the tried and true "traditional" PEM nuts, such as the ones sold by McMaster-Carr:

https://www.mcmaster.com/pem/
I use the "press fit for sheet metal" versions and buy a bunch for a variety of "minimum panel thicknesses" at each screw size. I epoxy them in just like the LumaDynes. They are cheap - in another thread I did an analysis and it came out to about $0.75 per PEM install, including the screw. If you countersink the screw, it is pretty flush with the airframe. However, using a flanged-countersink washer on the outside gets you pretty close to the old LumaDynes and increases compression to provide a secure junction. And, I think they look pretty cool. In many cases, I have painted them once installed and they look like part of the airframe. You can epoxy them to the frame as well.

https://www.mcmaster.com/washers/washers-4/countersunk-washers-8/
Using a PEM for a thick panel in combination with a countersink washer has served me well for LOC tubes, quantum tubes, FG/CF tubes, etc.
 
Here's what I did on a 3" rocket. No external fasteners and one seam between the upper and lower tubes

8kXPJCx.jpg
uvl79te.jpg
vw3sduc.jpg
 
Thank you all for the responses. I think I will try the PEM nuts in some upcoming builds. Anyway I was looking for methods that did not involve any side drilling. One thoughts is to avoid the switch band entirely and mount the electronics in a smaller tube. Hawk Mountain has a picture of what I am thinking. This idea is fine for larger rockets, but is an issue on smaller ones.

https://hawkmountain.ws/secure/kits.asp?productid=315883645337762
 
An FYI - I spoke to Apogee this morning. Apparently, LumaDyne is not dead yet. They said they are still producing the fasteners and that Apogee plans to get in a new stock in the next 2-4 weeks. They will still be expensive, but if anyone is interested in trying them out, looks like we will still get the chance.
 
An FYI - I spoke to Apogee this morning. Apparently, LumaDyne is not dead yet. They said they are still producing the fasteners and that Apogee plans to get in a new stock in the next 2-4 weeks. They will still be expensive, but if anyone is interested in trying them out, looks like we will still get the chance.
Thanks for looking into that. I looked at McMaster and they have a huge selection. Do you have specific nut and washer suggestions for common tube sizes?

Also the cost of LumaDyne's is high when compared to McMaster. If they are a custom part they are priced fine. Also they seem worth the money if they are easy to use and reliable. Compared to motors, most building supplies are cheap....so it is best to get high quality parts in my opinion.

For airframes about 4" diameter and below, I like 4-40 PEMs designed for a 0.09" thickness: https://www.mcmaster.com/96439A160/

For airframes about 5" diameter and above, I like 6-32 PEMs designed for a 0.09" thickness: https://www.mcmaster.com/96439A250/

Those are the ones I use the most for securing an Ebay to a payload bay. I use PEMs for a lot of other things like securing camera housings, attaching tube fins, securing nosecones, motor retention in the baseplate, etc - so I also have a lot of other PEMs on hand, but those two listed above are the workhorses.

BTW - you do not need any special tool (especially the one McMaster-Carr tries to sell you for $570!). McMaster-Carr tells you what size hole to drill - drill the hole, clean it up and epoxy the PEM in from the opposite side. Hold it in place while curing by screwing something into it from the airframe side - I like to use a rail button.

When I really want to secure things to a frame, like a rail button, I move to the rotaloc nuts: https://www.mcmaster.com/98007A029/

They are great for being able to switch between different sizes of buttons:

PXL_20211003_072632111.jpg

PXL_20211003_080704520.jpg

PXL_20211006_051005915.jpg
PXL_20211006_051045043.jpg
 
I generally use a small block of good plywood & tap it. (multi-layered Birch typically - and I have lots around.. 1/4" thick typically)
  • I will cut a 1" x 1" piece,
  • I then sand it to match the inside of the airframe tube (Hold a piece of sandpaper on the inside surface of the tube, then move it up & down vigorously) I will also sand down teh sharp corners, bevel it, etc.. so nothing can hang up on it
  • I then glue this block inside the airframe, at my desired location
  • I drill my hole in teh airframe tube at my desired location, thru both the airframe & the block
  • and then tap the hole for the desired thread
  • Squirt in some thin CA to harden teh hole & threads. Repeat (But be careful, the CA may take a while to cure!!)
Presto! a solid tapped hole from a little elbow grease & some scrap around the shop.

A tapped hole in quality plywood can be extremely strong! R/C airplane wings are typically held in place this way!

Also, go to the PEM source:

you are after 'CL' type PEM nuts

https://www.pemnet.com/
https://www.pemnet.com/fastening_products/pdf/cldata.pdf

Penn Engineering is awesome. Their HQ is located not too far from me. I buy their products from McMaster because I don't think PE sells anything direct. I looked through their catalogs a couple years ago to see if they had something similar to the LumaDyne product, but couldn't find anything. I have been meaning to drive over there at some point with a couple rockets tubes and couplers and basically ask "what do you recommend?", but I have been too lazy to do it. Need to get off my butt and go over there.
 
There was an other manuf of 'press fit hardware', but can't find them.. "Cinch" maybe..

But yeah, the intent was to use their catalogs as proper reference, instead of McMaster.. (And also to spur other ideas & conversations!!)
 
Apologies my original post was not clear. Attached are some pics. I am looking for alternatives on how to attach the entire altimeter bay into the upper airframe. I do not like the idea of rivets. Below are pics of how I did it on a fiberglass rocket. I put a set of rings in the payload bay and secured two threaded rods. The altimeter bay slides around those rods and can be secured with nuts and tightened. My method worked, but it is a bit complicated.

You already have an elegant alternative right here. I did this same technique on a 2.2" cardboard rocket. It was a little difficult to get the ring glued correctly and cleanly into the payload tube, but it was worth it for the coolness factor.

You can always glue the av-bay coupler into the payload. Assembling the endcaps and thread rod is a little fussy, but again, cool and with no external screws/rivets.
 
For airframes about 4" diameter and below, I like 4-40 PEMs designed for a 0.09" thickness: https://www.mcmaster.com/96439A160/

For airframes about 5" diameter and above, I like 6-32 PEMs designed for a 0.09" thickness: https://www.mcmaster.com/96439A250/

Those are the ones I use the most for securing an Ebay to a payload bay. I use PEMs for a lot of other things like securing camera housings, attaching tube fins, securing nosecones, motor retention in the baseplate, etc - so I also have a lot of other PEMs on hand, but those two listed above are the workhorses.

BTW - you do not need any special tool (especially the one McMaster-Carr tries to sell you for $570!). McMaster-Carr tells you what size hole to drill - drill the hole, clean it up and epoxy the PEM in from the opposite side. Hold it in place while curing by screwing something into it from the airframe side - I like to use a rail button.

When I really want to secure things to a frame, like a rail button, I move to the rotaloc nuts: https://www.mcmaster.com/98007A029/

They are great for being able to switch between different sizes of buttons:

View attachment 500732

View attachment 500733

View attachment 500734
View attachment 500735
This is great info. Thank you! Do you have a procedure for drilling larger holes in the tubing to prevent chipping and peeling? Also a question on rail buttons. I really like the 1515 ones from Aero Pack. They have a flange nut and this was fine on a 5.5" fiberglass rocket. Any thoughts for 7.5" rockets or alternatives?

https://aeropack.net/ldRailGuides.asp
 
You already have an elegant alternative right here. I did this same technique on a 2.2" cardboard rocket. It was a little difficult to get the ring glued correctly and cleanly into the payload tube, but it was worth it for the coolness factor.

You can always glue the av-bay coupler into the payload. Assembling the endcaps and thread rod is a little fussy, but again, cool and with no external screws/rivets.
Thanks! The downside of my solution is complexity. I should have used a better conduit-rod for the threaded rods to snake through the electronics bay. That would make it easier to seal it as well. I like the Hawk Mountain design a lot and thought of something similar after building the project shown above. The downside is access to the switches is more restricted.....
 
For drilling into FG, a brad point bit does work well with a backing. The dowel method works, but a couple other tricks can help you out. I like to smear some CA on the inside of the tube where you are going to drill. Then, tape it with some masking tape. This helps greatly in preventing tear out on the inside. Instead of a dowel, I prefer to use a coupler. Over the years, I have gathered up enough spare couplers to use as sacrificial backings. In the absence of a coupler, or to drill into a coupler, I find a piece of PVC pipe backing works nicely as it is easier to clamp in the right place as opposed to a dowel with a smaller diameter. PVC pipe is cheap, so it is good to have a bunch of sizes around for this.

When I really want a clean hole, I grind/file a hole, rather than drilling it. I started using diamond tipped hole saw drill bits a while back and they are wonderful. They make a very clean hole. The significant downside is that you must use a drill press - They slip all over the place if you try to use them with a hand drill. However you make the hole, diamond files are the way to go to clean them up.

https://www.amazon.com/gp/product/B073LRD5SF
PXL_20201225_011909870.jpg
PXL_20201225_192515810.jpg
PXL_20201229_145157934.jpg
 
Last edited:
There was an other manuf of 'press fit hardware', but can't find them.. "Cinch" maybe..
We use nutserts from "Advel" at work a lot. ( now part of Stanley Engineered Fastening. )
https://www.stanleyengineeredfastening.com/fasteners/rivet-nutsThe nuts squeeze into the sleeve on the "eurosert".
https://www.stanleyengineeredfastening.com/fasteners/rivet-nuts/avdel-eurosertOR
The "Thin sheet nutsert" rolls a bead on the backside.
https://www.stanleyengineeredfastening.com/fasteners/rivet-nuts/avdel-thin-sheet-nutsertBoth work well down to 2.14" LOC couplers... i just lightly file the front side to contor it to the tube.
 
For rail buttons, on 5 inch diameter and lower, I install 8-32 Rotaloc nuts and switch between 1010 airfoils and regular 1515 buttons (most of which have a hole for 8-32 screws).

For 6" diameter and above, I install 1/4"-20 Rotalocs to switch between 1515 airfoils and Unistrut buttons.

Scott over at SCP is the only one I am aware of making airfoils right now: https://scpconcepts.com/airfoil-rail-guides/. The ones you buy from Apogee, Onbadhawk, Giant Leap, etc are all made by him.

You can take a look at the booster section of my Darkstar Ultimate build to see what I mean: http://www.mountainmanrockets.com/i...uilds/6-inch-wildman-ultimate-darkstar-build/
 
@Tractionengines we use a lot of nutserts too!! and weld nuts, and weld studs, and.. :D

(you can see some of my work a the back of Costco, Sam's club, Bj's.. all those golden juicy chickens going around! :D I/we build & design the rotisserie ovens & hot display cases..)


And I'm a big fan of English steam traction engines!
 
Not to hijack the thread. But I would offer a body part, or organ, to get one of the 4" scale steam kits from Steam Traction World.... ie https://www.steamtractionworld.com/4-scale-burrell-scenic-traction-engine/
Too many hobbies, though; and so far the kids are not into 100+ year old machinery... so rockets it is.
drool, me too! I've tried to justify budgeting for one! (Even told my day [80yrs] that this would be a good 'father & son' project! :D)

but a 1"is more reasonable than a 4" Burrell!
 
I have used socket head screws to secure an e-bay into a FG rocket. The screws go into plywood and are fairly flush with the AF. No switchband here.
 

Attachments

  • CSC_3429.JPG
    CSC_3429.JPG
    432.7 KB · Views: 41
  • DSC_3393.JPG
    DSC_3393.JPG
    111 KB · Views: 40
Back
Top