


Andy Greene
Well-Known Member
- Joined
- Jan 11, 2013
- Messages
- 1,137
- Reaction score
- 194
Have any of you guys tried or heard of hydro dipping a Quantum Tube and G10 fins ??
")
 Might be hard to see. At ROSCO this rocket had a graphical flame pattern. At the time I didn’t know what hydro-dip was. I just figured it was airbrushed.
Stuff the dipping, I want to see the printer laying the paint on the water! Where’s THAT video?!?! [emoji16]
The patterns are printed onto a special film using a printer. The print is floated on the water and the film dissolves in the water leaving the pattern floating on top. Then you slowly dip the piece. Once completely below the surface the ink\paint is removed from the water and then the piece is removed.The dipping process looks fairly straight forward, and the results are amazing!
However, laying intricate checkered or flame patterns ONTO the water, in the first place, remains a mystery.
I'm sure there is as much as there is science to this, and I generally suck at artsy endeavors.
However, if someone can share an insight into how to figure that part out, all my colored fiberglass tubes might get something more than simple layer of clear-coat ;-)
a
The dipping process looks fairly straight forward, and the results are amazing!
However, laying intricate checkered or flame patterns ONTO the water, in the first place, remains a mystery.
I'm sure there is as much as there is science to this, and I generally suck at artsy endeavors.
However, if someone can share an insight into how to figure that part out, all my colored fiberglass tubes might get something more than simple layer of clear-coat ;-)
a
The patterns are printed onto a special film using a printer. The print is floated on the water and the film dissolves in the water leaving the pattern floating on top. Then you slowly dip the piece. Once completely below the surface the ink\paint is removed from the water and then the piece is removed.
Most systems use chemicals in the water, a prep chemical for the piece, and/or special ink. Google Hydro Dip Kit and you'll get a general idea.
I have an FG V2 that I plan to 'dip'. But a la hippy 60's style, by floating the paint on the water & making it all swirly & go-go flash!
Yep. If you do it yourself you would still need to be somewhat handy with graphic design, unless you purchased a kit with preprinted film. A full color wrap from Stickershock may even be cheaper than buying a hydrographics kit. Some of the cheaper kits are still 60 bucks (which is probably what I put into my finish on Ethos) and are probably not large enough for the larger rockets.Wow - makes sense. Thanks for the details.
Beautiful results, but far to advanced for my artistic ambitions.
I'm happy to stick to epoxying colored FG tubes, clear-coating them, and then straight onto flying. With may be an occasional vinyl sticker. ;-)
But my hat is off to those who can turn the final product into an artwork.
Do post the pics of the end result!
a
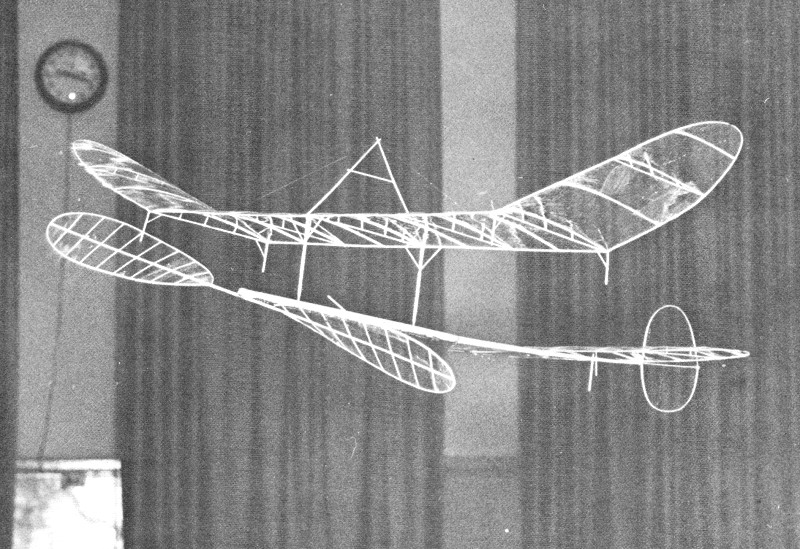
Everything old is new again. Way back in the mid/late 60's when I was making ultralight airplanes, one way of "skinning" the plane was called "microfilm". This consisted of a very thin nitrocellulose lacquer poured over a bucket of water and allowed to almost dry. The part needing to be skinned would be dipped in the water and brought up underneath the drying film of lacquer. The covering weighed almost nothing. Wings, horiz. and vert. stabs, even skeletonized propellers were covered. The really crazy people started putting a drop or two of tint into the lacquer. These things were amazing to watch - the prop might turn once a second or less. It was not unusual for someone to implode a plane by overwinding. They flew so slowly and gracefully - slower than a walking speed - they were poetry in flight. Good videos on YouTube...

Enter your email address to join: