Hyrdo Dipping ?

The Rocketry Forum

Help Support The Rocketry Forum:

This site may earn a commission from merchant affiliate links, including eBay, Amazon, and others.

Andy Greene

Well-Known Member
Joined
Jan 11, 2013
Messages
1,137
Reaction score
194
Have any of you guys tried or heard of hydro dipping a Quantum Tube and G10 fins ??
 
That certainly is one method- I was thinking professionally done , not that the spray paint way isnt kinda neat. . Most of the companies in my areas websites claim " we can dip anything" - we will see. ;)
Here ya go Andrew -
Hydrographics or HydroGraphics, also known as immersion printing, water transfer printing, water transfer imaging, hydro dipping, watermarbling or cubic printing, is a method of applying printeddesigns to three-dimensional surfaces. The hydrographic process can be used on metal, plastic, glass, hard woods, and various other materials.
 
Last edited:
It's a cool technique. If the cost isn't prohibitive and you prime the quantum tube before hand, I don't see it hurting to try it out.

My only hesitation was going to be "It may be hard to fit the whole booster", but your video just showed them dipping A WHOLE FRIGGIN BUMPER, so I bet you could find somewhere with a big enough tank.
 
C4B08658-8BC2-42E9-822D-02EC1CBEE538.jpeg Might be hard to see. At ROSCO this rocket had a graphical flame pattern. At the time I didn’t know what hydro-dip was. I just figured it was airbrushed.
 
Stuff the dipping, I want to see the printer laying the paint on the water! Where’s THAT video?!?! [emoji16]
 
Ok - not as interesting as I thought. I expected a plotter printing on the surface.


It’s a dissolving paper immersion process.
 
I have been hoping to do it to my Wildman Punisher Jr. I think it would look cool over the semi-transparent fiberglass.
 
I've looked into it a few years ago just never went any farther. You can buy home kits with all the supplies you need and just use your home printer. It was kinda expensive IIRC but been a few years since I looked at it so may be even more options out there now.
You would likely get better results if you didn't slosh around the piece once it is submerged but rather clean the paint from the surface of the water before removing the piece.
 
Stuff the dipping, I want to see the printer laying the paint on the water! Where’s THAT video?!?! [emoji16]

The dipping process looks fairly straight forward, and the results are amazing!

However, laying intricate checkered or flame patterns ONTO the water, in the first place, remains a mystery.

I'm sure there is as much as there is science to this, and I generally suck at artsy endeavors.
However, if someone can share an insight into how to figure that part out, all my colored fiberglass tubes might get something more than simple layer of clear-coat ;-)

a
The patterns are printed onto a special film using a printer. The print is floated on the water and the film dissolves in the water leaving the pattern floating on top. Then you slowly dip the piece. Once completely below the surface the ink\paint is removed from the water and then the piece is removed.
Most systems use chemicals in the water, a prep chemical for the piece, and/or special ink. Google Hydro Dip Kit and you'll get a general idea.
 
Last edited:
The dipping process looks fairly straight forward, and the results are amazing!

However, laying intricate checkered or flame patterns ONTO the water, in the first place, remains a mystery.

I'm sure there is as much as there is science to this, and I generally suck at artsy endeavors.
However, if someone can share an insight into how to figure that part out, all my colored fiberglass tubes might get something more than simple layer of clear-coat ;-)

a

Take a look at the video I linked… It shows the process of printing and then dipping an intricate pattern...
 
There are many places that hydro dip firearm parts. Look up a place in your area and see if they will do it.
The price has come down in recent years due to competition.

M
 
I have an FG V2 that I plan to 'dip'. But a la hippy 60's style, by floating the paint on the water & making it all swirly & go-go flash!
 
Somebody told me the other day about when they were a kid flinging paint at a new bird on the rod, then flying it wet to make the colors run. I'm totally going to try that at some point.
 
The patterns are printed onto a special film using a printer. The print is floated on the water and the film dissolves in the water leaving the pattern floating on top. Then you slowly dip the piece. Once completely below the surface the ink\paint is removed from the water and then the piece is removed.
Most systems use chemicals in the water, a prep chemical for the piece, and/or special ink. Google Hydro Dip Kit and you'll get a general idea.

Wow - makes sense. Thanks for the details.
Beautiful results, but far too advanced for my artistic ambitions.

I'm happy to stick to epoxying colored FG tubes, clear-coating them, and then straight onto flying. With may be an occasional vinyl sticker. ;-)
But my hat is off to those who can turn the final product into an artwork.

I have an FG V2 that I plan to 'dip'. But a la hippy 60's style, by floating the paint on the water & making it all swirly & go-go flash!

Do post the pics of the end result!

a
 
Last edited:
Wow - makes sense. Thanks for the details.
Beautiful results, but far to advanced for my artistic ambitions.

I'm happy to stick to epoxying colored FG tubes, clear-coating them, and then straight onto flying. With may be an occasional vinyl sticker. ;-)
But my hat is off to those who can turn the final product into an artwork.


Do post the pics of the end result!

a
Yep. If you do it yourself you would still need to be somewhat handy with graphic design, unless you purchased a kit with preprinted film. A full color wrap from Stickershock may even be cheaper than buying a hydrographics kit. Some of the cheaper kits are still 60 bucks (which is probably what I put into my finish on Ethos) and are probably not large enough for the larger rockets.

I would like to see the results if someone does it themselves with spray paint. I have a fiberglass V2 I may try just for the heck of it.
 
Im going to look into price after the holiday, there are a couple shops across the bridge from me- but in the mean time I may play around with the spray paint method on an old nose cone . Will let you guys know if I get around too it this weekend.
 
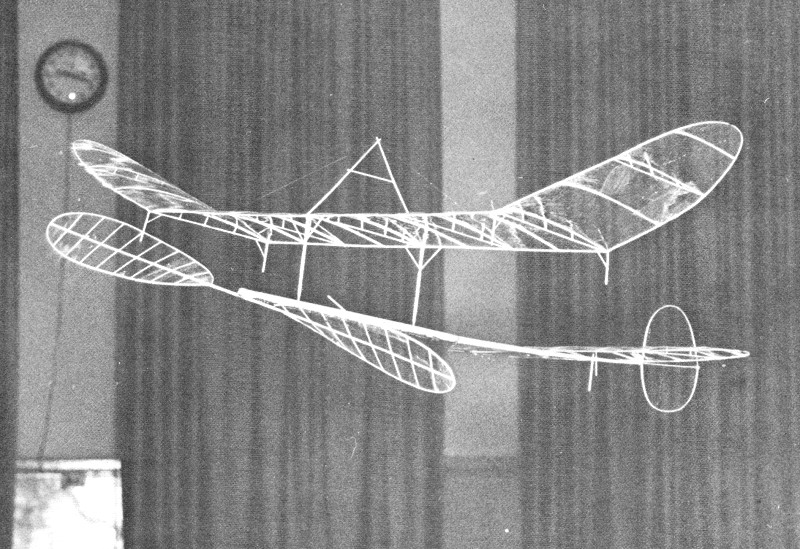
Everything old is new again. Way back in the mid/late 60's when I was making ultralight airplanes, one way of "skinning" the plane was called "microfilm". This consisted of a very thin nitrocellulose lacquer poured over a bucket of water and allowed to almost dry. The part needing to be skinned would be dipped in the water and brought up underneath the drying film of lacquer. The covering weighed almost nothing. Wings, horiz. and vert. stabs, even skeletonized propellers were covered. The really crazy people started putting a drop or two of tint into the lacquer. These things were amazing to watch - the prop might turn once a second or less. It was not unusual for someone to implode a plane by overwinding. They flew so slowly and gracefully - slower than a walking speed - they were poetry in flight. Good videos on YouTube...

microfilm-pouring-covering-american-aircraft-modeler-feb-1971-2.jpg
 
Last edited:
I'm curious - what's the reason you want to hydro-dip? Hydro-dipping a great technique for irregular surfaces that would be really challenging or time consuming to mask/paint using more traditional techniques, but for regularly shaped items like fins and a body tube I would think a regular water-transfer decal would be every bit as easy (if not easier) and look just as good for putting down a transferred pattern. As a consequence of the complex shape I could see some value if you wanted to put a pattern down on an ogive nosecone.

...Unless of course the object is just to learn the technique, in which case have at it! I completely appreciate the value of a "journey" in addition to a "destination".
 
The thought process if you will , was to put a patter or design on that otherwise would be very difficult to paint. I know the easier cheaper option would be to use a wrap , this was just an option I wanted to explore and figured I would see if any here had done it yet.
 
Everything old is new again. Way back in the mid/late 60's when I was making ultralight airplanes, one way of "skinning" the plane was called "microfilm". This consisted of a very thin nitrocellulose lacquer poured over a bucket of water and allowed to almost dry. The part needing to be skinned would be dipped in the water and brought up underneath the drying film of lacquer. The covering weighed almost nothing. Wings, horiz. and vert. stabs, even skeletonized propellers were covered. The really crazy people started putting a drop or two of tint into the lacquer. These things were amazing to watch - the prop might turn once a second or less. It was not unusual for someone to implode a plane by overwinding. They flew so slowly and gracefully - slower than a walking speed - they were poetry in flight. Good videos on YouTube...

microfilm-pouring-covering-american-aircraft-modeler-feb-1971-2.jpg

I love that plane! I made one from a kit once, it was so cool how it was just so SLOWWWWW. I have wanted to do one of these again.
 
Here I go, reviving old threads again. I hydro dipped some plastic parts and a couple topwater lures a few years ago, it was a pretty easy process and turned out good. I dont have pics of the lures I dipped but I was able to pull off a white/silver/chartreuse/blue tiger stripe pattern on a striper plug.

Now I got a rocket I want to hydro dip. Its a low power estes so the body tube is paper. I am concerned that dipping the body tube in water will make it swell/deform/rendered useless.

Has anyone here tried it on a rocket yet? I have a rocket the kid plays with in the house so I might do a 'test dip' on that...
 
You have identified the problem. A cardboard tube would have to be completely sealed/waterproofed. That sealing will likely mess with part fitment at the motor mount or couplers.

If you want to hydrodip low power, get some fiberglass kits from ******
 
After thinking about this, you can put the film on a rocket body tube without getting it very) wet. You put the film on water (whatever method), then use a wire loop or frame to lift the film out of the water (probably need to lift one corner first to break the surface tension). Then transfer it to the rocket; drape it over the body tube.
 
I played around with it. I wanted to do a 98mm min dia rocket.....together and in one dip. The plan was to do it from a boat in a lake. I was going to corral the paints with some dollar store water weenies..and then absorb the left over paint with news paper. It all seemed doable.

The only photo I took..I was playing around with base colors and fluorescent colors.
hydro.jpg

Tony
 

Latest posts

Back
Top