Help with tensile strength of 16ft parachute!

The Rocketry Forum

Help Support The Rocketry Forum:

This site may earn a commission from merchant affiliate links, including eBay, Amazon, and others.

akorn48

Member
Joined
Feb 4, 2024
Messages
9
Reaction score
3
Location
Durham, NC
Hi all,

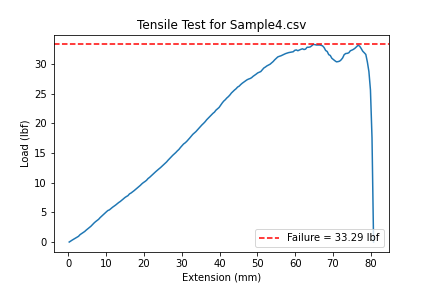
I’m currently in the process of manufacturing a 16 ft diameter circular parachute for my university’s high-powered rocketry club. Our rocket is 80 lbs, and the snatch force was calculated to be 437 lbf. The parachute is composed of 12 zero-porosity nylon ripstop gores connected by strips of Type 6 nylon webbing via Size E thread. I recently did tensile testing on 1” wide sample connections of ripstop & webbing as shown below in Figure 1, and found the ultimate tensile strength to be about 34 lbf (Figure 3).

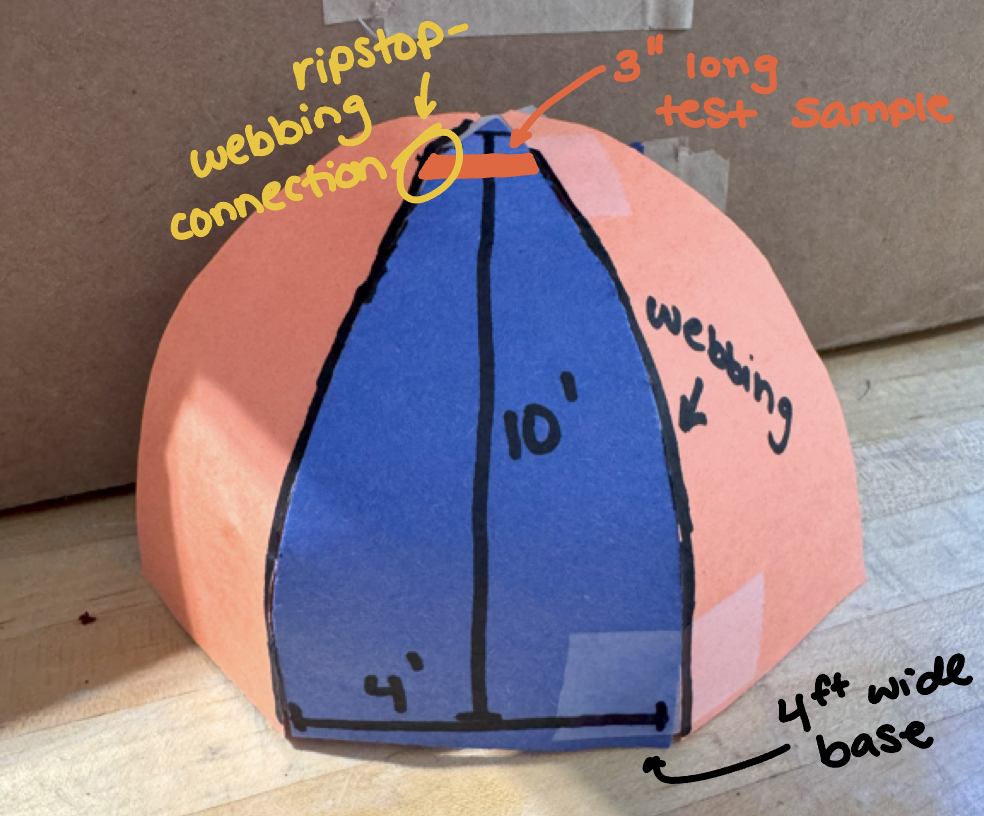
I am wondering how to determine what the ultimate tensile strength should be on such a sample in order to survive the load applied to the entire parachute under inflation. If there are 12 gores, it seems reasonable to me that each gore should be able to withstand 437/12 = 36.4 lbf. However, if each gore (4 ft base and height of 10 ft) needs to withstand 36.4 lbf, how much does each inch-wide strip of webbing/ripstop connection need to withstand? Is it simple enough to say there are 120 inches in length of each webbing line, so each inch-wide strip of webbing for each gore needs to withstand 36.4/120 = 0.303 lbf? That seems very small. Additionally, each gore has variable width along its height. How would this come into play when scaling up our small 3” long ripstop test sample, which would be found at the very top of the chute (Figure 2)? This tensile sample likely produces different results than a full 4 ft sample found at the base would.

Any guidance would be very much appreciated. Thank you very much!

Figure 1:
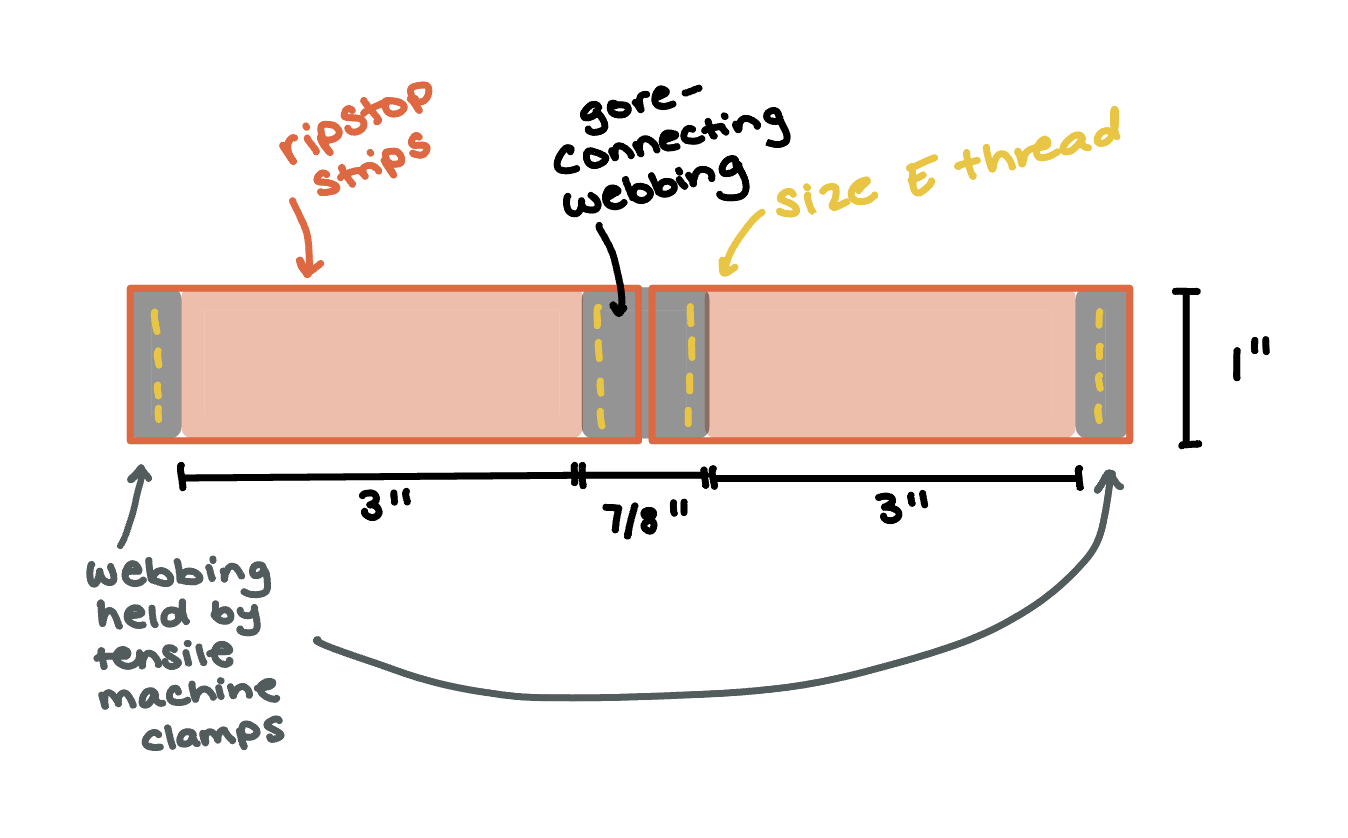
Vye9FXTgRmrKTRwtHOq0kCar9Np1_u5cfi-Tuf1_WbzMbMDgnOMPUMNujuxb-j8YfadkggruPr_XeTvkiAi_tX0DlVnLmN87qbM9XtMbrAVTHk3UUw2XKt2AVrRBSc4axEgT3TnEhJz9TVDkXgIvn_w


Figure 2:
JGWdhQTb530cXOGbZ5P9Mw_AImTfp3kyhpQbwhWoFSvirYZU9JNlCYBO6TM2pWPkWckKzOJegDIv_4qYkrfbZduYsDyQxtEI60TMo2zXRE2pGXsFTuriyRxjFLrt2OjMuF-ELhhfwrQbXlNShZF6Z-s


Figure 3:
NooheBVDvk-TKpB6wF8XIKkNNwvVluqcCUlx7W1XleKvIdOD83O6APLl3cgaDUwrlYko-da8Fi8OManq7SgyzIWkk7I61W0mVHtpoU4pjxy8BJcT7HW24jD2O3YkdX7qKklS6GBOPOdxlX1DNkeNKY8
 
Last edited:
Study the Parachute Recovery Systems Design Manual. Everything you should need to know will be in there.

Is there a reason you are using the nylon strip instead of felled seams? What was the failure mode on your tests? Did the nylon tear? Did the ripstop fail? Did the thread fail?

At what speed did you calculate your snatch force?

I would be more concerned about shroud lines and how they are attached then the seam connecting the gores together? BTW, what size spill hole are you going to use at the top?
Ok, thank you! I was recently recommended the manual from someone else and have found it to be helpful. The nylon strip was chosen following a how-to guide that other high-powered rocketry clubs have followed and found success with. It functions as a seam binding and each strip is the length of the arc of the parachute to provide structural reinforcement. During the tests, the ripstop was pulled out of the seams so that the material tore, but the stitches themselves never came undone. Our rocket will be falling at about 78 ft/s when this main parachute inflates, as the drogue parachute will have inflated at apogee. The shroud lines will be attached to the nylon strip that connects the gores--we have already tensile tested this and found that the connection can withstand extremely high loads with a FOS of greater than 10. We are not using a spill hole because we want maximum drag to slow our parachute to <25 ft/s upon landing, and the guide we're following uses apex caps.
 
Ok, thank you! I was recently recommended the manual from someone else and have found it to be helpful. The nylon strip was chosen following a how-to guide that other high-powered rocketry clubs have followed and found success with. It functions as a seam binding and each strip is the length of the arc of the parachute to provide structural reinforcement. During the tests, the ripstop was pulled out of the seams so that the material tore, but the stitches themselves never came undone. Our rocket will be falling at about 78 ft/s when this main parachute inflates, as the drogue parachute will have inflated at apogee. The shroud lines will be attached to the nylon strip that connects the gores--we have already tensile tested this and found that the connection can withstand extremely high loads with a FOS of greater than 10. We are not using a spill hole because we want maximum drag to slow our parachute to <25 ft/s upon landing, and the guide we're following uses apex caps.
If you are using the nylon to reinforce the seam, you might want to use full felled seams and then more stitching to attach the nylon. The full felled seams will hold the nylon rip stop together much better and the nylon strap would reinforce that.

My brother was a licensed rigger for sky divers, repairing chutes, harnesses, and folding and packing emergency chutes, and when I explained how I built my first HPR chute with the full felled seams and 6" of zig zag for shroud lines, he laughed and said our rocket chutes open at very low speeds and have very small loads on them and that I was way overbuilding it. 4 - 6 inch of zig zag stitch to hold 550 paracord to the canopy seams was way more than required according to him. Sky divers open their chutes as high as 300 ft/sec. The sliders and things they do to slow down the opening isn't to protect the chute, it can handle that, it's to protect the frail human in the harness.

I've never done the calculations like you have, but I've been stitching about 1.5" of shroud line to cheap umbrella skin seams to use as chutes for years and the only seam that ever spit was when an early ejection deployed the main at about over 400 ft/sec., even then, the shroud lines all held. I had one that came in ballistic from 2000 ft and deployed the main at 400 ft. and 440 ft/sec. and it didn't damage the chute at all.

If you need to do the calculations as a requirement for your project, by all means, dive in. If you are just worried if the chute will hold up, sew it with full felled seams, zig zag 4 - 6 inches of shroud line to each seam and don't worry about it. You are magnitudes more likely to break a shock cord, quick link, or anchor point because of over-sized ejection charges, anomalies in deployments, or other issues, than having a chute failure because of snatch forces.

BTW, a spill hole in the top of the chute is highly recommend because it dampens the swinging oscillations you can get without one. If the rocket is at the bottom of a full swing when it lands, that adds a lot of horizontal velocity to the vertical component when it hits the ground an makes breaking a fin or the rocket much more likely.
 
Ok, thank you! I was recently recommended the manual from someone else and have found it to be helpful. The nylon strip was chosen following a how-to guide that other high-powered rocketry clubs have followed and found success with. It functions as a seam binding and each strip is the length of the arc of the parachute to provide structural reinforcement. During the tests, the ripstop was pulled out of the seams so that the material tore, but the stitches themselves never came undone. Our rocket will be falling at about 78 ft/s when this main parachute inflates, as the drogue parachute will have inflated at apogee. The shroud lines will be attached to the nylon strip that connects the gores--we have already tensile tested this and found that the connection can withstand extremely high loads with a FOS of greater than 10. We are not using a spill hole because we want maximum drag to slow our parachute to <25 ft/s upon landing, and the guide we're following uses apex caps.
Spill holes can improve the performance of a parachute by reducing the swaying or rocking motion that causes air to spill from under the skirt reducing its drag. Test both ways, with and without a spill hole, I think you will find a hemispherical or parabolic chute with a spill hole will out perform one with no spill hole. There is a reason nearly all commercial non-hobby chutes have spill holes.
 
Spill holes can improve the performance of a parachute by reducing the swaying or rocking motion that causes air to spill from under the skirt reducing its drag. Test both ways, with and without a spill hole, I think you will find a hemispherical or parabolic chute with a spill hole will out perform one with no spill hole. There is a reason nearly all commercial non-hobby chutes have spill holes.
I see, thank you!
 
If you are using the nylon to reinforce the seam, you might want to use full felled seams and then more stitching to attach the nylon. The full felled seams will hold the nylon rip stop together much better and the nylon strap would reinforce that.

My brother was a licensed rigger for sky divers, repairing chutes, harnesses, and folding and packing emergency chutes, and when I explained how I built my first HPR chute with the full felled seams and 6" of zig zag for shroud lines, he laughed and said our rocket chutes open at very low speeds and have very small loads on them and that I was way overbuilding it. 4 - 6 inch of zig zag stitch to hold 550 paracord to the canopy seams was way more than required according to him. Sky divers open their chutes as high as 300 ft/sec. The sliders and things they do to slow down the opening isn't to protect the chute, it can handle that, it's to protect the frail human in the harness.

I've never done the calculations like you have, but I've been stitching about 1.5" of shroud line to cheap umbrella skin seams to use as chutes for years and the only seam that ever spit was when an early ejection deployed the main at about over 400 ft/sec., even then, the shroud lines all held. I had one that came in ballistic from 2000 ft and deployed the main at 400 ft. and 440 ft/sec. and it didn't damage the chute at all.

If you need to do the calculations as a requirement for your project, by all means, dive in. If you are just worried if the chute will hold up, sew it with full felled seams, zig zag 4 - 6 inches of shroud line to each seam and don't worry about it. You are magnitudes more likely to break a shock cord, quick link, or anchor point because of over-sized ejection charges, anomalies in deployments, or other issues, than having a chute failure because of snatch forces.

BTW, a spill hole in the top of the chute is highly recommend because it dampens the swinging oscillations you can get without one. If the rocket is at the bottom of a full swing when it lands, that adds a lot of horizontal velocity to the vertical component when it hits the ground an makes breaking a fin or the rocket much more likely.
Ok thank you, this is helpful and reassuring to know! I found a formula for determining the length of shroud line that should be sewn to the fabric, and while it was greater than 4-6", it does follow your reasoning of not needing too much length to be a strong connection, so likely it just has a very high FOS. I just want peace of mind that the gores stay sewn together and the parachute doesn't unravel under the snatch force and weight of the rocket. I will look into manufacturing spill holes as well. Thank you very much for the detailed explanation! I appreciate it.
 
Ok thank you, this is helpful and reassuring to know! I found a formula for determining the length of shroud line that should be sewn to the fabric, and while it was greater than 4-6", it does follow your reasoning of not needing too much length to be a strong connection, so likely it just has a very high FOS. I just want peace of mind that the gores stay sewn together and the parachute doesn't unravel under the snatch force and weight of the rocket. I will look into manufacturing spill holes as well. Thank you very much for the detailed explanation! I appreciate it.
I had a 6' ellipsoid chute eject at 220 fps on an anomalously-long delay. The chute has felled seams and survived. I still fly it. I also roll 1/4" or 3/8" twill tape into the apex vent hem to strengthen it. That hem gets very high stress compared to other parts of the chute.

I think felled seams, an apex vent 10-20% of your canopy diameter, and a reinforcing tape rolled into the vent hem will give you a plenty strong and stable chute.

 Steve
 
Last edited:
To follow on what @Handeman mentions, you really need a spill hole. They perform a couple of important purposes – reducing oscillation and opening shock loads. Here's a short article that talks about spill holes:

https://www.apogeerockets.com/Peak-of-Flight/Newsletter580
From there additional research should be persuasive of the importance of a properly sized spill hole.


Tony
 
Last edited:
I had a 6' ellipsoid chute eject at 220 fps on an anomalously-long delay. The chute has felled seams and survived. I still fly it. I also roll 1/4" or 3/8" twill tape into the apex vent hem to strengthen it. That hem gets very high stress compared to other parts of the chute.

I think felled seams, an apex vent 10-20% of your canopy diameter, and a reinforcing tape rolled into the vent hem will give you a plenty strong and stable chute.

 Steve
Ok, thank you! I do have a question about manufacturing a parachute with an apex vent--do you have any suggestions for guides to follow? The guide I've currently been following (https://www.nakka-rocketry.net/paracon.html) doesn't include one and that was what I was going to base the gore shapes around. Are there any reputable beginner-friendly guides that you recommend to making a chute with an apex vent? Additionally, some of the images I've seen online of parachutes with apex vents have vents that are pulled below the chute (pilot chutes). These lower-set vents seem to be held down by a type of webbing or continuous line (like this one: https://squirrel.ws/equipment/base-jumping/snatch). Could this be an application for my webbing? Or do you think a pilot chute is not necessary and I could just stick with a regular apex vent? Due to time constraints and that fact that I'm still learning I don't want to take on anything overly advanced right now, although in the future I would be interested in experimenting more
 
If the failure mode you're experiencing is the ripstop tearing away from the stitching and leaving the stitching intact, then adding another row of stitching will help increase the strength. In addition to the many other benefits of a spill hole people speak of here, they also make the parachute easier to make. Cut the parts, hem top and bottom, then start sewing panels together.

If it was my chute, I'd sew the ripstop pieces to each other if you aren't already doing that. That will help transfer the loads across the seams as well.
Thank you for the advice! In making a parachute with a spill hole, instead of cutting out gores that come to a point, would I just make the top of each gore flatter in shape so that when all put together the gores form an open circle in the middle? And I would not need to make apex caps? Additionally, do you know if there's a difference between a spill hole at the top and a spill hole that is pulled lower a bit as in a pilot chute?
 
Thank you for the advice! In making a parachute with a spill hole, instead of cutting out gores that come to a point, would I just make the top of each gore flatter in shape so that when all put together the gores form an open circle in the middle? And I would not need to make apex caps? Additionally, do you know if there's a difference between a spill hole at the top and a spill hole that is pulled lower a bit as in a pilot chute?
I usually cut the tops of the gores off flat at a suitable radius from the point, leaving a seam allowance for the hem. The end shape will be like a trapezoid with curved sides where the gores meet. My understanding is that if you pull the center down, you will want to adjust the gore shape since the chute won't be hemispherical any more.
 
I usually cut the tops of the gores off flat at a suitable radius from the point, leaving a seam allowance for the hem. The end shape will be like a trapezoid with curved sides where the gores meet. My understanding is that if you pull the center down, you will want to adjust the gore shape since the chute won't be hemispherical any more.
Ok, thank you! This is an unrelated question, but do you use binding tape when you manufacture your parachutes? If so, do you have a brand you recommend? Is the tap used to join two gores together, or do you sew it to each hem and then sew the tape lines together? I am struggling to find a good explanation online, just how to repair it
 
Thank you for the advice! In making a parachute with a spill hole, instead of cutting out gores that come to a point, would I just make the top of each gore flatter in shape so that when all put together the gores form an open circle in the middle? And I would not need to make apex caps? Additionally, do you know if there's a difference between a spill hole at the top and a spill hole that is pulled lower a bit as in a pilot chute?
Yes, make your gore template and then cut off the tip. I typically cut 10% of my diameter off the tip (e.g., a 48" chute loses 4.8" off the tip). That gives me a 20% vent (4% of the canopy open area). You can also cut off only 5% for a final 10% vent (1% of canopy open area). No cap is needed.

I stitch all my gores together then zigzag stitch the twill tape to the inside of the vent hem. I roll the hem to hide the tape and top stitch it down. The fabric will gather a bit inside the gore tip as you line up the rolled radial seams. That's good as the "fullness" it creates relieves stress on the fabric there.

The pulled down apex is a way of forcing the skirt to inflate wider. It's more effective on a flat or conical chute where the sides gather in more in the inflated profile. In an ellipsoid, you have the vertical wall at the skirt built in to give an inflated diameter much closer to the constructed diameter.20240206_172530.jpg
 
Ok, thank you! This is an unrelated question, but do you use binding tape when you manufacture your parachutes? If so, do you have a brand you recommend? Is the tap used to join two gores together, or do you sew it to each hem and then sew the tape lines together? I am struggling to find a good explanation online, just how to repair it
I don't use bias tape. I typically double roll my spill hole and bottom seams and French fell all other seams. The French fell has two rows of straight stitches. I do typically zigzag stitch in the shroud lines at the bottoms of the French fell seams.
 
I don't use bias tape. I typically double roll my spill hole and bottom seams and French fell all other seams. The French fell has two rows of straight stitches. I do typically zigzag stitch in the shroud lines at the bottoms of the French fell seams.
Ok gotcha thank you for the explanation!
 
I don't use bias tape. I typically double roll my spill hole and bottom seams and French fell all other seams. The French fell has two rows of straight stitches. I do typically zigzag stitch in the shroud lines at the bottoms of the French fell seams.
Yes, make your gore template and then cut off the tip. I typically cut 10% of my diameter off the tip (e.g., a 48" chute loses 4.8" off the tip). That gives me a 20% vent (4% of the canopy open area). You can also cut off only 5% for a final 10% vent (1% of canopy open area). No cap is needed.

I stitch all my gores together then zigzag stitch the twill tape to the inside of the vent hem. I roll the hem to hide the tape and top stitch it down. The fabric will gather a bit inside the gore tip as you line up the rolled radial seams. That's good as the "fullness" it creates relieves stress on the fabric there.

The pulled down apex is a way of forcing the skirt to inflate wider. It's more effective on a flat or conical chute where the sides gather in more in the inflated profile. In an ellipsoid, you have the vertical wall at the skirt built in to give an inflated diameter much closer to the constructed diameter.View attachment 628959
Ok gotcha! Thank you I appreciate the help and details very much!
 

Latest posts

Back
Top