Fliskits Thunderbird missile build

The Rocketry Forum

Help Support The Rocketry Forum:

This site may earn a commission from merchant affiliate links, including eBay, Amazon, and others.

Stymye

Well-Known Member
Joined
Jan 21, 2009
Messages
7,599
Reaction score
18
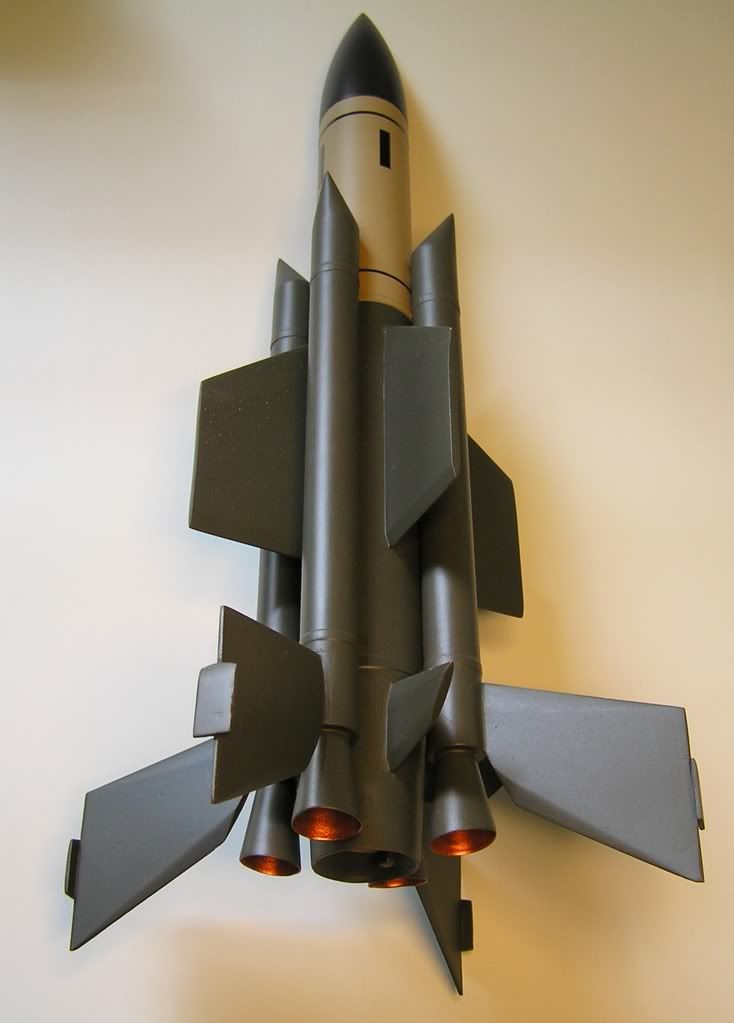
I took several pics of the build ,if anyone has a question about my build experience on this cool kit, please don't hesitate to post it.

one thing the folowing pics show is that, I deviated a bit from the instructions because I assembled and painted the boosters seperately from the sustainer . Jim knows how to design a kit, the build was very challenging yet the instructions take you thru each step and even offer alternative steps to take your build up a notch or two
this is one of those rockets I couldn't stop working on till the end. very few kits do that for me lately. If you like a highly complex looking rocket that comes with detailed easy to follow instructions , than by all means grab up a Fliskits Thunderbird . this will be the first rocket I launch next time out.


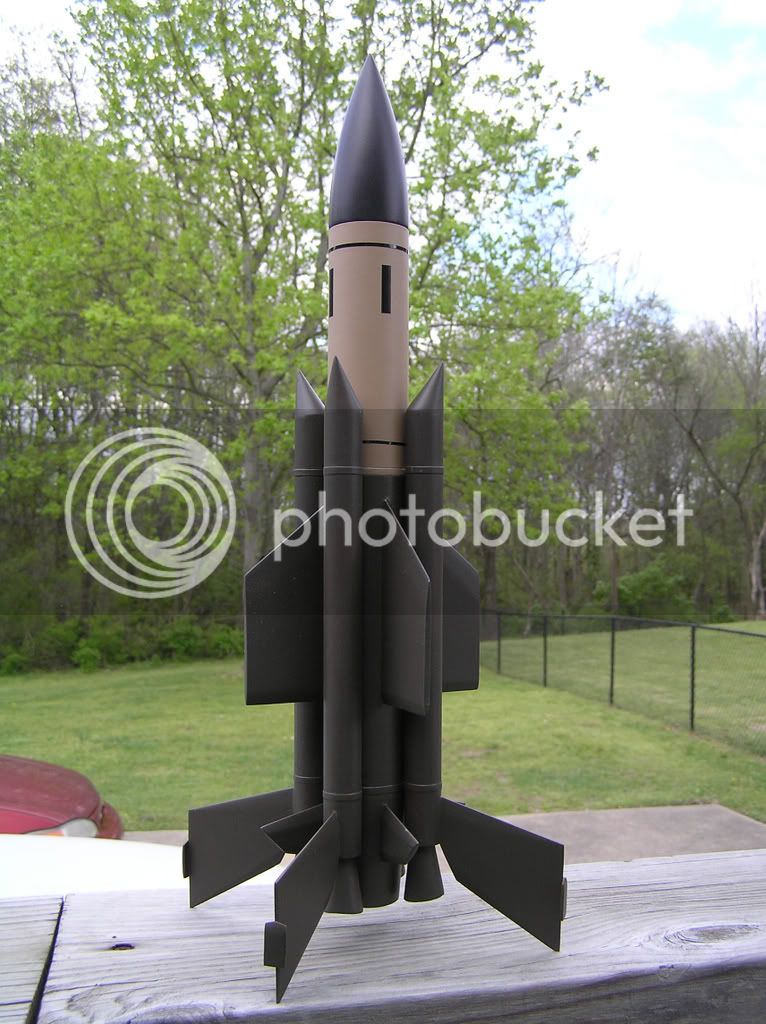
click on the photos to enlarge


final.jpg
 
That's beautiful Andy!!!

Great looking kit.
I'll be picking one up next weekend when I see Jim at our CMASS launch. :D
 
thanks Tony

one of those details Jim added just for that extra touch is the inverted cone inside the tailcone, this is too cool, and makes the build that much more interesting !

Thunderbird&


Jim, I gotta be honest, I wondered if you would ever put out a(sport or otherwise) scale model

...heh.. right off the bat you hit one out of the park !
 
Awsome Job! The fit, finish and paint all look great!

That must have been quite a job getting all the lumber to look so smooth.
 
sanding the fins took forever, I used masking tape to demarcate the bevels while shaping, this is essential ,you can't do it by eye... I used F-N-F to fill the grain, one trick I tried was to tape off all the bevels than applied the filler and sanded with a sanding stick, than I removed the tape from the beveled surfaces and taped off the flat surface of the fin,, more filler.. and sanded those areas. this left a nice sharp faceted and filled balsa fin.

for once... an experiment worked out good.
 
Outstanding!

:surprised:

Mine just leap-frogged up the build queue.
 
Ya know....
That actually looks like a prototype SAM- (I can look up the designation, which currently escapes me..), the Nazi's had tried to develope during the latter part of WW-2. If it isnt, it'd make one heck of a kit-bash!
Nice build Stymye!

AX'E :thrasher:
 
Oh man, you did our kit PROUD! That is beautiful!

Couple of questions, this being the first feedback I've gotten on the kit:

How was it making those asymmetrical nose cones?
How did the "booster straps" work out? Worthwhile detail or a pain?
How did the fit between the lower shroud and central motor shroud (that inverted shroud)?

This was a bit of a bear to document but I think it came out really well from a buildability point of view...

Thoughts?

thank you much!
jim
 
Andy, your builds, attention to detail, and finishing are among the best out there. Cool kit and outstanding job! This one is next on the purchase list and has been since it's announcement. ;)
 
Oh man, you did our kit PROUD! That is beautiful!

Couple of questions, this being the first feedback I've gotten on the kit:

How was it making those asymmetrical nose cones?
How did the "booster straps" work out? Worthwhile detail or a pain?
How did the fit between the lower shroud and central motor shroud (that inverted shroud)?

This was a bit of a bear to document but I think it came out really well from a buildability point of view...

Thoughts?

thank you much!
jim

the cones were not hard at all ,I pre curled them ,removed the overlap joint and glued it inside the join. I drizzled thin ca to harden them and used wood glue to attach them with the integral couplers. once dry, I dabbed wood filler around them and sanded flat with a sanding stick by keeping the stick flat with the od of the tube.

the booster straps were also easy , I used wood glue so they make a solid attachment with the sustainer straps.. I taped off the booster/sustainer attachment points before painting. I used med ca to tack the boosters on than applied wood glue fillets with a bamboo skewer.I think the straps add alot to the overall look of the model.

the aft shroulds coupled together perfectly, I was suprised at how well they fit together. I had a little issue with the outside tail-shroud being a little loose where it met the body tube so I reduced the wide end by cutting a angled sliver from the wrap ,this kept the smaller end to size.I only changed the size by mabey 2-3%, very little

one reason I built the boosters seperate was ,I thought the fins may be hard to fillet with the tubes in the way but after building the model ,I see enough room to do this after the boosters are installed.

the most time consuming part is the fin beveling. it was not really hard to do, just took some patience, I did alot of marking and checking as I filled and sanded them. they don't need to be perfect to look good on the launch pad. so they should only be as much work as the builder wants to invest in that aspect.
I'm just a little more anal than most..lol
I would liked to have had a little harder balsa for the finstock, it was easy to tear when trying to sand the bevels, I left the edges a little fat so they might hold up better. the soft balsa is easy to sand so it's not a big problem. also, I started out with 120 grit ,220 might have been a better choice to rough shape them.

The instructions are very well done, I found no problems at all with them . I jumped around (as I always do). but following them in order would work just fine.

I made one mod, on the inside small end of the booster motor shrouds I installed a round balsa block(1/8" thick) so I had a balsa to balsa joint when glueing them on. I used thin Ca to harden the paper also.

the best advice for building the model is to check measurements, alignment, and part fit before commiting to glue, this is good advice for any model ofcourse.

If a person prefers to fill the spirals, do it beforehand on this one, it will be much harder to do later. if you don't care to fill spirals , shame on you...( just kidding).


Overall I found it a very well executed kit with easy to follow instructions
Next,I'll give a flight report if the field ever dries up.
 
I should also note that the pics I show in the first 2 posts of the vinyl are for some fictional markings for my fictional version.I cut them from a small piece of black vinyl.

there are no decals included in the model .in reality, the real thing does not have much more than a solid green paintjob in most cases
 
Oh man, you did our kit PROUD! That is beautiful!

Couple of questions, this being the first feedback I've gotten on the kit:

How was it making those asymmetrical nose cones?
How did the "booster straps" work out? Worthwhile detail or a pain?
How did the fit between the lower shroud and central motor shroud (that inverted shroud)?

This was a bit of a bear to document but I think it came out really well from a buildability point of view...

Thoughts?

thank you much!
jim

First of all -- Wow, what an awesome job.

Second, those little details that may or may not be a pain are what really set a kit apart from the herd. Much like woodworking, the 'shadow relief' is makes an ordinary construction look outstanding.
 
Oh my God that looks like a pain in the butt to finish! It looks SOOOOO cool though! Jim! How did you come up with THAT for a scale kit??? A WAC Corporal just wouldn't do huh? I am really impressed with both the kit and the finished model by Stymye! It looks like the original designers of the actual missile had a "Box-O-Parts" competition like EMRR!:surprised:
 
great job my wife just bought one for me. I have a question where did you get the copper color for the booster nossles I like that look
 
Oh, and Stymye, I hope you're planning on posting an EMRR review as well?? :)

Again, great job, thanx!
jim
 
great job my wife just bought one for me. I have a question where did you get the copper color for the booster nossles I like that look

The metallic copper is anita's brand craft paint from one of the craft stores.Hobby Lobby,or Michaels. I just brushed it on.

Jim, I have started a review for emrr along with a few other rocket builds.

thanks for all the positive comments, the model is not that hard to build or paint if it's broken down into sections. I put tape over the glue joints between the boosters and sustainer than glued them together after painting.
 
Awesome build Andy! :D

As usual..:boring:..j/k Mine just jumped up higher on my queue
 
Beautiful! The copper/gold in the cones is a nice touch.

Man! It sure is intimidating with all those fins!:surprised:
 
Andy,

Great job on the rocket! I am looking forward to the flight report.

Best regards,
Brian
 
Ive been out of the rocketry loop for a year now because of my first year in college. i have to say, its nice to come back to the rocketry world and see a rocket like this to welcome me back. Im gonna get one soon along with some other fliskits. Its nice to be back for the summer :)
 
That is CHOICE, Andy. Awesome job!

Jim: You've got another winner on our hands.
 
Back
Top