Dedicated Photography Discussion Thread- Cameras,Lens,Techniques. Post your photography pics too.

The Rocketry Forum

Help Support The Rocketry Forum:

This site may earn a commission from merchant affiliate links, including eBay, Amazon, and others.
If you can find a 1Dx for $200 I'd pass. Something is wrong with it. 1 series cameras are water sealed (not water tight), rugged, heavy, etc, etc. They are considered "pro" cameras and no pro would be caught dead with a popup flash.
Well first I am not even a qualified amateur so having a camera with a pop-up flash does not bother me a bit because when you look at the Canon cameras, you have no idea whether they have a flash or not
there are 2 of the 1D mark II's that are within 25 miles of me, so i was thinking that I could take my lens and I would first contact the people and tell them I'm going to bring a lens. I want to see it fired up, take a few pictures, look at them on the screen to verify everything works. is that a good way to confirm things?
 
Ah 1D MKII That's an older camera. It came out around 2004. It's built like a tank. 8 megapixel. There's a piece software that lets you read the shutter count from the camera. That's the important thing to know along with battery condition and availability. A B&H Photo website search will tell you if the battery is still available. I think it used a CF card for storage. It'll need one of those. Just for future reference, if it has a built in flash (on top), it won't have a hot shoe. The hot shoe is a chrome bracket on the top that a speedlight or other flash slides into. I don't recall if the 1D MKII controls the flash other than triggering it. You can get a cable that plugs into the hot shoe and the other end slides onto the flash. That will let you hold the flash off to the side, high, low, whatever. The good news for you is YouTube will have a ton of info about using a flash.
 
You guys are ruining me, as I'm starting to spend more time researching photography than rockets. :p
Me as well....
The photos are more than I could ever imagine taking myself.
For me, macro and UV. I've always enjoyed looking at UV photos, see what we normally can not.
I've spent most of the day costing out a system to get started taking my own.
 
Me as well....
The photos are more than I could ever imagine taking myself.
For me, macro and UV. I've always enjoyed looking at UV photos, see what we normally can not.
I've spent most of the day costing out a system to get started taking my own.
You need to go over to Piston Heads.com and go to the photography section and check out the macro thread, it is fantastic
 
Macro. So.. in my opinion, the easiest Canon macro lens to use is EF 2.8L 100 Macro. I loaned mine to someone and they never returned it. I ended up replacing with the 180mm macro lens. Guess who doesn't loan gear anymore. The 180 mm lens is very good but not a good first macro lens. Macro takes a little time to figure out. Lighting is a big deal. Canon makes a macro ring flash that is really nice. The best and most difficult macro lens that they make is the MP-E65 f.28L 1-5 Macro. 1x to 5x and 5x gets in very close. All of these are made with a ESO 1D MKIII and the MP-E65. Another option is to use macro extension tubes on whatever lens you have. I've used them on my 600 f4. The tubes let you shoot from farther away.

The first two were shot with that. It doesn't have the electronics to record the macro factor unfortunately. I vaguely remember that I couldn't use the full 5x on the wasp (depth of field gets very skinny) at that magnification. I think it was shot at 4x. The mantis was probably around there. Every time I look at the mantis image I see that I chopped off the tip of the antenna :( That's what they call a "learnin lesson"

Praying Mantis
p673461384-5.jpg


Paper Wasp. This took almost an hour to get. I put the camera and lens on a tripod and moved it in until the wasps flew off of the nest. The nest was at least 4" across and covered in them. The antenna would brush the lens. That's how close the lens was. 1/250, f2.8, ISO 400, spot metering, MR-14X macro ring flash

p243875597-4.jpg


Dragonflies. 180 macro

p2054069382-4.jpg


This one took a little time because I wanted to catch it with it's mouth open.

p4116172401-4.jpg


Damsel Fly
p3887164090-4.jpg


p3887164080-4.jpg


Biting sob with lunch (I forget what this is called) No metadata on this one so I don't know which lens was used.

p3639144541-4.jpg
 
Best macro I've found is my 70-180 Mirco-Nikkor.
It's a screw driver lens so it doesn't get much love.
But having the ability to zoom when up close is SO nice compared to moving the tripod.
 
The MP-E65 moves too but no autofocus. Good macro lenses do. My 180 macro is more convenient but it can't do do what the MP-E65 can. 1:1 is about it. The dragonfly images are cropped. The mantis and wasp shots aren't.

This is a good article on Macro photography: Understanding magnification

I forgot something - If someone reading this goes down the rabbit hole of macro and you get curious about "what that bug is" Bugguide.net is the TRF of bugs.
 
Or a Brownie, or even a Polaroid.
True. I have a couple of Brownie Hawkeyes :) It doesn't get any simpler than the old Brownie (my first camera). Holga's are pretty cool too. Google pin hole camera. There's at least one out there that is incorporated into a truck.

Polaroid you say? But you can't buy Polaroid film right. Nope. Film has grown popularity and there are sites like Polaroid.com that sell new Polaroid film.

I can't find the link but there are still places to have your film developed. When I shoot it I send color out. B&W gets done at home on a Jobo.
 
True. I have a couple of Brownie Hawkeyes :) It doesn't get any simpler than the old Brownie (my first camera).

I learned on an Argus 75, at about 10 years old. There's an 8x10 of my dog that I took with it still hanging in my parents house.

(At this point, I should present the fact that I just like taking pictures and am not a talented photographer.)
1707580429657.png


Polaroid you say? But you can't buy Polaroid film right. Nope. Film has grown popularity and there are sites like Polaroid.com that sell new Polaroid film.

Thanks for the link. I haven't looked in a few years when it was a little more pricey. I have a basic 600 and an SX-70, perhaps I can manage a couple of packs to play with!


1707581738969.png

To plead on-topic, that photo was taken with an EOS Rebel XT, 18-55 lens manual focus on automatic exposure with flash.


I can't find the link but there are still places to have your film developed. When I shoot it I send color out. B&W gets done at home on a Jobo.

Jobo??? Jobo... geez @Hobie1dog, damn you for starting this thread!

I have more hobbies than I can afford already, I can't go down this rabbit hole now! (said as I add a new folder to my Favorites Bar.)
 
Yeah... The Jobo was a game changer. No darkroom required. Just a change tent to load film in drums or load holders.

"I have more hobbies than I can afford already" We share the same affliction 😂
 
I have a question. What basic setting do you guys use to capture mach diamonds in a rockets exhaust? I've tried shutter priority and a fast shutter speed but no luck. Just curious.
And no I've not taken anything I would want to show on this thread. I'm impressed my some of the images you guy have captured.
 
Looking back at some of the images that I've taken of other peoples rockets that should have had mach diamonds and didn't, my guess is, shoot in manual and adjust for 1 stop under exposed. Or use an ND filter. Maybe a polarizer? Point being that the exhaust is over or nearly over exposed and detail is washed out.

Digital cameras today have 14-ish stops of dynamic range (in good light). The human eye has 20-ish stops of dynamic range (in good light). A rocket launch will fit in that range EXCEPT the exhaust. The exhaust is so much brighter than anything else in the image that it's outside of the range limit of the camera and is over exposed or washed out. So you pick what you want to be exposed properly and let the rest be under exposed. Unless your a photoshop wiz and do some magic there.
 
The best and most difficult macro lens that they make is the MP-E65 f.28L 1-5 Macro. 1x to 5x and 5x gets in very close.
I don't have a really good macro lens but most macro lenses are pretty good so I have 3 that are pretty good. I don't do that much macro shooting but a few years ago I did digitize every transparency I owned, and this fall I digitized every 35mm negative I could find.

I got interested in playing with magnification beyond 1:1 and read that using a reversed lens as a closeup lens would work so I bought a reversing ring and a cheap prime lens. That was a long time ago so offhand I don't remember exactly what I got. One easy aspect of this is the brand of the lens you are going to reverse doesn't matter because you just mate the lenses with the filter thread. I think I had a lens about 35mm reversed on the front of a 90mm macro. The combination allowed for a lot of magnification but the images were very low in contrast. I should dig that out and play with it again, I could attack the contrast problem with post processing.
 
Thanks, that makes sense. I'll have to give that a try at our March launch.

Looking back at some of the images that I've taken of other peoples rockets that should have had mach diamonds and didn't, my guess is, shoot in manual and adjust for 1 stop under exposed. Or use an ND filter. Maybe a polarizer? Point being that the exhaust is over or nearly over exposed and detail is washed out.

Digital cameras today have 14-ish stops of dynamic range (in good light). The human eye has 20-ish stops of dynamic range (in good light). A rocket launch will fit in that range EXCEPT the exhaust. The exhaust is so much brighter than anything else in the image that it's outside of the range limit of the camera and is over exposed or washed out. So you pick what you want to be exposed properly and let the rest be under exposed. Unless your a photoshop wiz and do some magic there.
 
Thanks, that makes sense. I'll have to give that a try at our March launch.
I forgot one other option. Most cameras have the ability to use exposure compensation. With that you can use whatever settings you prefer and just set the exposure compensation to x stops under, so no matter what the scene does it's always at x stop over or under depending on the setting.

If I'm not shooting manual, I use aperture priority but that's not necessarily always correct. Looking back at some past rocket launches, sometimes I shot Av mode, sometimes I shot manual. I didn't use exposure compensation for any of them. I wish I would have. I always shoot raw format so a 1 stop under exposure is pretty easy to recover. You can't get blown highlights or shadows back. With digital, it's just data. If you don't collect the data, it's not there to recover.

For example:

This is the last "flight" of my LOC IV. What you see is not cutting edge finless can technology or a prototype motor installation coming out of the bottom. The lip of the motor sheared off and drove the case through and out of the fin can. Metadata - 1/1250 @ f10. ISO 400 for a fast shutter. Fast shutter gets the action and f10 gets the depth of field. Aperture priority ie the camera sets the f stop, I picked the shutter speed. 0 EV.

I had two cameras going. This was shot handheld with the 70-200 @200mm. The 600 f4 was on a tripod and caught the gory details of the fin can not traveling with the rest of the rocket. One hand on the button of the camera that the 600 was attached to and one hand holding the camera with the 70-200. When the countdown gets to zero I hold the button down on the 600 camera and let the high speed shutter collect frames fro me.

p259261573-5.jpg

Fin can's maiden flight without at motor. Manual, ISO 250 1/4000 @ f4. This reminds me of a scene from the 13th Warrior. It was after their first fight with the Wendol. "Come friend, your head has gone looking for your hands. They will meet each other in Paradise."

p394073845-6.jpg


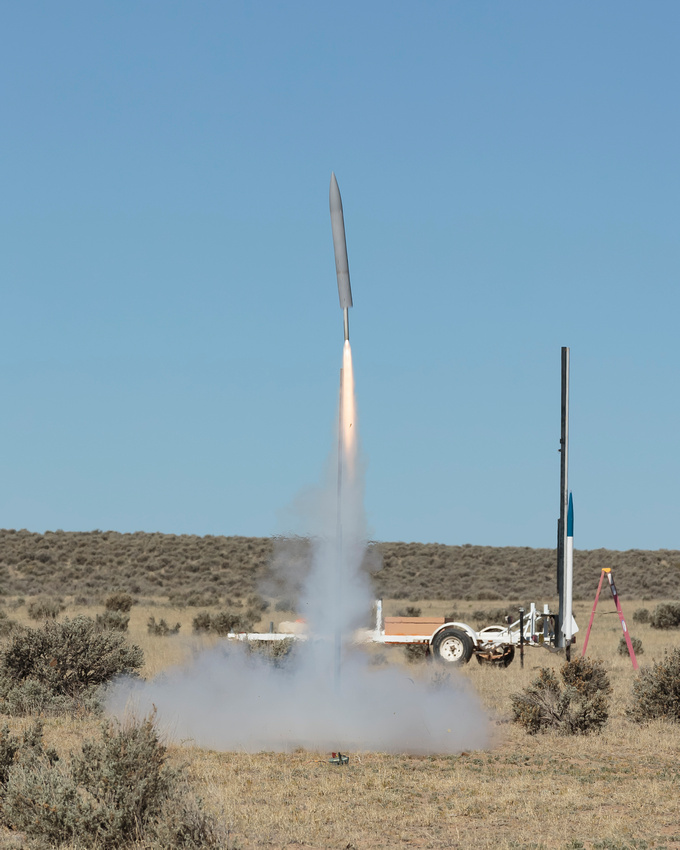
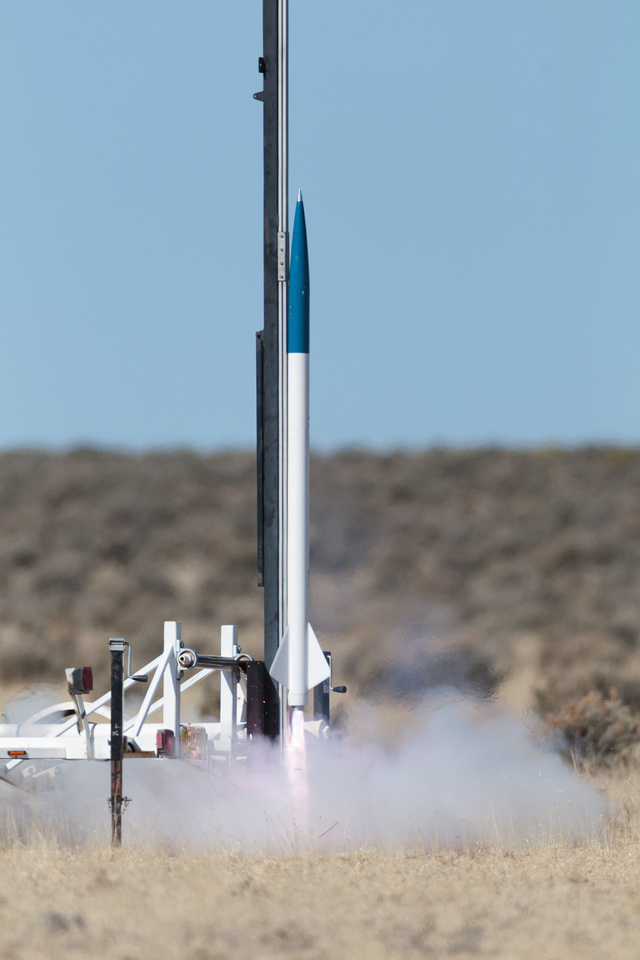
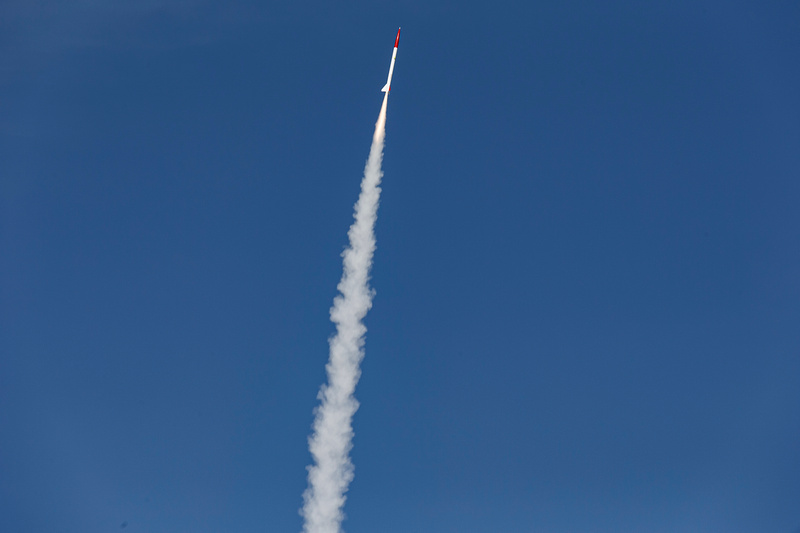
For our L3 guys launch, I used the same two camera setup but the settings were different. His rocket leaves the pad a bit faster than mine so the camera with the 600 was set to manual, 1/4000 @ f4, ISO 250. This is the 8th frame of the sequence which runs from no ignition to this point. I left out the camera model. It's an old 1D MKIV that has a relatively slow frame rate of 10 frames per second. Still a workhorse though. The newer, but not new, 1DX MKII is 14fps but it has a faster, larger buffer and it doesn't fill up as fast (which makes the camera stop). It'll shoot 4k video @60fps and full HD 1080P @120fps. I was just about to start shooting launches with one video camera and one photo camera when work transferred me back home to TX.

p488285580-6.jpg


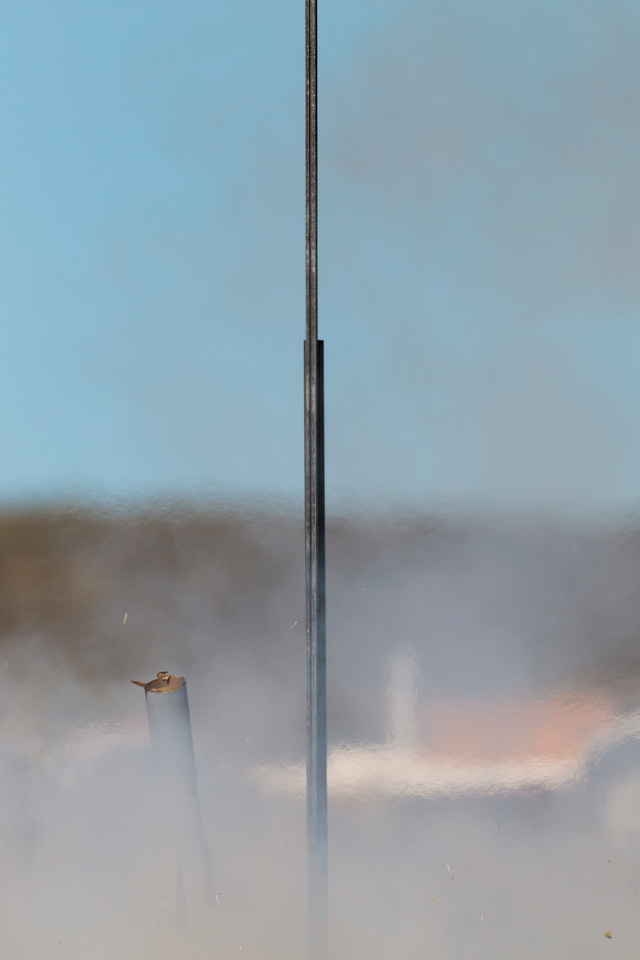
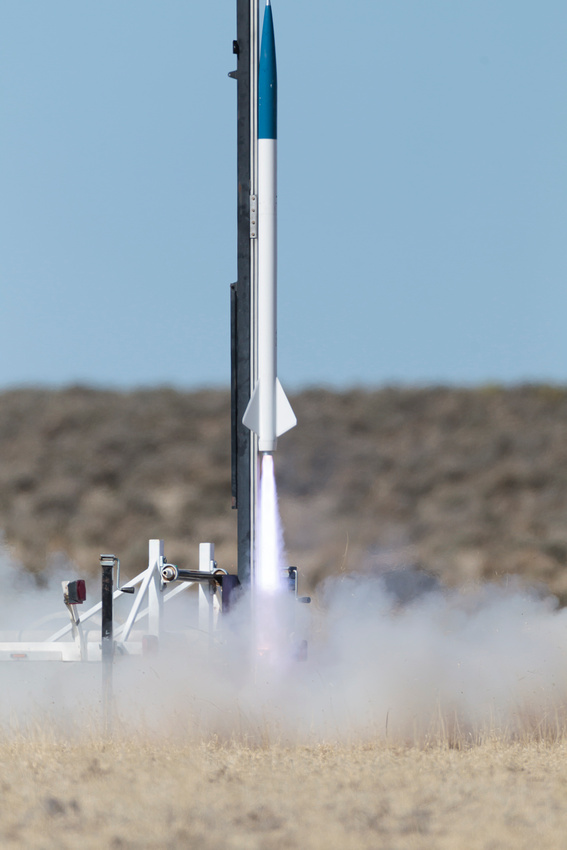
The next frame. The frame after this one is just the fin can (his was still attached) just before it clears the launch rail.
p356856180-5.jpg


I didn't get any good images of the rest of the flight. It happens,

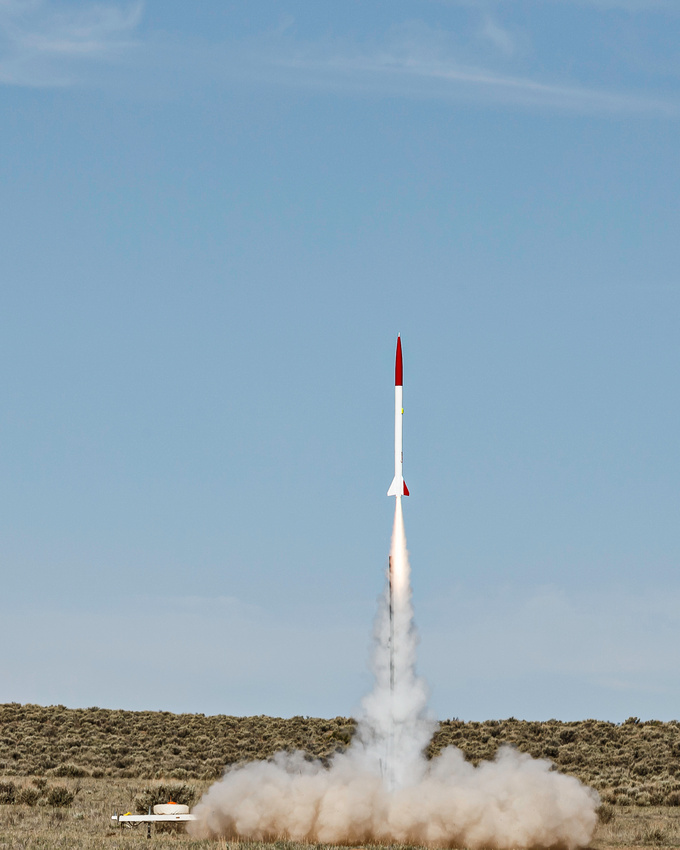
When I first started, I just used the 70-200. I don't think these are terrible.

L3 Launch (not mine)
p2589230458-5.jpg


Flight
p2589155490-4.jpg
 
If I'm not shooting manual, I use aperture priority but that's not necessarily always correct.
Anything other than rockets I may be shooting aperture priority, for rocket launches I shoot manual. I set a fast shutter speed and choose a compromise aperture around f5.6 or just above then I let the camera choose ISO. My biggest problem is we seem to always have our range set up where the rockets are backlit. If I end up with 30 launches I'm willing to post on FB I don't want to have to do extensive post processing to brighten up the rocket bodies although I think I need to do that for some of them anyway.
 
I like the idea of setting the camera so that it under exposes the frame by an f-stop and see what I get and go from there. Unfortunately, our launch site is set up so that the rockets are always back lit by the sun, but we do get a nice mountain range for a back drop that way. The other way would just be desert.
 
I like the idea of setting the camera so that it under exposes the frame by an f-stop and see what I get and go from there. Unfortunately, our launch site is set up so that the rockets are always back lit by the sun, but we do get a nice mountain range for a back drop that way. The other way would just be desert.
There are numerous strategies for exposure. Some people use "ETTR" which means you overexpose slightly so the histogram moves all the way to the right. The benefit is you get more light into the shadows or lighter tones. If you are off a bit you blow out some highlights. If you underexpose a stop then you don't risk blowing any highlights but you've lost some ability to recover detail from the shadows.

If your launch photos have the rockets underexposed you can fix that in post processing, it just takes more time. I usually get a lot of launch photos to process so I don't want to take that much time with each one.
 
I need to find out which one of you guys are good with Photoshop so that I can get you to change some things on my favorite photo of my wife.
 
I took a few photos of the annular eclipse, what part of it was visible from my house. I decided to be better equipped for the full eclipse next month so I bought a filter from Celestial Optical along with some glasses and a piece of solar film just in case. Since I received the filter we have had cloudy and rainy weather, it was clear and sunny today so I decided to get out and do some testing. The longest lens I have is a Sigma 100-400, the highest pixel density body I have is a Nikon D3300. I have a fairly heavy old Bogen tripod. I put it all together and headed out in the back yard. I wanted to test the setup as well as get some experience actually doing it.

A few things I learned-

1. trying to aim the camera at the sun is painful, it's hard to shield your eyes while manipulating the tripod. I'm thinking I need to cut a piece of cardboard to slip over the lens and block the light temporarily, something like a 16" square piece of cardboard with a hole in it just for the lens.

2. the D3300 is not the best camera to focus using live view because of the lag in the system but I think I managed to get the focus pretty well. Again light spilling over from the sun made this difficult. I got a piece of cloth and draped it over the camera and over my head so I could focus more easily. Also I suggest strong reading glasses to anyone who might have trouble seeing the rear screen with your face close to it. I suggest doing multiple focus attempts and photos during the process to improve your odds of getting good focus.

3. I needed longer shutter speeds than what I saw recommended on the internet. I was shooting at ISO 100, f8 and I needed 1/250 sec or slower. My filter doesn't state how many stops ND it is and that will probably vary depending on what you have. Actually 1/250 put the histogram of the sun right in the middle, with ETTR in mind I thought it should be at least 1 stop farther to the right but I was also leery of slowing my shutter speed at 600mm equivalent focal length.

I recommend that anyone who wants to photograph the eclipse but who isn't experienced at it should get out and do some tests of their gear. If you see anything that is difficult or isn't working then figure out how to change it or fix it. Make a list of anything non-standard that you need to bring with you. Record your exposures.

I was happy to be able to see some sunspots. This image is cropped and has a levels adjustment, no other processing was done.

DSC_0951b.jpg
 
Cool, you bought a white light filter. I've had a solar filter for my 600f4 for about 10 years, maybe longer. It gives me an orange image that I have to go in and color correct. I ordered a white light filter but due to the coming "frenzy" It's hit or miss whether I'll get it in time. Alan Friedman is an extremely talented solar image make. His website, Averted Imagination, is full of outstanding images. He did a members talk for the Houston Astronomical Society a few weeks ago and he shared a lot of info about how he captures and processes his solar images (he uses video and stacks frames for one thing). His equipment is old, his techniques are solid, and his images are distinctive.
 
Cool, you bought a white light filter. I've had a solar filter for my 600f4 for about 10 years, maybe longer. It gives me an orange image that I have to go in and color correct.
I was searching Amazon and I found a lot of filters that said they gave a natural yellow tint to the image. I was thinking that sunlight, at least when the sun is relatively high in the sky, is literally the definition of white light. It's not supposed to have a yellow tint.
 
Back
Top