Alex's Mini Squat build!

The Rocketry Forum

Help Support The Rocketry Forum:

This site may earn a commission from merchant affiliate links, including eBay, Amazon, and others.

Aksrockets

Now with 8% more aluminum
Joined
Apr 1, 2011
Messages
3,505
Reaction score
14
As if I needed another project....

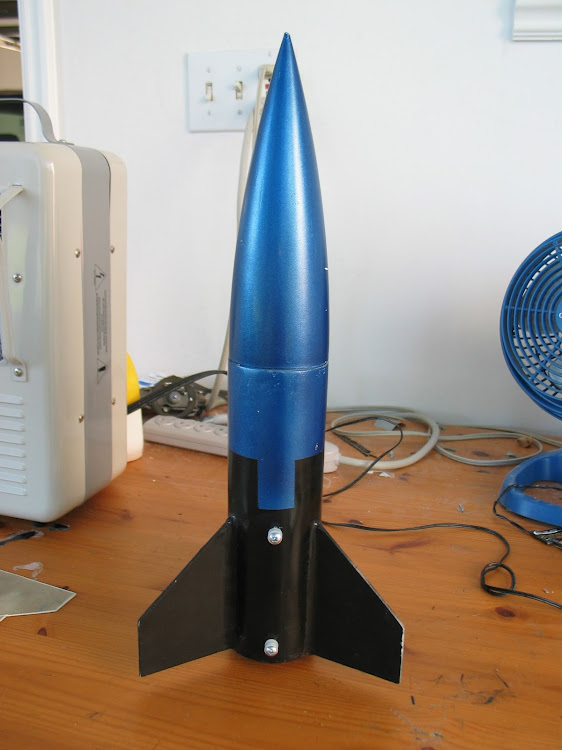
I've got a 2.6in Nosecone and a 10in length of tubing from a rocket I scrapped long ago. They've just been sitting in my parts drawer, begging to be turned into some small, stubby, ridiculously overpowered little thing. I finally decided to put them to use!

13+-+1


Here's whats going on...

I'm going to be making a downscale of the Madcow "Squat". It'll be 2.6in in diameter, under 18in tall and have a 38mm motor mount. :headbang:
It's designed to fly on anything from an E motor, all the way up to a 38/360 I motor.
Tube will be glassed with 2 wraps of 6oz fiberglass. The NC is a Madcow 2.6in "patriot style" nosecone. The fins and Centering rings will be 1/8in plywood. I may glass the fins. It just depends on how much willpower and time I have on my hands.

Here is the Openrocket file if you want to play around with it:
View attachment Little SQUAT.rkt


...and here is a screenshot of the openrocket design with a 38/360 loaded.
Screen Shot 2013-04-08 at 7.37.54 PM.jpg

I hope to start working on this thing in the next few days.

Alex
 
This looks awesome. I will be watching, who knows maybe madcow rocketry will add this to their collection of 2.6 inch diamter rockets. ;)
 
I spoke too late lol. Madcow already has a 2.6 lil Squat. Im still going to watch this build though.
 
I spoke too late lol. Madcow already has a 2.6 lil Squat. Im still going to watch this build though.
I did not know this. Just visited the Madcow site and and read through the online construction manual. This version looks like it will be a lot easier to get stable. My full-size Squat required a lot of BB's, epoxy, and bamboo skewers for the noseweight, a custom bulkhead and recovery anchor hardpoint added to the nosecone, and some other adjustments in the interest of reinforcing the construction. I'm very happy with how it turned out and it's a real flier. Doesn't swim well, tho. :y:
 
Fiberglassing....Fiberglassing...Fiberglassing

As you can see in the first picture, I peeled the cardboard tube down to about 1/2 the thickness of a normal tube. This is to compensate for the thickness the fiberglass will add. I used 2 wraps of 6oz fiberglass, laminated with West Systems resin. 2 wraps of 6oz is plenty heavy enough for a rocket of this size. It's what I use on my 4in rockets.
Here is the interesting part. Instead of peel ply (what I normally use) I'm using parchment paper. The parchment paper idea was inspired by this thread.
I drenched the tube in epoxy before applying the parchment paper. Then I wrapped the paper around the tube, just like I would peel ply.

13+-+


Parchment paper in nonporous so Epoxy can't flow in or out of it. That means the bubbles are much harder to work out. As you can see in the photo above, The tube will require some work to finish, assuming that everything else goes alright. Nothing a little bondo can't fix!

Stay tuned!

Alex

If the parchment paper isnt fragile like wax paper, I recommend using like a plastic card (credit card) to squeegy the epoxy out. This way pressure is applied and the bubbles will be removed.
 
If the parchment paper isnt fragile like wax paper, I recommend using like a plastic card (credit card) to squeegy the epoxy out. This way pressure is applied and the bubbles will be removed.
It's not to fragile and I don't mind poking holes in it. I poked a few to help a few of the bubbles drain out. I tried to work out the bubbles with my fingers. When I would press down lightly over a bubble, they would "swim away" from where I pressed down.

Alex
 
It's not to fragile and I don't mind poking holes in it. I poked a few to help a few of the bubbles drain out. I tried to work out the bubbles with my fingers. When I would press down lightly over a bubble, they would "swim away" from where I pressed down.

Alex

Thats a good flow out of the epoxy. I plan to use my squeegy method as to make the bond more stronger from the pressure being applied. I like this idea and I will use it in the future when I plan to laminate airframes.
 
Finished tube is......weird....

I peeled the Peel Ply off when I got home from school today. The surface is riddled with pinholes but the overall texture is smooth.

13+-+3


13+-+1


It's going to take a lot of filler!

Conclusions from the experiment:
There are much better alternatives then parchment paper for getting a smooth finish on tubes. While it's better then nothing, peel ply or a similar release fabric would mean less work.

Alex
 
Like Mason said, it could have been much worse. You should have squeegied it when you had the chance :p. To be honest the last time I got that formation was because I didnt apply enough epoxy. All I did was wet out the surface and thats what happened to me. I was laminating a fin, when that happened. I dont think that was the problem though. The thing about getting that glossy finish is that pressurization is required to allow the epoxy to stay evenly flat. I was thinking perhaps a few wraps of heat shrink tape would have done the trick, but then again that can be a pain. I will have to experiment myself on some small tubings or so. I should really look for sponsors to help me out.
 
I must say though you did a good job. I would have done worse to be honest :p.
 
I'm pretty sure the key to perfect tubes is using heat.

Lay up the fabric under high tension over a plastic mandrel (cast around an aluminum or steel rod for straightness and rigidity). Wrap it really tightly (and generously) in shrink tape. Wrap breather cloth around it. Vacuum bag it. Put it in an oven.

The mandrel would expand under the heat, and the shrink tape would contract. The expanding mandrel would prevent wrinkles from forming in the fabric, while the shrink tape would apply perfectly even pressure. The vacuum bag would degas the epoxy and evacuate excess resin from the surface.

Of course that's easier said than done, and casting plastic around the mandrel would be not so simple.
 
Alex, Your cardboard tube is probably soaking up more epoxy then you think...not leaving enough for the peel ply to do it's job.

Tony
 
I'm pretty sure the key to perfect tubes is using heat.

Lay up the fabric under high tension over a plastic mandrel (cast around an aluminum or steel rod for straightness and rigidity). Wrap it really tightly (and generously) in shrink tape. Wrap breather cloth around it. Vacuum bag it. Put it in an oven.

The mandrel would expand under the heat, and the shrink tape would contract. The expanding mandrel would prevent wrinkles from forming in the fabric, while the shrink tape would apply perfectly even pressure. The vacuum bag would degas the epoxy and evacuate excess resin from the surface.

Of course that's easier said than done, and casting plastic around the mandrel would be not so simple.

You would be willing to go through the above for a 2.6" sport rocket? Not slamming your rocket Alex. There's not to many motors on the market that a hand layed Fiber Glass body tube would not hold up to. I did a 5" P motor in a hand layed rocket. The rocket became 'misplaced' but did not rain down parts on us during the 'up part'.

sorry for jackin your thread Alex..

Tony
 
Like Mason said, it could have been much worse. You should have squeegied it when you had the chance :p. To be honest the last time I got that formation was because I didnt apply enough epoxy. All I did was wet out the surface and thats what happened to me. I was laminating a fin, when that happened. I dont think that was the problem though. The thing about getting that glossy finish is that pressurization is required to allow the epoxy to stay evenly flat. I was thinking perhaps a few wraps of heat shrink tape would have done the trick, but then again that can be a pain. I will have to experiment myself on some small tubings or so. I should really look for sponsors to help me out.

This was merely a test to see if parchment paper would work as a good release film for fiberglass tubes. I didn't want to introduce any other variables that would effect the outcome when I didn't know how the basic concept would turn out. If it turned out better, I might explore further into using Parchment paper as a release film, but seeing the results, I think I'll stop here. If you want to continue research, by all means do so. I would like to see this topic explored more.

Alex, Your cardboard tube is probably soaking up more epoxy then you think...not leaving enough for the peel ply to do it's job.

Tony
Tony, You are correct. The tube just ATE epoxy. However, I mixed 1.5x the epoxy that I would need, specifically to give the tube a heavy coat at the end before applying the wax paper. I don't think that the amount of epoxy I used was the problem (like it would be if I were to have used peel ply), I think the problem was that air bubbles are easy trapped under the parchment paper, causing the rough patches.

You would be willing to go through the above for a 2.6" sport rocket? Not slamming your rocket Alex. There's not to many motors on the market that a hand layed Fiber Glass body tube would not hold up to. I did a 5" P motor in a hand layed rocket. The rocket became 'misplaced' but did not rain down parts on us during the 'up part'.

sorry for jackin your thread Alex..

Tony
Although I probably couldn't (and wont) ever use the method that Carvac suggested, it is an interesting solution to getting layers of a tube compressed. But yeah, I agree. I'm not going through that much work on a 2.6in rocket that might not even need fiberglass in the first place.

By all means, Hijack away. I like the feedback and discussion.

Alex
 
Not to continue the spam, but that's really the only way I think would simultaneously get a dry, lightweight layup with immediately good surface finish.

Once you acquire a mandrel like that, it wouldn't be a particularly different process from a normal hand-laid, vacuum-bagged tube: you just use shrink tape instead of peel ply.
 
I trimmed the tube's ends square with a hacksaw. The tube is exactly 9in long.

13+-+1


It's not to exciting. More later once I take more pics!

Alex
 
I went to cut fins and discovered that I didn't have any 1/8in Plywood. :gasp:

I'm impatient and impulsive, so I figured; screw it. I'm going to overbuild this S.O.B.

I had plenty of 1/4in ply laying around so why not use that.

I printed out Templates from OpenRocket.

13+-+5


Next, I cut out the fins with a jigsaw and a fine tooth blade.

13+-+4


Because 1/4in really is super thick for my application, I needed to put a bevel on these babies!

I whipped up my first beveling jig in less then 5 minutes.

First, I attached 60 grit sand paper to my "cutting table". On one side I nailed a small strip of 1/4ply. This is what the fin pushes against when I'm beveling.
Second, I nailed 2 1/4in ply scraps together on the other side of the sandpaper. These hold the fin up at an angle to create the bevel.

13+-+2


The fin slides back and fourth between the 2 peices of plywood.

13+-+3


Ta Da! Nice, Clean, Straight bevel!

13+-+1


I beveled both sides until I got to the middle ply. From there, I just rounded the fin off. Often "knife edge" wood fins get dinged up easily.

13+-+1


I'm very pleased with these bevels. Wheww... One down, 2 to go!

Alex
 
This was merely a test to see if parchment paper would work as a good release film for fiberglass tubes. I didn't want to introduce any other variables that would effect the outcome when I didn't know how the basic concept would turn out. If it turned out better, I might explore further into using Parchment paper as a release film, but seeing the results, I think I'll stop here. If you want to continue research, by all means do so. I would like to see this topic explored more.
Alex

You skipped in important step from the thread that inspired you. The person clearly mentions wrapping tape around the parchment paper. Thus allowing the epoxy to spread and no air bubbles formed. That is where I though the heat shrink tape would be more suffecient. Either way the tubing still looks good. Just keep up the good work and have fun building a rocket. I will indeed do more research, but the real test is doing the lamination and getting the results.
 
Last edited:
You skipped in important step from the thread that inspired you. The person clearly mentions wrapping tape around the parchment paper. Thus allowing the epoxy to spread and no air bubbles formed. That is where I though the heat shrink tape would be more suffecient. Either way the tubing still looks good. Just keep up the good work and have fun building a rocket. I will indeed do more research, but the real test is doing the lamination and getting the results.

As Greg clearly points out (and I think he's right)
GregGleason said:
I don't know how well it would work on a tube, since 14 mil film has properties that make it want to bend in one direction at at time, whereas paper can be wrinkled fairly easily if it is taped.
I agree. As I was wrapping the parchment paper, It was starting to form wrinkles with no air bubbles, which would leave a bumpy epoxy surface. I think a wrap of tape would have caused the parchment paper to wrinkle more.

Alex
 
I've gone and done the impossible.

I took the engine mount out of a prebuilt rocket with TTW fins.

I had an old rocket the "Stub". Anyway, the stub took a nasty fall from 3000 feet at hellfire. It broke 2 fins and was deemed "un-reparible". It sat around in my closet for a while, just collecting dust.
So, I pulled the engine mount out of it. It took me about half an out with a dremel and hacksaw. First, I had to saw the fins off at the root, Then use the dremel to clean most of the fin out of the fin slot. Then, I cut the tube lengthwize and peeled the tube off the CRs. Any parts of the tube left on the tube I took care of with the dremel.
Before:
IMG_5256.jpg


After

13+-+1


RIP.

Here is the engine mount completely removed and next to the Squat body tube.

13+-+2


More later!

Alex
 
I like to think that reusing crashed rocket parts keeps the old rocket alive. It's kind of like re-incarnation!

Looking great! Can't wait to see the finished product
 
You might have noticed that I cut slots and didn't say anything about it.

I forgot to take pictures of my slotting process.

Here is what happens. I drill out 1/4in holes at the bottom of the slots, Then I run a jigsaw through the slots. Works like charm!
To see more on the process, check out this thread

Back to work!

Alex
 
Oh look. I seemed to have tacked the fins on with 5 minute epoxy. Engine mount was also installed with a generous amount of 5 minute.

13+-+1


Alejandro.
 
It's fillet time!

I masked the fins with scotch tape after marking exact lines with a sharpie.

13+-+2


I mixed up a good sized batch of US composites fast epoxy and threw in some microbaloons to thicken it up a tad.

Then, I poured it into the fillets and shaped it with a 1/2in piece of PVC.

13+-+3


I also tried to fill the gaps and pinholes in the tube with the rest of the epoxy. It's curing at the moment.


Alex
 
Great job so far Alex, nice to see people try new things.
For filet masking, I would recommend using blue painters tape. I've had great luck with it.
What motor are you planning on using? An H148R would do the job. :)
 
Back
Top