The Double Up build thread

The Rocketry Forum

Help Support The Rocketry Forum:

This site may earn a commission from merchant affiliate links, including eBay, Amazon, and others.

Balltip

Well-Known Member
Joined
Feb 20, 2006
Messages
988
Reaction score
0
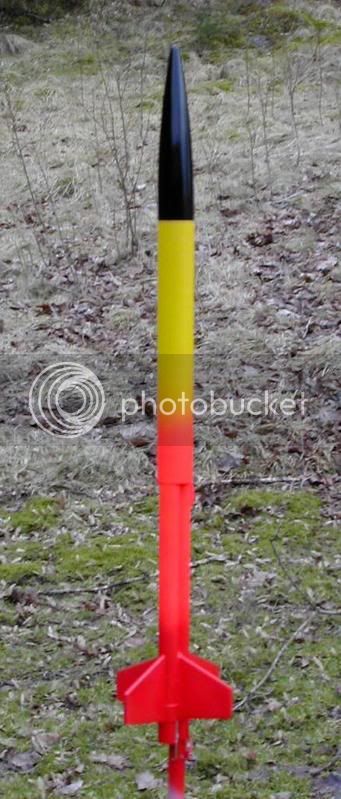
After experiencing my first clustered flight I thought I'd also post a build thread regarding the rocket that I used.

You can find a picture of the *prototype* rocket here: https://www.rocketryforum.com/showthread.php?s=&threadid=34074


This thread will be showing prototype number two (or shall I say the "final idea"? Errrrr... That was actually a rather cool name for a rocket! I might change it to that now LOL!)


Anyway, the rocket is pretty basic but do involve some tweaking of the materials used that I personally have not seen before. But I don't take credit for inventing anything - there are many things that I have not seen before. ;)


A parts list would be as follows:

1 piece of BT56, 24.5 cm long (9.6") for main body tube
2 pieces of BT20, 30 cm long (12") for motor mounts
2 motor hooks (preferably made from window wiper blade springs)
2 engine blocks to fit inside BT20
1 scrap piece of BT20, approx 3cm or 1½"
1 length of Kevlar thread (30 cm / 12") shock cord mount
1 Nose cone (Estes BT56 PNC, like the ones that you get from Red Arrow Hobbies, or a cone of your own choice)
4 fins made from balsa, 3mm or 1/8" thick (Fin measurements will be posted later in the thread)


Note: Edited on June 14, due to flaw to the parts list. Now it should be okey-dokey though.
 
Start out by sanding the surfaces of the BT's to a smooth finish so that the glue will adhere when you start assembling.

First step of assembly is that you glue the two motor tubes (BT20) together side by side. Use just a tiny amount of glue as you will not need more than that. The seam will be much smoother if you use just a little. Just make sure that you glue them together all the way from end to end.

Place them on a flat surface and let dry completely.

After that it is time to get the motor blocks in place, as well as the motor hooks (or you just fritction fit the motors - your choice really).
To keep the motor hooks sturdy, cut two pieces of the same lengt from the scrap piece of BT20. They should both be approx. 15mm long, or just a tad over ½". Cut them open length wise, apply some glue and slide them over the hooks so that the aft end of them are about 20mm or 3/4" from the rear of the motor tubes.
If you feel you need a bit more glue in the joints, add some CA when the white (or yellow) glue has dried. I also used a tiny amount of CA on the cuts that I made for the front end of the motor hooks, where they go through the body tube (circles).
See picture.

(I have always thought it would be better for the motor hooks to go in front of the motor block, and so do they do on this rocket too.)
 
Once the MMT is dry, it is time to put the twin motor tubes inside the main BT.

Place the main BT side by side with the twin tubes, so that the aft ends are flush. Mark the front of the MMT tubes where the main BT stops, using a pencil. The idea is that once assembled, the twin motor mount will look as long as the main BT.

Pour some white/yellow glue down the main BT and slide the twin tubes into the main tube by pressing the main tube slightly oval using your thumb and index finger. It can be a good idea to do a dry fit at first, before you add glue...
Once the twin tubes are inserted to the mark, twist them sideways about a quarter of a turn to spread the glue out a bit. You do not need a lot of glue as you will fill the gaps later.

You will, however, need to eye ball so that everything is straight! Take your time and get the joint straight. You don't have to rush this step as you will find that there is plenty of time for adjustments before the glue "bites".

Put aside and let dry *completely*!
 
Now you got something that is starting to look like a rocket. :)

And now it is time to look at the shock cord mount. Tie a relatively large loop at one end of the Kevlar. Slide the loop through one of the openings in the joint between the twin tubes and main BT.

(I let the loop stop about 1½ inches from the front end of the main BT as I want to avoid zippering. It feels better to have some soft elastic pulling at the front of the BT instead of that hard and sharp Kevlar. It is not that difficult to get the elastic in place down that relatively big hole in the 56-tube if you use a pair of tweezers.)

This is important though: You should have some Kevlar left at the aft end! Do NOT cut if off yet!!! See pictures below.

Now you either use CA or white/yellow glue to tack down the aft end of the Kevlar inside the main BT. Once done you will have to let it dry completely before you proceed to the next step.

Pics shows the main BT from the front (note the inner strengthening of the BT using some CA), as well as the rear of the main BT and the left over lengt of Kevlar.


From the front:
 
Now you will have to go looking for either some cotton balls or some toilet paper for closing up the gaps in the BT/MMT joint.

Make a small "sticky ball" (I do not know if there is a proper word for this, so maybe I just invented one...) out of some of the cotton or paper and white glue.
Work the glue into the cotton/paper, and add a tiny amount of glue to the interior of the area where you will push the sticky ball.

Using a match, a scrap piece of balsa or something similar. push the sticky ball down the joint. Look through the front end of the rocket (hold it up against a light) to see if the joint is completely sealed or not. If not - add some more "sticky ball".

Once both sides are done, you still have a piece of Kevlar sticking out, like a sort of "fuse". Cut it off so that about 25mm/1" is left. Use a dull pair of scissors so that the end of the Kevlar gets really badly frayed up! (Note: Even using a sharp pair of scissors, that is most likely the way it will end up anyway... ;) )

Now work that frayed end down into the glue/cotton (or paper) seal! Add some more "sticky ball" over it to get the surface looking smooth.

Set aside to dry again - preferably over night.
 
Now it is time to add some fins!

The design of the rocket does invlove the fins to be placed a little from the aft end. This is because I do some flying over frozen ground in the winter, and if the fins were to take the first beating when coming down they would soon get knocked out of shape. So the idea is to have the rocket land on the empty motor casings. (This is also why making your own motor hooks is a good idea - the Estes or Quest desing hooks tends to get beaten flat after a few landings.)


The fin measurements are as follows (I'll see if I can get this right...)

Root edge: 6.2cm / 2.45"
Fin tip: 2.8cm / just over 1"
Span: 6.2cm /2.45"
Sweep length: 25mm / 1"

I used paper laminated balsa fins on this second prototype build (yet another first for me!)

When glueing the fins in place you need to use a file for all of them to get them in the right shape. Start out by glueing the fins that are placed between the motor mount tubes. You will have to file the root edges down to a wedge shape so that they fit (circles). Also; you need to sand off just a tad of the back of the root edge so that the fins fit over the rings that hold the motor hooks in place. Dry fit before glueing.

The fin joint add strengt to the aft end of the twin MMT, this is why you don't have to use a lot of glue to join them together in the first place.

And yes, in this picture I still only got three fins in place. ;)
 
Once you got all four fins in place you are pretty much done.

Paint your Double Up in nice color/colors, add a length of elastic of your own choice, a chute (if you fly this thing on C motors it will go HIGH! Long delays are recommended.) and enjoy!

My own Double Up will most likely end up in something along the lines of a yellow/black "camouflage" theme.

If you do build one like this, I would be really happy if you posted something about it on here as it is my first "own" design! :)

("Own" design... I have probably stolen more ideas than I realize.... LOL!)


Cheers!


Per
 
Arrrrrrr!


I almost forgot!


Launch lugs!!!!


Add the lauch lugs (two) at one of the root edges of the fins that are glued to the side of one of the twin tubes, and one at the front of the same twin tube, just behind the main BT.


...geee, a build thread that leave out parts... :rolleyes:
 
nice thread! Now make one that is 5 engines ;) :p

thanx, Ben
 
Very Nice detail Balltip!
Wish my little digital got in that close clearly;) very nice first cluster. You'll have a ball with it! ease of hook up should keep this model flying in your fleet a good long while.
I find myself forgetting Launch lugs all the time. sometimes It's not a bad thing on clusters, Have you considered building a multi rail launch tower for you clusters? It does get you some nice additional altitude and frees the airframe of those ugly addons;)

I really couldn't see the fillets on your finished model in your earlier thread. for small 2 and 3 motor clusters I've gone to 3 fin designs. filling and file/sanding the fillets into smooth transitions to further reduce drag and just make people ask "how'd ya do that" :D it's really very easy with a little 5 minute epoxy and elbow grease. but setting your fin in the motor tube seam is a great way to mount and self align fins:)
I've also learned to allow a small gap between motor tubes, I use a double layer of thin cardstock to allow the addition of an external full wrap around each motor tube of masking tape in addition to the normal internal friction taping of motors, eliminating the need for motor hooks. This sometimes helps both appearance and performance.
Great looking bird and build!
 
Nice build thread and kewl design. I hope you remember to post painted and launch pix!

(John, you gotta get a camera with a good macro lens, it's great! :))
 
Thanks for the thumbs up!

Ben: Hold on, I have only come to twin engines so far. Maybe in a year... ;)

Micromeister: The fillets on my original prototype are there, I just won't get that close with the camera to show the ugliness... ;)
But to describe them in words, using the phrase "too much white glue added at once in a string that has got some lumps to it and then left to dry without even thinking about smoothing them out" would be appropriate! :D

Jim: I'll post pictures as soon as she's all done for sure! :)


Regarding the camera I'm using, it is only a (relatively) cheap Nikon Coolpix, that must be +4 years old by now. It has only got 2.3 megapixels, but it does have a macro setting and I use that setting a lot. (Great when working on technical things when dismantling them. If in doubt where that little screw or spring belonged, go back and have a look at the picture you hopefully took when tearing it apart :D )
 
Now I have splattered on some paint on the second build. I had to give up the "tiger camo" theme I had in mind due to that a) I ran out of yellow paint, and b) Getting sharp tiger stipes is yet beyond my capability using nothing but rattle cans (unless I mask heavily using tape - something I don't feel like doing...)

DSCN7312.jpg


It still looks "fast", I think. :)


What remains now is some letter reading "Double Up!" and a last layer of clear coat. Then she'll take to the skies!
 
Back
Top