Estes FoxFire build (#1941)

The Rocketry Forum

Help Support The Rocketry Forum:

This site may earn a commission from merchant affiliate links, including eBay, Amazon, and others.

Back_at_it

Well-Known Member
TRF Supporter
Joined
Jul 16, 2019
Messages
2,423
Reaction score
3,023
Location
Chicago Burbs.
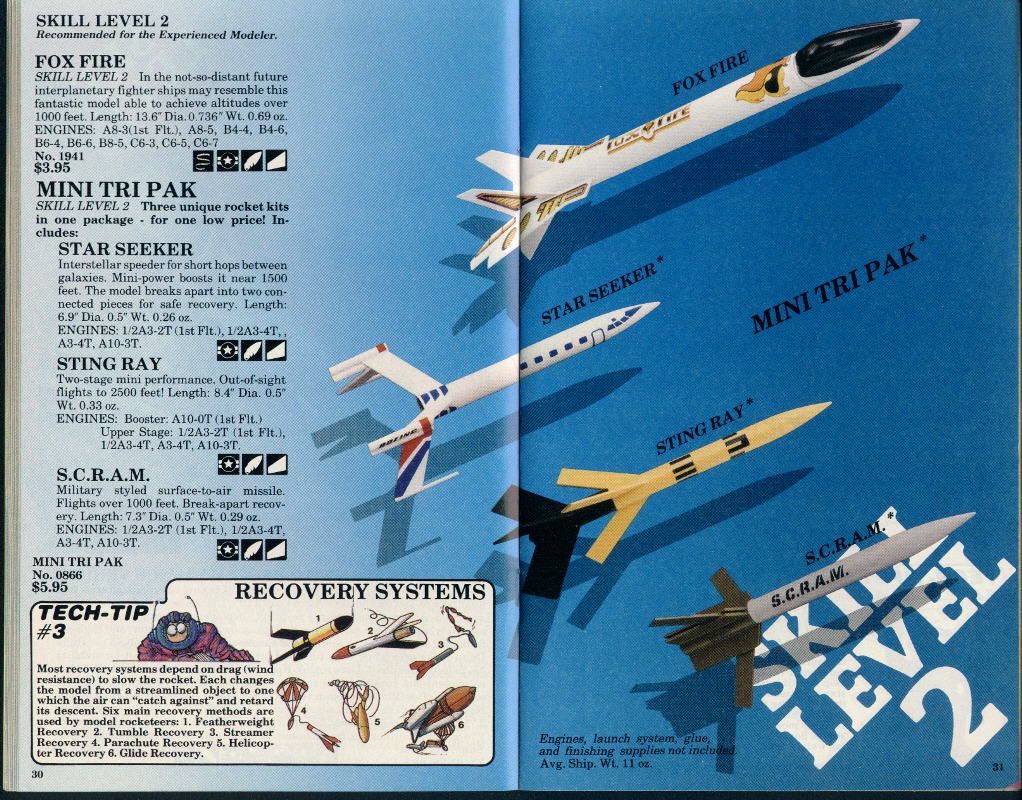
A could of years back I came across a FoxFire forsale at a reasonable price. The bag was opened but everything was in the bag. I've decided it's time I get back to some of the plane / spaceship designs that I like to build so much so this one came down off the shelf.

Kit is a typical old Estes. All of the parts are in good condition. Nothing damaged from years of storage. One thing I had forgotten about was just how thin and soft the balsa was on these old kits. It is really flexible. I was asked to by a couple of members to take pictures of all of the parts with a ruler if/when I ever decided to build this kit so here we go.

Main kit overview.

2.jpg

Main wing

4.jpg

Lower fin.

5.jpg

Upper tail fin.

6.jpg

BT20 body tube.

7.jpg

Shock Cord.

8.jpg

Launch Lug

9.jpg


Streamer.

10.jpg


Decals

IMG_9189.jpgIMG_9190.jpg
 
Last edited:
The build started with wiping down the entire tube with alcohol. This tube seemed a bit more slippery than newer stuff so a quick wipe and things were good to go. The tube was marked with the included marking guide. I was going begin with the more block but to my surprise, when I looked inside the tube there was already a motor block glued in place. This was an open kit after all.

The first fin was attached with a couple of small drops of CA. These fins are long and I didn't feel like trying to hold and align them while wood glue setup. One drop on the tip and another on the very bottom of the root edge and the fin was stuck in place and aligned.

12.jpg

Here we have the first fin attached with the second fin ready to go on.

13.jpg


Second fin is attached. This one accidently got an extra drop of CA in the middle of the fin as well. No harm done.

16.jpg

Due to the size of the fins I decided I was going to let the CA completely cure for a hour before doing any more work with the main body. The main body was set aside and I started on the nose cone. The kit comes with 3 grams of clay for nose weight. I've had bad experiences with clay coming loose in cold weather so I stopped using it years ago. In it's place I mixed up some epoxy with some BB's. The hole the back of the nose cone was enlarged and mix was poured into place. When all was said ad done I had added 4 grams to the cone so it's one gram heavier than Estes intended. No harm in having a little more weight up there.

14.jpg

More to come this weekend.
 
Over the weekend I managed to get the remainder of the fins installed.

Both the upper tail fin and the lower fins have fin guides to get the angle correct. These are printed on the backside of the face card. Not wanting to cut up the face card, I made guides using card stock.

15.jpg

Here I have cut my own guide and installing the first of the lower fins. All fins in this kit align with the end of the body tube.

17.jpg18.jpg

Next up was attaching the upper tails fins.

22.jpg

Here we have all of the fins attached. The balsa in this kit is very thin and very flexible. I'll be coating the fins in epoxy for strength and might still paper them if I feel they are not strong enough. Weight isn't a concern as I don't really want to lose this kit.

24.jpg25.jpg

In this final pic you can see that I have also coated the inside of the body tube with epoxy for a little extra strength and to help with zippering.

26.jpg
 
Coated the entire rocket in T-88 epoxy yesterday and had a chance to do some minor sanding this morning. The balsa is now very stiff so I'm thinking that I do not need to paper them.

Going to do external fillets in epoxy today and let everything cure for a couple of days before primer and paint.

28.jpg29.jpg30.jpg
 
This model always looked bigger in the catalogs. When I finally got one to build the small size surprised me. It helped that they turned the canopy to the side a little in the photos.
86est30.jpg
 
This model always looked bigger in the catalogs. When I finally got one to build the small size surprised me. It helped that they turned the canopy to the side a little in the photos.
86est30.jpg

It also helped that they pictured it with a bunch of BT5 rockets. Compared to the other rockets on the page, it is huge.
 
Making good progress. I got the fillets applied and let them cure for a day. Early this morning I was able to get two coats of SEM high build sprayed on. That was left to cure for 4 hrs. I then sanded with 600 grit to get to this stage. Hoping the weather holds off enough to allow me to get a final coat of white primer applied and maybe paint this weekend.

32.jpg
 
Great build! I had this rocket as a kid and loved it. The build and the catalog page that was posted just brought back a flood of good memories.
 
After a crazy week I've finally had a chance to get back to this project. After sanding, I shot on one quick coat of white SEM primer to hide the gray. Next was two coats of Krylon Gloss White.

That has been sitting for a few days now. I should have time to mask off and paint the canopy tonight and maybe decals this weekend

33.jpg34.jpg35.jpg
 
Nice build!

I wish I’d seen the overall catalog pic earlier. Seems like the look would benefit from some squared motor intakes just under the forward edges of the wing fins.

sort of like the F-15
1696613161843.jpeg
 
Wrapping this one up with decals and attaching the shock cord. I removed the stock loop from the nose cone and drilled a hole in the side of the shoulder. The shock cord was looped through the hole and tied off. Decals were a bit of a paint in the butt. I really hate waterslide but thankfully these didn't fight me too much. One piece of advise. The decals that go on the fins need to be trimmed as close as you can as there is a lot of excess decal around the edges that wants to hang off the sides of the wings and tail.

I'm going to wait a couple of weeks then shoot this with some duplicolor clear to protect the decals. Hopefully I'll get a chance to get a flight report of this one before we stop flying for the season.

41.jpg
39.jpg38.jpg37.jpg36.jpg
 
I had one as a boy....didn't loon near as slick as yours. Nicely done.

I think a guy could put a a 13mm mount in it and make it into a great lil park flier. It surely will get lost quick if a person runs the C6-7....
 
Back
Top