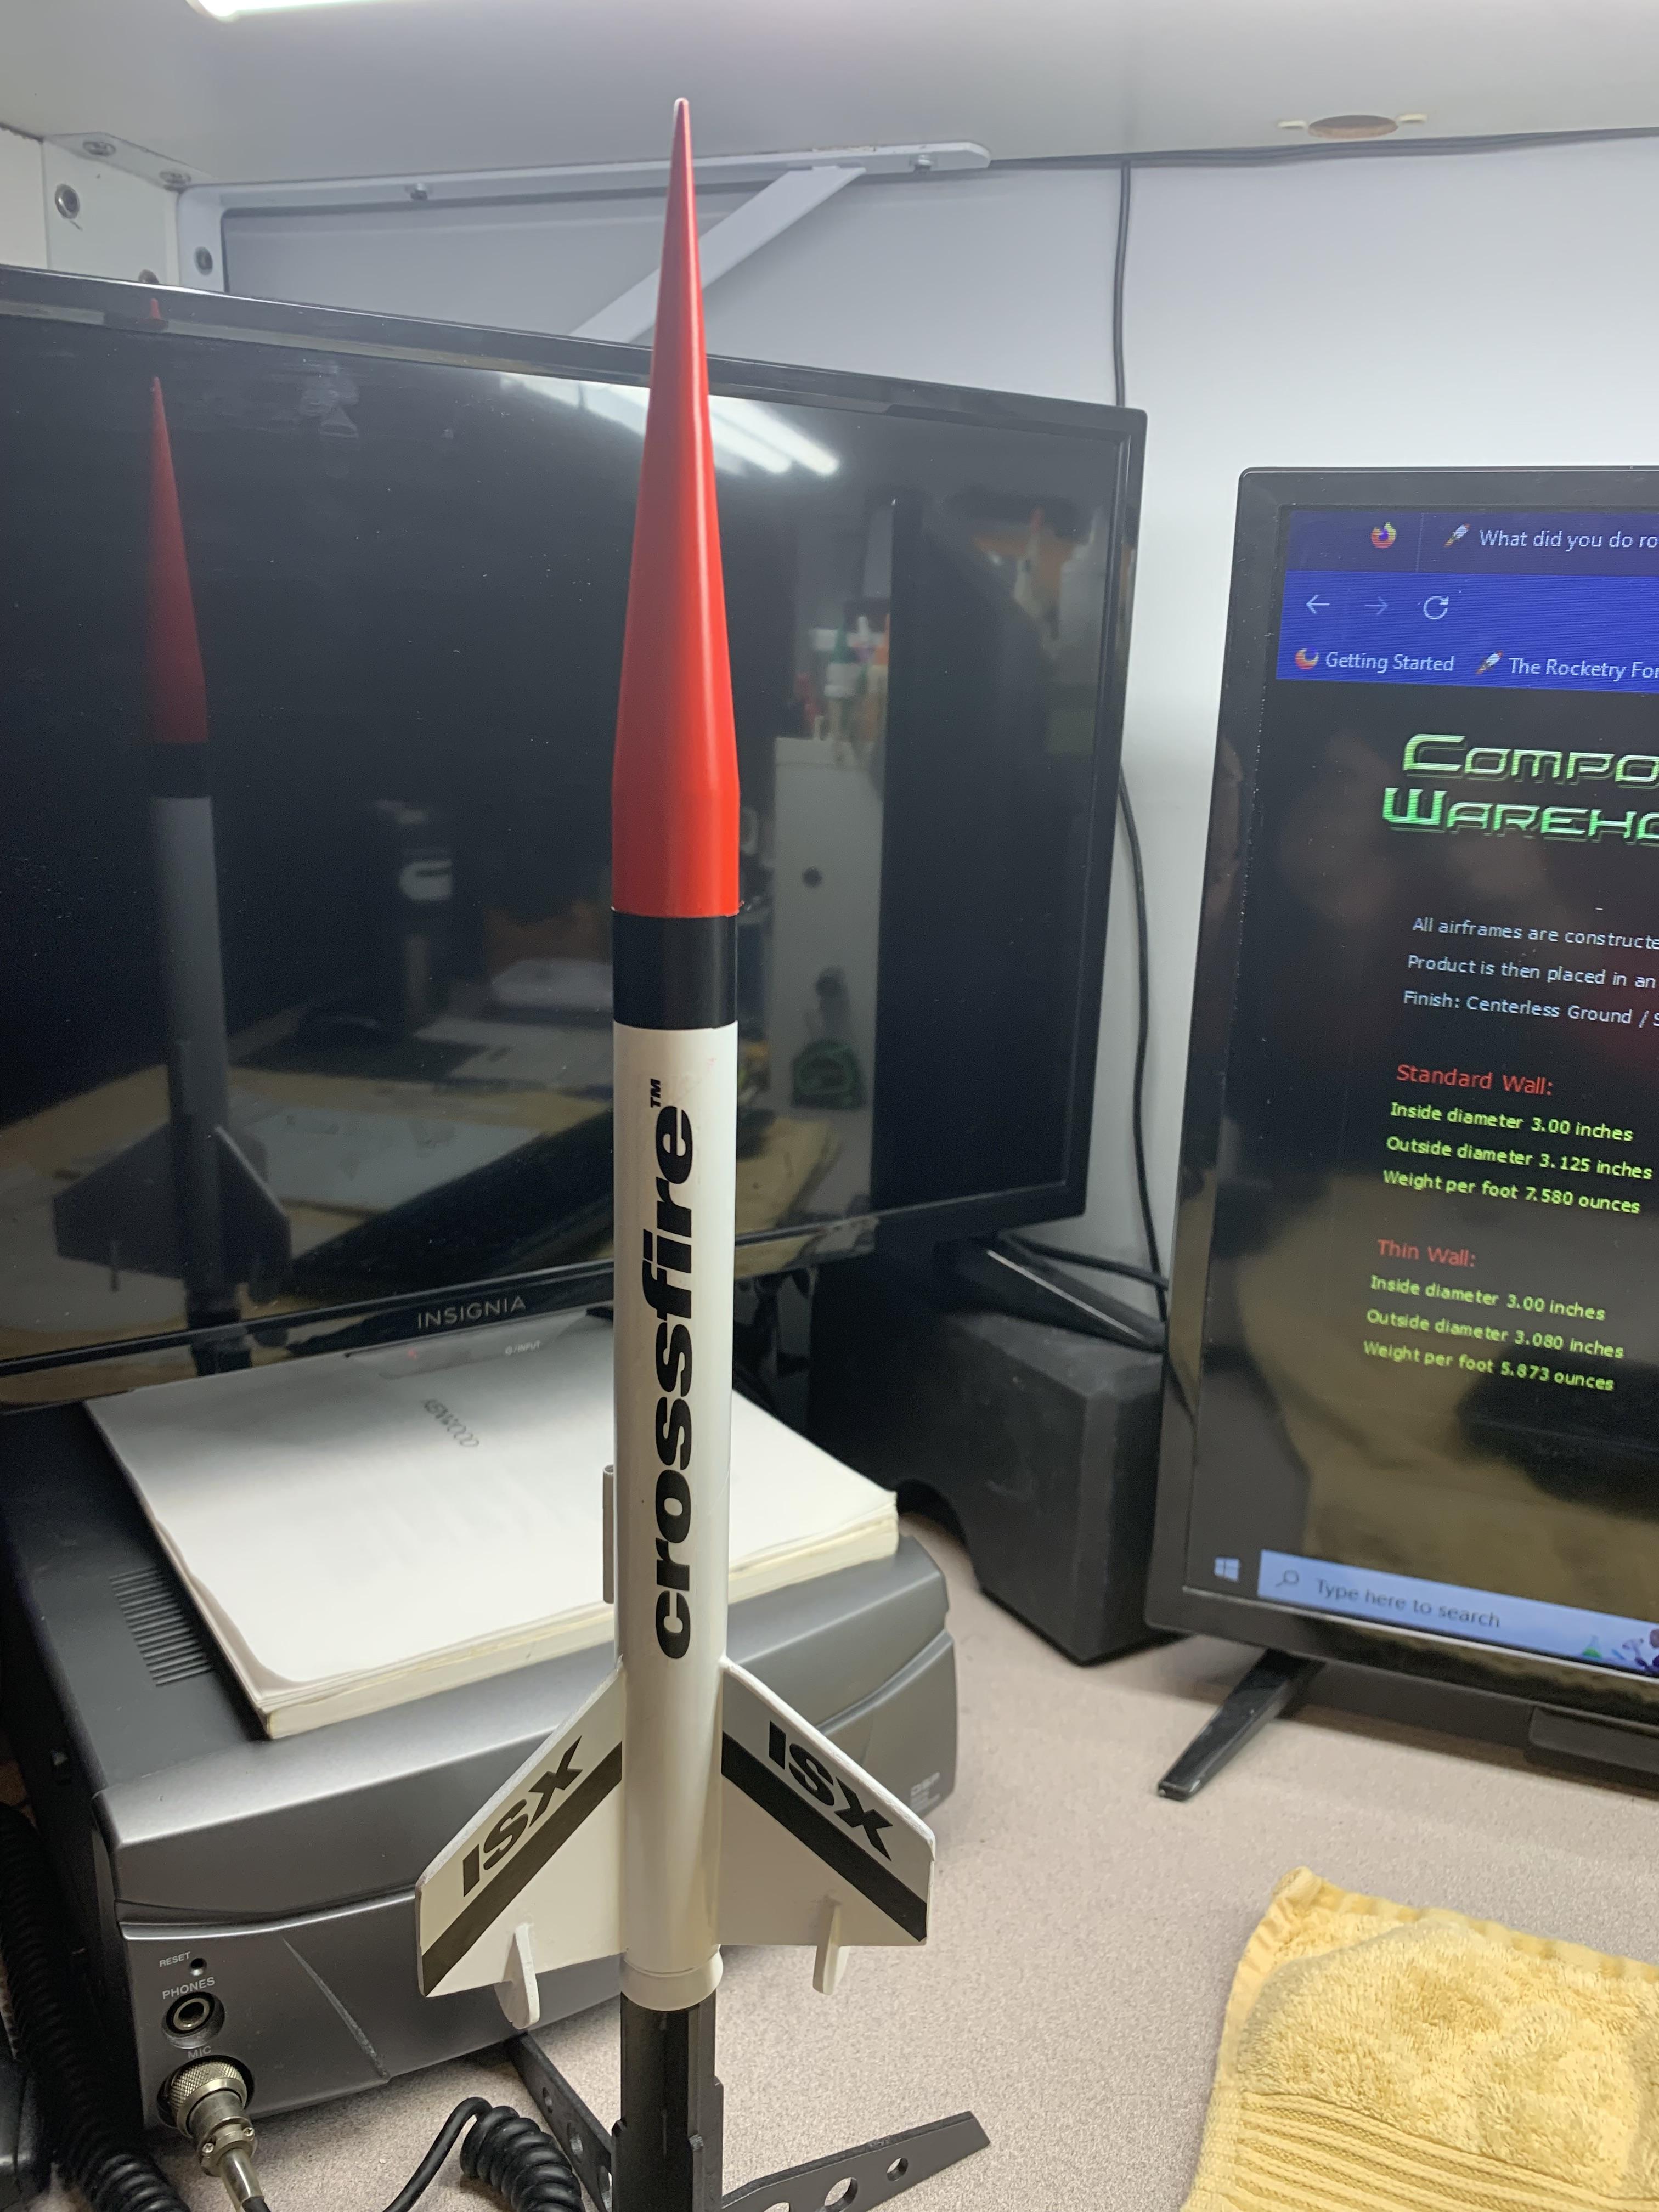
Estes Crossfire ISX "E" custom build.

The Rocketry Forum

Help Support The Rocketry Forum:

This site may earn a commission from merchant affiliate links, including eBay, Amazon, and others.

86mustang408w

Well-Known Member
TRF Supporter
Joined
Nov 4, 2012
Messages
2,148
Reaction score
1,552
Location
Milton, PA
I couldn't wait to start the Estes Crossfire ISX "E". So last night I started it, already did a normal one so it was easy plus I didn't use have Estes parts most are mine I had from their kits, leftovers, or bought exactly for this build. First thing was to get the forward motor ring it, and did that. I've mocked every next step up about 4 or 5 times before I glue, and use thin CA to take things in place. But got a ring and drilled, we pushing a drill bit thru it, then ran the rest of what I had from my 135# kevlar shock cord spool from RocketryWorks($.99 24mm 3D motor retainer is from him also)thru that hole which was about 4 feet long im gonna keep it that long for now, knotted it, then used an E motor to push the ring in here it had to be for the motor retainer to fit on, then used CA to hold the ring in place, it took a while O mocked it several times like said. But after that fought with my medical syringe the end was still clogged bc I didn't clean it good enough after I used it, that BTW I've used since 2013 on my builds. You just fill it with glue OR 30 min epoxy and use it inside the tubes and such. Then glue squeeze what you dont use back into the bottle or expos you just keep washing and using it with hot water. But its tricky epoxy can run. Them the first time. So think of them as disposal use for epoxy. But glue you can soak it in hot soapy water. But the syringe got messed up and it was about 4 or 5 inches nows its half...So I used that to out glue on each end of the ring, from each side letting it dry, then let it dry until today. So while I used JB weld on the motor retainer) I'm letting it cure for 24 hours before I resume the build)I cut out the fins, rhen mocked them in to clear the retainer, labeled them, filled the gaps where the little fins are supposed to intersect, but im gonna fill that in and just have the little one go on. I'm going to have to trim down the fin tabs and while I glue the upper edges to the body tube ill put frog tape over the slots so no glue gets in the tube as its really the motor tube. So after that MR cures, all do the fins, the tiny ones are the ones I chopped off the main fins Im gonna put those by the nosecone above the main fins. Gonna be chute recovery, probably with a massive spill hole. And def epoxy fillets for the fins. Wanted to do epoxy for the forward Green little motor ring, but used Titebond II instead. Gonna fly it on A and B motors around here but its gonna fly on an E July 29th with SPAAR in PA. So much fun, its gonna be the colors as they are, I love it like that..

And I'm prob gonna use JB weld with the fins because of its heat resistance. Then epoxy or Titebond Thick n Quick for fillets. I still wanna use the tube slots and fin tabs, but its gonna be down to the thousandths of an inch contact with the fins tabs going into the body tube...
 

Attachments

  • 20230703_094310.jpg
    20230703_094310.jpg
    1 MB · Views: 0
  • 20230701_133058.jpg
    20230701_133058.jpg
    7.6 MB · Views: 0
  • 20230703_141633.jpg
    20230703_141633.jpg
    906.1 KB · Views: 0
  • 20230703_141627.jpg
    20230703_141627.jpg
    7.1 MB · Views: 0
  • 20230703_141544.jpg
    20230703_141544.jpg
    1.3 MB · Views: 0
  • 20230703_094838.jpg
    20230703_094838.jpg
    1 MB · Views: 0
  • 20230703_094817.jpg
    20230703_094817.jpg
    1.2 MB · Views: 0
  • 20230703_094529.jpg
    20230703_094529.jpg
    1.1 MB · Views: 0
  • 20230703_094445.jpg
    20230703_094445.jpg
    1.3 MB · Views: 0
  • 20230703_094256.jpg
    20230703_094256.jpg
    1.2 MB · Views: 0
  • 20230703_093807.jpg
    20230703_093807.jpg
    1.4 MB · Views: 0
  • 20230703_093706.jpg
    20230703_093706.jpg
    934.8 KB · Views: 0
  • 20230703_093153.jpg
    20230703_093153.jpg
    1.1 MB · Views: 0
  • 20230703_084410.jpg
    20230703_084410.jpg
    1 MB · Views: 0
  • 20230703_005859.jpg
    20230703_005859.jpg
    1.1 MB · Views: 0
  • 20230702_231441.jpg
    20230702_231441.jpg
    1,002.8 KB · Views: 0
  • 20230702_231506.jpg
    20230702_231506.jpg
    1 MB · Views: 0
I built one last year, but haven't launched it yet.
qqBOYvA.jpg
 
Since an E motor will make it a Minimum Diameter rocket, are the fin tabs flush on the inside?
 
Since an E motor will make it a Minimum Diameter rocket, are the fin tabs flush on the inside?
Yes, they will be. The tube is a little distorted bc I'm not using the fins tabs to the motor tube. First one I built normally I put labels on the tabs, bad idea. had a hard time getting them in.... Best idea is to wrap a label around it, then cut out the tabs. I'm going to put tape on the inside to keep the "motor" tube smooth but going to trim down the tabs then prob use JB weld to attach them, then epoxy fillets.. I'll post updates! Very busy!!
 
Some of these I have not put the decals on yet. The long rocket with a orange bottom and black top is a Semroc copy of the FSI OSO. That flys on E9s very well out of site and was lucky to get it back.

1688661159480.png
 
I built one last year, but haven't launched it yet.
qqBOYvA.jpg
Here's mine and a launch with a kevlar shock cord and chute swivel. With epoxy fillets. Thr new E won't be so much different, just Flys on an E motor if it wants too. I'm gonna have to upload it to YouTube then post a link its too big of a video to post...hold on again...
 

Attachments

  • 20230616_001103.jpg
    20230616_001103.jpg
    1.2 MB · Views: 0
  • 20230609_014517.jpg
    20230609_014517.jpg
    1.8 MB · Views: 0
Some of these I have not put the decals on yet. The long rocket with a orange bottom and black top is a Semroc copy of the FSI OSO. That flys on E9s very well out of site and was lucky to get it back.

View attachment 590658
Whats the orange one all the way to the left?? Some of mine i do decals if they aren't waterslide, but if not I just paint them ood colors sometimes.
 

Attachments

  • 20230704_090608.jpg
    20230704_090608.jpg
    1.7 MB · Views: 0
Mine left the rod today and took a hard right turn and went horizontal. Chuck said the one launch lug being up 1/3 from the bottom did that. So I'm going to add another lug down near the bottom, so it will have 2 launch lugs.
 
Got some more done, ill add text later on..
 

Attachments

  • 20230718_202152.jpg
    20230718_202152.jpg
    7 MB · Views: 0
  • 20230718_202206.jpg
    20230718_202206.jpg
    787.6 KB · Views: 0
  • 20230718_223228.jpg
    20230718_223228.jpg
    1.3 MB · Views: 0
  • 20230718_223659.jpg
    20230718_223659.jpg
    1.2 MB · Views: 0
  • 20230718_223718.jpg
    20230718_223718.jpg
    7.3 MB · Views: 0
  • 20230718_224457.jpg
    20230718_224457.jpg
    6.9 MB · Views: 0
  • 20230718_224617.jpg
    20230718_224617.jpg
    7.1 MB · Views: 0
  • 20230718_224720.jpg
    20230718_224720.jpg
    7.1 MB · Views: 0
  • 20230718_224949.jpg
    20230718_224949.jpg
    1.1 MB · Views: 0
  • 20230718_225005.jpg
    20230718_225005.jpg
    993.9 KB · Views: 0
Finally got back to this and did the JB Weld fillets. I might have been better to not tape it, I still can do it that way. Probably would have been better make the tape in the center of the body tubes between fins a little smaller, ill just wait and see how this dries. In about 15 mins I'll take the tape off. And while thats going on, I need to nake a trip out to the garage and cut the nosecine shoulder off and get that eyelet and epoxy started.
 

Attachments

  • 20230926_194628.jpg
    20230926_194628.jpg
    7.4 MB · Views: 0
  • 20230926_200213.jpg
    20230926_200213.jpg
    1.1 MB · Views: 0
  • 20230926_202406.jpg
    20230926_202406.jpg
    1.4 MB · Views: 0
I'm tempted to pick up the launch set from Hobby Lobby that has one of these in it. Mostly to get the Amazon, as that's the last way I know of to get any useful length of BT-56 tubing. But that got me looking at the Crossfire's fins and I kinda want to performance-optimize it in OR by hacking the fins down. That PNC-50BB with the extra straight section is well suited for mounting an Eggfinder Mini. The reason not to is too many rockets already, and do I really need a third Estes LPR launcher? I suppose I could set it up to use an external battery for multi-clusters or something.
 
I'm tempted to pick up the launch set from Hobby Lobby that has one of these in it. Mostly to get the Amazon, as that's the last way I know of to get any useful length of BT-56 tubing. But that got me looking at the Crossfire's fins and I kinda want to performance-optimize it in OR by hacking the fins down. That PNC-50BB with the extra straight section is well suited for mounting an Eggfinder Mini. The reason not to is too many rockets already, and do I really need a third Estes LPR launcher? I suppose I could set it up to use an external battery for multi-clusters or something.
Hi! I have a Aerotech Interlock launch controller I bought over 10 years ago and getting back into this hobby recently got it back out. It needed a new part as the warning tone wouldn't beep. But I used to have a battery for this, but got a jumper pack from Walmart recently. Its definitely enough to do clusters, and lites them right away... Its only rated to G motors but know it would set off an H, it has the current. Another thing um doing is putting all 3/16" or 1/4" lugs on my rockets. That way its one rod or the other. I also picked up a 1010 rail for a launch setup. I have no idea what happened to my old setup.

I'm also looking at Eggfinder stuff, I recently picked up a GPS dog tracker that's very small. Thing is you need a subscription but its 3.99 a month. I found one more thats cheap coming too, says no subscription so its that's good. I'm going to buy a few and take them apart. Fit them into the rockets for tracking. It works with your cell too...
 

Attachments

  • Screenshot_20230821-135708_Chrome.jpg
    Screenshot_20230821-135708_Chrome.jpg
    1.3 MB · Views: 1
I'm tempted to pick up the launch set from Hobby Lobby that has one of these in it. Mostly to get the Amazon, as that's the last way I know of to get any useful length of BT-56 tubing. But that got me looking at the Crossfire's fins and I kinda want to performance-optimize it in OR by hacking the fins down. That PNC-50BB with the extra straight section is well suited for mounting an Eggfinder Mini. The reason not to is too many rockets already, and do I really need a third Estes LPR launcher? I suppose I could set it up to use an external battery for multi-clusters or something.

Did some OR work simming this and the tweaks I'd make to it. Definitely will need a tracker if I put it up there on an E. I was pleased with how perfect the matches are to the delay time on C11-7, D12-7, E9-8 and E12-8. A really clean, "pretty" set of sims. Oddly, it ends up right in between available delays with Quest motors.

But I also realized I don't have any other specific plans for the PNC-50BB NC that came in the NC-50 kit, and I have plenty of BT-50 and fin stock. Those and the decals are the only parts from the Estes kit I'd use, and there are good enough scans out there to print the decals on laser decal paper. Plus, once you are going MD, it seems like the TTW construction is making things more difficult without making them better. So this got added to the scratch-build clono-mod list.

Some of these I have not put the decals on yet. The long rocket with a orange bottom and black top is a Semroc copy of the FSI OSO. That flys on E9s very well out of site and was lucky to get it back.

View attachment 590658

That Crossfire looks a lot better with the additional length of the payload bay. I might also use it to get traditional DD going with a Quark for some composite motors.
 
Did some OR work simming this and the tweaks I'd make to it. Definitely will need a tracker if I put it up there on an E. I was pleased with how perfect the matches are to the delay time on C11-7, D12-7, E9-8 and E12-8. A really clean, "pretty" set of sims. Oddly, it ends up right in between available delays with Quest motors.

But I also realized I don't have any other specific plans for the PNC-50BB NC that came in the NC-50 kit, and I have plenty of BT-50 and fin stock. Those and the decals are the only parts from the Estes kit I'd use, and there are good enough scans out there to print the decals on laser decal paper. Plus, once you are going MD, it seems like the TTW construction is making things more difficult without making them better. So this got added to the scratch-build clono-mod list.


That Crossfire looks a lot better with the additional length of the payload bay. I might also use it to get traditional DD going with a Quark for some composite motors.
Well im finally going to get back to this now that flying season is over, and done focusing on my L1. Going to take the time with this over the winter, but updates will resume soon. I've kind of held off as I'm still thinking about it.
 
Back
Top