Two-stage HPR design build

The Rocketry Forum

Help Support The Rocketry Forum:

This site may earn a commission from merchant affiliate links, including eBay, Amazon, and others.
Steely, You build a fine rocket!

I Love your design work Too!!

You can say that again ! Makes me feel humbled :blush:

I don`t suppose you`re looking forward to the "filling of the spirals" after all those fillets.

Are you using Bondo spot putty then sealing the tubes ?

Keep up the great work !

And BTW.....that`s one rocket that I will need to see fly !!!

Paul T
 
You can say that again ! Makes me feel humbled :blush:

Well thanks Paul, I am equally humbled by your painting.

I don`t suppose you`re looking forward to the "filling of the spirals" after all those fillets.

Are you using Bondo spot putty then sealing the tubes ?

Lately I've been using Elmer's Wood Filler. I'm not sure it is as durable as Bondo, but it's easy to use/sand and it doesn't have the head-ache inducing fumes that Bondo has.

And BTW.....that`s one rocket that I will need to see fly !!!

Come on down to "Fire In The Sky" in Mansfield, WA for Memorial Weekend. It should be flying then (hopefully).

Cheers,
Bret
 
+2. An original, beautiful design and great worksmanship. Keep it going.

Thanks Alex. Building is my favorite part of rocketry, but building is even more fun when you get to see your own unique designs take shape. Similarly, it adds an extra sense of satisfaction when you watch your own creation roar off the pad. I DO ENJOY this hobby!

Cheers,
Bret
 
Adding a Vacuum system for dust control. Plus a few other accessories!
You'll see the results this year.:wink:
 
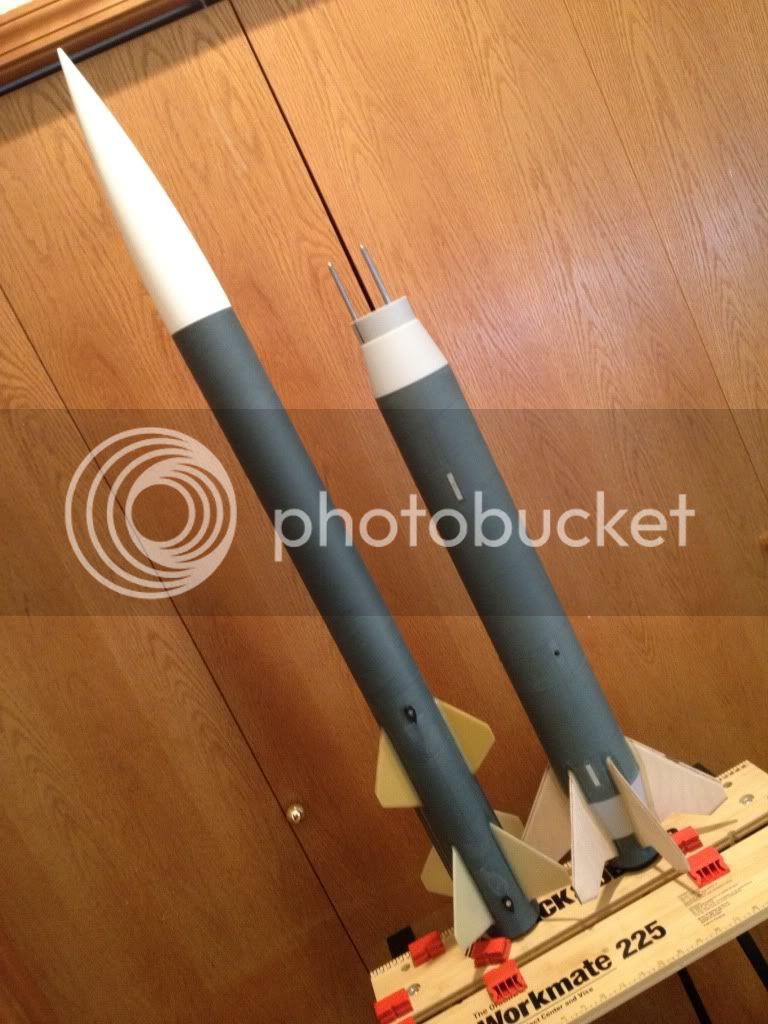
I can't use "terminals" like you have on my two-stagers, but in looking at yours, it occurs to me that such an approach might allow the use of a shunt. The shunt could be connected to the booster and the terminals such that the parts would have to separate and break the shunt before the sustainer could be lit. It might be better to do this with a separation charge. I hear stories from time to time about sustainer motors lighting on the ground and I know someone that was injured by that. A shunt would provide one more layer of safety. I'm going to see if I can figure out a way to do this on my two stagers.

Jim

Most of this build is complete, and now I'm turning my attention to electronics and some additional "options." So, several pages back in this thread... the above quote from Jim Jarvis gave me the idea to consider a device that would create a short circuit across the screw posts for the sustainer igniter (screw post are pictured below in Pic 1). The short circuit "device" would prevent "unplanned" ignition of the sustainer when the booster and sustainer are still coupled together (I really don't want the sustainer to ignite while coupled and melt/fry my plastic transition/plywood bulkhead of the interstage coupler). This configuration also serves as a safety feature to prevent accidental ignition of the sustainer on the rail (note if accidental ignition of the sustainer occured it would not have the benefit of rail guidance).

The idea is that the shorting device would only be present while the two stages are coupled, and would be removed as the booster falls away from the sustainer after booster burnout (drag separation). There are at least three questions (I'm sure there are many more) that arise from this idea, 1) will a short circuit harm the WRC+ if it sends current to a dead short?, 2) will the resulting (temporary) battery load cause other issues with the WRC+?, and 3) will the presence of a short circuit actually prevent unplanned ignition of the sustainer igniter while the two stages are coupled? I'm working through these issues... In the mean time, here are some pics to show what I'm talking about. And, OBTW, if the thing drag separates as designed none of this extra safety feature even matters, but it is there as a back up.

Pic 2 shows a "mock up" of a shorting device that is fabricated from two spring-type battery terminals (from an old battery box out of an RC car... can you believe I keep this kind of junk laying around?) attached to a 1/8th thick piece of plywood. The blue tape is there, just for now, to hold the springs in place. For the completed device, the two springs will be soldered to a thin copper strip and epoxied in place.

Pic 3 -- I cut and shaped the plywood to fit in between the two all-thread rod couplers and temporarily taped it in place. To locate the propper location for the springs (so they will be placed directly under the screw posts), I cut the ends off of two nails and wrapped them with tape until they fit nicely centered in the screw posts. I coupled the two stages, pressed them together, and the nails marked the locations.

Also, another nice feature of the springs... I placed them so that they actually cause the sustainer to ride about 3/16" of an inch higher than it would without the springs. Under thrust from the booster motor the springs will be compressed. After burnout, the springs will begin the drag separation process by pushing the booster away from the sustainer. Kinda cool I think...

photo 2.jpg

nails.jpg
 

Attachments

  • Business End (2).jpg
    Business End (2).jpg
    106.4 KB · Views: 18
Nice solution but get the heck out of the way when those spikes reach ground level! :y:
 
Steely,
That is the most elegant solution for a safing "switch" I have ever seen. It just simply works by its very presense, nothing to do, no switch to remember. Inherent safety when the stages are copuled. And it serves to initiate separation?!? Wow. You come up with some of the most amazing stuff I've ever seen in HPR.
:surprised::clap::cheers:
 
I put it all together to see what it's gonna look like...

Various2011081.jpg


Various2011084.jpg


Various2011083.jpg
 
Last edited:
Very Nice!!! You did a great job on this build, I've learned a thing or two so thanks again for all your posts. I wish you the best on your first flight, wish I could be there.
 
What`s not to like about that thing !! Standing there "full stack" looks absolutely awaesome ,hats off to you Bret.

I need to learn to build a little faster ,as your frantic pace has tired me out.

Are you able to paint in your area ,as I pressume it`s warmer but humid ?


Take care

Paul T
 
A few more elements of assembly left to do. I epoxied the booster anchor bulkhead in place. Pic 1 show its location within the booster airframe. Note that it is designed so that the interstage coupler can only be inserted one way (to make sure sustainer fins are properly oriented when stages are coupled). Third pic shows interstage coupler installed and secured with wing nuts on all-thread rods. Pics attached...

Anchor bulkhead.png

Anchor bulkhead installed.jpg

IS Coupler in place.jpg
 
So that the interstage coupler would mount firmly and flush with the surface of the anchor bulkhead, I used "thumb nuts" (aka knurled nuts) to secure the aft bulkhead of the interstage coupler. The tops of three thumb nuts provide a flat surface which butts up against the anchor bulkhead...

thumb nuts.jpg

Thumb nuts 2.jpg
 
So that the interstage coupler would mount firmly and flush with the surface of the anchor bulkhead, I used "thumb nuts" (aka knurled nuts) to secure the aft bulkhead of the interstage coupler. The tops of three thumb nuts provide a flat surface which butts up against the anchor bulkhead...

I was going to ask you what you had used for spacers ,but I see now.

Do you just happen to have all this hardware lying around your shop ,because if you did, I must insist on seeing pictures.

And I thought I had parts bins and hardware !

Looking good chum !

Paul T
 
After discussing some aspects of this project with Bret over the phone, he convinced me to head over here and check it out. He also made a great case as to why I should register and participate on TRF as well. After reviewing this build, all I can say is WOW... you are a "steely eyed missile man".

This should be a hoot to prep and to fly.
Looking forward to more posts!

p.s. love the nosecone bulkhead vid!

Welcome aboard !


Paul T
 
I was going to ask you what you had used for spacers ,but I see now.

Do you just happen to have all this hardware lying around your shop ,because if you did, I must insist on seeing pictures.

And I thought I had parts bins and hardware !

Looking good chum !

Paul T

Actually, I just happen to have an Ace Hardware Store two blocks away from my house. I almost have the store contents memorized.

Cheers,
Bret
 
After discussing some aspects of this project with Bret over the phone, he convinced me to head over here and check it out. He also made a great case as to why I should register and participate on TRF as well. After reviewing this build, all I can say is WOW... you are a "steely eyed missile man".

This should be a hoot to prep and to fly.
Looking forward to more posts!

p.s. love the nosecone bulkhead vid!

Welcome to TRF Jim and thanks for your help on the "safety system."
 
Thanks Bret... I hope I was able to assist in your decision process...
And thank you for encouraging me to join TRF. I'm already re-visiting your build thread to look for updates!

Wondering if you decided on a power source and series resistor combo for your staging safety shunt?
The 4.7ohm / 20W / TO-220 solution we discussed should work nicely for a 9V alkaline power source.

Looking forward to more progress... final PCB layouts will be heading off to the board house next week.
 
Back
Top