New-ish to rocketry, and working on building one

The Rocketry Forum

Help Support The Rocketry Forum:

This site may earn a commission from merchant affiliate links, including eBay, Amazon, and others.

shanejohnson2002

BT60 Enthusiast
Joined
Feb 6, 2019
Messages
193
Reaction score
156
Hey all!

First post here. I hope it's a good one.

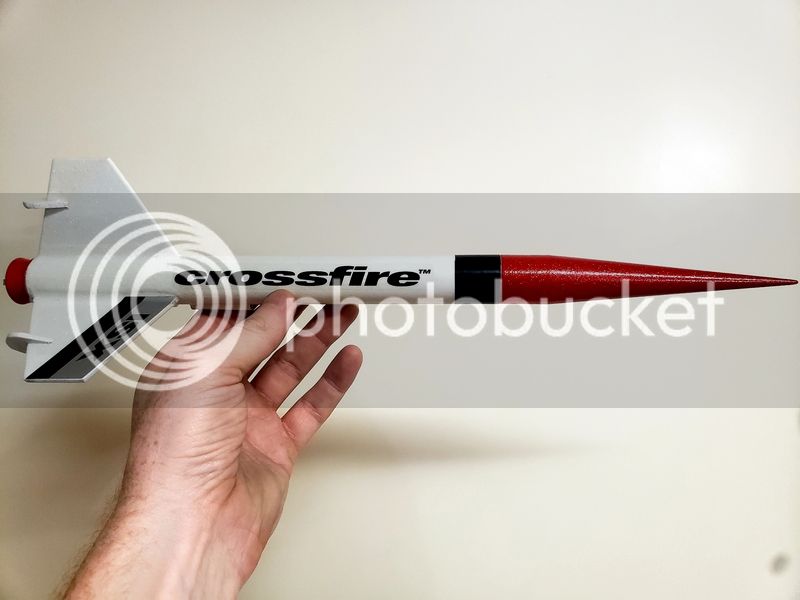
TL;DR story: I played with rockets quite a bit growing up, but never got serious / got good as a model maker. My kids found my circa 1984 model Estes box, with a pair of old launchers and some rockets. They got pretty excited since they're in a space phase (which I hope never passes). I purchased a pair of Generic E2Xs for them to get started with. I saw a Crossfire ISX kit nearby, so I snagged that for myself.

Which brings me to this post. I've done a LOT of reading and research and I'm just wanting to make sure I'm tracking correctly. My main limitation is launch area (and therefore altitude), so here's the lessons/ideas I've picked up from around here:

- Avery labels on the fins. I wish I had've known about this years ago!
- Filets. Not so much to reduce drag, more for looks.
- Bleed hole in parachute.
- Parachute attached via fishing line swivel.
- Replaced stock shock cord with 1/4" elastic sewing cord.
- Installing ejection buffer.

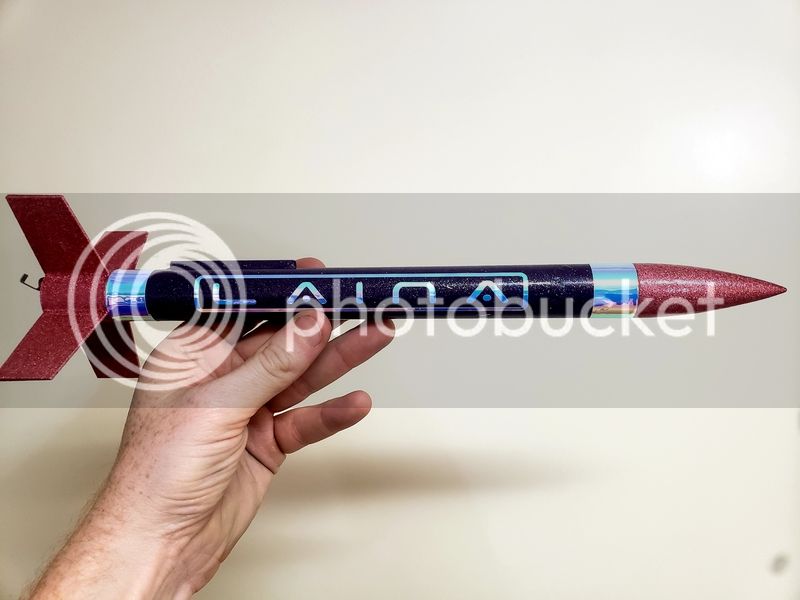
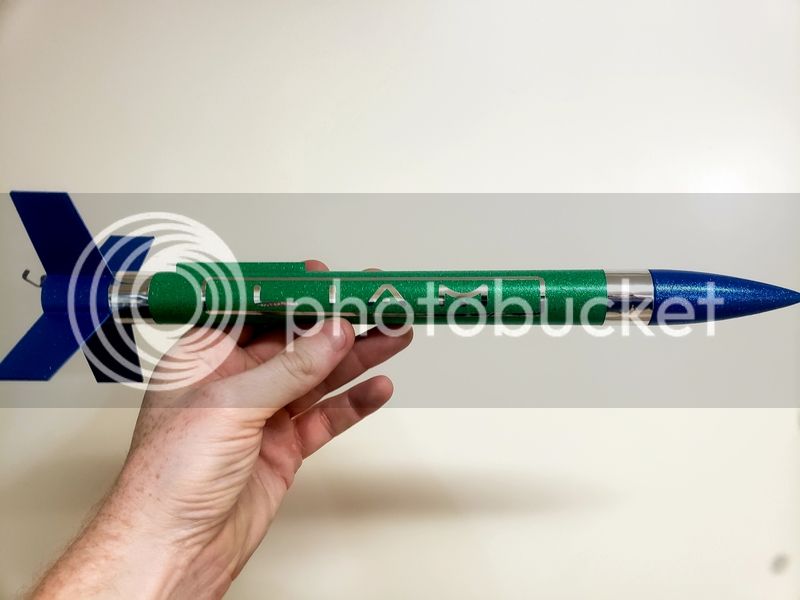
Also going to try glitter paint. Oh yes, there's a reason though. My daughter requested it. Those of you with daughters will understand that's not a request you can ignore or turn down. I don't think it'll help visibility much, but it could be fun/different. There again I'm not so concerned with weight/drag because we can't get super-high around here.

No build pics...cardinal sin, I know. Next project should be pretty cool though, if this one works. And that one will have build pics for sure. Stay tuned.

Hopefully soon I'll be posting a picture of a glittery red/white Crossfire and a pair of glittery E2Xs soon!
 
Fillets provide structural support to fin joints (picture an arch), but if you are papering, you may not any.

Altitude will be determined largely by the total impulse of the motor. In a perfect world, you would expect a B to go twice as high as an A, and a C to go twice as high as a B.

However, a motor needs sufficient thrust off the pad to ensure a safe, stable flight. An Estes A8 is really an A4 (4 Newtons of average thrust). 4N will safely lift a rocket weighing 2.8 oz. or less (with a 5:1 thrust-weight ratio); so try to keep your total weight under that. (Total weight means loaded with motor and chute at the pad, ready to launch.)

If your field can handle a B, an Estes B6 can lift about 3.5 oz.

Have fun!
 
Great first post. Anything that encourages kids in this hobby is always well received. Have fun!
 
Fillets provide structural support to fin joints (picture an arch), but if you are papering, you may not any.

Altitude will be determined largely by the total impulse of the motor. In a perfect world, you would expect a B to go twice as high as an A, and a C to go twice as high as a B.

However, a motor needs sufficient thrust off the pad to ensure a safe, stable flight. An Estes A8 is really an A4 (4 Newtons of average thrust). 4N will safely lift a rocket weighing 2.8 oz. or less (with a 5:1 thrust-weight ratio); so try to keep your total weight under that. (Total weight means loaded with motor and chute at the pad, ready to launch.)

If your field can handle a B, an Estes B6 can lift about 3.5 oz.

Have fun!

Good info. I have a pretty precise scale I use for reloading rifle rounds, so I'll double check the total weight when it's put together. Looks like I'll need to download RockSim or OR when I get home...
 
Try the glitter paint on a test swatch first. Many such paints are fairly translucent and need a reflective undercoat for a proper appearance.

Agreed. I did exactly this, and found a solid base coat of the same color works wonders. Right now, the nosecone and nozzle are wearing 2 coats of gloss red Rustoleum 2x. Since the fins are papered, I just pulled an extra sheet out of the Avery packet and tested on it....worked like a champ as long as I kept the spray passes light and consistent, and didn't let it build up to soaking any one area.

The body tube and fins will get 2 coats of gloss white before I put the glitter on anything. I plan on finishing it all with 1 coat of Rustoleum Crystal sealer, apply the decals, and then apply a final coat over the decals.
 
Good info. I have a pretty precise scale I use for reloading rifle rounds, so I'll double check the total weight when it's put together. Looks like I'll need to download RockSim or OR when I get home...
I would start with OR. It's free, and unless you get into tube fins and such, will do all you need.
 
Welcome to the forum! Looks like you've got everything down pat. But you'll also find that there's more than one way to do some things, use whatever works best for you.
As far as glitter paint, I've used the spray can glitter paints from Home Depot, Rustoleum brand. I found out some things the hard way:
Shake the can well, and go for multiple light coats, drying in between. The glitter coverage will have bare spots, build it up with each coat. Don't give in to the temptation to put on a heavy coat for better coverage. It will run and glop off. A white flat primer base coat seems to give the best results. And if you let the can sit for a long time between uses, it is prone to clogging. Way more than regular spray paint.
Have fun!

More great advice. Thanks!

I have found a trick to unclog them, thanks to the internet. Remove nozzle, and hit it from the inside with canned air. I've also seen WD-40 used. That should force any dried/stuck particulates out of the nozzle. I also have a pack of "art" nozzles from another project I can swap in and out if necessary.
 
...
- Filets. Not so much to reduce drag, more for looks.
- Bleed hole in parachute.
- Parachute attached via fishing line swivel.
- Replaced stock shock cord with 1/4" elastic sewing cord.
- Installing ejection buffer...

Welcome to the forums and back to the hobby! It can definitely provide a bonding opportunity with your kids. The caveat is that they may lose interest after a while, but you may be hooked like the rest of us...

Filets on rockets this size can add structural strength to balsa fins that are surface mounted, or even through fin mountings. On a rocket like the Generic with a plastic fin can however, they make little difference.
A bleed hole in the parachute will provide additional lift under many circumstances. It might be interesting to have a bleed hole in one Generic's parachute and see if there is a measurable difference.
I personally do not recommend fishing swivels, especially the kind with a spring clasp. They add a failure point, and in my experience are a frequent failure point.
Having an elastic shock cord is not as helpful as it might seem. For rockets the size of the Generic I generally use four feet of bias tape.
An ejection buffer can save on wadding, but in rockets the size of Generic and other model rockets you have to be careful about adding mass aft of the CG. You will probably need to add nose weight to balance.
 
A couple of notes: the fine folks of TRF have informed me (and I thank them) that a spill hole in a chute does not significantly change its Cd, but does help eliminate spinning. As for a fishing swivel, depends on what you have in mind. A ball-bearing, double-eye swivel is sold by many rocketry dealers. Like such:

media.nl
 
Welcome back to the hobby!

One small comment:
Replaced stock shock cord with 1/4" elastic sewing cord.
1/4" elastic is way overkill for small rockets. You're not gonna want to be shoving 1/4" elastic into a BT20 or even a BT50, and it's also heavy. For small rockets 1/8" sewing elastic is more appropriate. It can definitely get destroyed by ejection charges over time, though, especially if you have an instance where the chute doesn't fully eject (ask me how I know.) So installing it in a way that it's easily replaceable is very helpful. Common approach is to attach a piece of Kevlar to the motor mount (or baffle if you're using one), and then tie the elastic to the Kevlar just below where it emerges from the body tube. The Kevlar itself doesn't last forever, but it'll survive a lot more ejection charges than the elastic.

If you look over almost any of the LPR build threads here you'll see this type of construction. Here's an example from an old build of mine:
imageuploadedbyrocketry-forum1446774340-764720-jpg.275699


That's not exactly a traditional motor mount, but the shock cord aspect is pretty standard.
 
+1 for OR. Welcome and kudos for doing rocketry with your kids. But watch out--it can be very addicting for grown-ups too.
 
A couple of notes: the fine folks of TRF have informed me (and I thank them) that a spill hole in a chute does not significantly change its Cd, but does help eliminate spinning. As for a fishing swivel, depends on what you have in mind. A ball-bearing, double-eye swivel is sold by many rocketry dealers. Like such:

media.nl
I just used a standard Eagle brand brass fishing swivel. The latching loop end is just large enough to hook onto the nosecone's attachment point, so it's pretty light.
 
Welcome back to the hobby!

One small comment:

1/4" elastic is way overkill for small rockets. You're not gonna want to be shoving 1/4" elastic into a BT20 or even a BT50, and it's also heavy. For small rockets 1/8" sewing elastic is more appropriate. It can definitely get destroyed by ejection charges over time, though, especially if you have an instance where the chute doesn't fully eject (ask me how I know.) So installing it in a way that it's easily replaceable is very helpful. Common approach is to attach a piece of Kevlar to the motor mount (or baffle if you're using one), and then tie the elastic to the Kevlar just below where it emerges from the body tube. The Kevlar itself doesn't last forever, but it'll survive a lot more ejection charges than the elastic.

If you look over almost any of the LPR build threads here you'll see this type of construction. Here's an example from an old build of mine:
imageuploadedbyrocketry-forum1446774340-764720-jpg.275699


That's not exactly a traditional motor mount, but the shock cord aspect is pretty standard.


I'm not at the point yet where I've actually installed the baffle, so this is easily changed. I was wondering if 1/4" was a bit large but it was all Wal-Mart had at the time. Looks like I'll be making a trip to the fabric store, and/or ordering some Kevlar line.

Thanks for the suggestion!
 
Welcome to the forums and back to the hobby! It can definitely provide a bonding opportunity with your kids. The caveat is that they may lose interest after a while, but you may be hooked like the rest of us...

Filets on rockets this size can add structural strength to balsa fins that are surface mounted, or even through fin mountings. On a rocket like the Generic with a plastic fin can however, they make little difference.
A bleed hole in the parachute will provide additional lift under many circumstances. It might be interesting to have a bleed hole in one Generic's parachute and see if there is a measurable difference.
I personally do not recommend fishing swivels, especially the kind with a spring clasp. They add a failure point, and in my experience are a frequent failure point.
Having an elastic shock cord is not as helpful as it might seem. For rockets the size of the Generic I generally use four feet of bias tape.
An ejection buffer can save on wadding, but in rockets the size of Generic and other model rockets you have to be careful about adding mass aft of the CG. You will probably need to add nose weight to balance.

Excellent point. I figured the baffle might be a little heavier than wadding, but without having it in hand I don't know how much. Looks like I have to get comfortable with OR and/or RockSim to model some of these things (as much as I can, anyway). For sure can't move it too far forward if I want to still have room to pack the chute.

The Generic wasn't going to get any filet treatment...literally just help the kids glue it, paint it, and go launch. Probably all in the same day, or inside of 2 days.
 
I'm not at the point yet where I've actually installed the baffle, so this is easily changed. I was wondering if 1/4" was a bit large but it was all Wal-Mart had at the time. Looks like I'll be making a trip to the fabric store, and/or ordering some Kevlar line.

Thanks for the suggestion!
Just info for down the road.... Elastic as a shock cord can cause the NC to snap back and hit the airframe. This can cause a chute to foul or damage to a BT. As you get into bigger builds and motors with adjustable charges, you'll want to move on to Kevlar or nylon harnesses. The idea is to have a long enough harness so that the harness is stressed when the NC reaches the end of it. You cann do this by adjusting the charge size.

But meanwhile, I always use the provided rubber harness that comes with the Estes kits in those sized rockets.
 
So I'm at the stage now where I've painted the nosecone and nozzle. Couple of notes for anyone wanting to use rack-grade glitter paint.

Here's my technique I've tried on this rocket: (All paints are Rustoleum)

2 coats of 2x Gloss in a matching base color (red for red glitter, etc)
2 coats of Glitter
4 coats of Crystal Clear

The glitter paint by itself looked less-than-thrilling. The first coat of clear made it pop....it's looking more like a bass boat or carnival ride at this point.

Seems like a lot of paint, but I'm having to make sure I'm able to sand/polish over the rough glitter texture. The BT has been glued up and fileted. (filetted? filet'd?)I used white glue to secure the fins to the motor mount and body tube (since this is a through-the-wall design), and to secure the small fins to the larger ones. Also did a "semi-filet" using the white glue...which means I glued up the filet, but once dry it was thin and barely noticeable. No curve or blending into the BT. Once that dried completely, I did a true filet over that with DAP white wood filler, and rounded it into the corner using the end of a popsicle stick. Hopefully tonight I can sand/paint it.

Which brings me to another question. I would really like to have my decals under the clear, but I'm having to build up a LOT of clear to overcome the glitter texture. I'm thinking what I need to do is keep clearing until it's smooth-ish, apply decals, then put the final 2 or so coats on.

I thought about trying the Future method but that seems like a LOT of finish for such a small rocket. I'm debating on just taking the hit in mass so I can get "the look".

Kids rockets will be in today. Now that I have a phone with a camera that works I'll start a build thread on these this evening.
 
Welcome back to the hobby!

One small comment:

1/4" elastic is way overkill for small rockets. You're not gonna want to be shoving 1/4" elastic into a BT20 or even a BT50, and it's also heavy. For small rockets 1/8" sewing elastic is more appropriate. It can definitely get destroyed by ejection charges over time, though, especially if you have an instance where the chute doesn't fully eject (ask me how I know.) So installing it in a way that it's easily replaceable is very helpful. Common approach is to attach a piece of Kevlar to the motor mount (or baffle if you're using one), and then tie the elastic to the Kevlar just below where it emerges from the body tube. The Kevlar itself doesn't last forever, but it'll survive a lot more ejection charges than the elastic.

If you look over almost any of the LPR build threads here you'll see this type of construction. Here's an example from an old build of mine:
imageuploadedbyrocketry-forum1446774340-764720-jpg.275699


That's not exactly a traditional motor mount, but the shock cord aspect is pretty standard.

This looks interesting.....
What is it?
 
Welcome and congrats on sharing an activity with your kids.

I love glitter paint, it hides a lot of defects.

I use the krylon
https://www.walmart.com/ip/Krylon-G...MIg_vo_LvE4AIVIR-tBh2Q0A5YEAQYAyABEgL1NvD_BwE

Comes in great colors.

You have input have lots of experts. I am reading this going, hey they are basic simple build and fly rockets, don’t get so serious about “ the finish.” They will fly fine if you don’t paint them at all. Put a decent base of white primer, spray on your color of choice, slide the decals on (not sure how well the decals will show up over glitter, but what the heck?) and go out and have fun flying them.

Yes Kevlar is better. Eagle fishing swivels will work fine although your rocket will fly and recover fine without them. Other swivels are better but you will likely either lose or move on to different/more cool rockets by the time your eagle swivel fails. 1/4 inch shock cord is too much for these small rockets.

Maybe just me, but for a start, just build and fly a few before you start working on show room/museum models.

Straight Trails!
 
Totally agree with the build it and fly it philosophy. Theirs are really no more than "glue it up and paint it"... but if Daddy's Princess wants glitter...welll ...you get the idea lol.

Mine was just having some fun learning a new skill. I don't expect to be a pro modeler by any means. . but it's fun seeing just what you're capable of.

That said here's how they turned out:

20190215_214928_zpstuzgvdz2.jpg

20190215_215005_zpswxjffylk.jpg

20190215_214840_zps0wp7kznc.jpg

giphy890962418602984271_zps6trzwtui.gif
 
I love my Crossfire, it is my most flown rocket, had a couple close calls on C motors where I almost lost it. flies nice on B motors. yours looks like a nice flier too. Loving the glitter,
 
I love my Crossfire, it is my most flown rocket, had a couple close calls on C motors where I almost lost it. flies nice on B motors. yours looks like a nice flier too. Loving the glitter,

OR says a B6-4 should be just the ticket. It also says that, even using an ejection baffle in lieu of wadding, the stability is around .8. It has to be higher than that in reality based on just how smooth the takeoff and overall flight were. There's not even a hint of instability.

My next build is way over stable, so it'll be interesting to see the difference.
 
Those generics came out almost *too* nice for that rocket. ;) Well done. The princess should be pleased!

That's high praise from someone whose current build is powered by a literal warp drive lol. Thanks. They love the candy paint. The rockets go from the field to their display shelf, per their requests. They're not perfect by a longshot but add long as the kids like them, I figure I came out ahead.
 

Latest posts

Back
Top