You are using an out of date browser. It may not display this or other websites correctly.
You should upgrade or use an alternative browser.
You should upgrade or use an alternative browser.
Level 3 Build - Rocketry Warehouse Terminator
- Thread starter EeebeeE
- Start date


Help Support The Rocketry Forum:
This site may earn a commission from merchant affiliate
links, including eBay, Amazon, and others.
EeebeeE
Well-Known Member
- Joined
- Aug 7, 2011
- Messages
- 1,427
- Reaction score
- 56
I'll say it again--I really love the looks of the RW Terminator! I am hoping it lives on to be covered by the new Madcow combined operations.
I 100% agree.
I warned the neighbors today that I would be ground testing tomorrow.
Last edited:
I 100% agree.
I warned the neighbors today that I would be ground testing tomorrow.
Glad to hear it. When charges start to get above 2 or 3 grams, it gets loud!
EeebeeE
Well-Known Member
- Joined
- Aug 7, 2011
- Messages
- 1,427
- Reaction score
- 56
Found an ejection charge calculator called rimworld.com/nassarocketry/tools/chargecalc/index.
It is woefully wrong. I tried two drogue charges based on the info...one at 2.5 grams and the other at 3. The 3 gram charge was almost strong enough. The calculator suggested a little more than two. It suggested for 3 #4 shearpins that I would need 2 grams to blow the nose cone and main. At both 2 grams and 2.5 grams, the pins did not break. I will try 3.5 tomorrow, and 4 if that doesn't work. Hopefully I can be more successful.
It is woefully wrong. I tried two drogue charges based on the info...one at 2.5 grams and the other at 3. The 3 gram charge was almost strong enough. The calculator suggested a little more than two. It suggested for 3 #4 shearpins that I would need 2 grams to blow the nose cone and main. At both 2 grams and 2.5 grams, the pins did not break. I will try 3.5 tomorrow, and 4 if that doesn't work. Hopefully I can be more successful.
robbdm
Rocketry Tourist
Found an ejection charge calculator called rimworld.com/nassarocketry/tools/chargecalc/index.
It is woefully wrong. I tried two drogue charges based on the info...one at 2.5 grams and the other at 3.
I use 3 - #2-56 shear pins with 2.5 grams.....drogue and main sections.... no problems three flights.
Found an ejection charge calculator called rimworld.com/nassarocketry/tools/chargecalc/index.
It is woefully wrong. I tried two drogue charges based on the info...one at 2.5 grams and the other at 3. The 3 gram charge was almost strong enough. The calculator suggested a little more than two. It suggested for 3 #4 shearpins that I would need 2 grams to blow the nose cone and main. At both 2 grams and 2.5 grams, the pins did not break. I will try 3.5 tomorrow, and 4 if that doesn't work. Hopefully I can be more successful.
Interesting. I just ground tested mine this past weekend with 2 grams of BP, using 3 #4 shearpins, and it worked great.
[video]https://youtu.be/Z-M9kqK2i5c[/video]
I 100% agree.
I warned the neighbors today that I would be ground testing tomorrow.
I somehow missed both this thread and this rocket on the website- I'm a sucker for a good looking split-fin design, and this sure fits the bill! Good build thread, I picked up some new techniques here- thanks!
EeebeeE
Well-Known Member
- Joined
- Aug 7, 2011
- Messages
- 1,427
- Reaction score
- 56
"Make your charge cups out of PVC!", they said. "PVC can handle it!", they said.
This is why I normally use copper. The to in the forward end are also damaged. I just am waiting for the rocket to cool down before I take it apart.
Oh well. At least the ground test worked. Primary charges, 3.5 grams. Backup charges...4 grams.

This is why I normally use copper. The to in the forward end are also damaged. I just am waiting for the rocket to cool down before I take it apart.
Oh well. At least the ground test worked. Primary charges, 3.5 grams. Backup charges...4 grams.
Attachments
Thanks for all the pics. The sled design is awesome with those battery holders. They won't be sliding anywhere.
- Joined
- Jan 30, 2016
- Messages
- 8,996
- Reaction score
- 3,523
If that was PEX, it didn't stand a chance. Caps and or Sch. 40 is the way to go.
I'll probably use spare brass from the range when I get this far, but for my edification: Does one typically cement a cut-off piece into the cap to double-wall, or just as-is?
Does one typically cement a cut-off piece into the cap to double-wall, or just as-is?
yes
")
I'm actually a fan of blast caps and MAC's charge wells-
Last edited:
EeebeeE
Well-Known Member
- Joined
- Aug 7, 2011
- Messages
- 1,427
- Reaction score
- 56
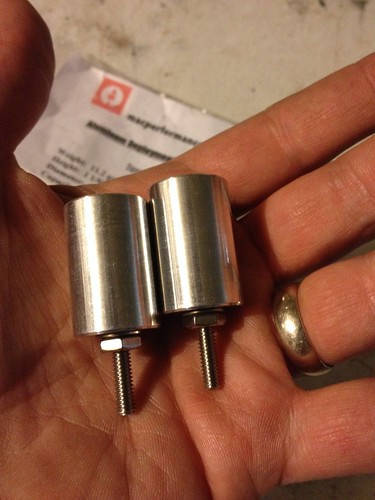
I picked up some 1" copper pipe caps. These have worked well for me in the past. This time I tried the double wall approach by using a cap with the tubing housed into it. In two cases the cap was either cracked or destroyed.
At least this didn't happen in the air.
At least this didn't happen in the air.
Igotnothing
Well-Known Member
- Joined
- Oct 26, 2014
- Messages
- 1,001
- Reaction score
- 210
PVC? Who said PVC would work?
I use CPVC and 6 grams Pyrodex P in a 7.5" which has a lot of spare space in the bay. No problem.
I use CPVC and 6 grams Pyrodex P in a 7.5" which has a lot of spare space in the bay. No problem.
webtech
Well-Known Member
- Joined
- Nov 15, 2012
- Messages
- 210
- Reaction score
- 1
For my smaller rockets I go without charge wells. But 3.5 - 4.5 grams is a LOT of black powder.
I did 4.6g and 6.1g for a backup for my level three.. worked great on the ground and in the air.
EeebeeE
Well-Known Member
- Joined
- Aug 7, 2011
- Messages
- 1,427
- Reaction score
- 56
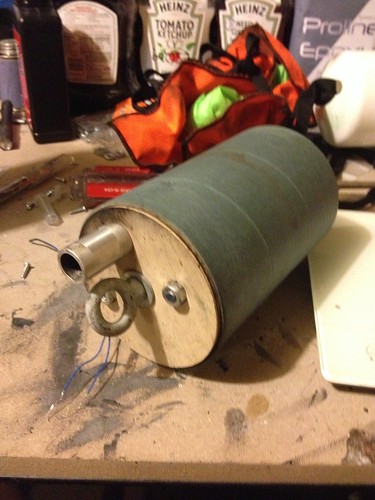
Electronics bay an bulkheads revised after ground testing. The PVC charge canisters have been replaced with 1" copper pipe caps. To the left of the sled is the ballast. It is held in place with 4 nuts on the threaded rods. It is made with a 3.9" coupler tube and 2x 1/8" plywood bulkheads surrounding 5 lbs. of lead shot and epoxy.
Tomorrow I start painting.

Tomorrow I start painting.
patelldp
Well-Known Member
- Joined
- Jan 23, 2009
- Messages
- 5,647
- Reaction score
- 101
Electronics bay an bulkheads revised after ground testing. The PVC charge canisters have been replaced with 1" copper pipe caps. To the left of the sled is the ballast. It is held in place with 4 nuts on the threaded rods. It is made with a 3.9" coupler tube and 2x 1/8" plywood bulkheads surrounding 5 lbs. of lead shot and epoxy.
Tomorrow I start painting.
View attachment 290576
Any chance that this weight could wind up being a bad idea? I'm just curious if it's possible it could wreak havoc somehow if the bay takes a shot or if you were to fly the rocket with any significant gee loading.
EeebeeE
Well-Known Member
- Joined
- Aug 7, 2011
- Messages
- 1,427
- Reaction score
- 56
Any force strong enough to strip 1/4-20 threaded rod is going to pretty much take out the electronics sled before the weight does.
A couple reasons why it is here instead of in the nose cone.
- First and most important - IT'S EASIER! There is plenty of room for it. I wanted this weight to be removable, and if I put it in the nose, I would have had to fabricate some sort of retaining system. The threaded rods were already there. All I had to do was make a weight that fit them.
- Second. If the weight was in the nose, then the inertia from the apogee ejection charge made it more likely that the shear in the nose cone pins would break. Putting the weight here lessens that likelihood substantially.
EeebeeE
Well-Known Member
- Joined
- Aug 7, 2011
- Messages
- 1,427
- Reaction score
- 56
The one thing about this build that bugged me a little was my Aeropack retainer. It have been on my previous L3 attempt and had survived two crashes...but it had gotten pretty ratty looking. So today it got a little TLC. I just happened to have enough black engine paint, heat tolerant to 550 degrees as well as some engine paint clear coat. So I used up the rest of the black on the first coat, then hit it with the clear on the second. Instructions say to let it dry for 7 days, then bake in an oven at 200 degrees for an hour. I think my wife needs to go shopping.

EeebeeE
Well-Known Member
- Joined
- Aug 7, 2011
- Messages
- 1,427
- Reaction score
- 56
Threaded rods transfer the stress of recovery on both fore and aft centering rings, with the fin roots in between them. Most people I know that use them build and fly big rockets with big deployment charges. You are far less likely to have your CR yanked out of the rocket. They weren't that difficult to work around in this build.
EeebeeE
Well-Known Member
- Joined
- Aug 7, 2011
- Messages
- 1,427
- Reaction score
- 56
It's a small part.... got an old toaster oven?
I was thinking I could use one burner on my gas grill (It's a 3-burner). Set it low and put them on the grill and the temp should hit 200 or so. Then it would smell like barbecue.
Similar threads
- Replies
- 4
- Views
- 688
- Replies
- 11
- Views
- 1K
- Replies
- 31
- Views
- 3K