Is birch ply generally used as fin material in HPR? I too have found it to be... well, not extremely robust, although I do like it for LPR centering rings. Similar issues to what @Off Grid Gecko reports, although it is pretty stiff.
You are using an out of date browser. It may not display this or other websites correctly.
You should upgrade or use an alternative browser.
You should upgrade or use an alternative browser.
L1 Scratch Build - First Draft
- Thread starter Off Grid Gecko
- Start date


Help Support The Rocketry Forum:
This site may earn a commission from merchant affiliate
links, including eBay, Amazon, and others.
Is birch ply generally used as fin material in HPR? I too have found it to be... well, not extremely robust, although I do like it for LPR centering rings. Similar issues to what @Off Grid Gecko reports, although it is pretty stiff.
I see "Baltic Birch" listed as a selling point in the HPR kit descriptions, but I'm not sure if that is actually made from Birch, or if it comes from the Baltic regions, or it is a particular "flavor" of plywood. I think it is also used in cabinet making as it has lots of thin plys.
boatgeek
Well-Known Member
- Joined
- Dec 27, 2014
- Messages
- 7,412
- Reaction score
- 7,960
B
"Baltic birch" as sourced from Rockler has been pretty good to me, with 6 (?!) layers in the 1/8" thickness. Aircraft ply has a 1-3 more layers but is about twice the price where I can get it locally. I would think that 3-layer standard birch ply from Lowe's Depot would be crap, mostly because virtually any plywood from Lowe's Depot is crap.")
Is birch ply generally used as fin material in HPR? I too have found it to be... well, not extremely robust, although I do like it for LPR centering rings. Similar issues to what @Off Grid Gecko reports, although it is pretty stiff.
"Baltic birch" as sourced from Rockler has been pretty good to me, with 6 (?!) layers in the 1/8" thickness. Aircraft ply has a 1-3 more layers but is about twice the price where I can get it locally. I would think that 3-layer standard birch ply from Lowe's Depot would be crap, mostly because virtually any plywood from Lowe's Depot is crap.
Yeah, I think it's the 3-layer stuff that is... well it is what it is. I've used it for non-critical stuff but for fins the stuff with more layers would undoubtedly be a lot better, at least for higher-performance rockets.
Off Grid Gecko
Well-Known Member
Lesson learned, I'll be ordering next time. Structurally this stuff seems fine, just need to put something on the outside to make sure it holds together. Sucks that something like a high grade ply needs to be ordered and shipped in. I saw another thread where someone was using a kind of reinforced canvas board? Something like that. Might be lighter than plywood. Looks like a heavy duty version of cabinet backing.
Off Grid Gecko
Well-Known Member
Motor mount load test. This was fun, and a bit unnerving.
The concrete blocks that I'm using are like these.
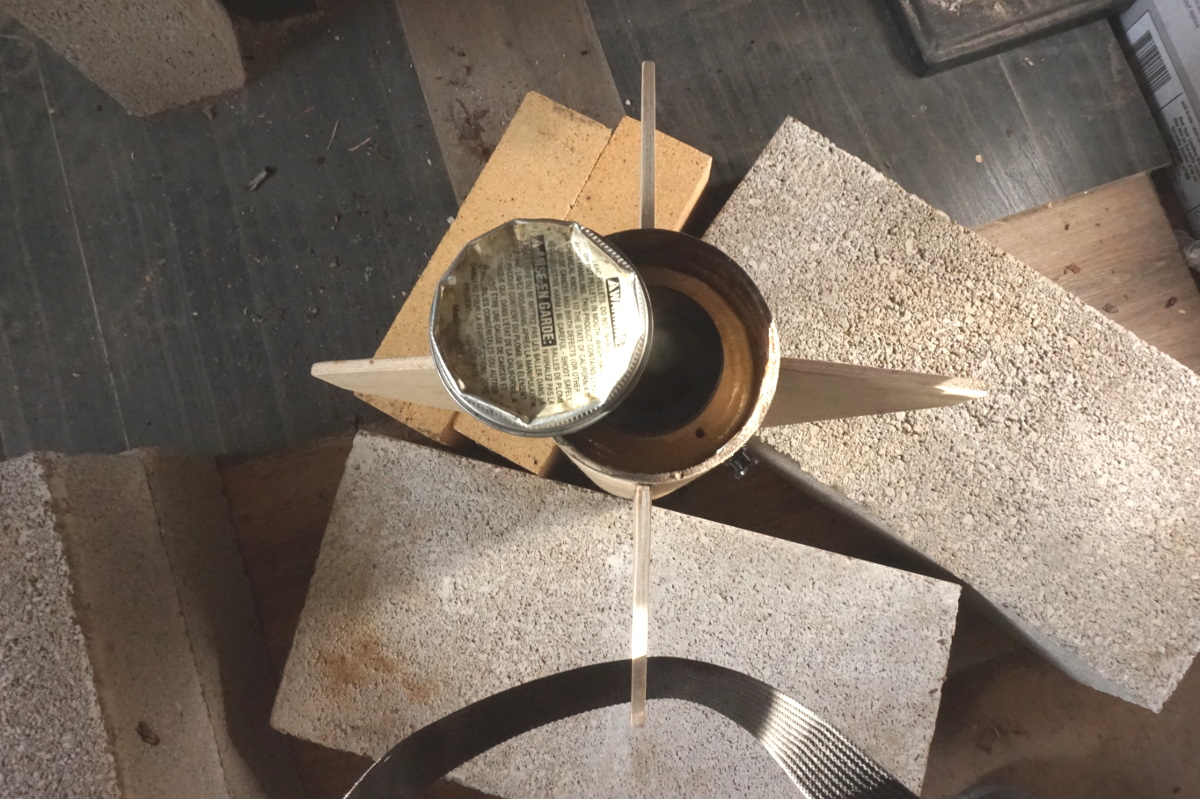
I used a pellet tin as a standoff so that the blocks would sit above the bottom of the rocket and ensure that all weight was placed on the retaining ring. The fin can was placed on level ground, the retaining ring set in place, the tin atop that, and I started stacking bricks.
I placed four of them, roughly 140 pounds of weight.
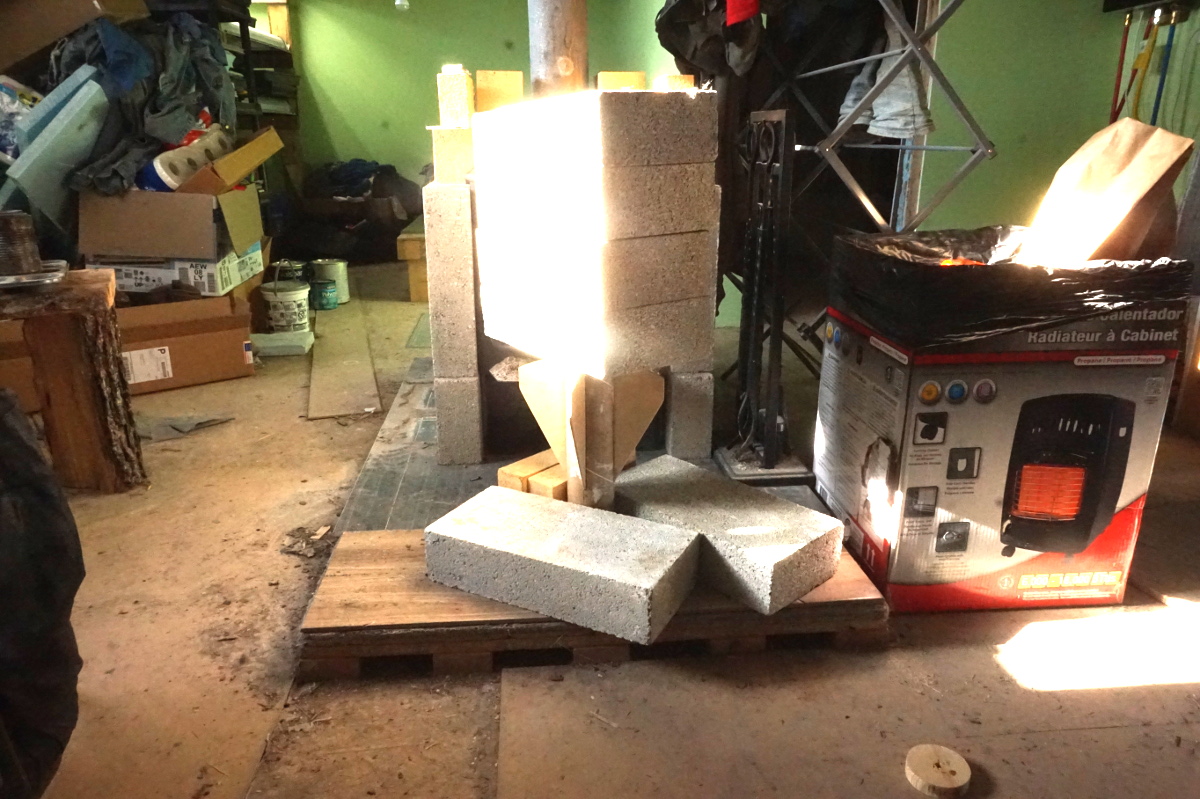
I'm not sure about the accuracy of the website information, the bricks feel like they are every bit of 40 pounds (versus a 5 gallon bucket full of water), so I went with the 35 listed as the minimum weight. One day I might buy a bathroom scale, but I don't care to weigh myself so I've never gotten one. I suppose the rocket testing could justify the inexpensive cost, so maybe next time I visit wally world.
Anyway, the third brick collapsed the little pellet tin. The final weight ended up squishing several of the pellets in the tin under the immense pressure, but the lid was still above the main tube and the lower section supported only by the motor mount, so I pressed on, and squeezed the bejesus out of those little lead pellets. Good thing I have back-ups. Don't think any of these are going to shoot right, so they'll end up in a melting pot at some point. Next time I'll take the extra 5 minutes to make a wooden testing block.
140lbs is equivalent to over 600N, and the rocket took it without flinching. which is good, because in this case a flinch=a crunch=start over with a new fin tube. This opens pretty much the entire 38mm motor catalogue, cept for those warp9 motors, sheesh. I'm willing to bet she can handle more but I need a steadier test setup and this gives me what I need for the moment: piece of mind on H and I motors and more than enough thrust to lift heavy payloads with fast acceleration to buck the wind and get stable off shorter rails.
And if I continue running into car trouble like I did this morning, could possibly make this a jumpy L2 model someday if I find myself without the funds to build the next rocket by the time I'm ready for that.
Think I'll fillet the fins tonight, and maybe coat the fins with a thin layer of epoxy to prevent the wood plys separating under aerodynamic drag. Also need to look up my Barrowman equations for fin drag so that I can force test the fins in the near future. I'll probably use Mach I as a baseline there.
That's the update, hope everyone had a good day. I spent mine at the repair shop.
The concrete blocks that I'm using are like these.
I used a pellet tin as a standoff so that the blocks would sit above the bottom of the rocket and ensure that all weight was placed on the retaining ring. The fin can was placed on level ground, the retaining ring set in place, the tin atop that, and I started stacking bricks.
I placed four of them, roughly 140 pounds of weight.
I'm not sure about the accuracy of the website information, the bricks feel like they are every bit of 40 pounds (versus a 5 gallon bucket full of water), so I went with the 35 listed as the minimum weight. One day I might buy a bathroom scale, but I don't care to weigh myself so I've never gotten one. I suppose the rocket testing could justify the inexpensive cost, so maybe next time I visit wally world.
Anyway, the third brick collapsed the little pellet tin. The final weight ended up squishing several of the pellets in the tin under the immense pressure, but the lid was still above the main tube and the lower section supported only by the motor mount, so I pressed on, and squeezed the bejesus out of those little lead pellets. Good thing I have back-ups. Don't think any of these are going to shoot right, so they'll end up in a melting pot at some point. Next time I'll take the extra 5 minutes to make a wooden testing block.
140lbs is equivalent to over 600N, and the rocket took it without flinching. which is good, because in this case a flinch=a crunch=start over with a new fin tube. This opens pretty much the entire 38mm motor catalogue, cept for those warp9 motors, sheesh. I'm willing to bet she can handle more but I need a steadier test setup and this gives me what I need for the moment: piece of mind on H and I motors and more than enough thrust to lift heavy payloads with fast acceleration to buck the wind and get stable off shorter rails.
And if I continue running into car trouble like I did this morning, could possibly make this a jumpy L2 model someday if I find myself without the funds to build the next rocket by the time I'm ready for that.
Think I'll fillet the fins tonight, and maybe coat the fins with a thin layer of epoxy to prevent the wood plys separating under aerodynamic drag. Also need to look up my Barrowman equations for fin drag so that I can force test the fins in the near future. I'll probably use Mach I as a baseline there.
That's the update, hope everyone had a good day. I spent mine at the repair shop.
Nytrunner
Pop lugs, not drugs
Just for technical thought practice, Consider also the difference between your test setup and a real flight.
A motor applies an impulse or short sharp amount of thrust (force) to a free moving rocket that responds by accelerating (hopefully upwards). Additionally the tubes, coupler joints, and fins are subject to dynamic stresses due to the airflow. For further learning, research fin flutter.
Your test is applying a Static load over a sustained time, and the rocket is prevented from accelerating, so it has to absorb all that force and stress within its structure (probably for longer than itll see any of it in flight)
Off Grid Gecko
Well-Known Member
Totally agree and I give this a lot of thought. I'm familiar with fin flutter, just don't know all the mathematical details. Hopefully the 1/4" fins are stiff enough to prevent most of it and strong enough to tolerate any that might develop in future flights as I push the rocket faster than I will on it's initial launches.Just for technical thought practice, Consider also the difference between your test setup and a real flight.
A motor applies an impulse or short sharp amount of thrust (force) to a free moving rocket that responds by accelerating (hopefully upwards). Additionally the tubes, coupler joints, and fins are subject to dynamic stresses due to the airflow. For further learning, research fin flutter.
Your test is applying a Static load over a sustained time, and the rocket is prevented from accelerating, so it has to absorb all that force and stress within its structure (probably for longer than itll see any of it in flight)
Might even be interesting to try putting a sensor somewhere to measure the effects, that would be cool right?
As to dynamic stresses of different parts, I can only speculate as I haven't read enough on the subject. In my head, it seems, take the weight of everything above this point, apply the G force to figure a load (equal and opposite reaction) and that should tell you something about the stress on that part. The drag force on the nose itself is pretty easy to calculate, and that's the brunt of the aero forces until the wind meets the fins.
It's all a lot to take in, and luckily my background gives me some insights. Does my above idea make any sense? It seems logical to me but I might be missing something.
And yes, static testing is definitely overkill...until you reach an equilibrium Max-Q, of course, but that rarely seems to happen with a model rocket, where the forces are all balanced out and the drag is pushing directly against the thrust with equal aggression. But that is how I define my safety margins and it seems like a fine plan. After this rocket is field-tested, I'll decide if I'd like to try her on a harsher engine to see how she does, but it'll need to be a calm day
Off Grid Gecko
Well-Known Member
Thank you, btw, @Nytrunner
My mind was starting to be a bit corrupted by my test results rather than actual flight characteristics.
The model(test) is just a model, it's not a true representation of reality.
My mind was starting to be a bit corrupted by my test results rather than actual flight characteristics.
The model(test) is just a model, it's not a true representation of reality.
Off Grid Gecko
Well-Known Member
Epoxy-coated 3 of the fins last night, prolly will do the other one this evening. Then I'm pretty well at the paint/sand stage. I realized that I still need to install my upper ring with the shock cord mounting point on it, so some time will be devoted to that tomorrow. With all the parts on the scale, I'm coming in over 1300 grams, so attempting to fly a G on this seems tenuous. Skating a very thin line there to stay under 1500 and I don't know how much a 1G Cesaroni case weighs, or if it is worth the bother. It's definitely the "cheap" way to go and I can fly my L1 attempt on a complete motor. Then when I up to a bigger case, I'll have a little one for launching locally (assuming I stay under the weight limit). Might be able to entice some of the locals to join me in rocketry and set up a little club here in the hills.
I'm also not sure on the length. It's crunch time to make a decision for that middle tube. I have a decently sized chunk of the heavy tube leftover so I wouldn't need to cut much other than trimming the stapled end. It'll be beefier but won't save me much weight, if any. Kinda leaning that direction at the moment. All it has to do is hold a parachute and shock cord, not to mention a shorter tube will cut the skin drag. Feeling a little vexed. My Cp is back far enough that it's a non-issue and I can make her as short as I like, so long as there is some tube there. Maybe I'll cut the tube and try it on, just to see how I feel about it.
There's always going to be another rocket, so I'm probably reading too much into this, just want things to be "right." Is that normal? I'm even crunching through other names, sticking with my writing theme. "Blank Page" is one that occurred to me that might be better suited for this rocket. Kinda leaning that way.
So close to finished yet so many decisions that need to be made and I've been putting them off.
Nytrunner
Pop lugs, not drugs
Epoxy-coated 3 of the fins last night, prolly will do the other one this evening.
How thick are your fins? I hate to say it late in the game, but they were likely plenty strong without the added epoxy weight.
The relatively low-aspect clipped delta design you've used is very stable at high speeds.
As you fly more, you'll begin to learn the limits and strengths of the materials you use, and your builds will get leaner (better overbuilding in the beginning than underbuilding). One thing I find annoying as an engineer is the lack of material data for the common things we use in rocketry which makes it difficult to do meaningful analysis without making a handful of -ish assumptions, and not having a personal wind tunnel to validate.
On flutter, the tool FinSim is a good resource to use if you're willing to do some reading about the proper inputs and interpreting the outputs.
Unless I'm mistaken, you won't be finding drag coefficients info from the barrowman equations. Their purpose is to aid in locating the CP, not determining component drag coefficients. (and unless I'm mistaken, flutter and divergence are more driven by Lift on the fins than drag)
Regardless, your rocket is looking great and will no doubt surprise you in how much motor it can take. If you're using OpenRocket, the motor selection page should list the full loaded weight (as well as empty weight) and that includes casing.
Blank page and first draft are great names. Maybe L2 can be "Revision" and L3 "Final Cut"
boatgeek
Well-Known Member
- Joined
- Dec 27, 2014
- Messages
- 7,412
- Reaction score
- 7,960
I don't know how much a 1G Cesaroni case weighs, or if it is worth the bother.
The G78 blue is just a hair under 200 grams. If you're on the edge on weight, you might look at a 29mm Aerotech single use (technically LMS) at 125 grams plus another 25-50 grams for a 38mm-29mm adapter. If you have lots of stability, shaving a little off the length is a good way to go to minimize weight.
Off Grid Gecko
Well-Known Member
Thanks again for the input. Yes, structurally I'm sure the 1/4 ply has it in that department, but the wood is quite brittle, so the epoxy is really to keep small chunks from splitting out on a hard landing rather than adding any kind of extra structural integrity. Just a skin to keep everything together.How thick are your fins? I hate to say it late in the game, but they were likely plenty strong without the added epoxy weight.
The relatively low-aspect clipped delta design you've used is very stable at high speeds.
As you fly more, you'll begin to learn the limits and strengths of the materials you use, and your builds will get leaner (better overbuilding in the beginning than underbuilding). One thing I find annoying as an engineer is the lack of material data for the common things we use in rocketry which makes it difficult to do meaningful analysis without making a handful of -ish assumptions, and not having a personal wind tunnel to validate.
On flutter, the tool FinSim is a good resource to use if you're willing to do some reading about the proper inputs and interpreting the outputs.
Unless I'm mistaken, you won't be finding drag coefficients info from the barrowman equations. Their purpose is to aid in locating the CP, not determining component drag coefficients. (and unless I'm mistaken, flutter and divergence are more driven by Lift on the fins than drag)
Regardless, your rocket is looking great and will no doubt surprise you in how much motor it can take. If you're using OpenRocket, the motor selection page should list the full loaded weight (as well as empty weight) and that includes casing.
Blank page and first draft are great names. Maybe L2 can be "Revision" and L3 "Final Cut"
Good to know that the low-profile design tends to be stable. I figured such but had nothing to go on. Just really like the shape, and I figured a thin leading wedge would flow a bit better than a sharp corner like on the Nike rockets. Elipticals I simply don't care for, and stabby fins (with the tip chord extending beyond the root) seem like they are asking to be broken off.
I have the names "Motivation" and "Inspiration" reserved for a future 2-stage high-altitude rocket, which go back to one of the books I wrote, and motivation just makes a nice name for a booster
Thinking about doing one of those pieces as an L2 or L3 project and then attaching the second part for a trip to Black Rock. A boy can dream, right?Looking at finsim and shaking my head, because windows. Looks like a cool program. Maybe I can look into some of the models they are quoting and come up with something though. Not really high on the list of concerns at the moment. Even at transonic vel I'm sure the fins will do their job. They are pretty darn sturdy in there.
Off Grid Gecko
Well-Known Member
Always a possibility. All glued up, I'm looking at 1233g with the thicker mid-section. Primer, filler, paint? And four screws to secure the mid section to the fin can, tiny ones but another couple grams. A 29mm LMS might be the way to go for small flights. I haven't used an adapter before, but I'm sure I could make it work with the retaining cap. The other issue is 80N of thrust pushing the rocket, for a TWR of just over 5:1, it should be fine on a 6-8 foot launch rail...I think. I'll need to run the numbers.The G78 blue is just a hair under 200 grams. If you're on the edge on weight, you might look at a 29mm Aerotech single use (technically LMS) at 125 grams plus another 25-50 grams for a 38mm-29mm adapter. If you have lots of stability, shaving a little off the length is a good way to go to minimize weight.
It's going to be a tight fit though. Guess this is the fun part. Just see where she comes out on weight in the end. Kind of fun in a way. But the die is definitely cast. The rocket is a bit nubby, but I think it'll do. Still an attractive design. I'll post some pics in the near future.
Nytrunner
Pop lugs, not drugs
Light coat of filler primer, sand most of it off, light coat of paint?
You can get a general estimate of rail exot speed* using a spreadsheet, its just tedious to import the thrust curve of the motor you want to analyze each time. That is important since the motors often thrust above or below their average thrust number during the time the rocket is on the rail. Thats where thrustcurve.org can help with its batch run of all motors that fit. (Make sure you tell it the mmt is longer than the motor or it wont run that motor). Thrustcurve will flag your flight as "red" if rail exit speed is below 50ft/s, but with no to low wind, and a rocket that isn't understable, you can go down to ~45ft/s
Example: using the AT G78, it ramps up to 80N thrust over 1/2 second (medium propellant, Mojave Green I think) compared to the AT G80 that puts out 100N almost instantly (Blue Thunder, fast propellant).
*Account for effective rail length being the tip of rail to forward rail button. Once that front button is free, the rocket can yaw.
Off Grid Gecko
Well-Known Member
I figured that many of these motors spikes quite quickly and then dropped off the thrust. I may look closer at the G motors and the range from 1G to max thrust. I assume it would be fairly linear, so no need to do an integral. I should be able to plot it out on a spreadsheet easily enough. I definitely don't mind the math that goes with rocketry, but I hadn't thought that it would take half a second for a motor to ramp up. I'll keep that in mind when it comes time to shop.Light coat of filler primer, sand most of it off, light coat of paint?
You can get a general estimate of rail exot speed* using a spreadsheet, its just tedious to import the thrust curve of the motor you want to analyze each time. That is important since the motors often thrust above or below their average thrust number during the time the rocket is on the rail. Thats where thrustcurve.org can help with its batch run of all motors that fit. (Make sure you tell it the mmt is longer than the motor or it wont run that motor). Thrustcurve will flag your flight as "red" if rail exit speed is below 50ft/s, but with no to low wind, and a rocket that isn't understable, you can go down to ~45ft/s
Example: using the AT G78, it ramps up to 80N thrust over 1/2 second (medium propellant, Mojave Green I think) compared to the AT G80 that puts out 100N almost instantly (Blue Thunder, fast propellant).
*Account for effective rail length being the tip of rail to forward rail button. Once that front button is free, the rocket can yaw.
Off Grid Gecko
Well-Known Member
Standing on the scale. The retaining ring is on the scale as well but still not attached. All other parts are in the tube. The 18' length of 550 cord and parachute tuck into a nice bundle wrapped in nomex that fits the tube so well you would think I planned it that way! I was trying Drywall screws to attach the fin-can, but the threads don't run near enough to the head to be useful, there will be nothing left to grip the tube if I trim them, so I'll need to checkout some hardware in town when I pick up JB weld for the ring. The new OAL is 49.5 inches long, and gives me a stability of 1.5 - 2.5 calibers depending on the motor weight (for safety I calculated it all with a small motor size at the rear of the rocket to 400g). Fine looking little ship, I think, for my first HPR certification attempt.
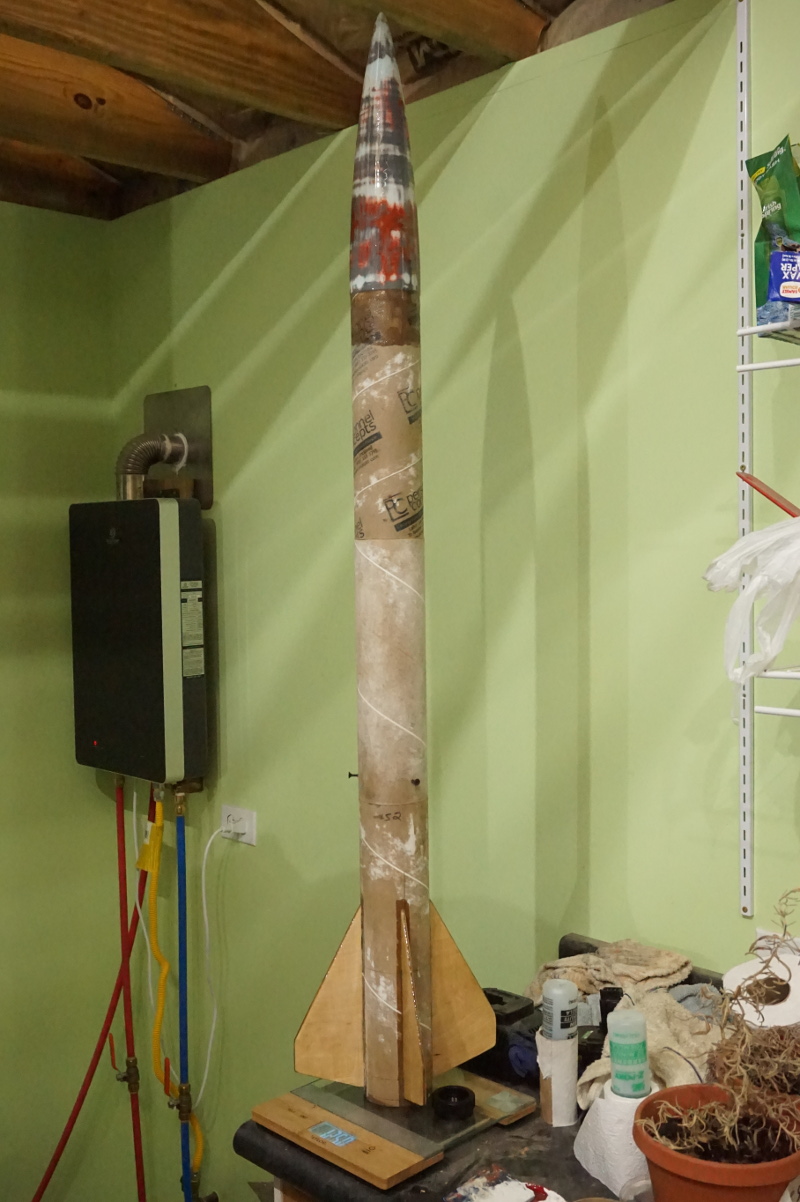
I left the screws in to mark the holes, so she's kinda Frankenstein's Monster looking at the moment.
I left the screws in to mark the holes, so she's kinda Frankenstein's Monster looking at the moment.
Nytrunner
Pop lugs, not drugs
Thats almost as tall as my biggest motor case! Lol
I rather like the various sanded coatings, wood grain, and exposed tubing look. A couple coats of clear coar will preserve it, and not weigh too much either.
Why screws? Does that section need to be accessible?
I rather like the various sanded coatings, wood grain, and exposed tubing look. A couple coats of clear coar will preserve it, and not weigh too much either.
Why screws? Does that section need to be accessible?
Off Grid Gecko
Well-Known Member
Hehe, naw, I at least need to do some kind of paint job. I can make krylon do wonderful things sometimes, when I get lucky and I don't have a nozzle that blasts big blobs.Thats almost as tall as my biggest motor case! Lol
I rather like the various sanded coatings, wood grain, and exposed tubing look. A couple coats of clear coar will preserve it, and not weigh too much either.
Why screws? Does that section need to be accessible?
Yes. The 550 cord is eventually going to turn crunchy after heating. 10 flights or 100 I'm not sure, people report that it's durable, but want the option. Also just testing the concept. It's nice to get access to the fin can when needed. I suppose I could skip it if it came down to it, but nobody is flying right now so I have plenty of time.
Calculated a basic flutter velocity tonight, around Mach3, think I'm safe there, lol. Keeping that in mind. So much seems to depend on the fin shape more than any other variable, and this is without tapering! I might recollect the terms of the equation I used: https://www.apogeerockets.com/education/downloads/Newsletter291.pdf
and see how everything looks from the perspective of root chord ratios and fin height. Regrouping the terms might look messy at first but prove to be very useful for high speed fin design, assuming the equation is halfway accurate and based on solid assumptions.
Nytrunner
Pop lugs, not drugs
Hmmm, what did you use for G (shear modulus) of 3 ply plywood? It doesnt exactly meet the isotropic properties condition of the apogee article
I have the names "Motivation" and "Inspiration" reserved for a future 2-stage high-altitude rocket, which go back to one of the books I wrote, and motivation just makes a nice name for a booster
I like those names, hope you build that one day. I'm curious, what books did you write?
Off Grid Gecko
Well-Known Member
I used 25000. found some numbers online ranging from 20k-30k and split the difference just to get a rough idea. There could be a weak point in there, but in general I would hold that something a 1/4 inch thick is going to have a pretty uniform stiffness. I think they are making a bigger deal of that point than it needs to be in the article. Like all the calculations to determine Mach speed which amount to very little change from day to day. I suppose if you are trying to be really precise and fly at the bare minimum requirements, then that would become more important, but for ballpark figures it hardly seems necessary. Just plug in 1100 and go, lol. I can't ever picture myself trying to tune down my fins to within 50 ft/s of the flutter calculation, when there are much bigger problems to worry about in rocket design. They should always be strong.Hmmm, what did you use for G (shear modulus) of 3 ply plywood? It doesnt exactly meet the isotropic properties condition of the apogee article
Off Grid Gecko
Well-Known Member
The book I referred to was called "Finish the Damn Book!" and written as a motivation source for writers. It's by far my best selling title (i.e. making enough money to buy me a taco each month, lol). If you look that one up on Google then you'll be led to my other titles on Amazon. Here are some of the titles:I like those names, hope you build that one day. I'm curious, what books did you write?
Operation Raindrop
Viral Spark
Incorporated First Strike
Off Grid Gecko
Well-Known Member
Okay, so kinda stuck on attaching the retaining ring. I've read about using JB weld for its heat resistant properties, so picked up a pack this morning. Got to reading the temperature stuff at lunch time, and it says 230F for the max operating temp. My Z-poxy (PT-39) is rated to 225F. ... Did I just waste the 6-7 bucks on that tube? Is there a "high-temp" JBweld that should be used?
Second and more imporantly, how critical is this on a 38mm motor mount? It seems that there's regular epoxy or wood glue all around the ring on most models, and that seems to work fine. Should I worry about the retaining ring coming off in flight, or is this one of those things where sitting against a hot motor nozzle on the ground could cause the glue in that particular spot to fail? Or is this another case of over-designing model rockets?
Second and more imporantly, how critical is this on a 38mm motor mount? It seems that there's regular epoxy or wood glue all around the ring on most models, and that seems to work fine. Should I worry about the retaining ring coming off in flight, or is this one of those things where sitting against a hot motor nozzle on the ground could cause the glue in that particular spot to fail? Or is this another case of over-designing model rockets?
Nytrunner
Pop lugs, not drugs
Can you take a pic of the JB you bought?
The reason JB steel-weld (original) is used on retainers is because they're metal. Better bonding properties
The reason JB steel-weld (original) is used on retainers is because they're metal. Better bonding properties
Off Grid Gecko
Well-Known Member
I realized what it was while looking at the mfg website last night. They only have KwikWeld at the local store. I ran to town this morning for some other stuff and picked up paint and original JBWeld which has the 550F resistance. Might put on the retainer tonight and let it cure while I sleep.Can you take a pic of the JB you bought?
The reason JB steel-weld (original) is used on retainers is because they're metal. Better bonding properties
The rest of the rocket is pretty much done, and with no launch in sight for me at the moment, I decided to start priming and filling in between chores today. Prolly not a good day for the AF to do a bombing run on my hill, it might raise an eyebrow out there. lol.
As for the stuff I bought before...I'll prolly just hang on to it. I'll find some use for it here or there I'm certain, and I'm not the type to take something back.
Off Grid Gecko
Well-Known Member
At some point, I feel like calling this project "done," and the paint is annoying the heck outta me. These tubes keep lifting new hairs as I try to get them them straight, and the nose cone is sort of a nightmare. I've got it in primer again. I'm going to remove a couple paint buildups on the fin tips (not sure where these are coming from) and give her a final "nose job" with spot putty. Then I'm going to start adding paint. My white base is also a primer coat, so I think that will be fine for a next step. I'm thinking thin blue lines running along the rocket to simulate a sheet of notebook paper, and maybe a thin red line running crossways.
As for the little bits of spiral remainder and small scuffs? I'm going to leave them. Teaching myself to say "good enough," especially for a "first draft," lol. She's bound to get dinged up from flights and I can't sit here an obsess about a few pinholes or I'll never finish this thing. Hopefully posting pictures soon.
The engine retainer is mounted and secure, the rail buttons are in place, the chute and shock cord are ready, so once the paint is done I'll weigh her and see where we are. I'm sure it'll be over 1300g and a Class II rocket even on the lightest G motor that will launch her (with hardware), but that'll save me some cash that would have been for building a launch rail. Once it's done I might shop some motors and see what I find. Looks like my maiden flight will be an L1 attempt.
Off Grid Gecko
Well-Known Member
Here's the base coat laid down. This paint works a bit better than the normal primer, so it's actually hiding quite a bit I think. Most of the tube is in alright shape, but the nose is a little weird. Good enough to fly I think, and it looks good from about 20 feet away.
boatgeek
Well-Known Member
- Joined
- Dec 27, 2014
- Messages
- 7,412
- Reaction score
- 7,960
Here's the base coat laid down. This paint works a bit better than the normal primer, so it's actually hiding quite a bit I think. Most of the tube is in alright shape, but the nose is a little weird. Good enough to fly I think, and it looks good from about 20 feet away.
Looks great! Also, the flatter your paint is, the harder it is to see imperfections in the surface. Flat white or black is the best for hiding dings and wows.
Off Grid Gecko
Well-Known Member
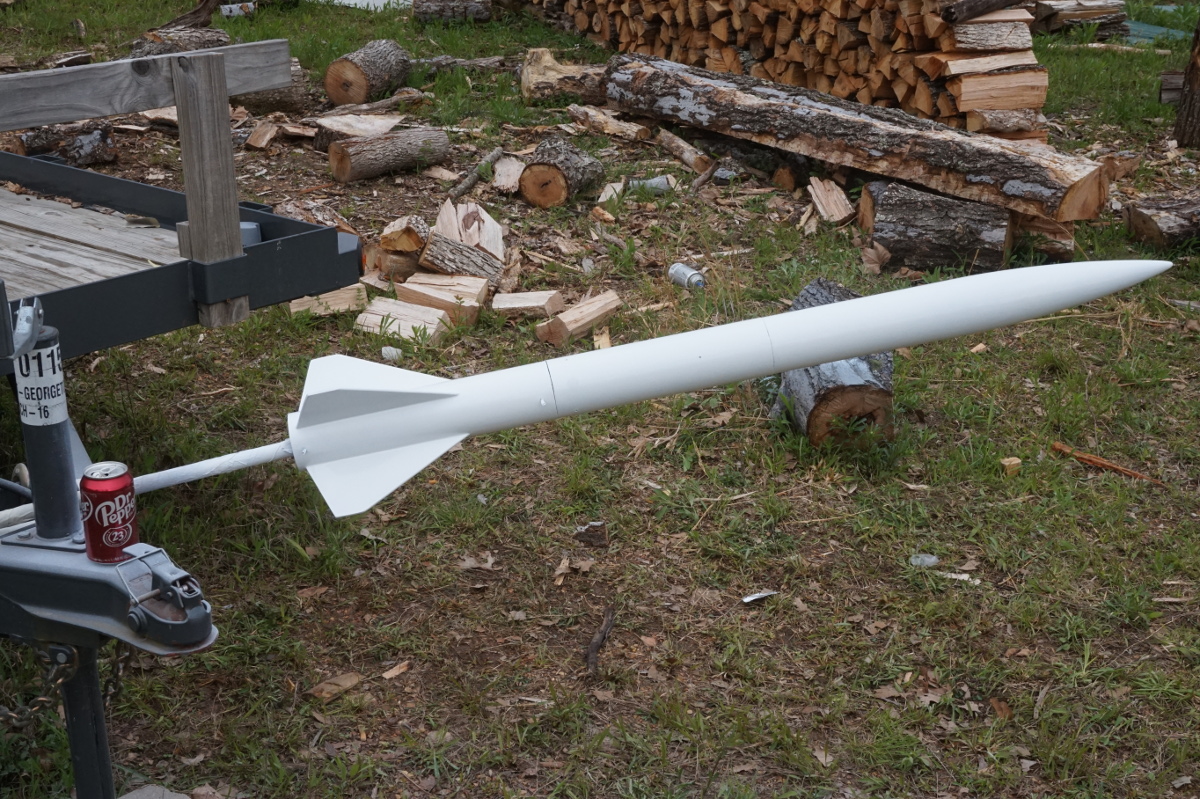
Decided to simplify the paint scheme and do it all in one masking (running out of tape) There's one long strip on either side, a blue one and a red one. Thanks to all the people on this forum who suggested Scotch tape for masking. In most places the lines came out razor clean. I'll need to refine my technique a touch and perhaps add some little pull tabs to make it easier to remove when everything is still tacky, but I'm really happy how the fin tips came out. Just need to put in a touch more care in making sure the entire tape line is sealed in the future.
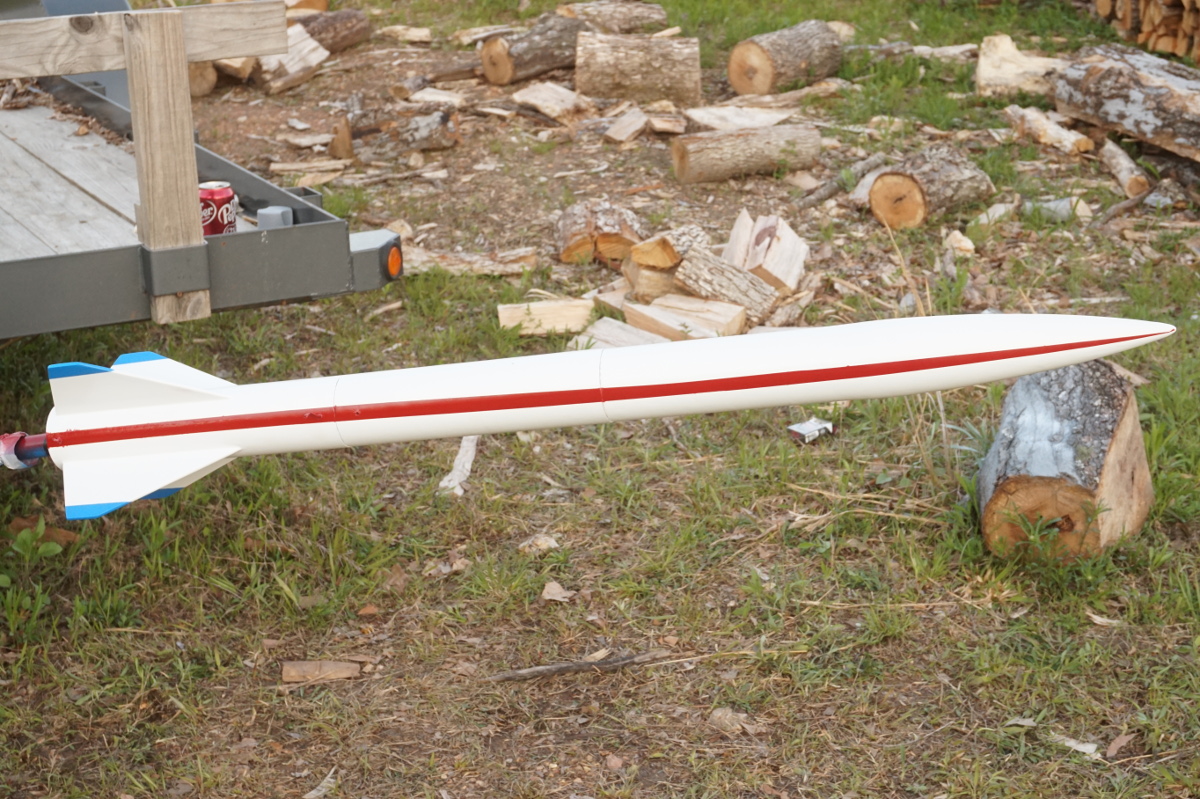
Kinda patriotic looking Might order some decals for it if I get time and have the inclination. For now it feels good to call this done and put more energy into finding a place to launch it.
First mission: Maiden and L1 Flight
Second mission: Altimeter and flight computer testing.
Third mission: Simple dual deployment testing.
Kinda patriotic looking
Might order some decals for it if I get time and have the inclination. For now it feels good to call this done and put more energy into finding a place to launch it.First mission: Maiden and L1 Flight
Second mission: Altimeter and flight computer testing.
Third mission: Simple dual deployment testing.
Similar threads
- Replies
- 14
- Views
- 521
- Replies
- 11
- Views
- 420
- Replies
- 16
- Views
- 577