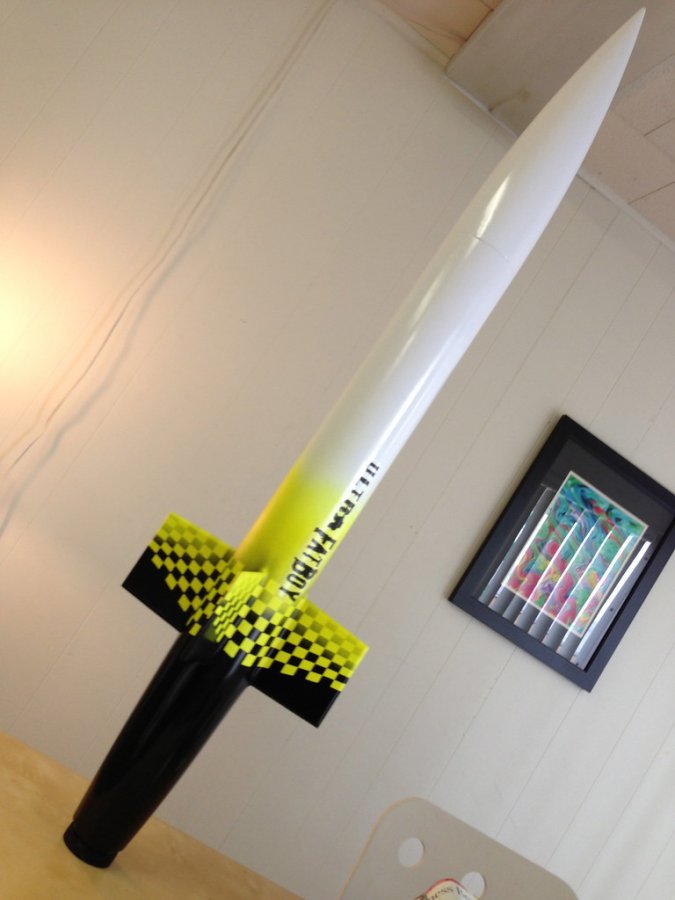
how do you paint a checkerboard?

The Rocketry Forum

Help Support The Rocketry Forum:

This site may earn a commission from merchant affiliate links, including eBay, Amazon, and others.

bjphoenix

Well-Known Member
Joined
May 3, 2011
Messages
2,714
Reaction score
2,014
I've seen this design on rockets before. I'm scratch building so I don't have factory decals, and I don't want to try to create decals. I would like to do it with paint.
1645240843969.png
A few years ago I did a larger pattern on an Honest John similar to the photo below. For the HJ I copied the pattern from Peter Alway's book. I used masking tape, put the tape on a sheet of slick cardboard and cut out the lines then peeled off the pieces and put on the rocket. I could do that same thing with the checkerboard but it takes a lot of patience.
1645241097699.png
 
Paint white first, let dry. Cut your squares, 1' Or what ever size you need. Lay out the first row along a guide tape. now just lay second row using the points on the first squares, and so on.
 
I'm still trying to figure out how they did this paint job:
7zAXXIR.jpg
 
Paint white first, let dry. Cut your squares, 1' Or what ever size you need. Lay out the first row along a guide tape. now just lay second row using the points on the first squares, and so on.
Perhaps -

Paint the white;
Cover the entire white field with 1" masking tape, laid edge to edge and neatly parallel;
Layout your spacing, and cut all tapes from top to bottom, perpendicular, with x-acto knife. Now your field is covered with a set of perfectly butted squares;
Pick off alternating squares with the tip of the knife.

Would work for pattern in post #3 also.
 
Paint white first, let dry. Cut your squares, 1' Or what ever size you need. Lay out the first row along a guide tape. now just lay second row using the points on the first squares, and so on.
This is probably what I'll do, but this is what I consider to be the "hard way". I'm not sure I can make it uniform enough to satisfy myself.


Paint the white;
Cover the entire white field with 1" masking tape, laid edge to edge and neatly parallel;
Layout your spacing, and cut all tapes from top to bottom, perpendicular, with x-acto knife. Now your field is covered with a set of perfectly butted squares;
Pick off alternating squares with the tip of the knife.
I've certainly thought about this. I think I could get a more uniform pattern this way. However I've been concerned about cutting too deep and when I peel the tape off it takes the underlying paint with it. Maybe I could put on a really think layer of white with lots of coats.
 
This is probably what I'll do, but this is what I consider to be the "hard way". I'm not sure I can make it uniform enough to satisfy myself.


I've certainly thought about this. I think I could get a more uniform pattern this way. However I've been concerned about cutting too deep and when I peel the tape off it takes the underlying paint with it. Maybe I could put on a really think layer of white with lots of coats.
The paint is more likely to peel if it is a thick coat. Use a good lacquer type primer, and a hard acrylic enamel for the base coat, and it will be fine. Suggest using the "delicate surface" paper tape, or the 3m fine line, a brand new blade and it will be fine.
 
Paint white.
Lay down masking tape in one direction, at appropriate spacing.
Lay down masking tape in perpendicular direction, at appropriate spacing.
Wherever two pieces of tap cross, carefully cut that square out.
Paint black.
Remove tape.

This seems easier in that you don't have to place individual squares - just lines of tape - but also means having to cut through tape while it is on the rocket, which may be difficult without scratching surface.
 
Here is a closeup of the roll pattern on my BT-50 size Honest John. I used the pink delicate surface tape, put a piece of it on a slick piece of cardboard like the advertising postcards we get in the mail, marked and cut out the pattern, then peeled up the pieces and put them on the nose cone. The pink tape seems capable of a better paint edge than the blue tape i've used before, but it still isn't perfect. I had more little bleeds than I expected. I went back with the tip of a sharp hobby knife and scraped off the little bits of black paint that seeped under and if you aren't looking at it too close it looks pretty good.
I'm tempted to buy some Tamiya tape to try, that is what a lot of plastic modelers use.
IMG_4688b.jpg
 
I'm still trying to figure out how they did this paint job:
7zAXXIR.jpg
I can't say for sure exactly how they did it, but if I were to attempt that it would be with decals. The checkerboard pattern could just be clear-backed decal over the yellow paint.

Admittedly, getting the tip-to-tip decal in place evenly between each pair of fins is not a trivial task, but I think it would be doable.
 
I have always used Frisket masking film and a single edged razor blade. I also use 14 mill mylar as a straight edge. As I cut the pattern out, I mark the strip sections with a dot. I take the Mylar, wrap around the tube, measure that circumference and divide by the pattern size wanted. I use dial calipers to get the spacing wanted. Sounds hard, it isn't.

img20200121_08505415.jpg img20200121_08333129.jpg
 
Here is a closeup of the roll pattern on my BT-50 size Honest John. I used the pink delicate surface tape, put a piece of it on a slick piece of cardboard like the advertising postcards we get in the mail, marked and cut out the pattern, then peeled up the pieces and put them on the nose cone. The pink tape seems capable of a better paint edge than the blue tape i've used before, but it still isn't perfect. I had more little bleeds than I expected. I went back with the tip of a sharp hobby knife and scraped off the little bits of black paint that seeped under and if you aren't looking at it too close it looks pretty good.
I'm tempted to buy some Tamiya tape to try, that is what a lot of plastic modelers use.
View attachment 505566
The higher grades of masking tape, especially the vinyl, provide a better edge. But a super sneaky trick works great - put your masking tape down, then give the edges a quick shot of your base color (white). The bleed under will be the same color as the base, so you wont see it. Let it dry, then spray the black. Score around the tape with a knife point before lifting the tape.
 
Wouldn't it be easier to have somebody that does vinyl signs lay out the pattern on their pc and create a checkerboard pattern so that you could Put it down after you put your primary coat on and then do the black in the open spots created by the printer?
 
Wouldn't it be easier to have somebody that does vinyl signs lay out the pattern on their pc and create a checkerboard pattern so that you could Put it down after you put your primary coat on and then do the black in the open spots created by the printer?
If you mean doing a cut vinyl mask, then yes, you could... but peeling off all the individual square pieces afterwards would not be fun, especially if it's a fine checkerboard.

If you don't have paint-matching problems (that is, at least one of the checkerboard colors is a good match to vinyl color, most likely black or white), then you could just do the whole checkerboard with the cut vinyl. Should work OK unless the checkerboard is very fine, in which case it starts to become a pain. Oh, and you only get one shot at positioning something like that.
 
Ask your local vinyl cutting shop to make you vinyl masks. The wavey checkered flags are great.
 
Correct me if I'm wrong here, but doesn't a vinyl mask such as you're discussing need to be a single piece? A checkerboard is not a single piece. There'd need to be little spurious dots of vinyl at the corners, which would show up as dots of base color. If they're small enough to satisfy the builder then that's all well and good, but it'll never be perfect.

My inner smart-ass, who never fails to chime in whether I want him to or not, read "how do you paint a checkerboard?" and thought "How do you eat an elephant? One square at a time."
 
Cut vinyl doesn't need to be a single piece, otherwise how would you do separate letters in a logo? Instead of permanent vinyl, you cut removable mask. It's still attached to a carrier and applied the same way. After painting the foreground color, you peel the mask away a piece at a time. It's almost impossible to match rattle can colors other than black with vinyl so I do almost all my vinyl this way.
 
A cut vinyl mask certainly does not need to be one piece, but a fine checkerboard mask made of 100 individual pieces would certainly be an unpleasant task to remove, and as mentioned before you'll only get a single chance to apply it (no repositioning), and that can be a bit challenging with a wrap.

Doable, but I'd probably look for other ways to get the same result.
 
Still confused.
Instead of permanent vinyl, you cut removable mask. It's still attached to a carrier and applied the same way.
Are there some words missing? Apply the same way as what? If you apply the carrier, how does it (the carrier) not block the paint?
 
Ohhhhh! It comes from me being a thick, thick, thicky.

Holding the sheet with the carrier in one's hand and the vinyl closer to one's eye, the way one holds a sheet of water slides, one would see a mirror image of the decal or mask desired. The vinyl is applied to the rocket (or whatever) upside down, with the carrier on top. Got it! Thick, thick, Thicky McThick has finally caught up.

Unless I still don't have it right. Have I got it right? Or am I Double Dumb Thicky McThick the Third?
 
Holding the sheet with the carrier in one's hand and the vinyl closer to one's eye, the way one holds a sheet of water slides, one would see a mirror image of the decal or mask desired. The vinyl is applied to the rocket (or whatever) upside down, with the carrier on top. Got it! Thick, thick, Thicky McThick has finally caught up.
Correct.

Have you never applied vinyl before? It's kind of fun.
 
Have you never applied vinyl before?
Clearly not. I've been thinking for a long time that "some time soon" I'll have some sort of design that makes it worth ordering some. My first project involving vinyl decals is just around the corner, like practical fusion reactors.

When using a vinyl mask, is it recommended to spray base color or clear to seal the edges, as it is when masking with tape?
 
When using a vinyl mask, is it recommended to spray base color or clear to seal the edges, as it is when masking with tape?
I have not done so, since the vinyl really creates a well-sealed edge. But it can't hurt I guess. I'd go with clear for this application.

My biggest problem when I used vinyl mask (from Stickershock23) is that it pulled up my metallic paint base layer. I would not leave it on too long if possible. Cricut mask may or may not have as much grab.
 
Something should also be said about the intended paint to be used.

Rattle cans are notorious for bleed under & other sorts of paint mask frustrations. Airbrush or spray guns on a light setting tend not to "drive" paint under the mask. and you can have a bit more finesse & control on how & exactly where you want to put paint.

The quality of tape also makes a difference, and here, the more you pay, the better the results (And I'm talking specifically about the Tamiya masking tapes & frisket films. As well as the wax & putty masking elements..
 
I have not done so, since the vinyl really creates a well-sealed edge. But it can't hurt I guess. I'd go with clear for this application.

My biggest problem when I used vinyl mask (from Stickershock23) is that it pulled up my metallic paint base layer. I would not leave it on too long if possible. Cricut mask may or may not have as much grab.

I've had similar issues with vinyl tape, Cricut and Frisket masks, even painter's tape. I found a quick shot of a clear coat where you want to put your mask really helps to seal down the previous layers and keep it from peeling up when you pull the mask.

I should note that I am not using rattlecans, but airbrush and spray gun.
 
Crafters use mod podge to seal the edges when using stencils, then "dry brush" to build up the color to avoid bleeding.
 
Back
Top