First 2.1" altimeter bay or ebay

The Rocketry Forum

Help Support The Rocketry Forum:

This site may earn a commission from merchant affiliate links, including eBay, Amazon, and others.

Sandy H.

Well-Known Member
TRF Supporter
Joined
Mar 20, 2009
Messages
2,463
Reaction score
1,973
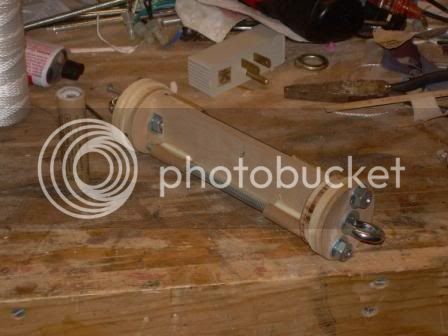
The following are pictures of my first attempt at an electronics bay. The diameter is 2.1" made from PML tube for my Callisto to use dual deploy.

I'll comment on the shortcomings after the pics.

All comments are welcome.

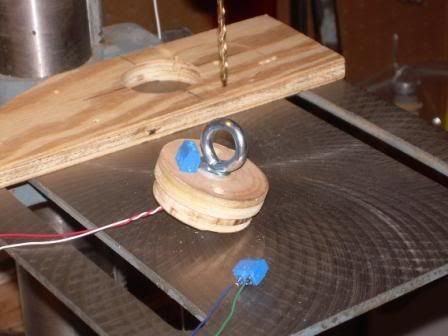
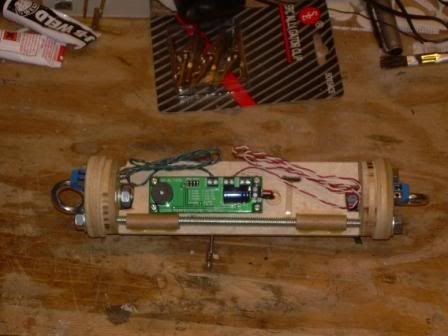
Here are the components, first view.

The battery is contained by a plate bulkhead.

Sandy.

View attachment 1.JPG
 
Next is the chassis inserted into the ebay with the ignitor connector exposed.

Clearance between the rail button mounting screw and the altimeter were close, which is why leaving the altimeter sled free to rotate on the central shaft made things easier.

S.

View attachment 4.JPG
 
Top plate connected.

I used Dean's connectors from the RC world to make connections. This seemed pretty easy and eliminates changes at the field.
S.

5.jpg
 
This is the top view prior to connecting the top plate.

At about 7 o'clock, you see my home made arming switch. Its pretty bulky and will likely be the last time I build my own.

S.

6.jpg
 
Last is the completed assembly.

I tighten the eye bolts as hard as I can hand tight, then tighten the jam nuts with a wrench. By hand, I can't loosen the assembly at this time. The ebay is connected to the rocket with #4 screws at both ends.

S.

View attachment 7.JPG
 
Overall, the ebay is way too heavy for its job. 1/4-20" threaded rod with couplers to use standard eye bolts from Lowe's was cheap, but heavy. For a more ideal weighted assembly, I would try to find/make #10 hardware next time.

The couplers and gaps on the eye bolts were welded closed to prevent loosening or stretching during flight. So far, this seems strong. However, to allow the center battery retaining bulkhead to be removed, I had to slot it. To do it over, I would not weld all of the components together and would give some way to remove the center bulkhead. Slotting it made alignment non-fixed and means I have to align it prior to tightening the nuts.

The central rod method is nice in the respect that the forces are axial and do not get divided in the upper or lower plates, like would happen with 2 threaded rods and/or U-bolts. This design, when tightened correctly, cannot be opened by hand, but as of yet, I am not sure that this is 100% flight stable. I think it will be and will continue to refine the design to more positively retain the ebay top and bottom plate with a central rod only. U-bolts just seem too bulky for my taste.

The home made screw switch works well when tightened fairly tight. I imagine over time, it will fall apart and could cause reliability problems.

Well, that's my take on an ebay for the first time. I searched a few times for ebay design on here and never found something that spoke to me. Some vendor designs are out there and I did use those for reference, but most used 2 rods instead of one, which is what I did here for stress and space reasons.

This is actually rev 2 of the design. Rev one was hastily put together and ended up lawn darting due to a lack of enough BP for shear pins. The top plate was damaged, along with the phenolic tube, so those are new, but the central rod structure was retained. The altimeter reported 67 Gees (a 70 Gee unit) and the nosecone was 1ft in the ground on recovery. The battery never came loose from the mount, which makes me feel that this portion of the design is somewhat sound.

Sandy.
 
I'm with you on the desire for a single central rod and minimum hardware. The less steel, the better, within reason

A method that I'm working on, for a mid-power rocket, is similar in that it uses a single threaded rod, but the shock cord attachment is different. It will have two wingnuts and two washers at each end. The stack at one end goes bulkhead, washer, wingnut, shock cord loop, washer, wingnut. The idea is that the outer wingnut and washer tighten against the wing tips of the inner wingnut, leaving a space for the (kevlar) shock cord loop. The inner wingnuts preload the bulkheads to seal them. A picture would be worth 200 words, but I don't have a camera handy.

No eyebolts, no welding, no u-bolts, no wrenches, and no holes other than the central one and an optional one potted wires for the charges. Lightweight, and easily dis-assemble-able.When I get it done and fly it we'll see how well the wingnuts stay tightened against each other. A wrench or pliers may be required, after all. If I make the shock cord loop small enough, though, the outer wingnut would have to become completely unthreaded for the loop to come off.
 
Here is some pic's of my 2.1 dia ebay. It is a total of 12 & 3/4" long, bay area is 6& 7/8" long, the batterys fits in the upper 4 3/4" coupler with the pull pin arm switch which is a power connector and jack, The battery pack is 8 AA batt's for 12volts of power to run the dual timer and wireless cam. The cam is in the lower coupler tube with its 5vdc regulator.
It is the dual rod design using 3/16 allthread and jamb nuts for adjustabilty for the slead and coupler tubes. The shock cord mounts are heavy duty picture hanging mounts that bolt to one of the allthreads on each end. There is also a alumn tube that travels the length of both couplers for wire pass through for the ejection charges, the bulkheads are mde up of two peices thatare glued togetherone the size of the OD of the coupler tube and one the size of the ID and they are glued together to act as a collar to keep them from slipping around. I hope this gives you some ideas or helps you out some. The outer cover slipes on to the ebay from the bottom and also has the mirror for the camera on it. I ues plastic push in reusable rivets to hod it all toghether and also to hold the body tubes on to the ebay.

5.jpg

7.jpg

4.jpg

8.jpg

9.jpg
 
I'm with you on the desire for a single central rod and minimum hardware. The less steel, the better, within reason

A method that I'm working on, for a mid-power rocket, is similar in that it uses a single threaded rod, but the shock cord attachment is different. It will have two wingnuts and two washers at each end. The stack at one end goes bulkhead, washer, wingnut, shock cord loop, washer, wingnut. The idea is that the outer wingnut and washer tighten against the wing tips of the inner wingnut, leaving a space for the (kevlar) shock cord loop. The inner wingnuts preload the bulkheads to seal them. A picture would be worth 200 words, but I don't have a camera handy.

No eyebolts, no welding, no u-bolts, no wrenches, and no holes other than the central one and an optional one potted wires for the charges. Lightweight, and easily dis-assemble-able.When I get it done and fly it we'll see how well the wingnuts stay tightened against each other. A wrench or pliers may be required, after all. If I make the shock cord loop small enough, though, the outer wingnut would have to become completely unthreaded for the loop to come off.

Another option that I use, tho the usual hardware stores don't sell em are eye-nuts. The disadvantage is conceivably they could be torqued off the center rod with a spinning rocket. So I tighten them down pretty good against jam nuts and leave enough rod exposed on both ends for another pair of lock nuts to act as stops incase the eye nuts work loose. Still more insurance I suppose could be provided by drilling the rod near the end and using a cotter pin.
 
Sandy, I like your central rod design, but..... You recognize the issues.

Here's a few pics of what I did with my 2" ID E bay. I also realize there's issues with this. First of all, since the rocket only weights 3 1/2 lbs. and I have 15 ft. of shock cord on each end, I should have used 3/16 threaded rod instead of the 1/4". I could have used smaller eye bolts too if I had welded them closed, the welder sitting in the garage just waiting.

Anyway, here's the pics.

Here's the ebay with end caps. I used a 1/4" ply to mount everything to.
EBay.jpg


The PCB terminals had the wires solders onto them, feed through the end caps, small dimples were drilled into all four sides and then JB Weld was used in and over the dimples to attach them to the end caps.
EBayterminals.jpg


Here's the electronic side of the bay.
EBayelectronics.jpg


Here's the battery and switch side of the ebay. There's a small wood block glued to the ply to hold the battery in place and it is tie wrapped to the board. The switch is done similar to the PerfectFlite manual for the HiAlt45K. I used a microswitch with a pin through a brass tube to turn the normally closed NC switch off when the pin is inserted. I also epoxied the brass tube (piece of ink tube from a pen) to the base instead of the switch.
EBaybatteryandswitch.jpg


I've only used it on one G64 test flight so far and it worked perfectly. This January it'll be used for my L1 cert flight with an I110.
 
I also like to use eyenuts as they make a central piece of allthread very simple. Though lately I've decided to make my avionics bays one size smaller than the airframe - 4" in 5.5", etc. That way I can mount my switch on the avionics bay and not have it in the airstream. I've also started running two pieces of allthread in the space between the avionics bay and the airframe and used eye-nuts there. That way I have a little more room in the bay to put everything dead center.

Edward
 
Jim:

Good threads.

Do the plastic rivets hold the ebay to the airframe? Do they carry 100% of the shear forces generated by the tension on the shock cords during deployment?

People use plastic screws as "shear pins", so I am a bit nervous about them holding the rocket together. I use #4 or #6 screws with blind nuts on my small DD models. The rivets do sound a lot easier!

Ken
 
I've used the plastic rivets on smaller rockets (up to K powered 4" rockets) without incident. Its best tho if the af is glassed or at least a small section that is supporting the rivet.
 
Do the plastic rivets hold the ebay to the airframe? Do they carry 100% of the shear forces generated by the tension on the shock cords during deployment?

People use plastic screws as "shear pins", so I am a bit nervous about them holding the rocket together. I use #4 or #6 screws with blind nuts on my small DD models. The rivets do sound a lot easier!
Ken

Yes, the rivets carry the tension from the shock cord. However, The hard plastic rivets are much stronger than the tiny nylon shear pins. You also have a little friction between the airframe and the coupler keeping things together.

I've used two rivets on rockets weighing up to 2 pounds and three rivets on rockets weighing up to 4 pounds. I've never had one break even when subjected to "much greater than normal" forces.

I do soak the edges of the holes in CA to strengthen them. Even with that, I've noticed that the holes will slightly elongate over time. Not enough to be a problem, however.

Jim
 
Back
Top