Thanks for the Madcow roll pattern, that helped clarify things a bunch.
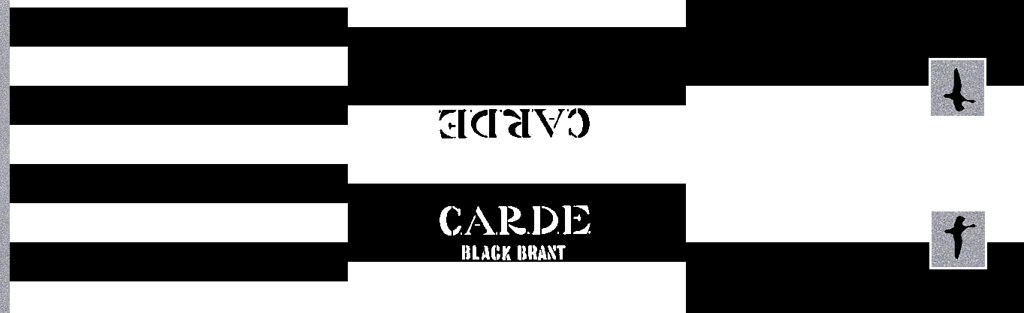
So, what I've done here is created a six view image of the Black Brant II's roll pattern.
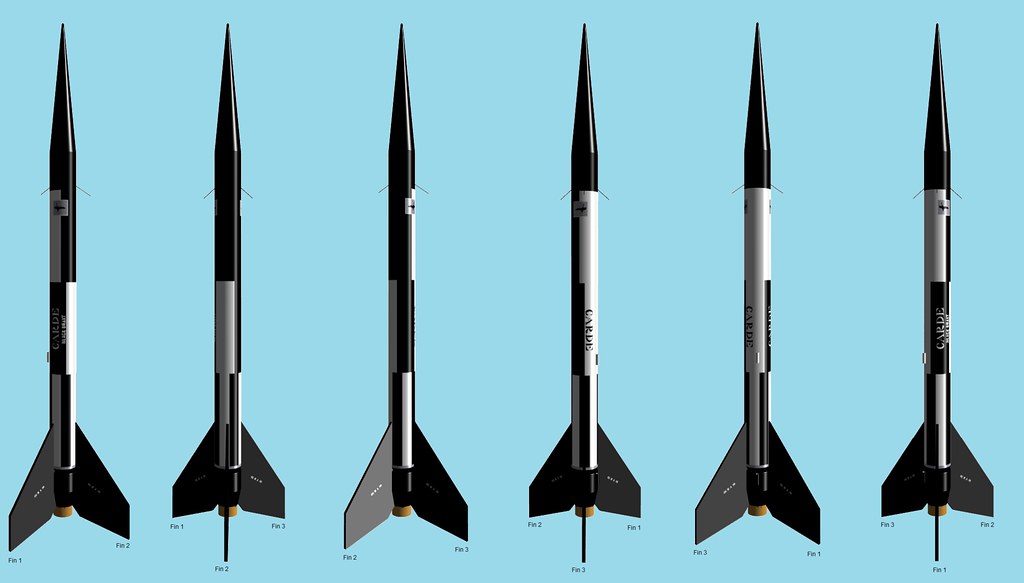
From what I've learned, to apply the decals correctly, the first decal that needs to be placed is the silver band, which is cut into 3 pieces and applied between the fins at the joint between the top of the wasp waist, and the body tube. That will be the foundation for all other decals. For clarity, all orientations below are presuming the rocket is siting on its fins and you are facing it. Fin 2 will be the fin directly opposite of the launch lugs, fin 1 will be to the left of fin 2, and of course fin 3 is to the right of fin 2.
The next priority should be the bottom section of the roll pattern. Specifically, the decal located centered between fin 1 and fin 2. If my math is correct, these decal are all actually .52" wide, leaving a .52" gap of white between them. My math looks like this... Body tube diameter (1.325") X Pi/8 (equal width segments), the results were then rounded to the nearest .01". These decals should be 4.5" long (body tube length (13.625") - silver band width (.125"))/3=4.5"
After the bottom course is done, the middle course the next priority. The black decal with the "C.A.R.D.E" and "Black Brant" markings is offset by .26" (not .25" as the instructions state) to the left of the right edge of the decal centered between fins 1 and 2. This will center it between that fin and the decal that is located just to the left side of fin 1. The decal should be oriented so that to read the markings, you should tilt your head to the left, this puts the "C" in C.A.R.D.E as the lowest letter.
That decal applied, the next decal will be the solid black rectangular decal. It will be offset from the right edge of the decal that is bisected by fin 3 (and the left edge of the decal located just to the right of fin 2). The black "C.A.R.D.E." insignia decal is applied with the "C" as the highest letter (thus you could read it correctly oriented with your head tilted to the right), it is located in the white gap which will include the launch lug.
Next comes the widest band with the notches. The notches are on the upper end of the the decal (I have seen one that was applied upside down (not my own)). That decal will align with the left side of the decal centered between fins 1 and 2.
The silver rectangular markings with the black brant (bird) emblem are applied in the notches, with the bird facing up, and the longer wing of the bird pointed towards the black.
The "CC II A 10" decals are applied to each side of the fins. My graphic has them oriented downwards at a 30 degree angle (from the horizon), and readable right side up.
Here's the image I used for my .ork file's body tube. NOTE: To use this in a .ork file, the image must be rotated CCW 90 degrees.