Kirk G
Well-Known Member
- Joined
- Jan 9, 2012
- Messages
- 1,326
- Reaction score
- 1
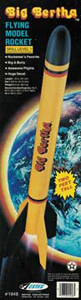
Well, for my birthday, I was given a Big Bertha kit by another club member....I don't know if it's because it was extra or she knew that I had done the Baby Bertha earlier, or if it was because it was damaged and left over... but the point is it arrived via USPS special delivery bag, and there's some damage.
The places I spot trouble are:
The launch lug (soda straw) is kinked slightly in the middle, but essentially straight. (Boy, it's long.....)
The main body tube is crushed at one end...flattened so that there is a permanent crease. The tube is not round, not even a perfect oval, but ellipse shaped.
Halfway up the body tube, there's an impact crease, a slight dimple or crease about the size of your thumb, but doesn't affect the integrity of the tube structure.
So, I launched into the kit after reading it through, and I chose to position the crushed end of the tube at the bottom, where the motor mount would shore-up, and hold the tube back to a round shape. Had I placed it at the other end, I'm concerned that either the nosecone would be held too tightly by the friction of the crushed tube, or, that once ejected, the tube would somehow be less that a desirable shape for a descent. Anyway, I decided upon shoring the damaged end up with the centering rings and motor mount assembly.
As it turns out, I glued only around the rear ring, both inside and then a filet from the outside. I guess the Big Bertha body tube is too long to consider reaching all the way down into the tube to attempt to spread a ring of glue to hold the front centering ring. At least, I didn't see any instructions to do so, so the forward ring is held by the glue to the motor tube and the friction fit to the body tube.
I feathered the leading edge of the fins before sealing, but this time, I attempted something new: CA to hold the root edge against the sanded body tube, and I positioned the launch lug along the crease line where the tube was flattened. (In other words, none of the balsa wood fins align with the crease. they are spaced, straddling ,and parallel with that crease.) Did I mention that I used carpenter wood glue as the filet on the launch lug as well as the balsa fins? Well, I did. And most were done last night at 3 a.m. They dried 9 hours. And then I hit the launch lug again and hour before painting.
As I get to the end stages of construction, I've tied the shock cord onto the nose cone but now notice that it increases friction for the slip fit. And after gluing the anchor inside at more than 1 1/2 inch down the tube, I know it's not impacting that. As I consider tying on the parachute, I note that it's a pre-pack assembled chute from China, carefully folded and pressed. I'm debating just looping the shrouds around the nosecone to tie it on, but not disturbing the chute, since it's so carefully folded, much better than I could do. (What do you guys think of that idea, or am I shooting myself in the foot by not fluffing the chute out and powdering it with baby powder?) Or course then, I'd have to re-roll it.

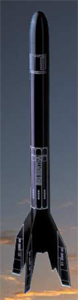
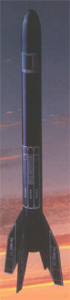
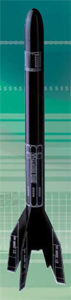
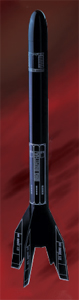
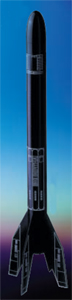
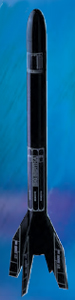
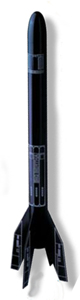
Today, as we have 75 F and bright sunshine, I primed the rocket by brush with Gray Valspar primer paint and avoided the fillets, as I think they could continue to cure and dry a little more (to yellow tinted clear state).

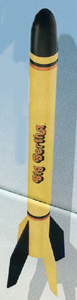
This time, I tried a flat brush-on primer, and gave it all (except the fillets) a thin coating, figuring to spray paint the thing flat black like my Hyper-Bat and the Baby Bertha. But somebody showed me a picture of their bright gloss yellow Baby Bertha and now it's gotten me thinking that perhaps recovery and sighting up in the air might be better with something brighter. The parachute is a black, blue, white pre-printed add for Estes Rockets...and not particularly eye catching like red or orange.

Any suggestions would be welcome, as I'm letting the primer dry this afternoon before looking at spraying a finish coat or two tomorrow.
The places I spot trouble are:
The launch lug (soda straw) is kinked slightly in the middle, but essentially straight. (Boy, it's long.....)
The main body tube is crushed at one end...flattened so that there is a permanent crease. The tube is not round, not even a perfect oval, but ellipse shaped.
Halfway up the body tube, there's an impact crease, a slight dimple or crease about the size of your thumb, but doesn't affect the integrity of the tube structure.
So, I launched into the kit after reading it through, and I chose to position the crushed end of the tube at the bottom, where the motor mount would shore-up, and hold the tube back to a round shape. Had I placed it at the other end, I'm concerned that either the nosecone would be held too tightly by the friction of the crushed tube, or, that once ejected, the tube would somehow be less that a desirable shape for a descent. Anyway, I decided upon shoring the damaged end up with the centering rings and motor mount assembly.
As it turns out, I glued only around the rear ring, both inside and then a filet from the outside. I guess the Big Bertha body tube is too long to consider reaching all the way down into the tube to attempt to spread a ring of glue to hold the front centering ring. At least, I didn't see any instructions to do so, so the forward ring is held by the glue to the motor tube and the friction fit to the body tube.
I feathered the leading edge of the fins before sealing, but this time, I attempted something new: CA to hold the root edge against the sanded body tube, and I positioned the launch lug along the crease line where the tube was flattened. (In other words, none of the balsa wood fins align with the crease. they are spaced, straddling ,and parallel with that crease.) Did I mention that I used carpenter wood glue as the filet on the launch lug as well as the balsa fins? Well, I did. And most were done last night at 3 a.m. They dried 9 hours. And then I hit the launch lug again and hour before painting.
As I get to the end stages of construction, I've tied the shock cord onto the nose cone but now notice that it increases friction for the slip fit. And after gluing the anchor inside at more than 1 1/2 inch down the tube, I know it's not impacting that. As I consider tying on the parachute, I note that it's a pre-pack assembled chute from China, carefully folded and pressed. I'm debating just looping the shrouds around the nosecone to tie it on, but not disturbing the chute, since it's so carefully folded, much better than I could do. (What do you guys think of that idea, or am I shooting myself in the foot by not fluffing the chute out and powdering it with baby powder?) Or course then, I'd have to re-roll it.
Today, as we have 75 F and bright sunshine, I primed the rocket by brush with Gray Valspar primer paint and avoided the fillets, as I think they could continue to cure and dry a little more (to yellow tinted clear state).
This time, I tried a flat brush-on primer, and gave it all (except the fillets) a thin coating, figuring to spray paint the thing flat black like my Hyper-Bat and the Baby Bertha. But somebody showed me a picture of their bright gloss yellow Baby Bertha and now it's gotten me thinking that perhaps recovery and sighting up in the air might be better with something brighter. The parachute is a black, blue, white pre-printed add for Estes Rockets...and not particularly eye catching like red or orange.
Any suggestions would be welcome, as I'm letting the primer dry this afternoon before looking at spraying a finish coat or two tomorrow.
Last edited:
") .
.