


JNUK
Well-Known Member
I would like to share details of one of my latest projects. The following description provides its very general overview but please let me know if more detailed description is required.
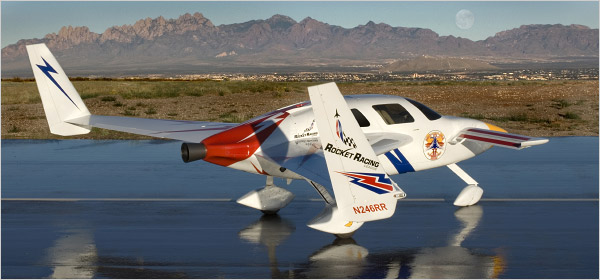
Inspiration for the design came from several photos of the Rocket Racing League rocket plane.
or here
In fact it is a highly modified version of beautifully shaped and proportioned VELOCITY manufactured by Velocity, Inc.

Check out their gallery for more nice shots of the bird.
General view drawings can be found here (LINK).
Design
I had been learning Google SketchUp8 software. Naturally I wanted to utilise it in the design process. ISO view of the final 3D model I managed to construct is attached below.

The actual SketchUp file can be found here (bottom of the page). It was my first attempt to utilise 3D software in my hobby design process. After passing the initial learning curve I found the tool to be extremely useful. It allows quick evaluation of ideas, simplifies recording of different design variants and what is very important allows quick and easy reproduction of a design. After completing the 3D model, I created component plans (two A4 size pages). Again, they can be found at the bottom of the same page.. All dimensions are adjusted for 1.6mm thick material. I used slightly finer, 1.4mm, Daler-Rowney white core mountboard, but it makes no significant difference.
Assembly
Details are cut out with some margin and glued to the board with a glue stick. After cutting out shapes with a hobby knife, paper templates are peeled off the board. Components are trimmed to fit each other and treated with thin CA glue.

The whole process is shown step-by-step here.
The assembly is bone with CA glue. Yellow glue is used only once to attach the triangular leading edges to wings.
After sanding the model was painted yellow.

Without a motor and a recovery system the model weights about 47 grams. This is including 7g of additional nose weight to bring CG to about 107 mm from the nose tip. Using balsa instead of cardboard will reduce weight to about 25...30g. Combination of different materials is possible as well. For example using balsa wood for fins/wings and retaining cardboard for the rest of the model may eliminate the need for the nose weight.
Recovery system
This aspect has not been worked out fully. The plan had been to use a relatively small streamer to stabilise the model horizontally thus reducing its descent rate. However, it did not really work very well at the end. A conventional parachute worked better and it is a preferred option for now. The recovery system compartment and its hatch may require modification to improve deployment.
Flight test
Estes A10T-3 was used for the maiden flight.
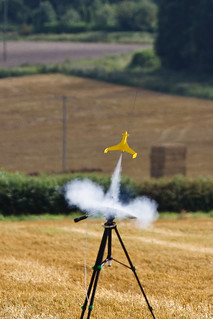
(thanks to Rob House for this shot)
It was followed by several flights again on A10T-3, A3T-4 and Delta B2-3 (this is a motor manufactured in Czech Republic for FAI competition).

In windless conditions the model goes vertically. With some wind (about 3 mph during the test) it travels vertically during the active phase and then coasts at about 60...70 degrees to the horizon.
I apologise for such skinny description. Please let me know if any details or aspect of the design require further clarification.
Inspiration for the design came from several photos of the Rocket Racing League rocket plane.
or here
In fact it is a highly modified version of beautifully shaped and proportioned VELOCITY manufactured by Velocity, Inc.
Check out their gallery for more nice shots of the bird.
General view drawings can be found here (LINK).
Design
I had been learning Google SketchUp8 software. Naturally I wanted to utilise it in the design process. ISO view of the final 3D model I managed to construct is attached below.
The actual SketchUp file can be found here (bottom of the page). It was my first attempt to utilise 3D software in my hobby design process. After passing the initial learning curve I found the tool to be extremely useful. It allows quick evaluation of ideas, simplifies recording of different design variants and what is very important allows quick and easy reproduction of a design. After completing the 3D model, I created component plans (two A4 size pages). Again, they can be found at the bottom of the same page.. All dimensions are adjusted for 1.6mm thick material. I used slightly finer, 1.4mm, Daler-Rowney white core mountboard, but it makes no significant difference.
Assembly
Details are cut out with some margin and glued to the board with a glue stick. After cutting out shapes with a hobby knife, paper templates are peeled off the board. Components are trimmed to fit each other and treated with thin CA glue.
The whole process is shown step-by-step here.
The assembly is bone with CA glue. Yellow glue is used only once to attach the triangular leading edges to wings.
After sanding the model was painted yellow.
Without a motor and a recovery system the model weights about 47 grams. This is including 7g of additional nose weight to bring CG to about 107 mm from the nose tip. Using balsa instead of cardboard will reduce weight to about 25...30g. Combination of different materials is possible as well. For example using balsa wood for fins/wings and retaining cardboard for the rest of the model may eliminate the need for the nose weight.
Recovery system
This aspect has not been worked out fully. The plan had been to use a relatively small streamer to stabilise the model horizontally thus reducing its descent rate. However, it did not really work very well at the end. A conventional parachute worked better and it is a preferred option for now. The recovery system compartment and its hatch may require modification to improve deployment.
Flight test
Estes A10T-3 was used for the maiden flight.
(thanks to Rob House for this shot)
It was followed by several flights again on A10T-3, A3T-4 and Delta B2-3 (this is a motor manufactured in Czech Republic for FAI competition).
In windless conditions the model goes vertically. With some wind (about 3 mph during the test) it travels vertically during the active phase and then coasts at about 60...70 degrees to the horizon.
I apologise for such skinny description. Please let me know if any details or aspect of the design require further clarification.


")

