You are using an out of date browser. It may not display this or other websites correctly.
You should upgrade or use an alternative browser.
You should upgrade or use an alternative browser.
Building the Estes Little Joe II: Tips, Tricks, and Modifications
- Thread starter James Duffy
- Start date


Help Support The Rocketry Forum:
This site may earn a commission from merchant affiliate
links, including eBay, Amazon, and others.
James Duffy
Well-Known Member
- Joined
- Jan 19, 2009
- Messages
- 1,446
- Reaction score
- 1,733
Never tried Tamiya paints before. Will one can of Aluminum and the White be enough? I would think the one of the black will be enough.
One can of each should be plenty, although you might pick up an extra can of gloss aluminum. Be sure to use the Tamiya primer for the plastic parts, too.
James
Donaldsrockets
Well-Known Member
Absolutely loving this build thread guys. Well done.")
My fiancee is getting me one of these as a Valentine's Day gift. I can't wait.
Just curious, if one is to be used, what would you recommend as a flat clear overcoat???
My fiancee is getting me one of these as a Valentine's Day gift. I can't wait.
Just curious, if one is to be used, what would you recommend as a flat clear overcoat???
Last edited:
James Duffy
Well-Known Member
- Joined
- Jan 19, 2009
- Messages
- 1,446
- Reaction score
- 1,733
Just curious, if one is to be used, what would you recommend as a flat clear overcoat???
For the non-aluminum surfaces I plan on using an acrylic satin finish overcoat, using this product sprayed through an airbrush:
https://www.hobbylinc.com/testors-a...ryl-semi-gloss-clear-coat-1oz-30ml-hobby-4637
Note that this is a satin finish, not a matte finish. I don't particularly care for dead flat finishes on model rockets, as these surfaces tend to attract dirt, grime, ejection soot, and other funky stuff at an alarming rate. The satin finish is a great way to simulate a matte finish without creating a "toothy" surface for filth. If you absolutely want to create a hard matte finish, I suggest this stuff:
https://www.hobbylinc.com/testors-m...02015-1-oz-hobby-and-model-acrylic-paint-4636
For the aluminum surfaces painted with the Tamiya Gloss Aluminum no overcoat is needed. George is using a different product for the aluminum surfaces, and has suggested a clear gloss spray overcoat.
Hope this helps,
James
- Joined
- Jul 29, 2014
- Messages
- 2,114
- Reaction score
- 715
Just heard that John Pursley is working on a wrap set for the LJII.
Will post details as they become available.
Will post details as they become available.
I simply LOVE your use of RTV rubber for getting the decal down where it belongs.
John Boren
John, how are non RTV rubber owning builders expected to do this? Is there a method to get those decals down in the grooves discussed in the directions, or being a level 4 kit did you plan on us knowing a way ourselves?
I do want to build this kit someday soon and I'm really enjoying this thread and learning a lot from it. Thanks for your help.
- Joined
- Jan 17, 2009
- Messages
- 5,204
- Reaction score
- 1,547
Just curious, if one is to be used, what would you recommend as a flat clear overcoat???
In addition to what James said, let me emphasize this:
TEST!!!
Spray the silver/aluminum paint you use onto something to test with. Apply some left over decal material to it, and it can even just be clear part of the decal sheet. Spray the clear onto it, and see what happens. Same thing for the white paint. And same for any other combination, a homemade decal (or decal from another source) may react differently than the kit decal.
One of the worst experiences I had was a clear coat that literally attacked the decal, ruining it. Another bad one was where the clear caused the silver paint to darken a bit, but NOT the decal, so all of the clear parts of the decal stood out.
When things go well, a clear coat actually helps the clear portions of a decal to disappear or be less noticeable.
The exception is if there is any air under the decal, then the clear portion of decal film looks a bit foggy or silver-ish. So, the emphasis on getting the UNITED STATES lettering into the corrugations. When I did my 1/100 Little Joe-II, even the RTV corrugated press trick did not work well enough, so the clear part of the decal strip was noticeable (1/100 was too small for me to cut out and do letters by hand as with the 1/39.5 model)
Another thing too, is do not apply decals that have clear areas, onto FLAT painted surfaces. Because the decals will have micro bubbles of air underneath due to the flat paint, so the clear parts will appear to be foggy/silvery. So, if I was not going to use paper wraps, I would paint the SM, CM, and LES motor GLOSS white, apply the decals, and then apply a clear spray, satin or flat.
Test, test, test!
John, how are non RTV rubber owning builders expected to do this? Is there a method to get those decals down in the grooves discussed in the directions, or being a level 4 kit did you plan on us knowing a way ourselves?
I will say that I made less use of the RTV molded strip than I expected to. As I wrote, I used the model brush to help press the decal into the corrugations, brushing lengthwise and forcing excess Micro Set out. The decal snuggled in pretty well by itself. I only used the RTV near the end when there were a few spots not down all the way. Without the RTV strip I would have just applied a bit more Micro Set to those areas and carefully used the brush to try to get them worked in. It does require a bit of time to let the decal and Micro Set to dry some, but you should come back to it before it totally dries out.
So, to me, the biggest trick is using Micro Set, not just water. And actually, I was intending to use Micro Sol, which is a more aggressive decal liquid, softens them up even more, but the hobby store was out of it. But that might have caused problems with the initial application. So now I think that a good way would be a one-two punch, using Micro Set to get the decal on and the initial snuggle down, then for any trouble areas, then break out the Micro Sol.
For those who can't justify getting any setting solution at all, then try White Vinegar. I do not recall if Micro Set is simply 100% White Vinegar, or not. Also.... test.....
- George Gassaway
Last edited:
Brent
Well-Known Member
- Joined
- Jan 19, 2009
- Messages
- 1,763
- Reaction score
- 129
One can of each should be plenty, although you might pick up an extra can of gloss aluminum. Be sure to use the Tamiya primer for the plastic parts, too.
James
They are out of stock on the Tamiya White Primer . How is their Fine Surface Primer Light Gray?
James Duffy
Well-Known Member
- Joined
- Jan 19, 2009
- Messages
- 1,446
- Reaction score
- 1,733
...a homemade decal (or decal from another source) may react differently than the kit decal.
One of the worst experiences I had was a clear coat that literally attacked the decal, ruining it.
+100 on this. In particular the Testors spray clear products (matte and gloss) have a long and infamous history of attacking decal materials, which is one of the reasons that I am such a vocal proponent of using only airbrushed acrylic clear overcoats.
James
James Duffy
Well-Known Member
- Joined
- Jan 19, 2009
- Messages
- 1,446
- Reaction score
- 1,733
They are out of stock on the Tamiya White Primer . How is their Fine Surface Primer Light Gray?
The grey will work just fine. If you're spraying white as a final coat over the grey you'll probably need an extra coat to get good coverage.
James
James Duffy
Well-Known Member
- Joined
- Jan 19, 2009
- Messages
- 1,446
- Reaction score
- 1,733
So, to me, the biggest trick is using Micro Set, not just water. And actually, I was intending to use Micro Sol, which is a more aggressive decal liquid, softens them up even more, but the hobby store was out of it. But that might have caused problems with the initial application. So now I think that a good way would be a one-two punch, using Micro Set to get the decal on and the initial snuggle down, then for any trouble areas, then break out the Micro Sol.
For those who can't justify getting any setting solution at all, then try White Vinegar. I do not recall if Micro Set is simply 100% White Vinegar, or not. Also.... test.....
A few random comments concerning Micro Sol and Walthers Solvaset, a similar (but more aggressive!) product...
Both Micro Sol and Solvaset work by causing the decal surface to soften and conform to irregular surfaces such as the corrugations on the LJ II wrap. They are both acetic acid solutions, literally specialized versions of vinegar. If you've ever done darkroom work you will immediately recognize the smell of stop bath, which is also an acetic acid solution.
Micro Sol is a less aggressive product than Solvaset; think of Micro Sol as a handgun and Solvaset as a nuclear weapon. I always use Micro Sol first, and if that fails to do the job I bust out Solvaset, the Weapon of Mass Decal Adhesion.
Final comment: if using either Micro Sol or Solvaset over acrylic paints, allow the paint surface to cure for several days before applying the decals. Both of these products will cause freshly-painted acrylic surfaces to discolor.
James
JumpJet
Well-Known Member
- Joined
- May 19, 2011
- Messages
- 748
- Reaction score
- 63
John, how are non RTV rubber owning builders expected to do this?
I simply laid the decal on top without pushing it in. I've never used decal solvent before. I would guess a soft paint brush could be used to push the decal in. Just go slow and apply a light pressure.
John Boren
- Joined
- Jul 29, 2014
- Messages
- 2,114
- Reaction score
- 715
Not saying in can't happened but of all the flights we've put on test models, it's not happened yet.
John Boren
Like I posted, not worried about the stock amount of clay creating strength issues with the tower as I know you tested that thoroughly.
- Joined
- Jan 17, 2009
- Messages
- 5,204
- Reaction score
- 1,547
Today I discovered that the “A” near the spice ring had a void under part of it.
I applied Micro Set, let it sit bit, applied more Micro Set, then pushed the RTV negative pattern over it and let it sit. A few hours later, it looks good. Without the RTV pattern, I may have perhaps used a small needle to puncture the clear part of the void, then apply Micro Set and repeat every 15 mins or so for awhile, and carefully pressed with a brush by the 3rd application. Or if I’d had something stronger I’d have used Micro Sol, or Solvaset as James Duffy mentioned.
As for wraps…. some progress. It is tricky to try to open some of the old MacDraw files that go back to as late as 1990. I am using a Mac G5 Desktop using OSX 10.4, running "Classic" (SOME of the earliest files were done on a Mac SE/30. The all-in-one with built in 9" B&W screen , which externally looked like the original 128K Mac). Some of the drawings are in MacDraw 1.9.5, some in MacDraw II. I have an easier time with files in MacDraw Pro and Clarisdraw, but very few of the files I am trying to modify were done in those, and the converter capability to translate say macDraw II to MacDraw Pro does not work due to the loss of system library files thru the years. Wish I had some installer disks for those old apps.
I actually have an older Mac that I have been tempted to try to hook up, which might have the proper converter files installed, it's a G3 from 1999 which is running OS 8, IIRC. But that'll be a last resort (May not even have a compatible keyboard or mouse as it may be pre-USB, it's original mouse and keyboard are in storage).
Anyway, it’s been some slow going. And even after opening and modifying files there are other steps to save them in a format that can then be opened in modern software. And then transfer those files from the G5 to my laptop. And getting them to print at exact size is another issue.
But I finally got some tests done. The SM wrap ended up a bit too wide, but not by much, actually I think it is an issue with printer options. I do not like where the seam ends up being, so I need to modify the SM drawing so the seam will be in a better location. For now, I put some small black rectangles where the RCS quads will go.
The LES motor wrap, that is pretty good. Width was about right. The length though was a bit tall. I have not measured yet to see if the kit’s LES motor is the correct length or not.
Biggest problem is the CM wrap. I made a pattern long ago for printing a “wrap” like template for cutting out the black markings from black decal sheet. It was never made to be a true wrap, no details, simply a cutting template. Well, I printed it out anyway just to check the basic fit. I found that the cone angle for the kit capsule and the cone angle of my printed wrap is not the same angle. So, I have to highly modify the drawing to work out the correct angle to fit properly over the kit capsule cone, and that will involve a lot of tweak, print, cut out, check fit, and do that cycle several times to get it right. Also, the roll patterns were too tall. Part of that is because the patterns were made up to fit onto the BPC which should be a larger diameter, and has a mostly sharp lip, while the kit’s capsule is smaller in diameter, and the big rounded edge leaves less of a straight section for the roll patterns. The kit patterns are a bit over 1/8” shorter than what I have, and that is what I need to aim for with my modified CM wrap.
When I do have the wraps done, I’ll post files. The CM looks funky-nekkid being blank while everything else has paint and markings.
- George Gassaway
Last edited:
James Duffy
Well-Known Member
- Joined
- Jan 19, 2009
- Messages
- 1,446
- Reaction score
- 1,733
Today I discovered that the A near the spice ring had a void under part of it.
I applied Micro Set, let it sit bit, applied more Micro Set, then pushed the RTV negative pattern over it and let it sit. A few hours later, it looks good. Without the RTV pattern, I may have perhaps used a small needle to puncture the clear part of the void, then apply Micro Set and repeat every 15 mins or so for awhile, and carefully pressed with a brush by the 3rd application. Or if Id had something stronger Id have used Micro Sol, or Solvaset as James Duffy mentioned.
Hit that puppy with some Solvaset, slice it open with a sharp blade, and it should settle right down into the corrugation.
The model looks great, George! I really look forward to seeing it with the final wraps in place. The silver you've chosen really turned out nicely.
James
- Joined
- Jan 17, 2009
- Messages
- 5,204
- Reaction score
- 1,547
Hit that puppy with some Solvaset, slice it open with a sharp blade, and it should settle right down into the corrugation.
Thing I'd be concerned about by slicing it, is that when done there could be a visible gap where the slice was. That is why I mentioned if I did not have the RTV negative pattern to help, i'd have pierced a clear area and used Micro Sol or Solvaset if I had any (More of a Plan B recommendation for those who won't be trying the RTV pattern trick)
I don't have any Solvaset... i forgot to look for that at the hobby shop the other day, and do not know if they have any. That is certainly something that ought to be in "the arsenal" of finishing supplies, though. But only used when absolutely needed, as you noted.
In any case, it is fixed now, the Micro Set plus RTV pattern took care of it.
The model looks great, George! I really look forward to seeing it with the final wraps in place. The silver you've chosen really turned out nicely.
Thanks. The silver Krylon in retrospect was a mistake, the clear coat helped but still it is not as smooth as I'd like. I wish I'd been more patient to try to get the Tamiya Aluminum like you are using.
BTW - The Escape Motor tube is a bit short. Should be about .25" taller, I figure the original Centuri kit was the same length. I do not think I am going to try to fix that though, just modify the LES motor wrap to fit with the kit so it can be useful for other builders of the kit. Well, maybe two versions, one to fit the kit and one to work with a scale length tube.
And now for something completely different (well, sort of): Scale Rocket prOn!
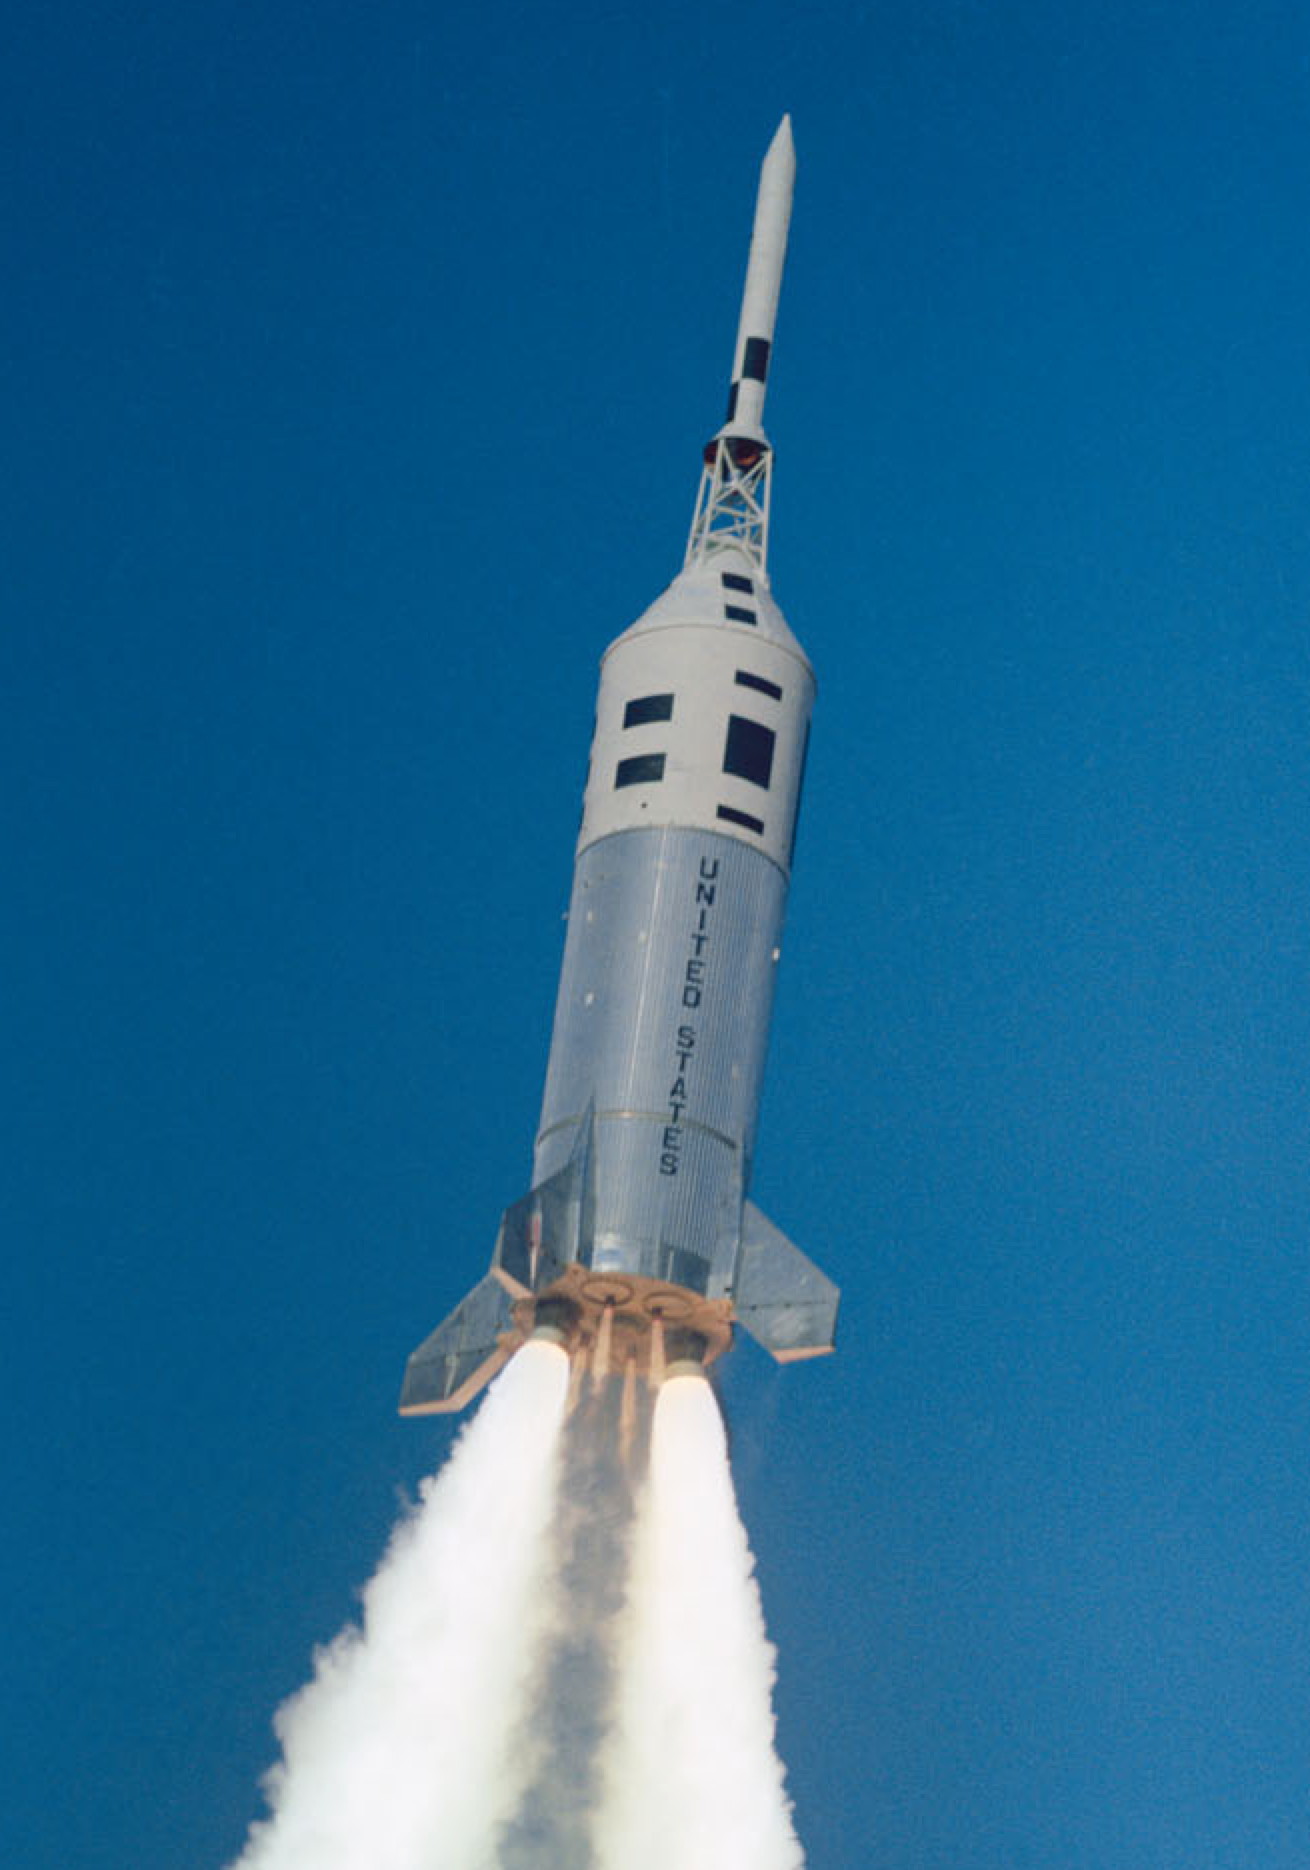
Mission A-002, only one to fly with the short fin root fairings. Two Algols, and four Recruits. Nice example of what the Algols should look like, and best view of the base of the vehicle in flight that I recall seeing. It's a bigger image than you see in this message, open the pic as a new window or new tab.
- George Gassaway
Last edited:

James Duffy
Well-Known Member
- Joined
- Jan 19, 2009
- Messages
- 1,446
- Reaction score
- 1,733
George seems to have sprinted ahead of me, so it's time to get back to work. If everything works out as planned I should have this LJII model finished for a maiden flight at the upcoming Austin Area Rocketry Group launch on the 6th.
Having previously painted the nozzle assemblies with primer and Tamiya pure white, they are next masked and sprayed with black. In retrospect I wish I had done this with a different airbrushed acrylic black shade instead of the rattle can black, if only to provide a subtle bit of contrast to the other black bits on the model.


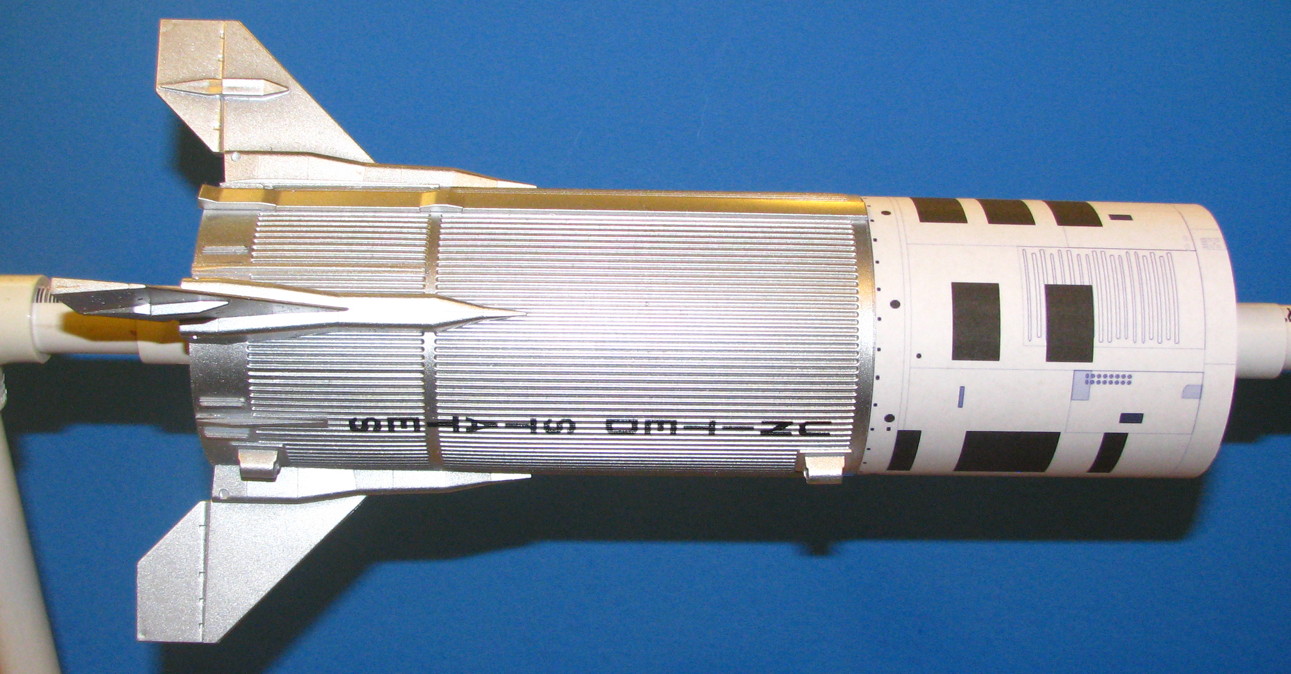
Next, attention is turned to decal application on the BPC cover. This part was previously sanded to eliminate the molding seams, primed, and painted. The decals were closely trimmed and installed according to the drawings on George's reference site. Micro Set and Micro Sol were used for decal application. In these two photos you can see some of the wrinkling that occurs when these products are applied. This distortion is normal, and the decal will smooth out quickly, usually within an hour. I'll post another photo of the BPC when everything settles down.


EDIT: I neglected to mention in this original post that the tick marks on the Centuri capsule are great for lining up your first decal. If you look closely at the left photo above you can just make out the tick marks at the top and bottom of the two lines that encircle the capsule. With one decal installed accurately at this position it will be much easier to "eyeball" the other three into the correct positions.
The "UNITED STATES" markings will not be used on this model, as the kit represents the Boost Protective Cover (BPC) and not the underlying Command Module, where the markings did appear. I'll throw them into a box of spares, as you never know when they might come in handy.

The LES aft skirt and nozzles were painted with an airbrush loaded with Tamiya semi-gloss black acrylic. Note that the shoulder portion of the aft skirt assembly was masked off before painting the black, as this portion of the part should be white. If you elect to simplify things and paint the whole thing black I'd be willing to bet that no one will notice.

I've also painted the assembled tower lattice and LES motor/cone assembly with Tamiya pure white lacquer. No photos to share, though.
More later,
James
Having previously painted the nozzle assemblies with primer and Tamiya pure white, they are next masked and sprayed with black. In retrospect I wish I had done this with a different airbrushed acrylic black shade instead of the rattle can black, if only to provide a subtle bit of contrast to the other black bits on the model.
Next, attention is turned to decal application on the BPC cover. This part was previously sanded to eliminate the molding seams, primed, and painted. The decals were closely trimmed and installed according to the drawings on George's reference site. Micro Set and Micro Sol were used for decal application. In these two photos you can see some of the wrinkling that occurs when these products are applied. This distortion is normal, and the decal will smooth out quickly, usually within an hour. I'll post another photo of the BPC when everything settles down.
EDIT: I neglected to mention in this original post that the tick marks on the Centuri capsule are great for lining up your first decal. If you look closely at the left photo above you can just make out the tick marks at the top and bottom of the two lines that encircle the capsule. With one decal installed accurately at this position it will be much easier to "eyeball" the other three into the correct positions.
The "UNITED STATES" markings will not be used on this model, as the kit represents the Boost Protective Cover (BPC) and not the underlying Command Module, where the markings did appear. I'll throw them into a box of spares, as you never know when they might come in handy.
The LES aft skirt and nozzles were painted with an airbrush loaded with Tamiya semi-gloss black acrylic. Note that the shoulder portion of the aft skirt assembly was masked off before painting the black, as this portion of the part should be white. If you elect to simplify things and paint the whole thing black I'd be willing to bet that no one will notice.
I've also painted the assembled tower lattice and LES motor/cone assembly with Tamiya pure white lacquer. No photos to share, though.
More later,
James
Last edited:
- Joined
- Jan 17, 2009
- Messages
- 5,204
- Reaction score
- 1,547
When I applied the UNITED STATES decals, the model was mounted horizontally on a stand, on the build table. I cobbled together a stand to hold it horizontally, using 1/2" PVC. I made use of various pre-cut pieces, so that is why the two long base legs make use of "T" connectors to join a short length to a longer length. Nothing is glued together, just snug. So, the PVC parts will go back into the storage box when this stand is no longer needed.
I wanted to show this since it is more convenient to do the UNITED STATES decals, and also would be very useful for the Service Module decals (either one piece or separate pieces) if I was not doing a paper wrap.
- George Gassaway
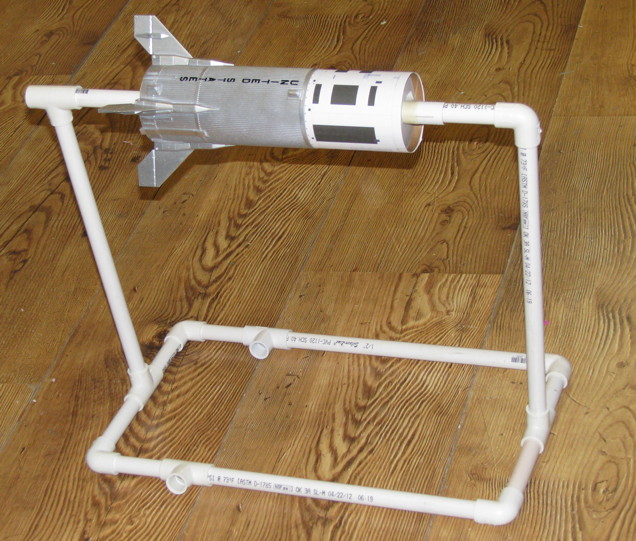
I wanted to show this since it is more convenient to do the UNITED STATES decals, and also would be very useful for the Service Module decals (either one piece or separate pieces) if I was not doing a paper wrap.
- George Gassaway
Last edited:
James Duffy
Well-Known Member
- Joined
- Jan 19, 2009
- Messages
- 1,446
- Reaction score
- 1,733
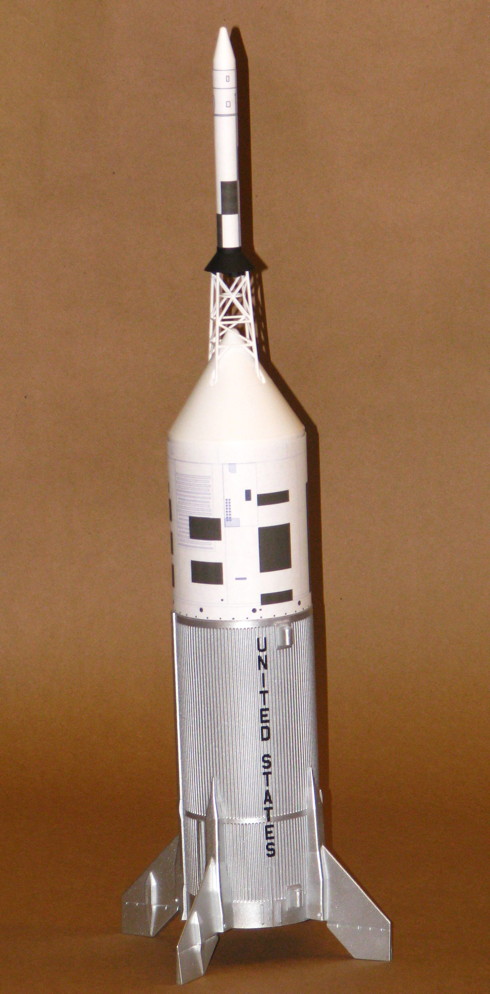
In previous steps the entire airframe was primed with Tamiya white primer and the upper Service Module section was painted with Tamiya pure white lacquer. With that work dry we'll next mask off the Service Module with Tamiya 10mm masking tape and an old plastic bag, and shoot the undercoat for the gloss aluminum layer with Tamiya black lacquer. (Puzzled as to why I'm undercoating the silver bits with black? This post will explain.)


You'll notice that I keep recommending Tamiya supplies throughout this build. The reason is simple: the products are reliable, consistent, and perform exceptionally. Unfortunately I neglected to stash enough of the gloss aluminum lacquer for this project and another project currently underway, and all of our local hobby shops are out of the stuff. I placed an order for more from Hobbylinc, so airframe construction will halt at this point until that order arrives. That will give me time to knock out the remainder of the BPC and LES, as well as pay attention to the other project that I've been neglecting for the past couple of weeks.
James
Trident
Retired, plenty of kits
- Joined
- Jan 18, 2009
- Messages
- 888
- Reaction score
- 74
+100 on this. In particular the Testors spray clear products (matte and gloss) have a long and infamous history of attacking decal materials, which is one of the reasons that I am such a vocal proponent of using only airbrushed acrylic clear overcoats.
James
I have had 100% success using Krylon UV-Resistant Acrylic Clear over decals, and every type of paint. It comes in Gloss and Matte. I am interested in the airbrush clear you used that has a Satin finish.
I've used Testors Dullcote exactly once. I had some green decals make for an Estes Orbital Transport, and decided I wanted to clear coat them. The Dullcote worked, but the rocket developed a hazy yellowish-brown tint over a period of about 2 years. And this rocket was in my basement, only getting a bit of indirect sunlight. I've used the Krylon ever since, and never any issues.
Also, thanks for the details on the Tamiya White Primer. I have seen it at Hobby Lobby, and always figured it was just overpriced regular primer. Great to know it uses fine particles so details are not lost. This definitely makes the use of Tamiya lacquers on the wraps, or anything plastic, possible, without crazing. I suspect other lacquer topcoats would be fine. I've used Rustoleum Lacquer spray cans together with Testors and Model Masters lacquers with no compatibility issues.
Finally, I definitely appreciate all the info you and George have shared about your builds. We just got over a foot of snow last night, so my plans to do any priming or painting have once again been delayed. At least I can keep apprised of all the latest tips from you guys while I await warm weather. Maybe I'll go find some balsa fins to paper ...
Last edited:
James Duffy
Well-Known Member
- Joined
- Jan 19, 2009
- Messages
- 1,446
- Reaction score
- 1,733
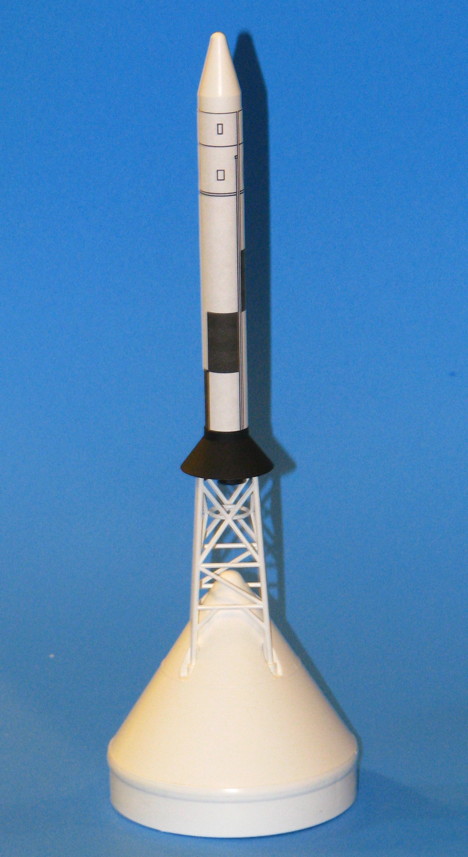
The BPC and LES components have been dry-fitted and stacked for the first time, and I'm really impressed at how well everything aligned. The old Centuri molds seem to have been well engineered in the first place, and still in good condition. Just a few tasks remain for this end of the model. First, the roll pattern needs to be applied to the escape tower motor. Rather than use the decal supplied with the kit I'll mask and airbrush the roll pattern, although the oval markings representing the nozzles for the tower jettison motors will be cut from the sheet and used. (EDIT: I ended up cutting the individual black squares from the sheet and applying them one at a time.) Next, the nose weight will be smoooshed* into position and the whole assembly will be glued together. An airbrushed coat of satin overcoat will then knock the shine off of the beastie.

I keep waiting for someone other than George to start their build...anyone out there working on one of these yet? If you're somehow intimidated by this kit, you really shouldn't be. I've only got about 15 hours invested so far, and should be done before the clock reaches 20 hours. C'mon, get to work!
James
* I know this isn't a word, but it should be.
Attachments

Last edited:
- Joined
- Jul 29, 2014
- Messages
- 2,114
- Reaction score
- 715
As much as I want to start mine right now, I am on a pretty intensive 7 day a week work schedule for the next three weeks, plus I am prepping to direct a large college aerospace design competition (SAE Aero Design) being held here in Fort Worth the second weekend in March. My personal building time will be at a bare minimum for a while.
Will likely start the LJII right after my event has concluded.
Enjoying the build threads and they will have to be enough for now.
Will likely start the LJII right after my event has concluded.
Enjoying the build threads and they will have to be enough for now.
Last edited:
- Joined
- Dec 31, 2009
- Messages
- 4,144
- Reaction score
- 3,481
Mine showed up yesterday from ASP (thanks, Andy!). This thread is pure inspiration. Now, if I only had the time to built it with the precision that James and George have done!
- Joined
- Jan 17, 2009
- Messages
- 5,204
- Reaction score
- 1,547
Engine Mount Assembly - Part Two
See Part One from earlier in the thread, at this link:
https://www.rocketryforum.com/showt...ricks-and-Modifications&p=1545500#post1545500
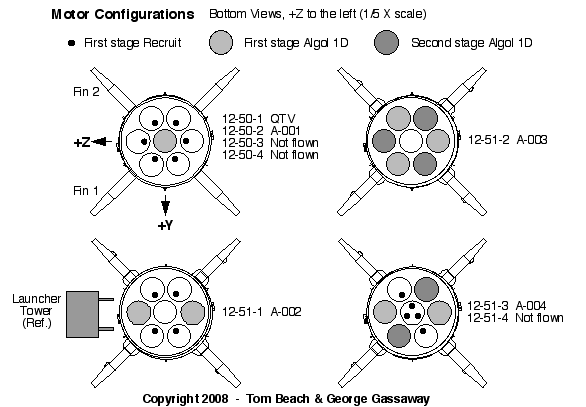
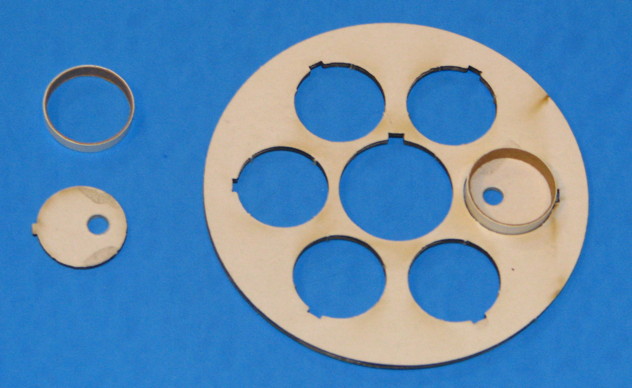
Since I am modeling A-004 (lower right engine layout in the above drawing), I drilled a 3/16” hole into two of the removed outer hole discs from Step 1. Those 3/16" holes will be for holding the small simulated Recruit rocket motors. I also cut out a couple of short 20mm rings (cut from 20mm tubing that slide-fits over BT-20 tubing), to simulate the rings at the base of the vehicle.
Later, I glued the two discs in place, as well as the short rings. After drying, and masking off the outer edge of the ring and inner holes for the engine mount and Algols, I painted the ring flat white. That was to simulate the white RTV coating that was applied to the base of A-002, A-003, and A-004 as heat protection of the aluminum structure.
I added a wire cable shock cord mount to the upper ring. The cable is from Sullivan brand .030 (1/32” steel flex cable pushrods for R/C models. Could also use .025” or 1/32” music wire, I prefer the cable (Beware that the kind of stranded wire you can get at Hardware stores for things like picture hanging, is brittle and will break easily due to metal fatigue). One end was anchored to a sturdy piece of spruce. On the opposite side of the disk, about 3/4” of wire sticking forward after a U-Turn around the spruce anchor, was wrapped with thread and thick CA used to secure the thread in place. Thick CA was also used to glue the spruce anchor to the disc.
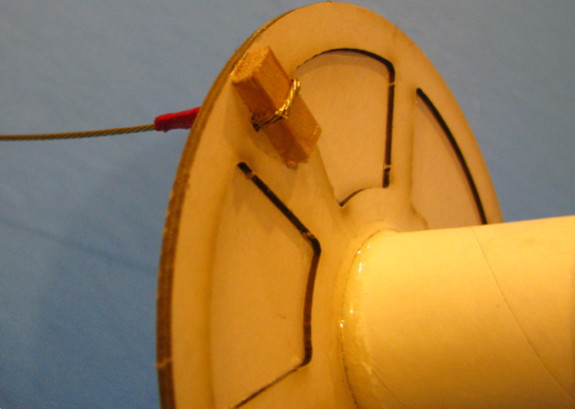
In the image below, you can see all of the engine mount parts and wire cable. At upper left, a close-up of the front end of the cable. It was bent (with needle nose pliers) and secured together with thread and CA in the same way as with the centering ring. I had made the cable a bit longer than needed, beyond the excess needed for the U-Turn. I measured how long the wire cable needed to be so it would be even with the top of the tube (top of Service Module), then made the first 90 degree bend for the U-Turn. Made another 90 degree bend after about 1/4” distance. Then did a couple of slight diagonal bends to be able to bring the cable together to wrap with thread. Trimmed excess before wrapping with thread. What I just described for bending is the same process used for anchoring in the centering ring.
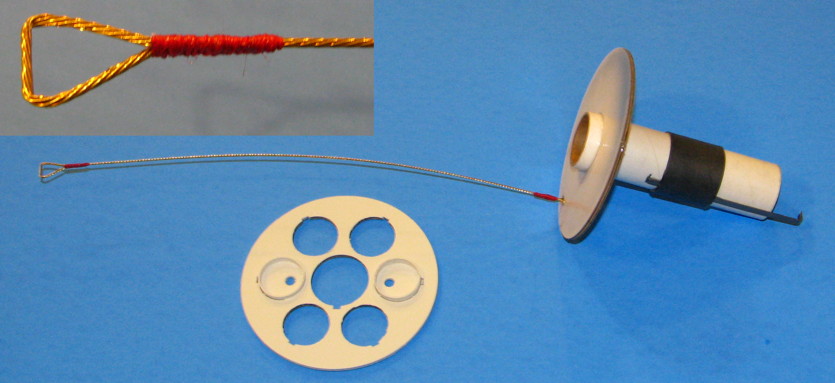
Also visible in the above photo is the aft ring assembly, after the Recruit mods were added and it was painted flat white.
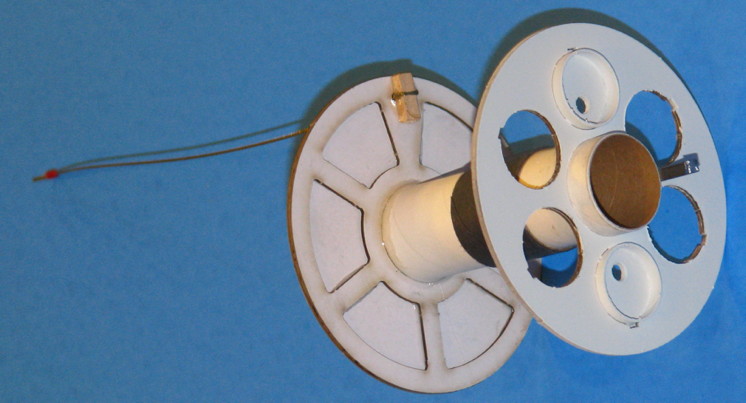
Here is the mount with the rear ring assembly in place, but not glued yet.
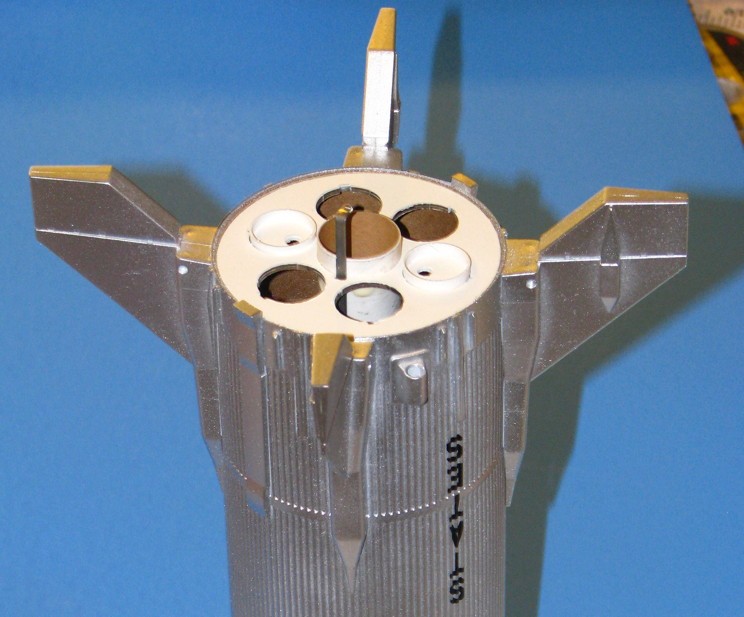
When I wanted to glue the rear ring to the mount tube, I wanted to be sure it would be perpendicular and not tilted in any way. My choice for doing that was to use some Elmer’s glue to attach it to the 24mm engine mount, but not glue anything else. Then I slid the mount into the model, and adjusted the ring until it was even with the main body tube. It is still drying as I type this. When dry, I will carefully use 5 minute epoxy to glue the mount in, most of it bonding to the front ring, making sure that it is in the proper roll orientation to match the engine locations on the Little Joe-II (One opposing pair of Algols were centered on the Z axis. See drawing at the top of this post).
- George Gassaway
See Part One from earlier in the thread, at this link:
https://www.rocketryforum.com/showt...ricks-and-Modifications&p=1545500#post1545500
Since I am modeling A-004 (lower right engine layout in the above drawing), I drilled a 3/16” hole into two of the removed outer hole discs from Step 1. Those 3/16" holes will be for holding the small simulated Recruit rocket motors. I also cut out a couple of short 20mm rings (cut from 20mm tubing that slide-fits over BT-20 tubing), to simulate the rings at the base of the vehicle.
Later, I glued the two discs in place, as well as the short rings. After drying, and masking off the outer edge of the ring and inner holes for the engine mount and Algols, I painted the ring flat white. That was to simulate the white RTV coating that was applied to the base of A-002, A-003, and A-004 as heat protection of the aluminum structure.
I added a wire cable shock cord mount to the upper ring. The cable is from Sullivan brand .030 (1/32”
steel flex cable pushrods for R/C models. Could also use .025” or 1/32” music wire, I prefer the cable (Beware that the kind of stranded wire you can get at Hardware stores for things like picture hanging, is brittle and will break easily due to metal fatigue). One end was anchored to a sturdy piece of spruce. On the opposite side of the disk, about 3/4” of wire sticking forward after a U-Turn around the spruce anchor, was wrapped with thread and thick CA used to secure the thread in place. Thick CA was also used to glue the spruce anchor to the disc.
In the image below, you can see all of the engine mount parts and wire cable. At upper left, a close-up of the front end of the cable. It was bent (with needle nose pliers) and secured together with thread and CA in the same way as with the centering ring. I had made the cable a bit longer than needed, beyond the excess needed for the U-Turn. I measured how long the wire cable needed to be so it would be even with the top of the tube (top of Service Module), then made the first 90 degree bend for the U-Turn. Made another 90 degree bend after about 1/4” distance. Then did a couple of slight diagonal bends to be able to bring the cable together to wrap with thread. Trimmed excess before wrapping with thread. What I just described for bending is the same process used for anchoring in the centering ring.
Also visible in the above photo is the aft ring assembly, after the Recruit mods were added and it was painted flat white.
Here is the mount with the rear ring assembly in place, but not glued yet.
When I wanted to glue the rear ring to the mount tube, I wanted to be sure it would be perpendicular and not tilted in any way. My choice for doing that was to use some Elmer’s glue to attach it to the 24mm engine mount, but not glue anything else. Then I slid the mount into the model, and adjusted the ring until it was even with the main body tube. It is still drying as I type this. When dry, I will carefully use 5 minute epoxy to glue the mount in, most of it bonding to the front ring, making sure that it is in the proper roll orientation to match the engine locations on the Little Joe-II (One opposing pair of Algols were centered on the Z axis. See drawing at the top of this post).
- George Gassaway
Last edited:
JumpJet
Well-Known Member
- Joined
- May 19, 2011
- Messages
- 748
- Reaction score
- 63
I think everyone needs to buy two of these kits. One to quickly throw together and fly and one to build for a display model, and one to store away for the future. So make that everybody needs to buy at least three of these kits.
John Boren
John Boren
- Joined
- Jan 17, 2009
- Messages
- 5,204
- Reaction score
- 1,547
I think everyone needs to buy two of these kits. One to quickly throw together and fly and one to build for a display model, and one to store away for the future. So make that everybody needs to buy at least three of these kits.
John Boren
Really?
Heck, the three I got.... are simply the first three. Gonna get more.
If it was not such a hassle to do mods to the fin assemblies and body wrap to model the first three, I would be tempted to build QTV, A-001, and A-002, and have all 5 eventually. Well, I could scratchbuild fixed fins for QTV and A-001 but the nice fin alignment and glue tabs for the long fin root fairing type fins on the vacuformed wrap would be exposed and a PITA to try to cover over with perfectly grafted corrugated sections (My last name is not spelled "Biedron")
I almost flipped a coin to choose whether to build this one as A-004 or A-003. Second one I build probably will be A-003.
Anyway, back to what you said, the first one also is good for learning. Sort of practice, allowing for "oops", learning, and so forth.
EDIT - Adding this other reason for people to buy more of the 1/45 kit. For the Apollo parts for a scratchbuilt Saturn-IB or Saturn-V.
Below, Mary Roberts at a trade show (around 1992), and a 1/45 R&D test model.Also, proposed but never built variants. Some listed on my website: https://georgesrockets.com/GRP/Scale/DATA/JoeReports.htm#other
Such as an orbital version using a Minuteman missile for upper stages, and ones shown at the bottom of this post
- George Gassaway
Last edited:
P-40Warhawk
Active Member
- Joined
- Feb 8, 2013
- Messages
- 35
- Reaction score
- 1
I keep waiting for someone other than George to start their build...anyone out there working on one of these yet? If you're somehow intimidated by this kit, you really shouldn't be. I've only got about 15 hours invested so far, and should be done before the clock reaches 20 hours. C'mon, get to work!
James
* I know this isn't a word, but it should be.
I received mine late last week and have done a little work on it. This thread has been a great resource, although I probably won't be too concerned about a perfect finish. This one I actually hope to fly so it's bound to take a bit of a beating. I am really glad that Estes released it. I have the old Centuri kit and the Estes one defintely looks to be an easier build.
Mark
JumpJet
Well-Known Member
- Joined
- May 19, 2011
- Messages
- 748
- Reaction score
- 63
I hate to reduce sales of this kit but there are plans on selling a replacement set for the capsule parts in the near future. Sorry, but I don't know what the price is but I'm sure it will only be offered on the Estes web site.
John Boren
John Boren
- Joined
- Jul 29, 2014
- Messages
- 2,114
- Reaction score
- 715
I hate to reduce sales of this kit but there are plans on selling a replacement set for the capsule parts in the near future. Sorry, but I don't know what the price is but I'm sure it will only be offered on the Estes web site.
John Boren
Nice.....with that and the tube to match, that 1/45 S-1B is not too tough of a scratch build.
Similar threads
- Replies
- 7
- Views
- 291
- Replies
- 3
- Views
- 230
- Replies
- 5
- Views
- 547