2.5 upscale Red Max

The Rocketry Forum

Help Support The Rocketry Forum:

This site may earn a commission from merchant affiliate links, including eBay, Amazon, and others.

karl66

Well-Known Member
Joined
Feb 9, 2007
Messages
61
Reaction score
0
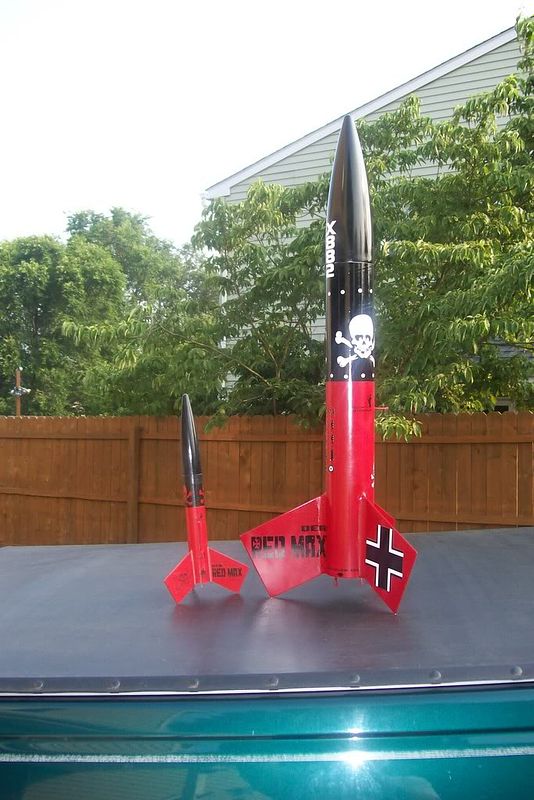
I have been working on a secret project, As a kid The Red Max was always my favorite. Well I scratch built the original and after doing so I decided it was time to kick it up a notch.
I started my 2.5 upscale project last December and finially finished it on 6-24-07.
My plans are to launch it this Sunday at our club launch which just so happens to be my birthday.....can you think of a better way to celebrate?!?!
Thanks to Tango Papa for the FANTASIC upscaled decals.

I plan on using a 38mm H148 for the first launch.

https://i189.photobucket.com/albums/z231/slik_karl/100_0351.jpg

https://i189.photobucket.com/albums/z231/slik_karl/100_0352.jpg

https://i189.photobucket.com/albums/z231/slik_karl/100_1193.jpg

https://i189.photobucket.com/albums/z231/slik_karl/100_1194.jpg

https://i189.photobucket.com/albums/z231/slik_karl/100_1195.jpg
 
you can't post something like this without pictures!!!!!!!!!!! sounds like a classically great project... :)
 
there we go
100_1194.jpg
 
WOW - I LOVE THE RED MAX!!!

Most look at me funny when I bring out the family

max.jpg


I would love to stun them by adding something like that!

Karl, how did you make it? Any recommendations for someone who never did an upscale (or has an original to upscale)?

Thanks!
 
I have my Roc sim files.
All the parts are Loc except the fins which I made from avation grade phenolic.
This is my first upscale ever, I usually just build kits but figured it was time to go for it.

I have tango pappa vynal decals, does anyone know if it's ok to clear coat over them?
Thanks
 
Looks good. I am in the middle of finishing up a 1.9 upscale of the Der Red Max.
 
Sure you can clear coat them...I have done that on my Goblin upscale - It has Tango Papa decals as well.
 
Well this past Sunday,9-2-07 was the 3rd and last launch of my Red max.
Went up on a H128, it jumped off the rail, nice apogee then.....nothing! Another high speed post hole!! A few seconds after impact "POP!" The ejection charge went off and blew the side out of my crunched body tube.
This is the second rocket I lost the exact same way with exact same AT reload! And before you ask, there was NO grease anywhere near the delay or ejection areas.and yes it was assembled correctly :mad: I think i'm going with AMW from now on!!!

09-02-07_1519.jpg
 
Those are some nice Maxes, Karl!

I've been a Red Max fan for a long time also. I did a 2.5X upscale about 12 or 13 years ago, and just finished a 1.6X (BT-80). Like you, I've had others along the way.

Here's a shot of my kid back when I first built the 2.5X....The little squirt is old enough to drive now.

kab3.jpg


Here's the small ones. Far left is an old Citation kit that was given to me by my cousins after they crashed it a couple of times. I repaired it and flew it quite a bit in the mid 70's, but I wanted one that looked better and ordered a kit in the later 70's. I flew it only a few times before it floated away. The second from left is the same one that my son was holding in the picture above. I think it was from the later 80's, probably not long before the kit was discontinued. The next one is a clone that I made, including homemade decals. The 1.6X upscale has a nosecone that I turned and decals from Excelsior because I hated using the white decal paper that's available. The last one is a "Blue Max" varient that I made using a home turned pine nosecone (hollowed out) and the first ever set of home made waterslide decals. It was the first home turned nosecone to fly and the first time I used Future Floor Polish as a clearcoat. Basically, it's a proof of concept vehicle. ;)

DSC_0006.jpg


I've used various brands and shades of red over the years, but I must say that the Testors Model Master Italian Red I used on the 1.6X is the most georgeous red I've ever seen on a rocket. The photo (and most monitors) can't do it justice.

P.S. I used to fly my 2.5X on H200 experimental motors back in the days before it became a royal pain to get AP (post Pepcon fire) and store motors (post 9-11). Our motors always ejected! I fly exclusively low power now....just BP motors. It's a lot cheaper. ;)
 
Boy those are some nice Der red max rocket. Im planing on upscaling it to 3.01 upscale. Should look pretty good when im done with it. Me and this other person want to do a drag race with them. On some O motor. Have to wait for pics. But will put them up when I start working on it.

Patrick
 
Well since my DRM got smashed, I have an idea, use whats left and make a Der Big Red Max. I think the extension will become an Ebay. I tired of losing rockets to conventional deployment. Any thoughts?
 
Very nice karl. Sorry to see that is lawn darted.

Georgeous fleet tbzep.
 
Boy those are some nice Der red max rocket. Im planing on upscaling it to 3.01 upscale. Should look pretty good when im done with it. Me and this other person want to do a drag race with them. On some O motor. Have to wait for pics. But will put them up when I start working on it.

Patrick

wow that sounds like a neat project! ;) Let me know how it goes!

Ben
 
Well since my DRM got smashed, I have an idea, use whats left and make a Der Big Red Max. I think the extension will become an Ebay. I tired of losing rockets to conventional deployment. Any thoughts?

I built and flew a dual deployment 4" diameter Goblin for several years. I had to sacrifice using long 38mm motors to have plenty of room, but I could squeeze an I motor in there pretty easily...no J's though. If you are willing to fly a 4" DRM on 38mm H's and small I's, you should have enough room for dual deployment on the standard length version. You'll have to keep the motor mount as short as possible. I like the lines of the regular length version better than the DBRM.

The Goblin is a bit longer than the DRM when using the same diameter body tube, but it's doable. If I had put a shorter motor mount in my 4" DRM, I would have reworked it for dual deployment. However, it was my first HPR rocket and I had no idea what motors I would eventually use. I don't see much point in lofting them on anything more than a small "I" motor because rockets like the DRM are meant to be seen all the way up and back down. :)
 
I need some help/info on repairs to my super max. I have preped the fincan and motor mount tube. I want to keep the motor mount tube as long as possible. I am going to attach the new upper body tube with a LOC stiffy tube coupler. My question is does anyone forsee a problem if I turn down the forward centering ring to fit inside the stiffy coupler. I want to be able to attach a rail button thru the hole mess into the center ring.
My other option would be to use 2 center rings, one below the coupler and one above.
Any ideas on the best route? Thanks

Why do you need to keep the motor mount tube as long as possible? Is it just for the rail button mount or for longer motors? Reloadable motors with rear thrust rings work just fine sticking up past the motor tube. Are you planning on using single use motors? If so, I've seen folks use a rear thrust ring made of tape on "L" class motors....and it held every time they did it (YMMV). I was used to seeing it on motors up through "H" class back then, but the first time I saw it on an "L" I was expecting to see the motor go through it like a mortar! :)

BTW, if you get the diameter of the ring correct, you shouldn't have any trouble having it inside the coupler.
 
Back
Top