Wildman Blackhawk 38

The Rocketry Forum

Help Support The Rocketry Forum:

This site may earn a commission from merchant affiliate links, including eBay, Amazon, and others.

TheNewGuy

Well-Known Member
Joined
Apr 24, 2017
Messages
48
Reaction score
1
Previous thread with general questions about the kit: Blackhawk 38 Questions

Introduction

I'm currently working on a Wildman Blackhawk 38. So far I've epoxied the fins to the lower airframe (will post pics later), and attempted painting. I'm also working on a 3D printed electronics bay for the coupler, and my own Arduino based GPS tracker. The altimeter will be a Raven 3.


Painting
Painting has not been fun.

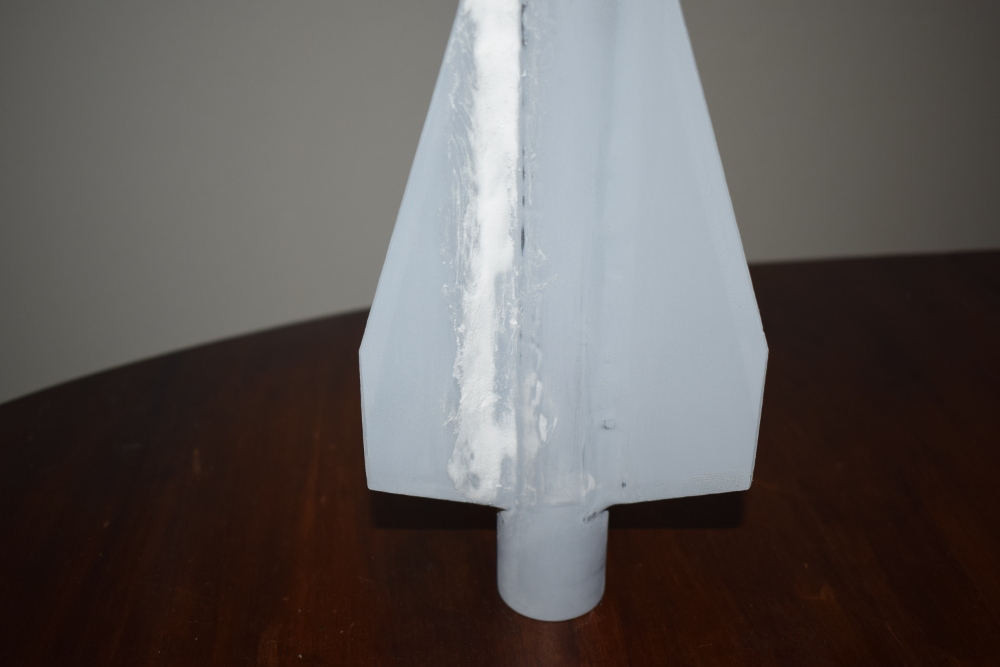
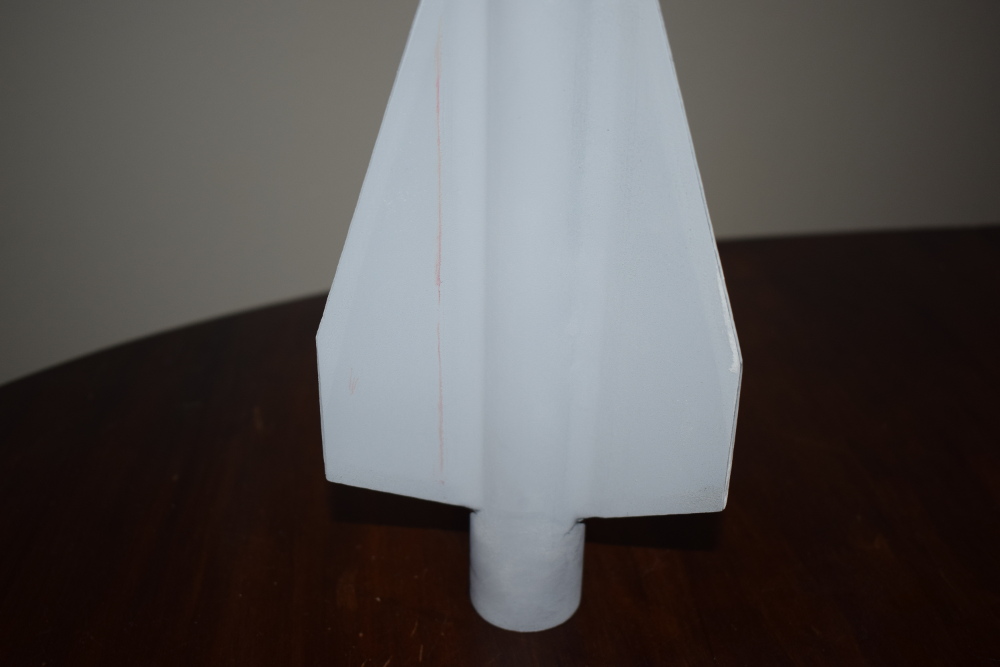
The fillets on the booster section were ok, but not great. I pulled the masking tape off too late, and on others I completely forgot to put the masking tape all together.

After a ton of sanding, I had fillets that structurally sound, but are not perfect at all.

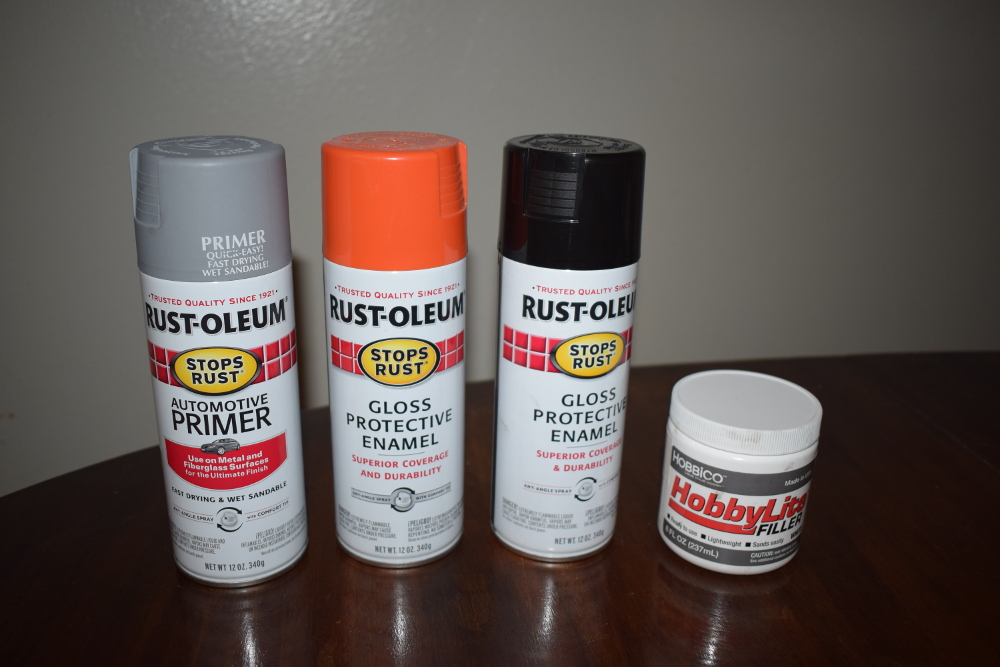
So I went ahead and sprayed primer on everything (the last pic below shows everything I'm using). I let it dry for about 17 hours, then sprayed black paint on the nose cone and payload tube.

Here is where things started to go down hill.

After letting both parts sit for 15 minutes, I do a check of the parts and see drips on both payload tube and nose cone. Nose cone is really bad, payload tube only has one drip at the top (see pictures below).

I went to home depot and got 800 grit sandpaper, and started sanding away at the nose cone. I started to realize that the drips are only becoming more and more pronounced, as well as the primer starting to show through the black paint in certain areas.

Question: What's the best way to fix the nose cone and payload tube?

When painting the rocket, I put some plastic sheets on the wall and floor in the corner of my kitchen. Now, anytime I walk in my kitchen the bottoms of my socks are black. I've tried cleaning it up with cleaner and even acetone, but with no luck.


Lower Airframe
I've been trying to fill in some of the waves and lines in my fillets with HobbyLite Filler, but I'm not fond of this filler at all. It's really hard to apply to the rocket, and I'm not 100% confident it's going to stay on the primer.

I'm going to spray another coat of primer, and hope it stays.

Overall, I'm really excited to fly this rocket, but not enthusiastic about the way finishing is going. Advice is much appreciated.


Pictures
d1lvw1M.jpg


1usk4AH.jpg


xCXKEYi.jpg


8K9bNV0.jpg


GDAbboA.jpg


4D5KEc8.jpg


OEUyUyX.jpg
 
Last edited by a moderator:
Bondo spot putty might help with the fillets. Most people just put clear coat on the black hawk. I won’t comment about your choice of paint since I’ve never used it but temperature plays a big part in getting a good finish.
 
This already happened to me.
I used Cellulosic diluent (paint stripper) to remove the paint and the primer. I think this is the best you can do. If the paint is not totally gone you can use sand paper maybe like 240 grid.

Make sure to test the paint stripper on a small part to see if it react to the epoxy or something...

But I would remocomend you to sand everything to start from scratch.

For painting you really need to go slowly.
Sand the body with 500 grid sandpaper and applying the primer in thin coat. (I didn't apply primer on mine).

For the paint I sprayed 3 light passes at the time. Waiting 5 to 10 mins between each coat depending on the weather.
You need to wait for the paint to fully cure before doing any kind of sanding (1000 grid up to 5000)

If you have small drips, wet sand it with 1000 grid.
Seem to work fine.

But I don't know if the paint will hold the temperature...
 
I wouldn't strip it, Just sand and sand till you get your drips out then prime and sand and repeat till your satisfied. But most of all take your time. Dont rush painting. Give it light coats. And as for painting indoors... you must not be married. Think thru all the steps and beyond. When taping off the fins and airframe for fillits, tape EVERYTHING before starting fillits. Sand it till your satisfied and then wait for a "warm" day and paint outside. Spray painting can be hit or miss. Spay some test passes on a piece of cardboard of something to see how the paint comes out. Light coats will save you lots of grief and sanding.
 
You need to read the back of the spray cans to see what the the recoat windows are. In the case of your Rustoleum paint, you will find it says "Recoat within one hour or after 48 hours". At 17 hours after spraying primer, you sprayed right in the middle of the "do not recoat" window.
 
Now, anytime I walk in my kitchen the bottoms of my socks are black

You have discovered paint particle vapors. They hang in the air and diffuse beyond the area you're spraying directly. Unless you plan to fully cover all surfaces in the room, you might be better off making a little paint booth.

You need to read the back of the spray cans to see what the the recoat windows are. In the case of your Rustoleum paint, you will find it says "Recoat within one hour or after 48 hours". At 17 hours after spraying primer, you sprayed right in the middle of the "do not recoat" window.

I haven't noticed the 48 hr prohibition on rustoleum 2X primer. Just the paints
 
I wanted to thank everyone for their advice. I am learning new things about the finishing process.

Paint

I went with stripping the paint on the payload tube and the nose cone. Tonight, I plan on spraying grey primer followed by black or blue 15 minutes later.

Parachute
The Blackhawk 38 came with a 26.5" hexagonal parachute, and the rocket currently weighs 731 grams. Although that is not the final weight, I don't anticipate it increasing a significant amount. Using an online calculator, the descent rate is estimated to be 23.27 feet per second. Since I plan on launching at Lucerne Valley next weekend, I'm thinking the rocket will be somewhat cushioned by the dry lake bed.

Tracker
I've been making progress on the tracker I've been building, but I'm not absolutely confident that it and the 3D printed payload bay I hope to put it in will be fully functional. I was debating trying to fly the Blackhawk sans tracker, but only flying to 3K feet doesn't seem appealing.

Pictures
aRWvE6u.jpg
 
Also, is it possible for me to go to back and edit my original post with smaller pictures? I realize now that the large pictures are annoying, but the edit button is not there.
 
are those epoxy drips or are they paint drips? either way I wouldn't go higher than 400 grit sand paper more likely 320 grit. in either case you will have to let the paint/epoxy dry/cure before you can sand with out gumming up your sandpaper (and you will need to do it wet to keep things cool). save the high grit paper for the finish coats.
Rex
 
I like to use the primer you did also. The shinny spots on your NC are low spots in the glass. You either have to sand them out or fill with primer and then sand smooth. I'd go the latter. Use several coats and let dry completely before sanding. 120 grit for fast cut, down to about 400 or so before spraying color. Clean everything before spraying, use windex or grease and wax remover. Clean with tack cloth right before the color coats. Spray light mist coat first, make sure to cover all areas, like backside of fins and such, let it tack up and spray the color coats. I'll let it dry for several days before touching, otherwise the oil on your fingers will mar the finish. Good luck.
 
You have discovered paint particle vapors. They hang in the air and diffuse beyond the area you're spraying directly. Unless you plan to fully cover all surfaces in the room, you might be better off making a little paint booth.


I haven't noticed the 48 hr prohibition on rustoleum 2X primer. Just the paints
The automotive primer pictured, has the recoat window limitation.
 
The automotive primer pictured, has the recoat window limitation.

Good to know, thanks for pointing that out.

I don't know how I missed this. :confused:

are those epoxy drips or are they paint drips? either way I wouldn't go higher than 400 grit sand paper more likely 320 grit. in either case you will have to let the paint/epoxy dry/cure before you can sand with out gumming up your sandpaper (and you will need to do it wet to keep things cool). save the high grit paper for the finish coats.
Rex

They are paint drips. After eventually finishing sanding with high grit sandpaper, would I need spray a gloss coat? The paint was originally glossy on its own.

I like to use the primer you did also. The shinny spots on your NC are low spots in the glass. You either have to sand them out or fill with primer and then sand smooth. I'd go the latter. Use several coats and let dry completely before sanding. 120 grit for fast cut, down to about 400 or so before spraying color. Clean everything before spraying, use windex or grease and wax remover. Clean with tack cloth right before the color coats. Spray light mist coat first, make sure to cover all areas, like backside of fins and such, let it tack up and spray the color coats. I'll let it dry for several days before touching, otherwise the oil on your fingers will mar the finish. Good luck.

I didn't realize they were low spots, and instead thought I sanded too hard in those areas.

How do you paint the edges of fins without focusing on the area too long and causing drips? Tape off the rest of the fin maybe?
 
Last edited:
For fin edges, apply with quick short bursts of paint. Light coats! Not too close and always keep the can moving.
 
After a few months of being busy, I've finally got the chance to work on rockets.

I'm trying to finish my Blackhawk 38 build, but I'm stuck on two things.

Electronics Bay Coupler
Shear Pins
Question 1: where is the best place to drill the holes through the body tube and coupler for the upper and lower shear pins?
I have a 100 or so plastic nylon screws that I plan on using for shear pins.

Vent Holes
I'm going to drill a hole right in the middle of the coupler tube right where the upper and lower body tube sections meet. I need to do some research on how to size this vent hole.

Recovery Harness
I'm also trying to figure out where to drill holes for the 1" coupler with the kevlar loop on it. I would like to eventually put a crazy long motor in my Blackhawk, but won't obviously be flying that long of a motor all the time.

Question 2: Should I just drill the holes at 24", and drill new holes later if I decide to fly a longer motors around 27" long? How do I cover up the new holes once I go back to shorter, 24 inch, motors?

Vent Holes
Question 3: I also read that you need to have vent holes between the top of the motor and the bottom of the e-bay coupler. But I'm not sure how that plays with Question #2 above.

I really appreciate any responses.
 
I saw in the first post that you are planning to use a Raven 3 for the altimeter. Are you planning two of them for redundancy? I'm working on the same kit right now, and I'm finding that packing two Eggtimer Quantums in the bay is really tight.
 
Have you read the original BlackHawk build I did?
They were the original instructions for the kit.
If you have not, I can resurrect it and link it here. After reading I will gladly answer any questions you have that are not in the instructions. The above ones are.
The only difference since then is the nose cone is not molded but spiral wound with metal tip. More roomy and useful than old one.
If I were to do it again all recovery retention would be from front motor closure, either eyebolt or modified to attach harness.
Mine used removable hollow harness retention place at where longest motor would fit. Never needed to be removed other than to inspect harness.

100_8206.jpg
 
Have you read the original BlackHawk build I did?
They were the original instructions for the kit.
If you have not, I can resurrect it and link it here. After reading I will gladly answer any questions you have that are not in the instructions. The above ones are.
The only difference since then is the nose cone is not molded but spiral wound with metal tip. More roomy and useful than old one.
If I were to do it again all recovery retention would be from front motor closure, either eyebolt or modified to attach harness.
Mine used removable hollow harness retention place at where longest motor would fit. Never needed to be removed other than to inspect harness.

View attachment 398320

Thank you for replying. I have read your thread multiple times, and am still unclear about the above questions.

This is the second time I've missed a rocket launch because I haven't been able to figure out this kit.

No offense, but at this point I really wish I had just gotten the Mongoose. I heard a rumor it has instructions.
 
Last edited:
Thank you for replying. I have read your thread multiple times, and am still unclear about the above questions.

This is the second time I've missed a rocket launch because I haven't been able to figure out this kit.

No offense, but at this point I really wish I had just gotten the Mongoose. I heard a rumor it has instructions.

Go to the rocket launch. Take your rocket and ask questions. People will be able to get you going in the right direction.
 
I saw in the first post that you are planning to use a Raven 3 for the altimeter. Are you planning two of them for redundancy? I'm working on the same kit right now, and I'm finding that packing two Eggtimer Quantums in the bay is really tight.

Sorry I missed this. I was only planning on one, for now. Since the space is limited I'm still trying to figure out how to achieve redundancy. A second Raven 3 would be expensive, so I'm trying to achieve a more cost effective solution.

Go to the rocket launch. Take your rocket and ask questions. People will be able to get you going in the right direction.

I would love to go, but it's 3 hours away to be tortured watching everyone fly.


Search button was the second thing I did, after reading the "instructions" thread.
 
After a few months of being busy, I've finally got the chance to work on rockets.

I'm trying to finish my Blackhawk 38 build, but I'm stuck on two things.

Electronics Bay Coupler
Shear Pins
Question 1: where is the best place to drill the holes through the body tube and coupler for the upper and lower shear pins?
I have a 100 or so plastic nylon screws that I plan on using for shear pins.

Vent Holes
I'm going to drill a hole right in the middle of the coupler tube right where the upper and lower body tube sections meet. I need to do some research on how to size this vent hole.

Recovery Harness
I'm also trying to figure out where to drill holes for the 1" coupler with the kevlar loop on it. I would like to eventually put a crazy long motor in my Blackhawk, but won't obviously be flying that long of a motor all the time.

Question 2: Should I just drill the holes at 24", and drill new holes later if I decide to fly a longer motors around 27" long? How do I cover up the new holes once I go back to shorter, 24 inch, motors?

Vent Holes
Question 3: I also read that you need to have vent holes between the top of the motor and the bottom of the e-bay coupler. But I'm not sure how that plays with Question #2 above.

I really appreciate any responses.

After some brainstorming, this is what I'm thinking of doing:
  • Question 1: I think I'm just going to guess, and drill holes 1" from the bottom and top of the bulk plate.
  • Question 2: The longest motor casing I could find is the Loki 1200, which is 24.625 inches long. I'm going to put the recovery coupler there, and only use the section between the top of the motor casing and bottom of the e-bay coupler for the drogue parachute. Even then, it's a really tight fit and I think there's a good chance the drogue parachute could get scorched.
  • Question 3: I'm just going to forego the vent holes and see what happens.
 
Put your payload vent hole about 1” below the NC shoulder and the booster about 1” below the aft AV bay bulkhead.
 
There was a really good instruction set for that kit. I’ll see if I can find it. CJ wrote it and has all the answers to your questions.
 
Altimeter Vent Hole Sizing (Link). It also answers your question about sustainer venting.

Altimeter Vent Hole Calculator & other resources (Link)

Off We Go Rocketry's Static Port Holes PDF Doc (Link)

RRC3 User Manual [See page 4] (Link)
 
I would love to go, but it's 3 hours away to be tortured watching everyone fly.
You’re over thinking this. It won’t be torture. Within the first hour you’ll probably get all your questions answered and have your rocket ready to fly. Even if you don’t fly, you’ll enjoy it. I promise nobody will look down on you for asking advice and you’ll find the best support group you could ask for!

As far as recovery, maybe you missed it, but Jim slipped in a very good suggestion about hooking to the forward closure. If you aren’t using motor deployment, that’s what I would suggest also.

As far as redundancy, don’t overly complicate things yet. For a small rocket just use the single altimeter that you already have. If you want to add redundancy add an inexpensive and easy Missileworks or Perfectflite.

Shear pin placement is not critical. Your choice of an inch from the edge is great.

The vent hole to prevent the nosecone from popping off (or other sections from separating) during a rapid ascent just needs to be about a one sixteenth to one eighth inch diameter hole in each piece that would hold pressure. Again, it’s not very placement or size sensitive. If the up part is not too fast you might not even need it but I have experienced the shameful zippering and I always put them in.
 
Don’t get frustrated. For a min dia kit a the placement of these features will depend on the gear you are using with the kit. For example if you use a switch behind the vent holes to arm electronics your vent hole locations will depend on the sled layout. And again, your choice of motor retention location depends on your largest case and drogue size (chute, streamer, drogue-less?). A lot of the “instructions” available serve more as guidance than step by step directions.
 
Myself, I like to put all vent holes, shear pin holes and mounts all in line with the fins. Think that it makes a much neater looking rocket. I locate the vent holes right near the bottom of the Av Bay and NC shoulder, so as not to block the vents. This also puts them away from chutes so they do not block the holes either.
 
Here are the build instructions for the Blackhawk that Jackie sent me when I asked for them. I followed this pretty much exactly for my build. A little change in the nose to handle my tracker. It's a great rocket, flys easily on G->I motors and larger if you dare.

cheers - mark
 

Attachments

  • BlackHawk 38mm.pdf
    3.5 MB · Views: 67
Back
Top