What did you do rocket wise today?

The Rocketry Forum

Help Support The Rocketry Forum:

This site may earn a commission from merchant affiliate links, including eBay, Amazon, and others.
I sanded the Satellite Interceptor some more today. I f I hadn't been lost on You Tube I would have painted it tonight. I was thinking about the next project. I have a few ideas but haven't decided what to do. I was looking at my rockets and I took one off the ceiling. It had 3 years of dust on it. It is the 49th rocket I built. I made it out of clear acrylic tube and Lexan fins. It has a 29mm HPR mmt. It's 46" long and weights 47 ounces with a chute. I call it Ghost. It's one of a few rockets that has part of a nylon shock cord in it. 20230608_225219[2879].jpgProbably never fly. The ejection charge would coat the inside. I don't think you all have seen it before.
 
With grandson duty today I didn't get much done. But I did manage to get the final color paint done on the inside of the tube fins on the Kink Kraken, fillets done on the Don't Drink, and sanded and primed the nose cone on the Crawler. Going to have to hustle to get all 4 done by next Saturday.
 
With grandson duty today I didn't get much done. But I did manage to get the final color paint done on the inside of the tube fins on the Kink Kraken, fillets done on the Don't Drink, and sanded and primed the nose cone on the Crawler. Going to have to hustle to get all 4 done by next Saturday.

I need to hustle as well. The paint on BT60 Goblin #2 did not turn out well...odd dark splotches in it. I may just live with it. Want to have the upscale Ninja done too....but that is currently in primer coat #1 and unsanded.
 
Love it!
Probably never fly. The ejection charge would coat the inside. I don't think you all have seen it before.
What you might do is place a piece of coupler stock down the inside for flight. If you can get it. BMS sells coupler stock in 34" length, but I don't know if they go that big (or if that's even a standard size tube you've got there. Come to think of it, if it's not a standard size tube, you might get lucky it its ID matches a regular tube's OD.)


I did manage to get the final color paint done on the inside of the tube fins on the Kink Kraken...
Unless that's a typo, you must post pictures.
 
Probably never fly. The ejection charge would coat the inside. I don't think you all have seen it before.
Perhaps you could rebuild it with a CO2-based avbay. Most of the CO2 sytems on the market use black powder to fire the piston that pierces the CO2-cannister's burst disk, but it's a very small amount of powder and doesn't directly spray the body with burnt powder, so you could probably clean up any residue fairly easily. It's what I plan to use if I ever do a clear rocket.
 
Any bits of BP residue (as opposed to just smoke) that hit the tube will hit hot and probably embed themselves and/or permanently discolor the acrylic. But I bet some sort of shield could be devised. Or a non-pyro way to pierce the canister, probably some sort of spring loaded doohickey.
 
Any bits of BP residue (as opposed to just smoke) that hit the tube will hit hot and probably embed themselves and/or permanently discolor the acrylic. But I bet some sort of shield could be devised. Or a non-pyro way to pierce the canister, probably some sort of spring loaded doohickey.
Well, when I said residue, I meant the residue of smoke. I don't fly CO2 yet myself, but several people who do have told me cleanup is negligible, which makes me think the confinment of the BP chamber results in nearly complete combusion, so you are only dealing with smoke. I could be wrong though, and it could vary from one system to another.

There was at least one system on the market that used a servo-released firing pin to pierce the canister disk, but it's not been for sale for a couple of years that I've seen. I know several universities in countries where powders are restricted have implemented similar systems.
 
That's pretty awesome that they did that. Calling the electric company would have been my first suggestion, but I didn't know if they would actually do it, or if they would charge you an arm and a leg.


Today I rearranged the desk in my airplane room to make room for my rockets, and ordered a LOC Iris 3.1.
It took them 3 hours to get there, (their supervisor arrived within 30 minutes of the call, but he was a jerk) and they were great. They didn’t charge me at all, they were asking all kinds of questions about it, and I tipped them each $20.
 
Hand stitched a short harness that will reach the forward closure eye-bolt in a CTI 75mm case with two case spacers installed. The auto upholstery man's machine only ran one line of stitches, than gave up. I "saddle stitched" all three inches of the Kevlar webbing. I'll probably go back over a second time after my fingers return to normal.

1686350052123.png
 
Gave the central assembly of Thunderbird 3 a coat of flat black. The "cooling fins" will get gloss black, the rest of this assembly gets orange. It will be much easier to paint a lot of these parts before assembly.

I absolutely love this builder's kit! Can't imagine how much work it would be to do a scratchbuild.

Been perusing images of TB3. The Spaceship Handbook says the body is red, the cooling fins blue. The web shows red, dark orange, red-orange, etc. for the body. Cooling fins: black, dark gray, medium gray, and dark blue. The image here is the best one from the show I've found, and it looks medium-dark orange and black to my eye; so that's where I'm going.

1686403230269.png
 
Yesterday, we had a low-key launch with some BAR members in Castle Rock, CO. I launched 4 rockets:

Launch #1:
- Rocketeer: Anne
- Rocket: "Gary" - Estes Baby Bertha on an A8-3 (sparkly black BT with silver nose cone and fins)
- Maiden flight for both rocket and rocketeer
- Successful launch to about 200-ft and recovery

Launch #2:
- Rocketeer: Maximus
- Rocket: Estes Alpha III on an A8-3 (Black BT with orange nose cone and fins)
- Successful launch to about 200-ft and recovery

Launch #3:
- Rocketeer: David (Frogglicker)
- Rocket: WAC Corporal Experimental on B4-4
- Successful launch to about 400 ft and recovery. Had a cool twist on assent.
- The motor retainer became stripped from the launch so I couldn't send it again.

Launch #4:
- Rocketeer: David (Frogglicker)
- Rocket: "Skylicker" - Estes Hi-Flyer XL with 3D-printed fins/CRs/motor retainer on an E20-4
- Successful launch and deployment. The ascent was nice and straight. The motor report definitely got everyone's attention.
- Apogee: ~600 ft.
- Recovery: Failed. The wind caught it and it drifted into a tree. My tribute to the rocket gods --again!--


The surprise was the WAC Corporal. I put a B4-4 in it and it zoomed! I didn't paint it or put any special care into the assembly. Just CA's the parts on and sent it; it performed well. I determined that the motor case needs to be worked a bit, since it's 3D printed and, as expected, there was heat deformation. I will redesign it with an 18mm tube sleeve and a different motor retainer. I should have it ready for the CRASH launch next Saturday.

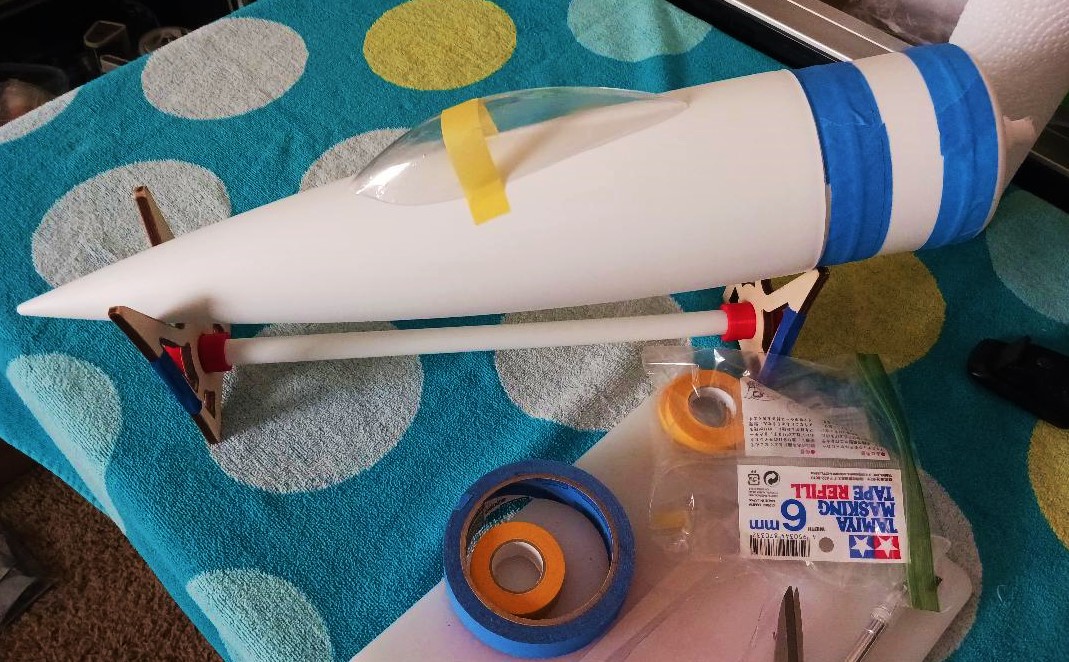
I've been working on SpiderMax over the past week and will post pictures while I finish up the main assembly

WAC-Corporal.jpgHi-Flier_final.png
 
It's a Katana Jr, but you're right. Good thing is after the way they treated me with the two issues I had with this build, I don't really care what he thinks.
I have had mixed results with Apogee. When I go to the office/showroom/warehouse in person, they're all lovey-dovey. When I have ordered online or asked questions via email/chat, it has been a less than pleasant experience. It is mentioned on their site they are more expensive because they offer excellent CS but in my opinion, they are just more expensive. They were my go-to for a while because of proximity but now, I have others I consider first.
 
Been perusing images of TB3. The Spaceship Handbook says the body is red, the cooling fins blue. The web shows red, dark orange, red-orange, etc. for the body. Cooling fins: black, dark gray, medium gray, and dark blue. The image here is the best one from the show I've found, and it looks medium-dark orange and black to my eye; so that's where I'm going.

View attachment 585444
To me, the cooling fins look dark, greyish blue.
 
Sealed the fins, cut out and shaped the canopy on Project Rocketdyne.

canopy-test-fitting.jpg


Project-Rocketdyne-ready-to-paint.jpg
 
I've been busy today. I started off with designing some different takes on the 29mm to 38mm motor adaptor for my Hobgoblin. I tried variations on clamshells, fully printed tubes, and centering rings on a motor tube and the last was what I settled on. The tube is 190mm to accommodate the H135 SU motor. I've been struggling a bit with this and finally got it worked out. The fitment in the rocket was perfect as was the motor retainer cap (also redesigned to make it longer). It's locked in a tight. I feel really confident with this solution.

hobgoblin_motor_adaptor_and_motor_retainer_cap.jpg

I also worked on SpiderMax. First, I threaded the shock cord through the forward CR, and secured it with a half-hitch and 3 gallons of epoxy. Next, I cut the body tube above the forward CR so I had easier access to the top of the assembly. I had slit the body tube for the fin cutouts earlier in the week and tested the fitment of the assembly. Got scared for a minute because it did not want to come back out. After some sweet talking, I got it out, epoxied the body tube, and put it right back in. Seems to fit pretty well. There were some small gaps between the aft/forward CR and the body tube. hmmm. Mixed up more epoxy (that's the correct answer, right?) and added some fumed silica. This really thickened up the epoxy and gave both a good goopy slathering, jamming some down in the gaps to make sure I had a good body/ring bond. The initial cure looks good with good fillets. I then took the other half of the body tube and epoxied a coupler in to be mated with the fin can later.

spidermax_fincan and coupler.jpg

While the printer was whirling and the epoxy was curing, I pulled out the IPL Chimera. I modded the fin can, eliminating the motor mount and replacing it with a 29mm motor tube. I also added a 29mm motor retainer ring and cap. The fitment with the H135 and a G74 proved successful as well. I finished sanding the couplers and the nose cone shoulder and everything is together. I just have to add the shock cord, rail buttons, and a chute. I will probably not finish (as in paint) this one. It looks spectacular. I am working on printing another one in different colors. The print files can be found here. I will be launching this on an F and G class motor this weekend. I'll provide a post-launch report.

chimera_mk2_dryfit.jpgchimera_mk2_disassembled.jpg

This update was brought to you by the letter E for epoxy. Love this stuff. Thank god it's not toxic. It's not toxic, right?
 
Back
Top