


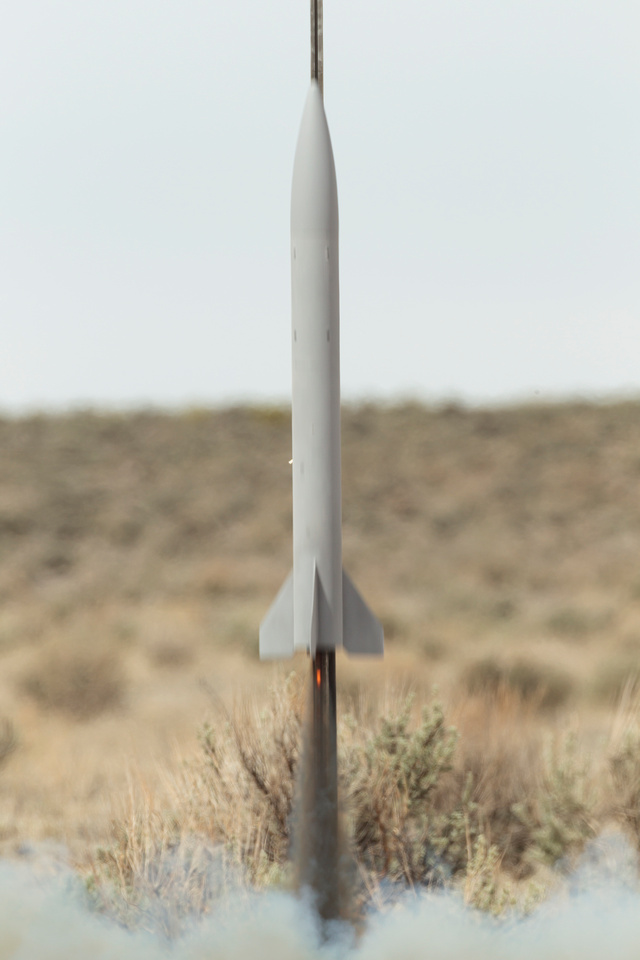
Congratulations!I accomplished my L1 Cert with a LOC IV. You know how everyone says to take it easy, don't modify the rocket, use the lowest power motor? It's great advice. I didn't follow itThe little ricochets that I took to get here were something else. Good lessons though. Cesaroni I350. Just for the record, gray is a paint color
You are using an out of date browser. It may not display this or other websites correctly.
You should upgrade or use an alternative browser.
You should upgrade or use an alternative browser.
What did you do rocket wise today?
- Thread starter BeerorKid
- Start date
Help Support The Rocketry Forum:
This site may earn a commission from merchant affiliate
links, including eBay, Amazon, and others.
Running a second launch in 2 weeks. This one is a 2 day affair in Rembert SC.
tOD
Sinking in the quicksand of HPR

tOD
Sinking in the quicksand of HPR
Congratulations! It's earned it's paint.Congratulations!
If you're interested, prebuilt rockets make good club donations for distribution to the kiddies.(wasn't into the pre built models
Thanks for reaching out to a new generation. I salute you.I made the final plans for what is becoming an annual “zoom build sessions” with the elementary school my boys...
Congratulations.I accomplished my L1 Cert...
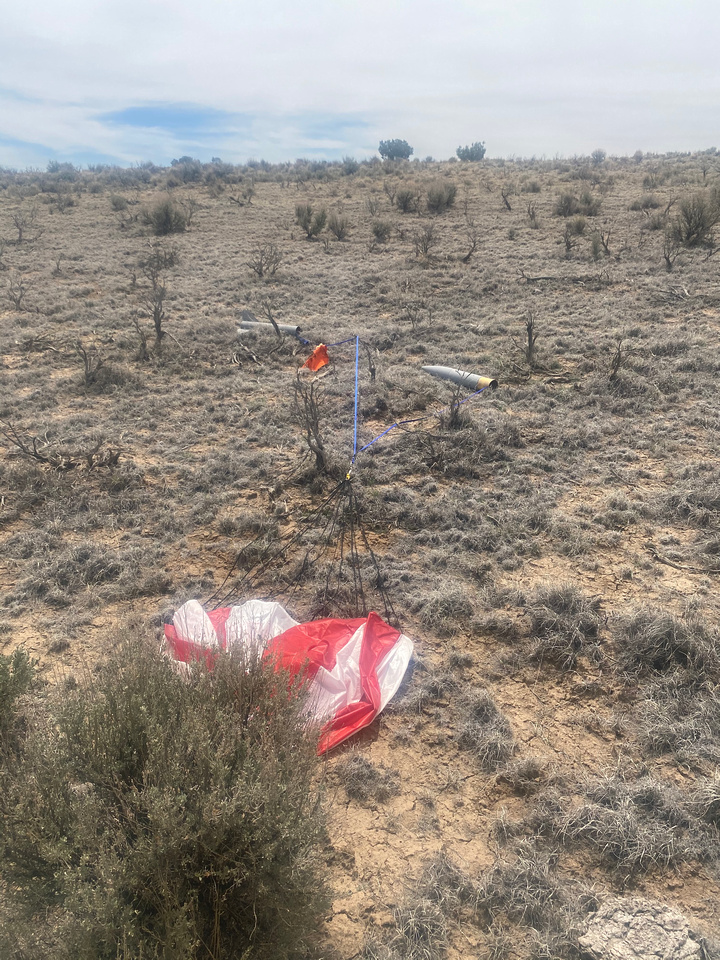
Oh, my, did you forget to notch the leading edge of the fin tab to accept that bolt and washer? It's a good thing you misaligned the the CR so that wasn't needed.Who can spot the "Almost a screw-up" when glueing in the forward centering ring?
Anyway, yesterday I helped with the club cleanup day. The weather was sunny and cool, with very little wind. And we were cleaning and repacking launch equipment instead of using it. Oh well.
Doorknob decal'ed up. Probably going to be at least a couple of weeks before I risk clearcoat. The orange is one that is known to krinkle.

The Rocket Gods do require a harsh sacrifice, it is just a different sacrifice than what we offer to the Tree Gods...Anyway, yesterday I helped with the club cleanup day. The weather was sunny and cool, with very little wind. And we were cleaning and repacking launch equipment instead of using it. Oh well.
- Joined
- May 29, 2019
- Messages
- 1,234
- Reaction score
- 993

GrouchoDuke
Well-Known Member
- Joined
- Oct 18, 2016
- Messages
- 1,693
- Reaction score
- 1,537
Expoxied the fins on to my current build. Sent the fins for my next build off to get CNCed.
Tim51
Well-Known Member
I maidened my new build at my club range - it's a sort of scratch built 4" Micro Magg type stubby but with 4 fins and a 54mm MMT. Built with Loc tubing and Loc NC. MAC Performance NC bay kit, Aerpack retainer. Carbon fibre wrap and T2T, just for looks. Flew it on a CTI I150 Blue Streak, motor ejection. Nice simple satisfying flight, brisk walk in the sunshine. Sim suggested 2700 in perfect conditions. The breeze meant it was probably more like 2400'.


tOD
Sinking in the quicksand of HPR
Well, sort of. When I glued on the centering ring I wanted to locate the nut and washer (which is the back end of the eye bolt for the shock cord attachment) equally spaced between the fins. Had it been rotated a little more it would have interfered with the fin contacting the motor mount tube, I would have had to notch the fin tab which I didn't want to do. Fortunately I test fit the fins before the epoxy set. The aft ring was in place, to keep the tube aligned, but not glued yet so I didn't notice how close it was to the fin tab. Anyway, I'll finish doing the internal fillets and glue on the aft ring and no one will ever see it.If you're interested, prebuilt rockets make good club donations for distribution to the kiddies.
Thanks for reaching out to a new generation. I salute you.
Congratulations.
Oh, my, did you forget to notch the leading edge of the fin tab to accept that bolt and washer? It's a good thing you misaligned the the CR so that wasn't needed.
Anyway, yesterday I helped with the club cleanup day. The weather was sunny and cool, with very little wind. And we were cleaning and repacking launch equipment instead of using it. Oh well.
RockSim said 5,564'. I flew it with a TeleMetrum V3.0 but lost the downlink relatively early in the flight. Thankfully the RSO's link stayed up but I haven't received the data from him yet. The problems with the TeleBT 4.0 / TeleMetrum V3.0 is just one of many, many, many problems, some self induced that I have had. I'll get to that at another time. I changed the chute to a 48" Fruitychute (more to that story) and it took a loooong time to come back to earth. There were lots of good lessons, frustrations, and ongoing frustrations in this one, but I'm happy.Congratulations job well done
what type of altitude did you get with that motor ?
My assistant is pointing at the chute

No damage!!
- Joined
- Aug 25, 2019
- Messages
- 6,124
- Reaction score
- 4,311
Put two fillets on my LOC Goblin. Been procrastinating too much, lately, on rocketry.
I finished one that gave me problems. It's 3" BT with 4 29mm high power mounts that are exposed. The first time I put the four into the 3" the epoxy set before I noticed it was crooked. So cut 10 inches out of it and tried again This time the 4 tubes were twisted when the epoxy set. Cut 10 more inches out. I finally got smart and used a slow setting epoxy and all was well. Added the missing 20". The rocket is 75" long and weighs 74 ounces with the chutes. It is dual deploy. On four G80-13's thrustcurve predicts 3200'. Combined Newtons are 548. So equal to an I. I'm calling this one Odin.
Attachments
![20210502_001440[543].jpg](https://cdn.imagearchive.com/rocketryforum/data/attachments/379/379511-71184bb3e18249e4eb7eeb40d1c7493d.jpg)
![20210502_001458[542].jpg](https://cdn.imagearchive.com/rocketryforum/data/attachments/379/379512-3f2c19c812bb665a96e2d580bf56fb21.jpg)
I worked on my cart/frame for my 1/4 scale Viking 7 project. I had put something together last year and thought about things over the winter to make it a little more user friendly.
I picked up a wheelbarrow handle and some hardware to bolt it on. I moved the bottom 2 2x4's up the frame, I moved the 1x3's out a little and found some concrete form edging to attach to the 1x3's to protect the paint on the rocket.

I am on attempt number 2 to solder up a eggtimer wifi switch. The first one started out good but I have an issue, it powers on but is not operating. I will come back and diagnosis that later.
I added some labels to my parts bin and plan to keep this one as my wifi switch layout. I have 3 more containers and will just add tags as I work on small parts projects. I also glued a aluminum 90° bracket with 1/4" holes onto the soldering iron base to hold the tweezers and the pic I have used the most.

I picked up a wheelbarrow handle and some hardware to bolt it on. I moved the bottom 2 2x4's up the frame, I moved the 1x3's out a little and found some concrete form edging to attach to the 1x3's to protect the paint on the rocket.
I am on attempt number 2 to solder up a eggtimer wifi switch. The first one started out good but I have an issue, it powers on but is not operating. I will come back and diagnosis that later.
I added some labels to my parts bin and plan to keep this one as my wifi switch layout. I have 3 more containers and will just add tags as I work on small parts projects. I also glued a aluminum 90° bracket with 1/4" holes onto the soldering iron base to hold the tweezers and the pic I have used the most.
Wow you got some altitude on that flight !!!RockSim said 5,564'. I flew it with a TeleMetrum V3.0 but lost the downlink relatively early in the flight. Thankfully the RSO's link stayed up but I haven't received the data from him yet. The problems with the TeleBT 4.0 / TeleMetrum V3.0 is just one of many, many, many problems, some self induced that I have had. I'll get to that at another time. I changed the chute to a 48" Fruitychute (more to that story) and it took a loooong time to come back to earth. There were lots of good lessons, frustrations, and ongoing frustrations in this one, but I'm happy.
My assistant is pointing at the chute
No damage!!
very nice
Lots of things to experience and learn through the L1 cert journey and further , everything learned helps us for future flights.
congrats again

Nice work looks clean nice sanded fins super clean filletsI finished the back end of my Loc Terrier booster.
View attachment 462659
Next up is painting but I have other business to deal with first. Most of all, I needed to clear up the work space.
I worked on my cart/frame for my 1/4 scale Viking 7 project. I had put something together last year and thought about things over the winter to make it a little more user friendly.
...
View attachment 462649
Rocket stuff aside, I can't believe I'm seeing a classic DBR X2 in your photo! I have one and beat the tar out of it for many years; multiple trips to Moab. Upgraded everything on it. Diamond Back replaced the front triangle after I cracked the shock mount point on a huge drop. Finally, a second swingarm weld crack did it in and I swapped the parts over to a Trek Fuel EX frame. Still have that X2 frame though. Need to put it on the wall.
Finished six 38 mm graphite nozzles. Just need to drill cores in one cured batch (was too stiff for coring rods) and cut liner tubes, and I'll be ready to head to my mentor's tomorrow to test his stuff and my two propellants--at least four tests each if all goes well.
Best -- Terry
Best -- Terry
Registered for NARAM-62... 

Opened my inbox and saw a "Back In-Stock" notification from Apogee and got REALLY excited. Then I opened it and realized its not the rocket I want for my L1 cert. 
While I wait I'm going to get back to building an adjustable fin jig so I can get back to my Harpoon build.
While I wait I'm going to get back to building an adjustable fin jig so I can get back to my Harpoon build.
What did you end up picking for your future L1 flight rocketOpened my inbox and saw a "Back In-Stock" notification from Apogee and got REALLY excited. Then I opened it and realized its not the rocket I want for my L1 cert.
While I wait I'm going to get back to building an adjustable fin jig so I can get back to my Harpoon build.
What did you end up picking for your future L1 flight rocket
The apogee Peregrine. I plan to do it single deploy to start, then work towards the dual deploy electronics later.
Awesome pick solid rocket look forward to seeing your buildThe apogee Peregrine. I plan to do it single deploy to start, then work towards the dual deploy electronics later.
Hey check out apogee again I just looked and it’s in stock nowThe apogee Peregrine. I plan to do it single deploy to start, then work towards the dual deploy electronics later.

Last edited:
Hey check out apogee again I just looked and it’s in stock now
Hahaha, this came in 3 hours ago (5 hours after the other kit!)

I've officially purchased my L1 rocket

Awesome !!! That’s a big bird cool designHahaha, this came in 3 hours ago (5 hours after the other kit!)
View attachment 462907
I've officially purchased my L1 rocket
I feel like I was watching paint dry...


A little while back I realized I was a coupler away from making a Super Baby Bertha (or close enough) with some BT80 on-hand. We love our little Baby Bertha and never have owned a regular Big Bertha or Super Big Bertha, so why start that trend now? Trying the baffle thing on this; haven't ever used one so figured this was a good time to experiment. Made one from basswood kinda modeled after this Qualman BT80 version. I should have taken pics before I put it in the BT. Quick puff through the motor tube shows it should work just fine. Got a lot of BT80 rockets now so I'm tired of wadding/dog barf usage
Fins are a tiny bit underscaled if based on a normal Baby Bertha; mostly to work with the 1/8" balsa sheets I had. Papered with resume paper and TBII. (done a few now with this combo and no edges of the paper want to peel up and they round perfectly when sanded. Made my own centering rings. Top is two layers of 1/16" basswood and the bottom is doubled up thick cardstock.
OR shows I could probably get away with no nose weight once complete. .9c with a E12-6 and it's stubby...we'll have to see how it really balances out. It's not like this will fly on anything smaller than a D so maybe a bit of weight would be smart.
Just not sure on color scheme. Logo I made is red/white/blue/black/yellow. So, might stick to the current paint scheme of the SBB (but perhaps a different color on the lower parts).
Trying the baffle thing on this; haven't ever used one so figured this was a good time to experiment. Made one from basswood kinda modeled after this Qualman BT80 version. I should have taken pics before I put it in the BT. Quick puff through the motor tube shows it should work just fine. Got a lot of BT80 rockets now so I'm tired of wadding/dog barf usage Fins are a tiny bit underscaled if based on a normal Baby Bertha; mostly to work with the 1/8" balsa sheets I had. Papered with resume paper and TBII. (done a few now with this combo and no edges of the paper want to peel up and they round perfectly when sanded. Made my own centering rings. Top is two layers of 1/16" basswood and the bottom is doubled up thick cardstock.
OR shows I could probably get away with no nose weight once complete. .9c with a E12-6 and it's stubby...we'll have to see how it really balances out. It's not like this will fly on anything smaller than a D so maybe a bit of weight would be smart.
Just not sure on color scheme. Logo I made is red/white/blue/black/yellow. So, might stick to the current paint scheme of the SBB (but perhaps a different color on the lower parts).
Attachments


Similar threads
- Replies
- 158
- Views
- 5K
- Replies
- 5
- Views
- 249
- Replies
- 18
- Views
- 2K
- Replies
- 1
- Views
- 970