3D Printing What Are You Printing Today?

The Rocketry Forum

Help Support The Rocketry Forum:

This site may earn a commission from merchant affiliate links, including eBay, Amazon, and others.
Printing parts to build a new 3D printer. Printing on my CR10 in PETG+CF from 3DXtech. Printer is going to be a HevORT, 615x615x900 build volume. Pausing pretty much all rocketry stuff this year to put all the time and effort into this. Going to be awesome when it works.
IMG_20220108_102255404.jpg
 
More 3d printed Centering Ring router templates. Got a Loc 5.38 x 98mm mmt printing now, and adapters for it up to 7.51 Loc airframe (still 98mm mmt) and mmt adapters from 75mm to 38mm, all working off the 5.38 template, just need to print them all.

View attachment 498982

Interesting how do the templates work?
 
Interesting how do the templates work?
Bearing guided router bit (flush trim or laminate trim bit, bearing is a must) mounted in a router table, bearing rides on inner and outer sides, wood for cr's is attached via nails or screws, or double sided tape. trim close with bandsaw on outer and hole saw on inner, finish on router table.
 
Last edited:
Would you share the stl files please?
Since you asked so nicely :).

These are the STL files for both the mast top and the bottom mount. They use a length of PVC pipe (not sure how well they work with USA PVC pipe) to elevate the receiver above the roofrack of the car. The bottom mount is designed to bolt onto my roofrack which has slots for T-Nuts. Maybe you can use some sort of program to scale them to suit your PVC, or just use some wraps of tape (Kapton?) or a file to tweak the fit.
MastHeads.jpg

3DMasthead.jpg

MastBase.png
 

Attachments

  • MastBaseRev2.STL
    410.9 KB · Views: 4
  • MastMountTop.STL
    215.4 KB · Views: 4
Last edited:
Since you asked so nicely :).

These are the STL files for both the mast top and the bottom mount. They use a length of PVC pipe (not sure how well they work with USA PVC pipe) to elevate the receiver above the roofrack of the car. The bottom mount is designed to bolt onto my roofrack which has slots for T-Nuts. Maybe you can use some sort of program to scale them to suit your PVC, or just use some wraps of tape (Kapton?) or a file to tweak the fit.
View attachment 499076

View attachment 499077
Pipe is supposed to be standardized worldwide....doesn't mean it is but its supposed to be....
 
Lots of nice stuff going on in this thread! :cool:

This is what I'm working on at the moment, been going on for some time a ton of parts I scaled it down to 1/100 to go with my Saturn V's.

Cheers Rob.
 

Attachments

  • 20210827_173039.jpg
    20210827_173039.jpg
    110.1 KB · Views: 14
  • 20220109_154254.jpg
    20220109_154254.jpg
    112.7 KB · Views: 14
Since you asked so nicely :).

These are the STL files for both the mast top and the bottom mount. They use a length of PVC pipe (not sure how well they work with USA PVC pipe) to elevate the receiver above the roofrack of the car. The bottom mount is designed to bolt onto my roofrack which has slots for T-Nuts. Maybe you can use some sort of program to scale them to suit your PVC, or just use some wraps of tape (Kapton?) or a file to tweak the fit.
View attachment 499076

View attachment 499077

View attachment 499086
Very nice; thank you.
 
Not totally rocket related but sort of! Files were found on the web and imported into Fusion 360 and fixed and modified to work as needed. I generated new parts in 360 to support lighting, sound, stand, and linkage configuration. I use magnets to switch from patrol mode to attack mode. Drone 166 is about 8 inches in diameter.
drone 1.JPGdrone 2.JPGdrone 3.JPGdrone 4.JPG
 
Not totally rocket related but sort of! Files were found on the web and imported into Fusion 360 and fixed and modified to work as needed. I generated new parts in 360 to support lighting, sound, stand, and linkage configuration. I use magnets to switch from patrol mode to attack mode. Drone 166 is about 8 inches in diameter.
View attachment 499219View attachment 499220View attachment 499221View attachment 499222

This is a tough one to ask, but if you don't mind, can you show some pictures of what turned out BAD or some of the time consuming steps you took to go from 3DP to such as great looking model?

When I first bought my Form2, I thought it was basically a replicator from Star Trek, but I soon found out that was not the case. The amount of supports needed for resin printing leaves a lot of hand work to be done (IMO, not a fact, but far from a replicator. . . ).

I gave up on 3D resin printing due to unrealistic expectation and a lack of understanding before I bought the equipment - both faults on my own.

Having said that, that is an awesome model and I would like to know how to adjust my expectations of what comes off my 3D printer and what level of modelling skills I need to develop a final product like you've made. I want to elevate my skills to that level.

Thanks for the post!

Sandy.
 
This is a tough one to ask, but if you don't mind, can you show some pictures of what turned out BAD or some of the time consuming steps you took to go from 3DP to such as great looking model?
There are plenty of good videos on Youtube about finishing 3DP models. It all comes down to a lot of filling and sanding. Here is one to start:

In my opinion, finishing is the last step in getting a nice looking model. It starts with understanding capabilities of FDM printing and as you say, managing expectations. You are not going to get "museum" quality models straight from a printer (at least not at this point in FDM tech development, maybe in the future). You've heard the phrase; "a good finish starts with the prep work" and that is true of 3DP. Things like designing prints to avoid supports, layer orientation, layer height and so on. That all comes with trial and error and reading/watching as much on the subject as possible.

You also can't forget personal preference in printing. Some people like the way they print because it best suits their needs. That may be different than others. It really comes down to "just do it" until you find what works best for you.

I don't really have photos to share but this one should give you an idea on the "versions" I started with. I printed both SLA and FDM to see which better fit what I wanted. I found that printing is PLA and PETG (clear parts) worked for what I needed. I slowed the extruder down and used a .15 layer height. A couple of things that worked in my favor is the PLA is hard. It does not sand well so you have to fill the layer lines to get a smooth finish. I tried epoxy/microballons as a fill but settled on good old spackle. It sands easy and then can be covered with a primer. Once that was done, the rest was easy.
IMG_9316.jpg
 
Finished up the last of my centering ring router templates (for now)...one with screws is a Loc 5.38" w/98mm mount, by using the largest ring with the 5.38x98 it becomes a Loc 7.51x98mm, and the 3 smaller ring adjust the size of the MMT to 75mm, 54mm, or 38mm.
20220112_175806.jpg20220112_175851.jpg
 
I printed this up the other day.

Found it (and lost it) on Thingiverse. Now it's on PrusaPrinters.org at: https://www.prusaprinters.org/prints/50076-starship-sn8-in-action-remix
I added "Fuzzy Skin" in Prusa when I sliced it.

I also used Tinkercad to add a 18mm "dummy engine" that the rocket slips onto.

Turned out pretty cool.

Model displayed on it now is my 18mm upscale of the Estes Quark.

New display stand.jpg
 
I recently printed 3 test jigs for work, chain tensioners.. (Sorry, no pics . not allowed!)


As for @Sandy H. 's comment: I've seen this with others. They seem to think the quality & strength of a 3D print is comparable to a properly molded [hi quality] plastic part. Like, they get can get an exact replacement for their 'thing'.. and the time required for some prints just baffles them.. 16hrs to print that?!?!? "I tried to print up some Lego parts. they don't fit / broke.. :( "

I had a friend who had a friend.. They wanted to get a 3D printer 'and put China to bed'! Their intent was to get a printer (or two or three) and print up custom shot glasses for the local bars.. (He initially asked me as I have one at my disposal). SO, I told him: about 1-2hrs to print, you need to design up the glass & logo, and ideally, it be made of FDA approved plastic.. And you want to compete against a company that specializes in glass, etched or screen printed on glass.. (And from a country that artificially lowers costs to ensure the business!!)

The subject quickly changed.
 
[snip]

As for @Sandy H. 's comment: I've seen this with others. They seem to think the quality & strength of a 3D print is comparable to a properly molded [hi quality] plastic part. Like, they get can get an exact replacement for their 'thing'.. and the time required for some prints just baffles them.. 16hrs to print that?!?!? "I tried to print up some Lego parts. they don't fit / broke.. :( "

[/snip]

I think, in my case, I didn't do enough research to fully understand the post-process finishing time required as my first mistake and I got frustrated number of failed prints due to user error in the method of creating supports. So, I think the blame is squarely on me for choosing to go with a premium priced consumer product (around $6k when purchased due to the additional accessories I bought) after just watching a handful of Youtube videos (that show 'right-click->add supports->run part') and when the part comes off with all the external supports, gets cleaned and cured, they either completely skip or just fast forward through the final cleanup of all the little pin points left from the supports.

The quality of the parts themselves are pretty darn good and I could care less about the run time on the machine as it is a pretty safe design (i.e. not worried about smell or burning down the house), but I wasn't satisfied with the time it took to make a high quality piece. My intent was to make masters for molds and then produce the final parts using rotocasting. That way, I could produce very special nosecones on a small run basis (i.e. 100 pieces or less). The thought was that a well made product would be worth $5-20 each, even though something common would be $0.20 each if purchased in quantity from China.

Sandy.
 
As i tell my co-workers (those who I train on our 3D printer & Simplify3D): "Every print is an experiment.."

We 've also started to standardize on one type of filament, and one colour. I've noticed the settings for PLA+ Red tend to need a slight tweak from the settings for PLA+ Orange..

We use our Fusion3 for work prototypes, proof of concept, and some assembly jigs


Best print quality & part prints I've seen, come off a Markforged brand printer.. (but $ $ $ $!)
From someone I knew in the injection molding business, he said that color change in a plastic is not just a dye...its a chemical change as well that can alter the properties and useability of the product. I predominantly print using Amazon Basics Lt.Grey PETG and only occasionally print with the same AB PETG in natural color, but there are definite tweaks to the print settings to get serviceable prints.
 
I dropped my gaming PC moving it to a new room, and cracked the whole front bezel. I went online to see if someone had made a replacement and found this:

https://www.thingiverse.com/thing:4777561

large_display_Back_assembled.jpg


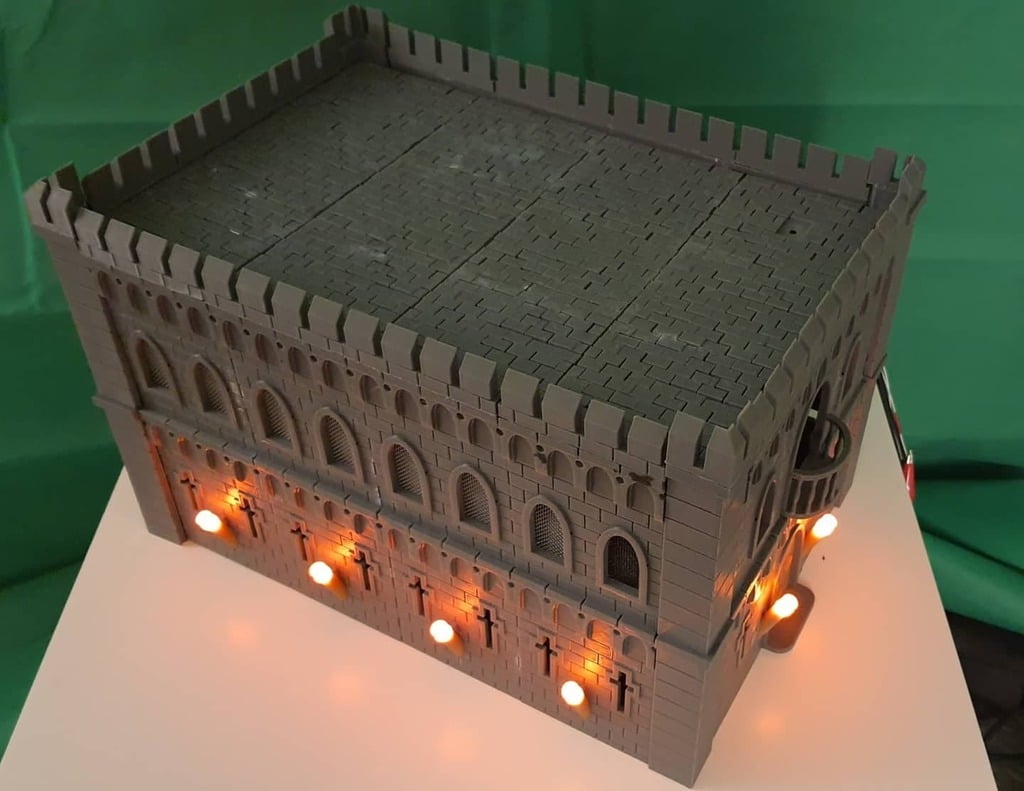
a 3d printed medieval castle computer case.

I liked the idea but didn't need a full case, so just designed the medieval skin to fit onto my old case. I shouldn't use the word "made" since almost all of the 3d designs and flourishes I found online - I just packaged it all together and made sure it fit.

mideaval.jpg
 
8.15" diameter version of the Estes PNC-80BB, will be printed in two parts. I used the Bill Kalsow OpenScad nosecone generator (that was modded by Alex Zoghlin to split big nc's into two parts).
 

Attachments

  • 20220206_164755.jpg
    20220206_164755.jpg
    185.5 KB · Views: 11
Back
Top