


Took a few pic's of my latest build, not really a build thread, but I will point out some of the stuff I did while building this rocket.
My wife Sharon bought this rocket over a year ago and decided that I needed to build it before we visit New Mexico to attend the National Sport Launch near Alamagordo. https://www.nar.org/site/nsl2017/
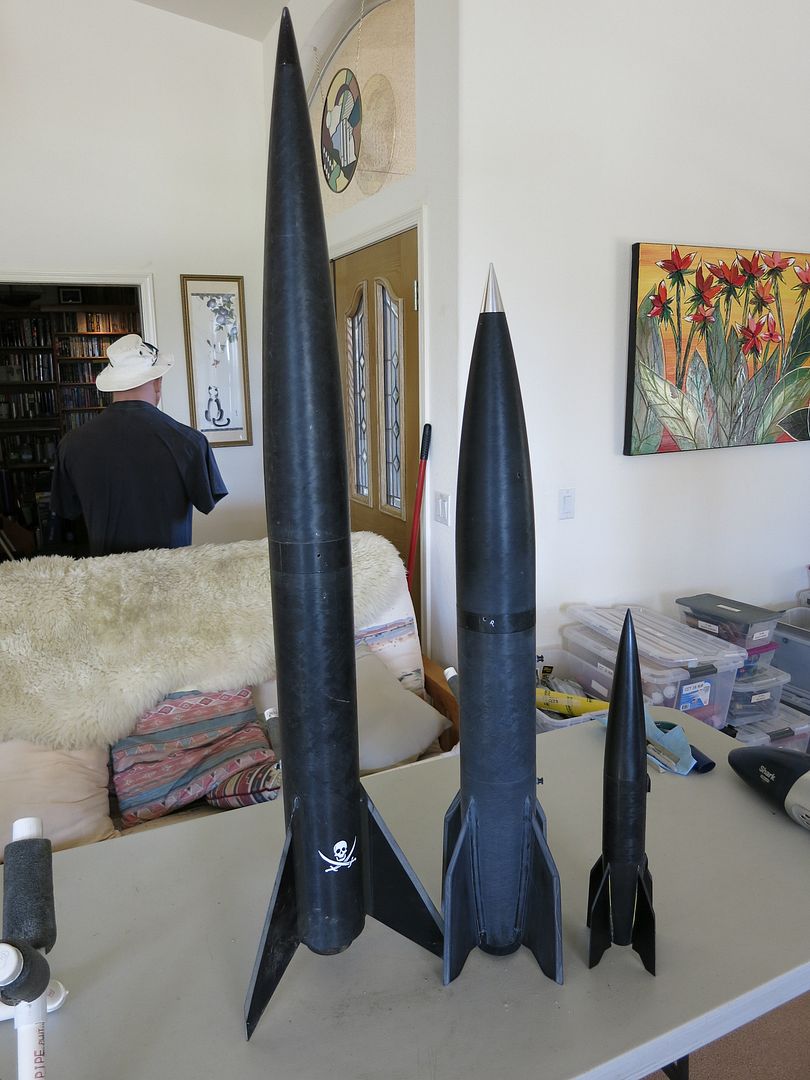
They plan on having a mass V2 launch on Sunday, May 28th and Sharon wanted me to have a V2 for the launch. She already has her "drunk V2" which was built at Airfest 2015 with Tim and CJ in front of the Wildman Motorhome with massive amounts of Margarita's to help the process. I won't go into detail about this, but I did take a picture of her V2 with my V2 and her "Jimbo Jart" which had the distinction of beating Wildman in a drag race and then losing to CJ at the same launch.
I started this build with the fincan/motor mount tube in a rather traditional method, using a 16" piece of kevlar strap epoxied to the MMT and slots filed out of the forward centering ring. This forms a "Y" with the drogue shock cord attached in the middle.
Since most of the fincan is a tapered nosecone with the tip cut off, it does not have an aft CR. The rear end of the MMT is held in place with the Aeropac 54mm motor retainer. The forward CR is actually in the short coupler that holds the body tube to the tapered tailcone. Since the tailcone, coupler and body tube are all glued together, I had to wing it a bit to get everything connected in the proper order. I glued the retainer onto the MMT with JB weld, then inserted them into the bottom of the tailcone, then slid the coupler with the forward CR already glued into it into the front of the tailcone. Then I used some Rocketpoxy to glue the fins in, buttering up the root of each fin and sticking each fin in separately, one at a time, letting each one dry before moving to the next fin. Then I removed the coupler/CR and did the internal and external fillets in sets, while the rocket was laying on it's side. Once that was all done, I glued in the the coupler, with the kevlar strap fit through the forward CR. When I added the body tube, I filled the gap with more Rocketpoxy tinted black, just like the external fillets. If you look closely, you can see where they meet. You might also notice that the rear rail button is on the non-tapered part of the fincan, screwed into the plywood centering ring.
The avbay was pretty straight forward, although I had to offset the switchband to make room for a 4 grain 54mm motor. I also offset the rear retention point with a u-bolt on the side of the aft avbay lid:
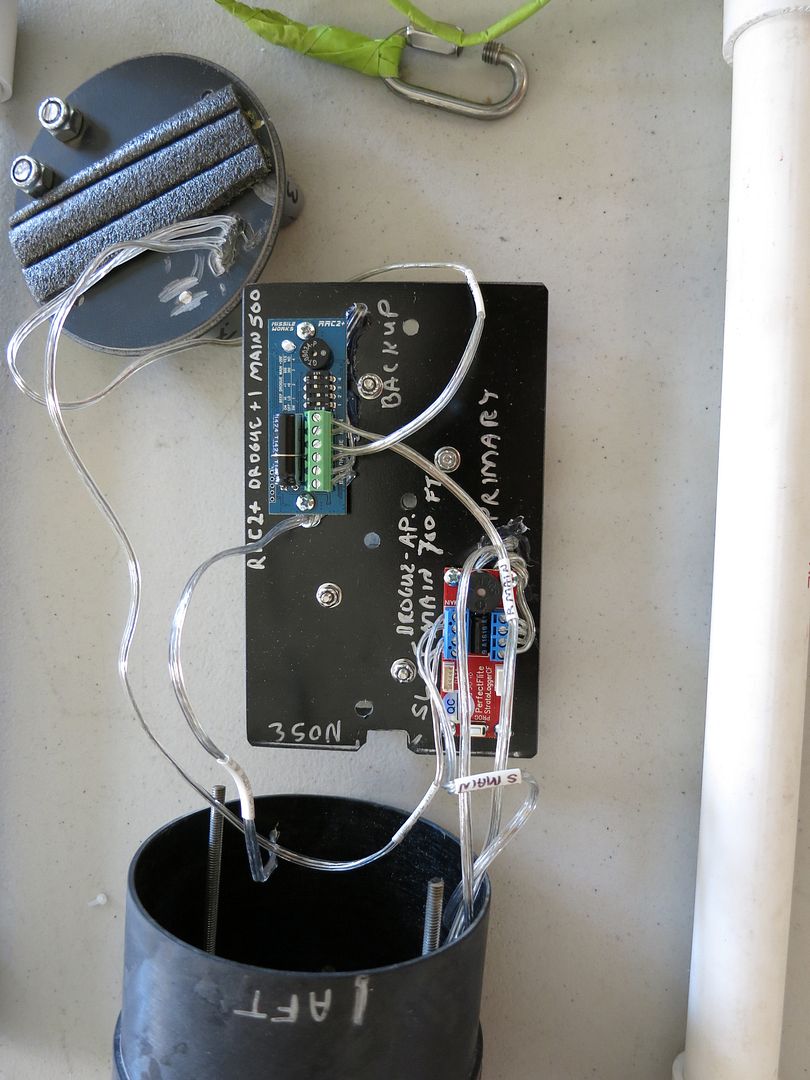
I used Doghouse/Binder design 1.5 gram charge cups and some small terminal blocks which is how I do most of my dual deploy rockets. Since this is a 4" rocket, there was plenty of room for redundant altimeters, so I mounted a Stratologger SLCF and a Missleworks RRC2+ on one side of the sled, and two 9v batteries in Doghouse battery boxes on the other.
The top avbay lid has a forged 1/4x20 eyebolt and the same TB/charge cups:
The all-thread holding it all together is 8/32. Since I cut the sled a little short, I added a piece of foam to the inside of the aft lid, and ran a couple of strips of 1/8" fiberglass glued to the inside of the top lid to keep it from moving around. The switches are wires that stick out through the static ports and are twisted and taped to the switch band. Since two of the static ports are clogged up with wires, I enlarged them to 5/32".
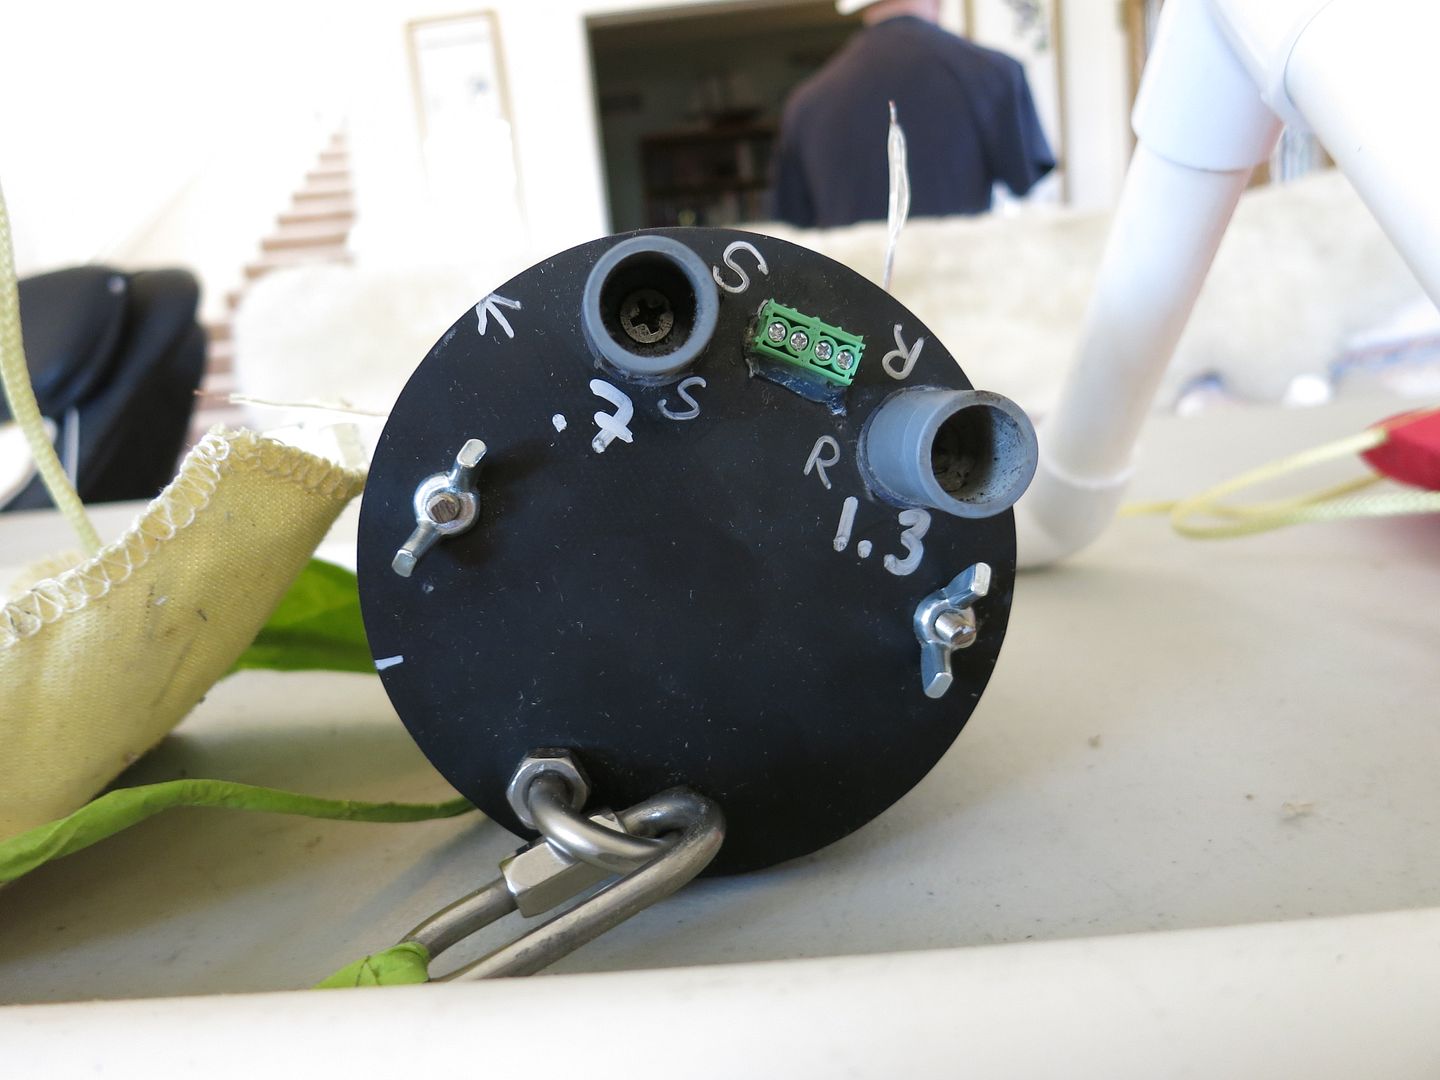
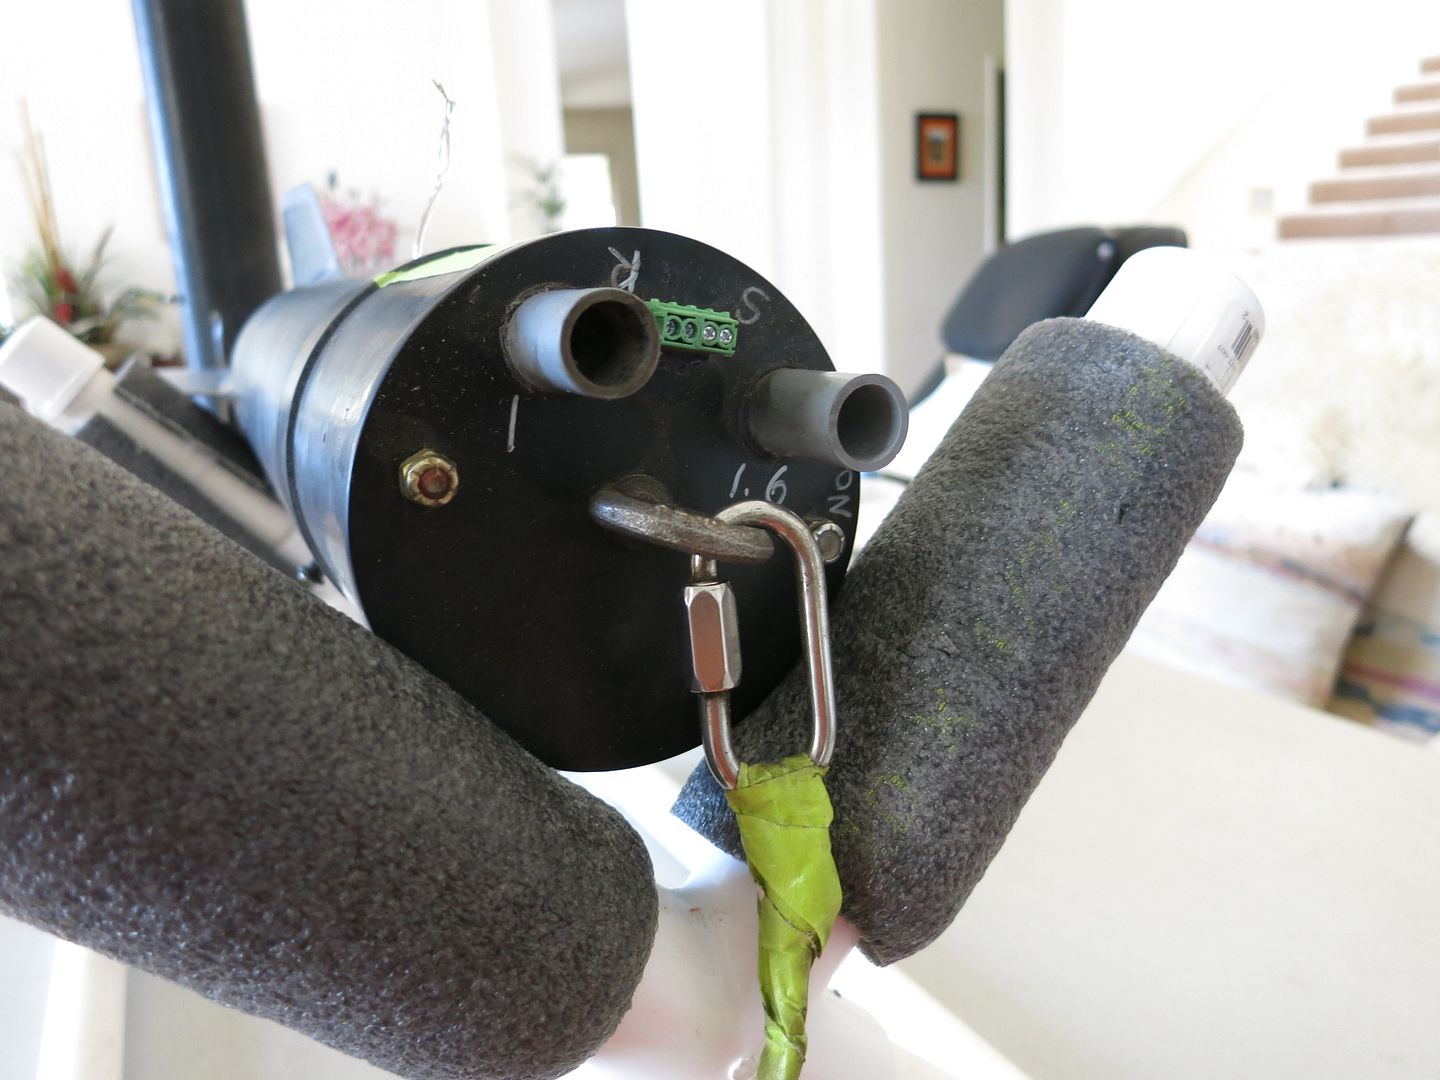
The rocket weighs in at about 6 pounds, so I dug out a 48" chute and added a 12" nomex pad, a quick link with a swivel to the 10 ft. of 1/4" kevlar and two 3/16" quick links at the ends. The nosecone has a metal tip held in place with another forged eyebolt which doubles as the forward retention point. I had to do a bit of sanding to the forward end of the avbay to make it fit 3" into the N/C without sticking. Then I added three 2-56 nylon shear pins to hold it in place. Did my ejection charge tests this morning and decided that 1 gram of BP is plenty to get the nosecone off, with a backup of 1.6 grams, and the fincan came off with .7 grams, so the backup will be 1.3 grams. That was with an AT 1706 casing and a plugged forward closure installed.
Thrustcurve says this rocket will fly to about 5400 ft. on a K456 Dark Matter, leaving the rail at 64 fps. Sounds like a good first flight to me, so we will probably fly it at the next TRA/PHX launch and see how it goes. If it flies good, I will paint it and give it a name, maybe R2-V2?
...
My wife Sharon bought this rocket over a year ago and decided that I needed to build it before we visit New Mexico to attend the National Sport Launch near Alamagordo. https://www.nar.org/site/nsl2017/
They plan on having a mass V2 launch on Sunday, May 28th and Sharon wanted me to have a V2 for the launch. She already has her "drunk V2" which was built at Airfest 2015 with Tim and CJ in front of the Wildman Motorhome with massive amounts of Margarita's to help the process. I won't go into detail about this, but I did take a picture of her V2 with my V2 and her "Jimbo Jart" which had the distinction of beating Wildman in a drag race and then losing to CJ at the same launch.
I started this build with the fincan/motor mount tube in a rather traditional method, using a 16" piece of kevlar strap epoxied to the MMT and slots filed out of the forward centering ring. This forms a "Y" with the drogue shock cord attached in the middle.
Since most of the fincan is a tapered nosecone with the tip cut off, it does not have an aft CR. The rear end of the MMT is held in place with the Aeropac 54mm motor retainer. The forward CR is actually in the short coupler that holds the body tube to the tapered tailcone. Since the tailcone, coupler and body tube are all glued together, I had to wing it a bit to get everything connected in the proper order. I glued the retainer onto the MMT with JB weld, then inserted them into the bottom of the tailcone, then slid the coupler with the forward CR already glued into it into the front of the tailcone. Then I used some Rocketpoxy to glue the fins in, buttering up the root of each fin and sticking each fin in separately, one at a time, letting each one dry before moving to the next fin. Then I removed the coupler/CR and did the internal and external fillets in sets, while the rocket was laying on it's side. Once that was all done, I glued in the the coupler, with the kevlar strap fit through the forward CR. When I added the body tube, I filled the gap with more Rocketpoxy tinted black, just like the external fillets. If you look closely, you can see where they meet. You might also notice that the rear rail button is on the non-tapered part of the fincan, screwed into the plywood centering ring.
The avbay was pretty straight forward, although I had to offset the switchband to make room for a 4 grain 54mm motor. I also offset the rear retention point with a u-bolt on the side of the aft avbay lid:
I used Doghouse/Binder design 1.5 gram charge cups and some small terminal blocks which is how I do most of my dual deploy rockets. Since this is a 4" rocket, there was plenty of room for redundant altimeters, so I mounted a Stratologger SLCF and a Missleworks RRC2+ on one side of the sled, and two 9v batteries in Doghouse battery boxes on the other.
The top avbay lid has a forged 1/4x20 eyebolt and the same TB/charge cups:
The all-thread holding it all together is 8/32. Since I cut the sled a little short, I added a piece of foam to the inside of the aft lid, and ran a couple of strips of 1/8" fiberglass glued to the inside of the top lid to keep it from moving around. The switches are wires that stick out through the static ports and are twisted and taped to the switch band. Since two of the static ports are clogged up with wires, I enlarged them to 5/32".
The rocket weighs in at about 6 pounds, so I dug out a 48" chute and added a 12" nomex pad, a quick link with a swivel to the 10 ft. of 1/4" kevlar and two 3/16" quick links at the ends. The nosecone has a metal tip held in place with another forged eyebolt which doubles as the forward retention point. I had to do a bit of sanding to the forward end of the avbay to make it fit 3" into the N/C without sticking. Then I added three 2-56 nylon shear pins to hold it in place. Did my ejection charge tests this morning and decided that 1 gram of BP is plenty to get the nosecone off, with a backup of 1.6 grams, and the fincan came off with .7 grams, so the backup will be 1.3 grams. That was with an AT 1706 casing and a plugged forward closure installed.
Thrustcurve says this rocket will fly to about 5400 ft. on a K456 Dark Matter, leaving the rail at 64 fps. Sounds like a good first flight to me, so we will probably fly it at the next TRA/PHX launch and see how it goes. If it flies good, I will paint it and give it a name, maybe R2-V2?
...


 uke:
uke: