Vintage HPR Glider - Wasatch Rocketry SST Build

The Rocketry Forum

Help Support The Rocketry Forum:

This site may earn a commission from merchant affiliate links, including eBay, Amazon, and others.

J Blatz

Well-Known Member
TRF Supporter
Joined
May 8, 2010
Messages
1,285
Reaction score
261
Well here's an itch that took twenty years to scratch:cool:

View attachment WasatchCover.pdf

Back in the day (early 90's) when I first got heavy into HPR I bought many a kit and motors from Gary and Sydney Price who ran High Sierra Rocketry in it's second iteration. Gary also had his own line of kits under the name Wasatch Rocketry. Most notable were the gliders of which there were two versions, a BT-60 based model with 24mm power and a BT-80HD version with 29mm power. I never actually saw one in the flesh back then, but Gary had given me a catalog with them in it and I always wanted one.

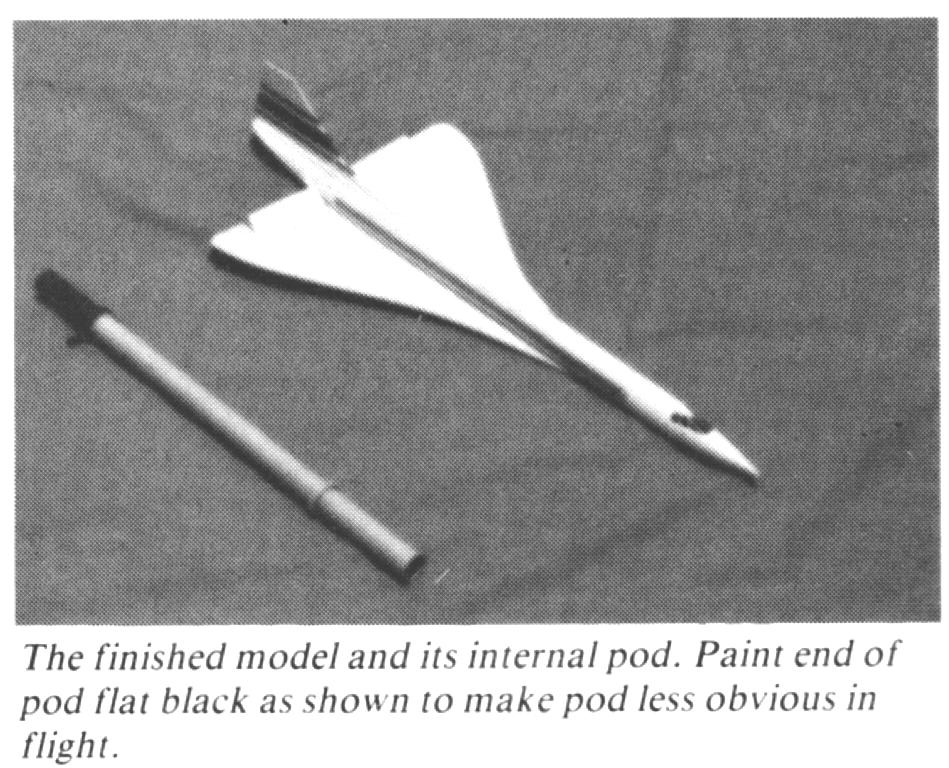
About 10 years back I saw one of them on Ebay and bought it. Since then it has been chilling in the garage. Recently I decided that it would look better built than in the bag, so I started the build. Before I get into that too much, I do want to mention that this appears to not be an original design by Gary Price but rather an upscale of an earlier, smaller SST design by George Gassaway. Also, I would like to thank TRF member AstronMike for his advice on this project.
 
Last edited:
Ok, so here's an overview of the parts. The glider is based on BT-60 and the nice old plastic nosecone that was so popular in Estes products twenty years ago. The wings are 3/16" foamboard and came with the patterns pre-marked. Centering rings are made out of some type of household fiberboard. Nylon chute. Some pieces of various dowels. Four Dubro hinges (I liked this feature). Patterns and a nice overview schematic were included, as well as instruction printed by dot matrix printer...old school!

Here's the main components-

SSTParts1rev.jpgSSTParts2rev.jpgSSTParts3rev.jpg
 
And the secondary parts...

SSTParts4rev.jpgSSTPatternsrev.jpgSSTSchematicrev.jpg


I think I neglected to take pics of the piece of coathanger that is the eleven hold-down and a short but stout homemade coupler that joins the BT-60's. It is also worth noting that I did order replace the BT-60's with new ones from BMS (their service is great BTW) since the originals weren't quite round and I figured that it is critical on model like this with a pop-pod.
 
Glad to see you working on this!

First thing, make *really sure* that the foamboard is NOT warped! If it is, it will affect the entire flyability of this craft, both boost and glide. That's the only real downside to standard foamboard products.

Second, you mentioned switching NC's. If the new one is heavier, make sure to realize that this will cause the glider itself to be more noseheavy, and thus require larger elevons or more angle thereof for trim. If it is less, then you may get off with less elevon deflection, and thus a slightly better glide, but again, you'd have to make sure to compensate with more weight on the pod. If balsa, you could just 'gouge out' the NC to lighten it up some. IF plastic, you should cut off the shoulders back end, just to allow the pod to be longer enough to go inside the hollow NC itself - this will increase the 'moment arm' of the pod ballast in your favor and you may need a bit less thereof. IF you intend to fly with Estes 24mm BP motors, this is quite handy.

Never liked 'Dubro-style' hinges on stuff like this. Yes, they look 'realer' but on foamboard especially, I tend to just use clear heavy duty tape on both sides of the elevon joint. Even do this up to the real HPR stuff and never had problems.

Also hated the old 'elevon hold down wire thingy you gotta bend real funny' stuff. That's necessary here, due to the single ply wing, but you HAVE to have this bent EXACTLY CORRECTLY, or you'll know it on boost. What I used to do on singly plied wings w/elevons in them was to add a backing wire, made of music wire (like .060) running across the *underside* of the wing, right near where the elevon will sit. This should be, on your sized bird, like an inch longer on each side of the elevon cut-out area. Once the elevon is hinged into place, it will not be able to be bent 'negative' in relation to the wing, allowing a hold down wire to press it against this 'backer' and make it square.

Even better, though, is getting rid of the d@mn thing in the first place, and just having thick wire or Kevlar with two paper clips (larger ones), bent open to where you can 'clip' each on the back of each elevon for boost - not too tightly, but just enough pressure to 'hold it there' against the underwire backer. This will easily keep the elevons dead square on the way up, and release correctly at ejection. As you'd guess, I've been doing this trick for nigh over 30 years, and even upscaled it to HPR (I'm lazy and unimaginative, if that's not obvious). IMHO, a better way than 'bend and pray' with the old 'coathanger wire' deal.

I might 'mirror' your build here, but use cardstock and Depron, as to end up with hopefully a 'BT60' bird that uses C6-3s. I'm guessing the main wingspan will be like 16", with the chord being like 20" IINM.

You'll love flying this if you get it right and will definitely want to do a 'real' BT80 (not HD!) build next. Still beat around my old BT80 Concorde (obviously my own iteration here) on F20s and the like.
 
Thanks Mike. I actually swapped out the BT's not the NC, and I did cut off the bottom of the shoulder.

I have yet to finish the hold down mechanism. I will take your observations into account. Now, more pics of the build!
 
Here's the pop-pod. It consists of a lower length of MMT separated from the upper one by a piece of dowel. The upper piece of MMT holds nose weight and has a plug on top to hold it in. I have not done the nose weight yet, so you can see it off to the side. Also note that there are three staggered slots to allows the ejection gases out of the lower MMT section.

This pop pod is quite similar to the type found in the Estes Skydart and many other designs.

SSTPop2.jpg
 
Next I cut the body tubes to proper lengths and joined them with the coupler, removed the bottom part of the shoulder off of the nosecone, and then cut the back of the body tube to the contoured shape shown in this pic below. I got a little lazy taking pics during this part but you can see the finished result a few posts later. In the meantime, here is the diagram that comes with kit....gives a good idea how it goes together.

SSTSchematicrev.jpg
 
Next I cut out the wings and tailfin. Below is a pic of the cut wings. Note that the root edges are bevelled where they attach the to body tube. The second pic shows the elevons attached with hings as well as the hold-down assemblies attached. This is 3/16" foamboard material, available at WallyWorld and other emporiums of junk.

After these steps, I attached the wings to a wing former, which is basically a strip of heavy cardstock like material that both wings are glued to. Approx 5/8" of each wing is glued to the this former. The shape on contour of can be seen in the diagram above.SSTWingsCutrev.jpgSSTWingswelevonsatached.jpg
 
At this point in the build I started to think about the elevons and their angle of inclination after pop pod ejection. The instructions call for one to use a rubber band looped around the tailfin to pull the elevons up and suggest that a piece of fishing line be taped to the underside of the elevons and an anchor point on each wing to limit how much the elevons can travel to a forty five degree angle. Well, that sounds clunky to me, so I cut out some small "elevon stops" that would limit the swing on the elevons to 45 degrees. You will see them in the pics below...I think this is an improvement over the original design.

Next I attached the wings/wing former to the body tube. I used 30 minute epoxy to allow plenty of time. I had to make jigs to set the proper wing dihederal (wing tips are 1.25" higher than center). The BT was weighed down with a Kosdon 38/640 casing in back and a loaded AeroTech I motor in front...I wanted to ensure positive contact of the BT with the wing assembly and also the proper dihedral, so I had to make sure the whole thing was bottomed out. This technique worked great.

Once that was done, I attached the tailfin, and then in front of it a small piece of balsa with a screw eye attached. This is the front anchor point for the elastic band that will activate the elevons. I thought this was a better solution than just having the elastic band loop over tailfin.

SSTWingattach1rev.jpgSSTWingattach3rev.jpgSSTScrewEyerev.jpg
 

Attachments

  • SSTWingattach1rev.jpg
    SSTWingattach1rev.jpg
    10 KB · Views: 217
So the bevel in the foam board is to conform the wings to the body tube due to the dihedral? How did you cut the bevel? After you cut the foam board you attached a light cardboard to one side of the wings?
 
So the bevel in the foam board is to conform the wings to the body tube due to the dihedral? How did you cut the bevel? After you cut the foam board you attached a light cardboard to one side of the wings?

I've never liked having foamboard wings being semi-spanned, where you need this 'wing former' to join them. Blah. I just make the entire wing planform, this being roughly like 20" chord x 16" span, from a single sheet of material, which easily fits as such. You then just mark the centerline and carefully crease it before bending in the dihedral. Much, much simpler than overengineered bevels and wing formers and such.....

Now, on the Depron version I'm about to start, I *have* to do the wings as two panels, since you cannot bend dihedral of any real amount into Depron, as it is too rigid to accept this. Even then, the 'wingformer' will be nothing more than a strip of clear tape on the lower side, while I'll just glue the upper 'foldy side' against the cardstock BT, which has to still be on the mandrel, of course.

When I first got the 'HPR version' of this 20 years ago, I was hoping it was going to a whiz-bang improvement over my 'cruder' Astron SST design at that time. Man, was I underwhelmed when I opened the box!! While Gary Price rightly deserves some credit for getting this model to a given makeable point, I feel that it needed to be *much more refined* in order to be a rather expensive kit for sale. Was like $60 back then, which is like ~$100 or so now. I don't think many of you would go for that level of crudeness and need for 'further bashing' to end up with a flyable model for that kinda scratch now......

Now, for the exceedingly few of you who might recall my own foray into glider kitting, around 17-18 years ago, and how crude those were, you can also recall that these were priced reasonably for what you got, not to mention that you'd end with a decent or better flying glider right out of the box, especially the Marauder class design. Sometimes wonder if I should 'dust em off' and have another go at those but I rather doubt it......
 
.......

You'll love flying this if you get it right and will definitely want to do a 'real' BT80 (not HD!) build next. Still beat around my old BT80 Concorde (obviously my own iteration here) on F20s and the like.

Hmmmmm....Concorde. Your post reminded me that I have a semi retired but decent looking Robbe molded foam Concorde (long discontinued by Robbe) sitting out in the garage. RX and servos still installed. Remove the twin pusher Speed 400 electric motors, props and speed control, add a RX battery, hollow out an area in the lower aft fuse for a 29mm motor mount tube, make arrangements for CG control during boost.

A nearly instant R/C rocket glider.....:)

image.jpg
 
Last edited:
That dual fan Concorde looks great, Tom!

What's its length/span/weight look like? That might be better off as is, and just 'slap together' like the real BT80 version I mentioned above. Heck, since you're the RC pro here, make *that* RC, and if you use Readiboard for the wing, the end up wing loading would be quite acceptable indeed.

It seems that most everyone who does foray into larger gliders, especially towards HPR, goes for RC instead of 'old skool' like myself. Can't say that I blame ya...
 
So, over the weekend I added the elevon hold down....this is basically a piece of coat hanger wire bent to the exact shape to hold the elevons down during the boost phase. Since I since used hinges rather than tape there was no need for a stop on the bottom side as Mike had described. Also, added rail guides, surface mounted w/epoxy(the kit included a 1/4" lug, since this was before rail guides were in common use....I like guides so much better, I hate the way the slightest wind can blow a gilder around a launch rod) . I have not glued to NC on yet but slipped it in for the pics because it looks better.SST991REV.jpgSST992REV.jpgSST993REV.jpgSST994REV.jpg
 
I've never liked having foamboard wings being semi-spanned, where you need this 'wing former' to join them. Blah. I just make the entire wing planform, this being roughly like 20" chord x 16" span, from a single sheet of material, which easily fits as such. You then just mark the centerline and carefully crease it before bending in the dihedral. Much, much simpler than overengineered bevels and wing formers and such.....

Now, on the Depron version I'm about to start, I *have* to do the wings as two panels, since you cannot bend dihedral of any real amount into Depron, as it is too rigid to accept this. Even then, the 'wingformer' will be nothing more than a strip of clear tape on the lower side, while I'll just glue the upper 'foldy side' against the cardstock BT, which has to still be on the mandrel, of course.

When I first got the 'HPR version' of this 20 years ago, I was hoping it was going to a whiz-bang improvement over my 'cruder' Astron SST design at that time. Man, was I underwhelmed when I opened the box!! While Gary Price rightly deserves some credit for getting this model to a given makeable point, I feel that it needed to be *much more refined* in order to be a rather expensive kit for sale. Was like $60 back then, which is like ~$100 or so now. I don't think many of you would go for that level of crudeness and need for 'further bashing' to end up with a flyable model for that kinda scratch now......

Now, for the exceedingly few of you who might recall my own foray into glider kitting, around 17-18 years ago, and how crude those were, you can also recall that these were priced reasonably for what you got, not to mention that you'd end with a decent or better flying glider right out of the box, especially the Marauder class design. Sometimes wonder if I should 'dust em off' and have another go at those but I rather doubt it......

Man, I would buy one. Now all you need is another hundred customers or so, right?

You could sell plan packs. I hear that is what Matt Steele at NCR is going to do for the kits that he is not going to produce.

And I would of course enjoy seeing how you would build a model like this, or even better, the larger version. This is my first build thread ever, and it has been a lot of fun and I have even learned how to do some new stuff with my "smart" phone.
 
So the bevel in the foam board is to conform the wings to the body tube due to the dihedral? How did you cut the bevel? After you cut the foam board you attached a light cardboard to one side of the wings?


Yes. Basically, I used a razor blade and cut it to an approx 30 degree angle, freehand. Accuracy on this not terrible important as there is a jig set up used when the wing assembly is attached to the body tube.

And the light piece of cardboard was just attached to the inside of the wing root edges. See the "belly-up" pic I just posted.
 
That dual fan Concorde looks great, Tom!

What's its length/span/weight look like? That might be better off as is, and just 'slap together' like the real BT80 version I mentioned above. Heck, since you're the RC pro here, make *that* RC, and if you use Readiboard for the wing, the end up wing loading would be quite acceptable indeed.

It seems that most everyone who does foray into larger gliders, especially towards HPR, goes for RC instead of 'old skool' like myself. Can't say that I blame ya...

The Robbe Concorde spans 31.5" and is 44" long. Weight with electric flight equipment is about 2 lbs. Would be a little less than 2 lb minus electric flight equipment and plus a G motor.

Like I said, I have semi retired it from my electric aircraft fleet, so I think it would be much more fun to convert it to G power. It must have 100-120 flights on it. No reason the model could not be swappable back and forth between power systems if I ever had the urge to fly it on electric again.

The BT80 Concorde model is pretty cool, but the foam model really captures the shape of the real Concorde fuse far better.

RC makes a lot of sense once you get into RCRG or RCBG models that weigh more than 8oz or so.
 
More work accomplished.

I completed the "hold-down" assembly that keeps the elevons down during post. Also, added two small, short wood screws to the ballast holding area in the front of the pop pod rather than gluing it in - this will allow me modify the ballast amount if ever needed. And then, rather than gluing in the NC I did a tight friction fit backed up by two 6-32 screws opposite of each other.SSTFrontofpod.jpgSSTNC.jpgSSTrearofpod.jpg
 
Well here's an itch that took twenty years to scratch:cool:

........
Before I get into that too much, I do want to mention that this appears to not be an original design by Gary Price but rather an upscale of an earlier, smaller SST design by George Gassaway.

Yes, he scaled it up. Here's a link to plans for the original BT-50 sized Concorde model I designed:

https://georgesrockets.com/GRP/Plans/Sport/Concorde.htm

- George Gassaway

Concorde-Scans145a.jpg


Concorde-Scans139.jpg
 
George-

Thanks a lot for the link. I looked for your original design to no avail. Now I have it!

Man, the upscale is just that - no changes other than the size. If it makes you fell any better, I'll bet Gary Price didn't sell more than dozen.

Jason
 
Finished model with Krylon Plasticote gloss white, did not prime dues to weight issue. Also put some trim on it to make it pretty.

Second pic shows the elevons in glide position as well as the elastic band that pull them up to the stops.

With nose weight and motor (E15-4), 13 oz liftoff weight. Might be just light enough for a D12-3, but I think the E15-4 is going to be perfect!

SSTfinished.jpgSSTelevons.jpg
 
The Wasatch SST flies/glides very nicely, I've flown a G/H model many times.
Mine was a scratch build that I basically back engineered by taking dimensions off of a well used model Ken Allen acquired on one of his trips out west.

three memorable flights:
- An aggressive launch at a Red Glare on an H97 stripped the elevons as soon as it left the rod - very nice altitude, then it it arced beautifully and corn stalked itself, right beside the real corn stalks.
- after several well worn flights, the pod ejected and it proceeded to transition to a very nice glide, with flames trailing out the back...the tail cone that sticks out the back holds the vertical fin caught fire. Need to fireproof that thing.
- the pod ejected after launch but I had used a G reload with a very small ejection well...the pod stopped midway short of completely ejecting. But the pod stopped in a position where the CG still balanced stable enough to glide quite normally for a gentle touch down....I could not have trimmed/planned it to fly better - go figure.

Wasatch SST%20dusk.JPG

Wasatch SST REDGLARE.jpg
 
Last edited:
If I don't miss my guess, I think that nosecone is an Estes PNC-60AH (same one used on the Der Red Max, Citation Patriot, etc.).
 
I've never liked having foamboard wings being semi-spanned, where you need this 'wing former' to join them. Blah. I just make the entire wing planform, this being roughly like 20" chord x 16" span, from a single sheet of material, which easily fits as such. You then just mark the centerline and carefully crease it before bending in the dihedral. Much, much simpler than overengineered bevels and wing formers and such.....

Now, on the Depron version I'm about to start, I *have* to do the wings as two panels, since you cannot bend dihedral of any real amount into Depron, as it is too rigid to accept this. Even then, the 'wingformer' will be nothing more than a strip of clear tape on the lower side, while I'll just glue the upper 'foldy side' against the cardstock BT, which has to still be on the mandrel, of course.

When I first got the 'HPR version' of this 20 years ago, I was hoping it was going to a whiz-bang improvement over my 'cruder' Astron SST design at that time. Man, was I underwhelmed when I opened the box!! While Gary Price rightly deserves some credit for getting this model to a given makeable point, I feel that it needed to be *much more refined* in order to be a rather expensive kit for sale. Was like $60 back then, which is like ~$100 or so now. I don't think many of you would go for that level of crudeness and need for 'further bashing' to end up with a flyable model for that kinda scratch now......

Now, for the exceedingly few of you who might recall my own foray into glider kitting, around 17-18 years ago, and how crude those were, you can also recall that these were priced reasonably for what you got, not to mention that you'd end with a decent or better flying glider right out of the box, especially the Marauder class design. Sometimes wonder if I should 'dust em off' and have another go at those but I rather doubt it......

Sorry to necro this thread but as an old BAR who's become fascinated with gliders, I was hoping you'd share some of foam glider plans if you had them, and your build and design techniques/tips. I'd enjoy resurrecting some of your unique "AstronMiike" designs and I'm sure others would be too. Maybe in a separate thread?
 

Latest posts

Back
Top