Upscale Thrustline Duster - Level One Question/Build Thread

The Rocketry Forum

Help Support The Rocketry Forum:

This site may earn a commission from merchant affiliate links, including eBay, Amazon, and others.

Buckaroo

Well-Known Member
Joined
Mar 2, 2009
Messages
392
Reaction score
9
So I'm finally going to quit talking (not really) and build a rocket for a Level 1 flight.

I am very interested in folks opinions regarding the basic concept I've got outlined below (honest).

x1.77 Upscale of a Thrustline Duster
Semroc #225 airframe (2x30") and balsa nose cone (Upscale of classic BNC55-AC)
Handmade airframe coupler (Semroc doesnt make one for this tubing yet?)
29mm motor mount (14" long) 3x plywood centering rings
1/8" plywood fins
TTW mounting of main (aft) fins, surface mounting of fwd fins
Leaning towards a Slimline motor retainer
1/8" Tubular Kevlar shock cord (~15 feet) anchored to bulkhead (2 sandwitched centering rings) just fwd of the tube coupler
30" or 36" chute based on finished weight and kevlar chute protector
No electronics, straight up delay grain and out of the bag ejection charge
Lugs or rail guides - undecided

So let's hear it... thoughts, advice, opinions... Thanks

hi_power_duster.jpg
 
2" airframe, that will go like crazy! You may want to leave room for electronics just in case you want to put a large motor in it. I'm not sure how thick the Semrock tubes are, but if you have time you may want to consider putting a light fiberglass on it, more for transportation than launching. Use rail buttons.
 
2" airframe, that will go like crazy!

The #225 tubing has an OD of 2.34" (2.25" ID). The 2x30" was me trying to say that I needed to join two 30" airframe sections together.

My original design had a 38mm motor mount and I could just see myself losing it. Since this is my first foray into true HPR I wanted to go as simple as possible.

Hhhmmmmmm... I didn't take into account that you'all would be talking me in over my head...:rolleyes:
 
A few suggestions:
1) go with buttons. Skip the lugs. I only put lugs on low power and small mid power rockets
2) You might want to go with a little thicker tube. Might I suggest using the LOC 2.56" tubing. It's plenty durable for your needs. By doing this, you can also get a standard LOC 2.56" plastic NC. Obviously, this will be a tad larger than 1.77 upscale, but it will only increase your length a small amount and should still fly nicely on an H....might even be able to stuff an I in it & not have it go out of sight. Also, there are standard couplers available for it so no making your own...why complicate things when parts are available
3) Go with a 38mm mount. You can always adapt down to 29mm. The first HPR rocket I built was a kit that came with a 29mm mount. Though I haven't flown it with anything larger than an H, I still have regretted that I didn't put 38mm mount in it.
 
3) Go with a 38mm mount. You can always adapt down to 29mm. The first HPR rocket I built was a kit that came with a 29mm mount. Though I haven't flown it with anything larger than an H, I still have regretted that I didn't put 38mm mount in it.

I second Mark's recommendation on the 38mm mount. You might even think of taking it one step further and actually using a 38mm motor -- at least if you are thinking of Level 2 one day. If you go with Aerotech reloads and hardware the 38mm offers reloads from G to J. With a 29mm for your L1, you will need to buy more motor hardware for your L2 -- someday.

My :2:
 
:cool: I have a 3" Duster upscale. Dyna Wind tubing, composit fly-lite fins. 38MM mount DD. Totaly nasty on any big 38. Your 2.3 should do very well on either 29 or 38. I would go with 38. A nice H123, should get the level 1 done nicely. Later you could add an av.bay and go bigger, if you like. It is always easy to go down to 29MM from 38mm. However, there are so many 29 loads out there, plus the new Pro 29's. The Pro's will be on the market by the end of May, and feature F thru I's. Either way will be good. Just build it right and fly it hard...:D
 
I'll third Mark's recommendations.

Consider using LOC parts including a 38mm - 29 mm motor adapter. That way you can use both 38 mm and 29 mm motors.

Bob
 
:cool: I have a 3" Duster upscale...:D

OK New Rule: Anyone that starts off a post with "I have a..." MUST INCLUDE A PICTURE OF SAID ITEM! :p

So I'm pretty much convinced that a 38mm motor mount is the way to go, after all "Flexibility is the Key to Air Power". Now I just have to make sure I don't do anything Stoopid when it comes time to stuff a motor in this bad boy.

I'm still sold on the Semroc #225 tubing, and the fact that they have an upscaled BNC55-AC for it. I'd really like to get Level 1 without having to resort to glassing or electronics, and then be able to tackle those things seperately. I guess it all comes down to motor seleciton...

Thanks for the feedback folks, keep it coming!:D
 
If your using Semroc tubing, don't put any dents in the tubing and it should be fine without glassing. Any imperfections will lead to structural failure at high velocity. I would go with the LOC tube just to take one more worry out of it.
 
...I'm still sold on the Semroc #225 tubing, and the fact that they have an upscaled BNC55-AC for it. I'd really like to get Level 1 without having to resort to glassing or electronics, and then be able to tackle those things separately. I guess it all comes down to motor selection...

Thanks for the feedback folks, keep it coming!:D
Fiberboard airframe designed for HPR is strong enough so that it is not necessary to glass a simple L1 rocket, or an L2 and even many L3 rockets for that matter, but as rockets get larger, fiberglassing becomes important for transportation as well as durability.

I think our concerns center around the suitability of Semroc tubing for high power use. It really comes down to wall thickness, and the length to diameter of the rocket which is important from a column buckling viewpoint. A long skinny rocket can buckle under acceleration and you actually might need to use a full length coupler inside the airframe if it's too thin.

You don't need electronics for an L1 rocket either but just remember that the principal reason for using electronics in smaller, light weight rocket is to reduce wind drift and have the rocket recover closer to the pad. A small light rocket like the one you are planning to make will go quite high, and will drift quite a distance from the launch area.

Bob
 
I agree with the advice so far, 38mm MMT and don't glass it. My suggestions would be since you are using two 30" tubes, split the rocket at the tubes. When you "build" your coupler, make it an alt-bay right away. You should be able to fit everything in one end and use motor ejection. Later you can add the electronics and actually use the alt-bay for DD without having to mod the rocket any further.
 
And working off Handeman's advice, use removable rivets to hold in the coupler. If you decide to convert it to dual deploy, then you can just change out the coupler tubes. I also find it easier to work with an E-bay when it's removed from the rest of the rocket.
 
A few suggestions:
2) You might want to go with a little thicker tube. Might I suggest using the LOC 2.56" tubing. It's plenty durable for your needs. By doing this, you can also get a standard LOC 2.56" plastic NC.

I disagree. I think that HPR rockets are way overbuilt a lot of times. I have a 3" rocket with 1/8" laminated balsa/card rings and 1/16" ply fins, the tube thickness is .15", and was donated by a family member that knows I'm into rockets. Adhesives were CA for tack joints and sparing epoxy for fillets. When I took it to a club that does a lot of high power, I got a lot of comments about the unexpectedly high performance. Haven't flown it on an H yet, but I'm very confident about its strength after a half dozen G flights. Also, it goes higher on a G64/G76 than my L1 bird did on it's H128 cert flight!

The final plus is that you can fly it on a wider variety of motors, especially before you get your certification. By the sounds of this, you could probably fly it on a large E and have plenty of altitude to work with.

So my :2::
1.)1/8" Ply is overkill, especially with this fin shape, since they don't have exposed pointies to get broken on hard landings. 1/16" ply will work just fine and can be cut with a hobby blade.
2.)Ply centering rings for this size are a pain to cut, so unless you have something that will do this easily or are purchasing them, using 65# cardstock and 3/32" or 1/8" heavy balsa to make a three-layer laminate of card/balsa/card will give you plenty strong rings and save weight.
3.)Separate the rocket at the coupler joint. This will allow you to set up the rocket for dual deploy at a later date, especially with the altitudes this could hit on larger motors.
4.)Use rail buttons as long as you/your club has a rail launcher.
 
All very good suggestions posted already!

My :2: :

Go with the LOC tubing as suggested -for the wall thickness
Maybe make the shock cord a bit longer to an even 20'- it can never be TOO long(well, unless it all won't fit in the tube!:rolleyes: )
Have it split at the coupler..That way at a later date you can configure the coupler to hold your electronics..That is what I use to hold my electronics in all my dual deploy rockets..

Good luck..Looking forward to seeing the build progress! ;)
 
TheAviator: I will agree with you that many HPR rockets are overbuilt but I am very leery about your 1/16" ply fins. I am betting they will flutter off if/when you fly on an H.

Buckaroo: 1/8" ply is the better choice and is still easy to cut with a keyhole saw or if you are patient with an xacto razor saw.

I don't think they will flutter off with an H unless it gets past 80% Mach. Then the 1/8" could flutter off too, depending on shape.

I think the biggest reason for going with the 1/8" would be transportation and landing. All my broken fins have occurred during these two activities. I've never tore a fin off on boost.

The most likely candidate I have is an Estes Stormcaster, but it held up just fine on a F39 load. I've also cracked a 1/4" 5 ply fin on a BD Thug under a 30" chute even though it was fine the couple of times it fell flat with no chute, go figure. You might fly with 1/16" fins forever and never break one, or you might break a 1/8" fin the first three times you fly it. The rocket gods are a fickle bunch.
 
The rocket gods are a fickle bunch.

She sure is... or wait, you said BUNCH, still most profound :rolleyes:

So I did a little research and the issue with the airframe tubing isn't so much about the wall thickness but the material? The Semroc tubing has a wall thickness of 0.045" while the LOC 2.6 is 0.035". The question then is if Kraft Fiber Tubing is really that much stronger than Kraft Paper Tubing? More thought required, maybe Doc has done some testing...

With respect to the fin thickness, none of the 38mm H or I motors that I simmed go anywhere near mach, I'll have to look back and see if any are flirting with transonic. The fin layout is pretty compact, and even though you could probably get away with 1/16" I would probably stick with 1/8" just to deal with the wear & tear issues.

I'm liking the idea of setting the rocket up to seperate at the body joint and leaving the option for a future E-Bay. Haven't done much research into that aspect of the game yet, is there a good rule of thumb for how long it should be?

Thanks for all the good discussion folks, I really appreciate it :clap:
 
The general rule of thumb, is that each part of the alt-bay that fits into the tube should be as long as the tube is wide. 2" BT, the alt-bay should be 4" long, plus any body tube that is part of the alt-bay. 4" BT would need 8" bay plus the BT on the bay.

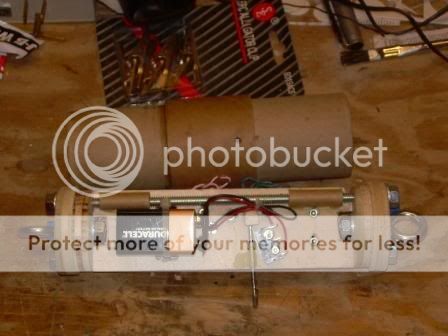
Here's a pic of my bay. The BT on the bay is 2" and each end of the coupler is about 2 inchs.
EBaybatteryandswitch.jpg
 
It looks like that AvBay could take quite a bit of abuse. This is the one part of the rocket that probably should be overbuilt a little, IMHO. If the AvBay is built stronger than the rest of the rocket, on the off chance that you have a complete recovery failure, everything around the AvBay will crumple and absorb the impact, as least leaving your (EXPENSIVE) electronics intact. Most of this strength, especially for Buckaroo's build, could come exclusively from the threaded rod.
 
A good theory about av-bays but unfortunately not what happens in practice. Unless you are landing in super soft ground a complete recovery failure usually leads to near complete destruction. Sometimes you get a fin can back. Or an aft closure. Usually everything in front of that is pulverized into little pieces. Even expensive electronics. Ask me how I know that one!
 
A good theory about av-bays but unfortunately not what happens in practice. Unless you are landing in super soft ground a complete recovery failure usually leads to near complete destruction. Sometimes you get a fin can back. Or an aft closure. Usually everything in front of that is pulverized into little pieces. Even expensive electronics. Ask me how I know that one!

Okay, okay, I'll bite. How do you know?
 
OK... I've decided to bring this thread out of retirement, mostly because I've had some good learning with this rocket and I'd like to share and hear what folks think.

First I'll skip to the end: I built it, I flew it on an H242T, I certified Level 1 with it. :D

Hero shot and flight pic

Duster 38mm 049 Cropped.jpg

ST2009-078602 Cropped.jpg
 
Based on the feedback I got from folks I made two major adjustments to my build plan. First I decided to go with a 38mm motor mount, and second I built it with an avionics bay. Thanks to everyone who gave me their thoughts and suggestions, especially on those two items.

Backing up a little bit: My plan was to fly my level 1 cert flight at Southern Thunder 2009 (20-21 June). I actually started the build on 8 June (two weeks should be plenty right... :p)

First I imposed on my next door neighbor who happens to have a very nice woodworking shop (and brews a mean IPA, and plays the drums like nobody's business... but I digress) where we cut out the centerning rings, bulkheads and fins. At this point I had most of the hardware in hand.

Duster 38mm 009.jpg
 
I had originally planned on using a piece of Semroc series 150 tubing for the motor mount, but when I did a dry fit check, I discovered that the tolerance was too close and it wouldn't work :y: My ST09 plan was in serious jeopardy. Luckily a fellow Music City Missile Club member (who I had never met, but answered the call for help) had a piece of LOC 38mm tube on hand and gladly gave it to me for my project... Thanks again Hal :clap:

The motor mount is 12" long with three 3/16" centering rings. The recovery harness is 20 feet of 1/4" flat woven kevlar threaded under the forward centering ring, with a knot behind it and the tail epoxied to the motor mount tube. The aft centering ring and Slimline retainer are not glued on at this point.

In the background of the pic you can see the slots cut in the bottom BT section and the nose cone "curing" out Minwax Wood Hardener.

Duster 38mm 017.jpg
 
Once the motor mount had been installed I decided to mount the ACME conformal rail guides before I started on the fins. I reckoned that once I had the fins on I would have a hard time getting the BT to sit level so I could verify the alignment on the rail guides. Not sure if that would have been the case, but it worked out OK. The conformal rail guides are actually meant for 54mm tubing, but they were so close on the Semroc 225 that I couldn't see any gaps at all. I laid them down with JB Weld and added epoxy fillets later.

Duster 38mm 025.jpg

Duster 38mm 028.jpg
 
Next the aft fins were mounted (1/8" birch plywood for all the fins). I had cut out a fin alignment guide using mat board, and used that to help me mark the tube for cutting the fin slots. Fin tabs are 5 7/8" long.

Duster 38mm 037.jpg

Duster 38mm 038.jpg
 
The forward fins went on next. They are surface mounted, and I used a system of aluminum angle and clamps to make sure they were aligned with their respective aft fin. Alignment turned out almost perfect except for one fin that had warped a tiny bit so that the aft tip was not exactly in line with the leading edge of the fin behind it. Almost un-noticeable (unless you know it's there :mad:) All in all it came out pretty nice.

Duster 38mm 043.jpg

Duster 38mm 047.jpg

Duster 38mm 048.jpg
 
Next it was time to do the fillets. 6 fins and 3 TTW fin tabs works out to be 24 separate fillets :eek: All I did was to dab epoxy into the seams with a small paper dowel (lollipop stick) and let it smooth down on its own. The internal fillets were done in a similar fashion, except of course with much less space to maneuver they are pretty ugly looking. For the most part the external fillets came out decent, except for a couple where I tried to hurry and finish when the epoxy started gelling up.

Don't have any good pics of the internal fillets, you'll just have to trust me that they're ugly :rolleyes:

I also laid down some fillets around the rail guides. My plan had been to remove the masking tape and let the epoxy sort of spread down and make a nice smooth run down to the BT, but I waited too long and ended up with butter pats. Oh Well... :roll:

Duster 38mm 114.jpg

Duster 38mm 106.jpg

Duster 38mm 108.jpg
 
First off, congrats on the L1! :D I will greet you as I was greeted after accomplishing this task:'Welcome to High Powered Rocketry! Now, open your wallet!':roll:

Awesome looking build! Am sure you will post it later, but gotta ask anyways..LOL..You got a RockSim file for this puppy? Looks like a project I may undertake..Keep showing the build, I am sure there will be something new to learn!
 
Back
Top