


I've read of multiple cases of people daunted or hesitant when it comes to the paper nose extension ("Witch's Hat") that needs to be added to some of the TLP kits, so I thought I'd post what I do step-by-step for this step. I hope others find this helpful!
First off, TLP kits are made to be "builder's kits", so if you're a beginner, you should understand that they require a lot more work to build compared to the common Estes kit. Fins will have to be traced and cut out from balsa sheets. Nose cones may have to be weighted. Some require a paper nose extension to be added. Additionally, they're built to be lightweight so that a 2.6" wide nearly 4' rocket can launch off a D12-3. They also make a great basis for mods once you learn more techniques; however keep in mind that some mods add weight, so you may no longer be able to launch off the smallest motor. Regardless, they have GREAT missile designs at what I consider to be a low price - which is the reason you may have to modify the nose cone since custom nose cones are very pricey (it can cost about half of the price of the kit or more!).
Secondly, TLP already explains how to do this in their instructions (short story is they say to just form the cone shape and that you can use steam to help form the tip - along with a few cautions about that); however my personal method differs somewhat and works for me, so I'm relaying here. Feel free to try both methods since you'll be making copies of the template if you follow my instructions first.")
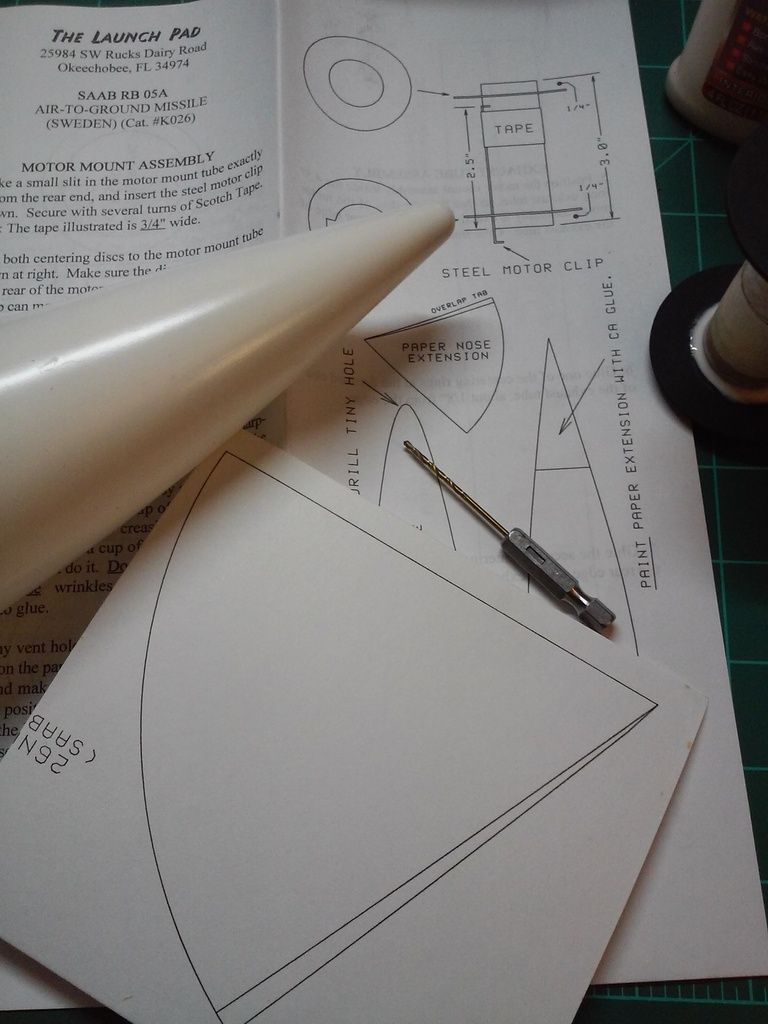
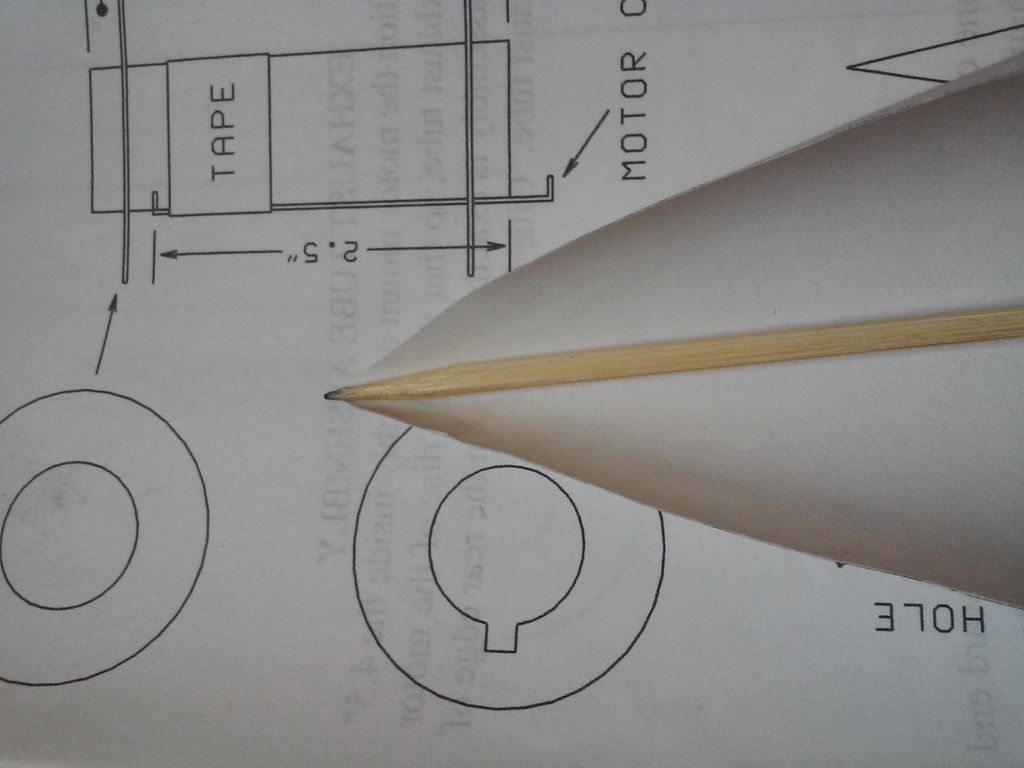
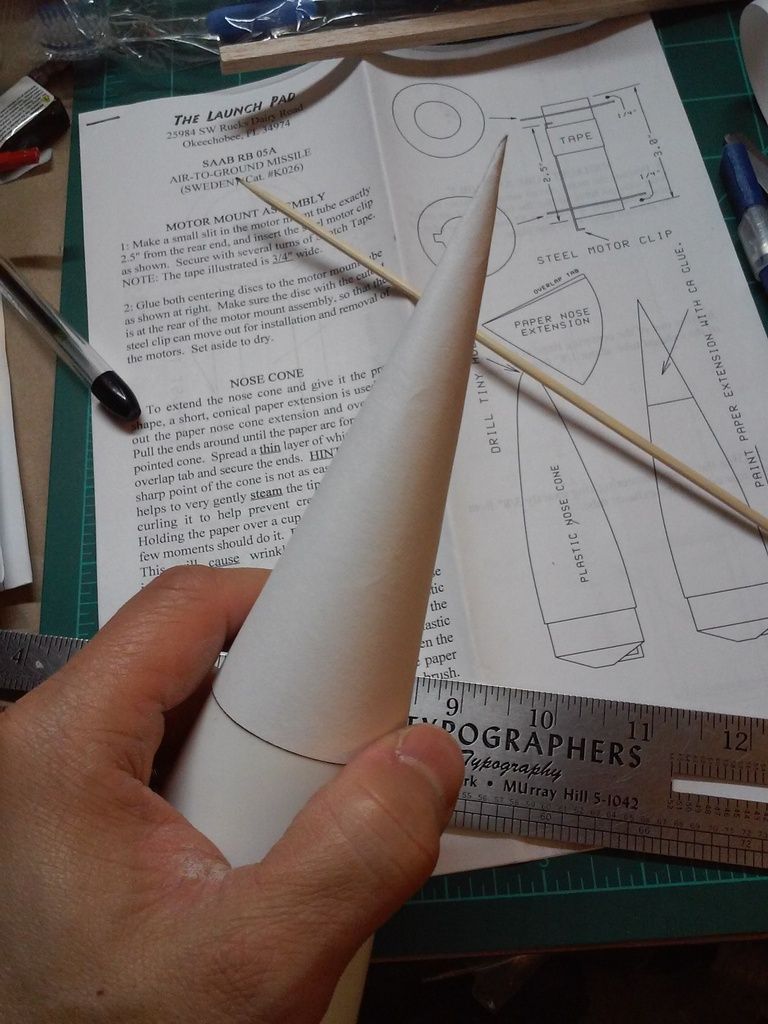
So assuming you have a kit with the PNE (Paper Nose Extension)...
Step 1: Make a copy of the PNE template.
You can scan and save the file or make a copy. Regardless, you want some fallback in case you mess up the PNE. This also makes it less worrisome to commit to doing it and it's a good thing to have another in case you drop your nicely finished pointy nose cone on the floor and have to replace it.
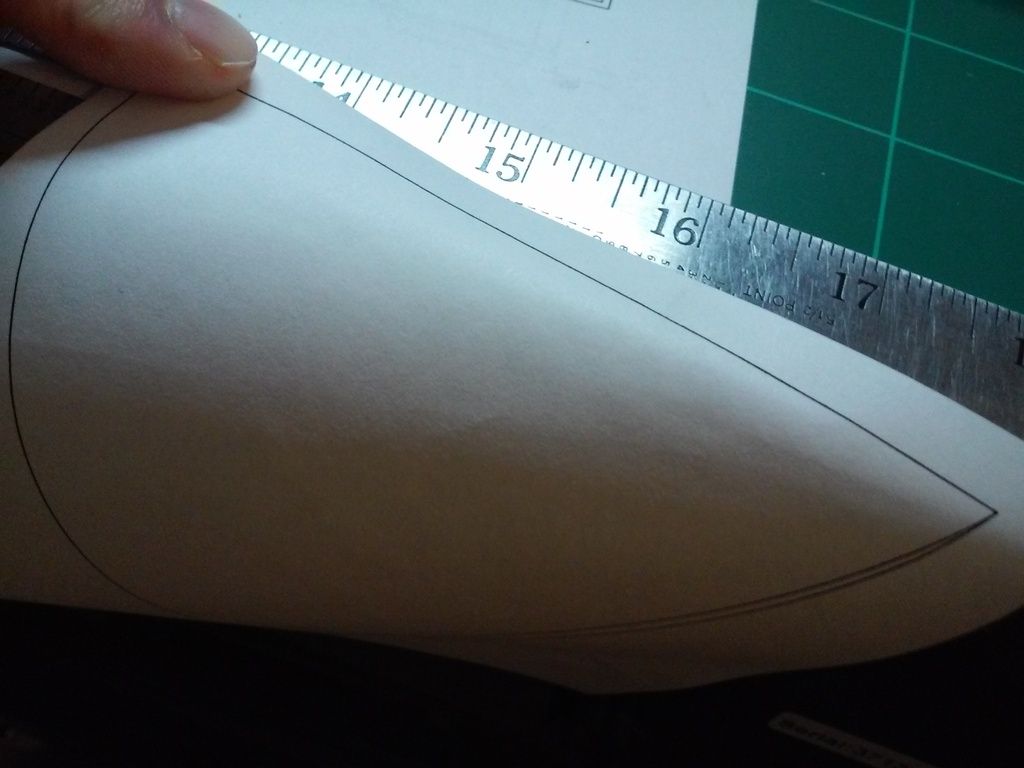
Step 2: Curve the PNE template before cutting it out.
I like to precurve the PNE before cutting it out since it gives you a lot more paper surface to grip and work with. I like to first pull it against the edge of a table which has a sharp edge, then do it more with the edge of a metal ruler - pull downwards about perpendicular to the edge or slightly more than that. Note that you should also be pulling the PNE in an arc to simulate/create the shape you're aiming for (more paper pulling on the wide part and less movement on the pointy part). This curling action is similar to how people curl ribbons for gift embellishment. You're basically stretching the outer side of the paper and compressing the inner side to form the curvature. If you haven't done this before, try it on strips of paper of varying thickness until you get a feel for what is happening and how it's working. Fun stuff.
Step 3: Cut out the PNE
Self explanatory...if you need help or a pic here, get off TRF and buy a RTF rocket. :wink:
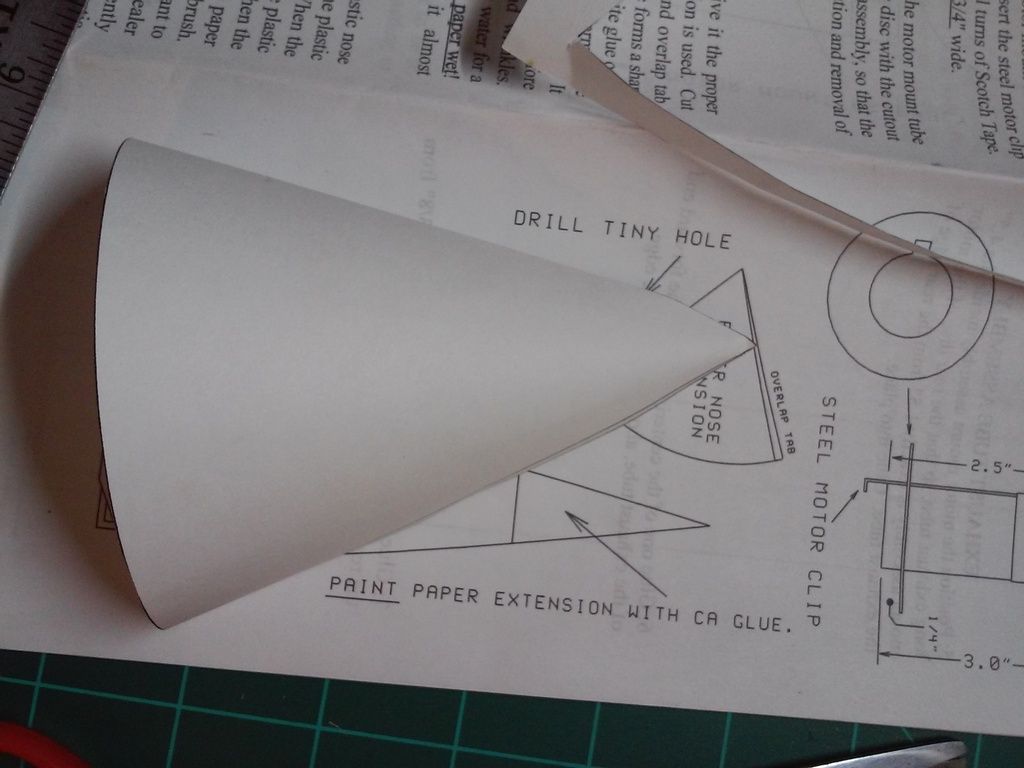
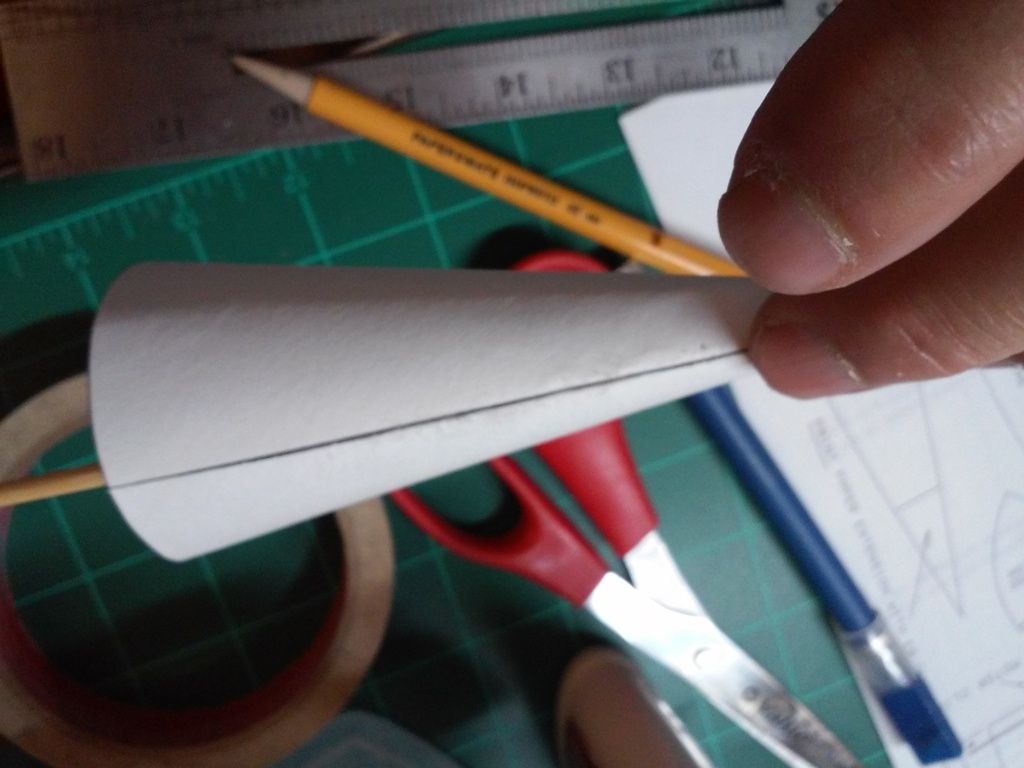
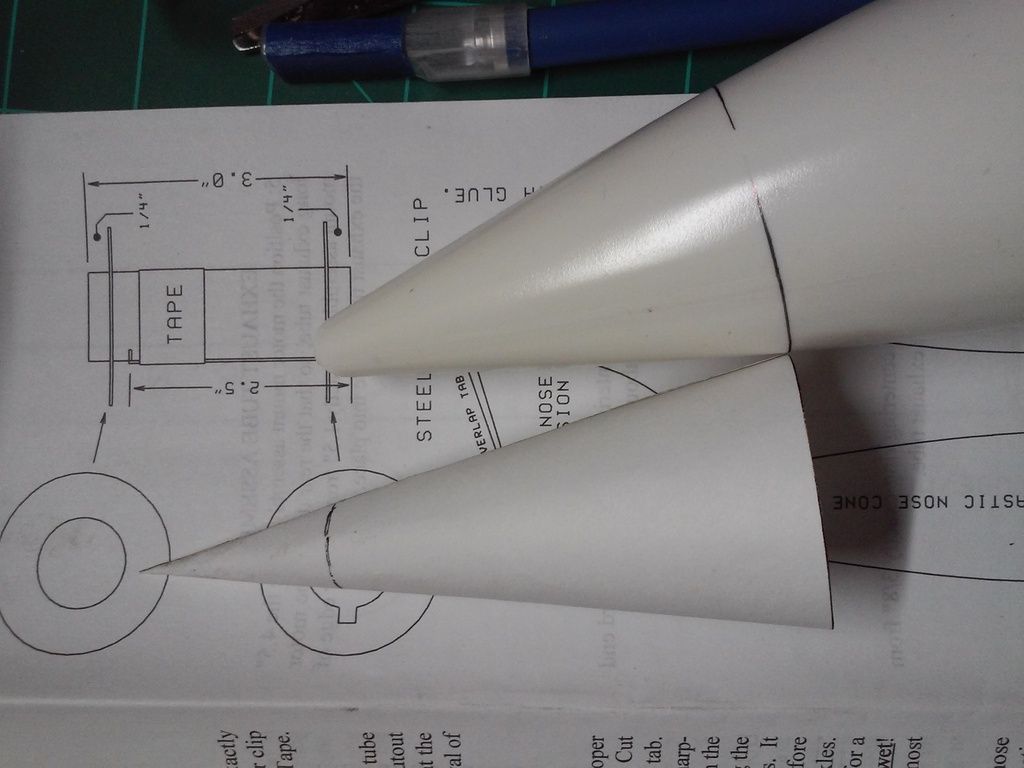
Step 4: Test shape the PNE and fine tune the tip.
You should have a decent curl on the PNE now...more is probably better than less; however you have to be careful to not crease the paper, so there is a balance. Check the shape by putting the two bottom parts together (overlapping on the glue strip area/overlap tab) and see how the rest of the cone feels as you try to carefully squeeze it into shape (be careful of the tip if it seems too stiff since you don't want any crease/fold).
If the tip seems too stiff/flat, try shaping just that around some pointed object like a bamboo skewer or similar.
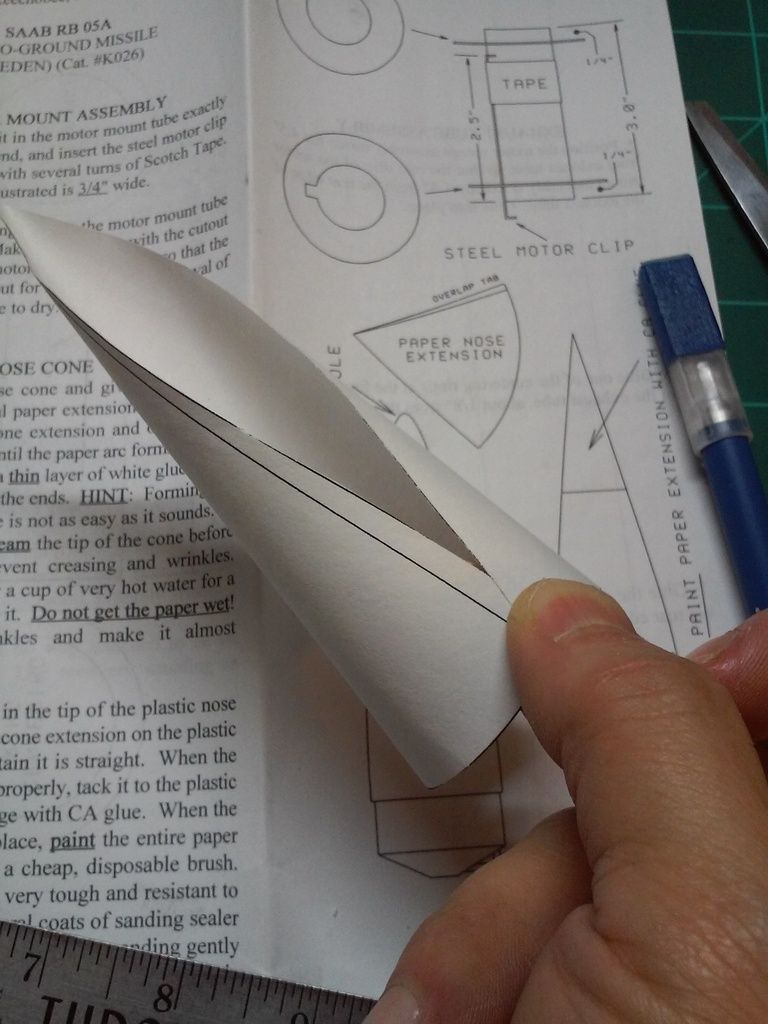
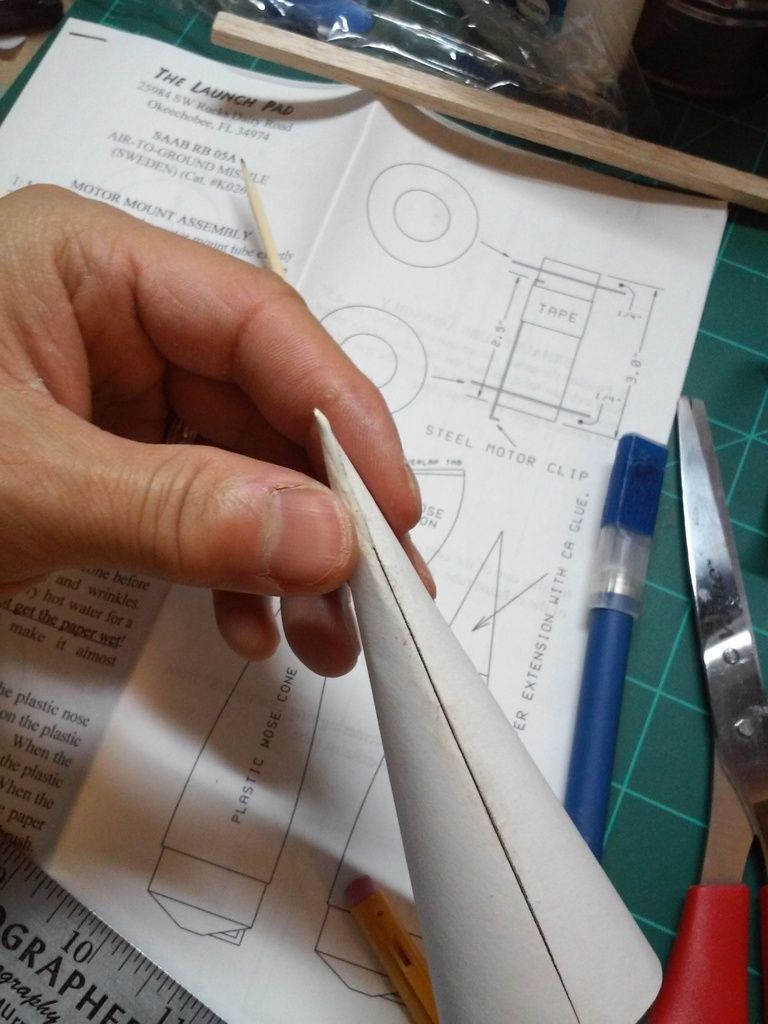
Step 5: Go for the Glued!
Okay, time for the big show! I like using Elmer's Carpenter's Wood Glue; however white glue works fine too. Note that you'll have to work somewhat quickly once glue is down and parts put together since glued paper dries fairly quickly. Add a line of glue to the glue strip area/overlap tab and start pulling the sides together. Holding the bottom area together during the process makes it a bit easier (I've used a binder clip the previous time) and start getting those edges together. As you get to the tip, be a bit more careful since it starts to get a bit soft.
I found a dowel inserted and held under the glue line is helpful to make sure the seam is glued down well once you have most of it in place (supports the other side as you press the glued paper seam down).
There will likely be a small gap at the very tip...no problem at all. Just fill with glue and continue to shape/squeeze until the glue dries. Blow the glue into the seam if you need to. Once the glue is dried, it also covers the seam.
Don't worry too much if there are very slight wrinkles or slight creases since you'll be hardening/filling later.
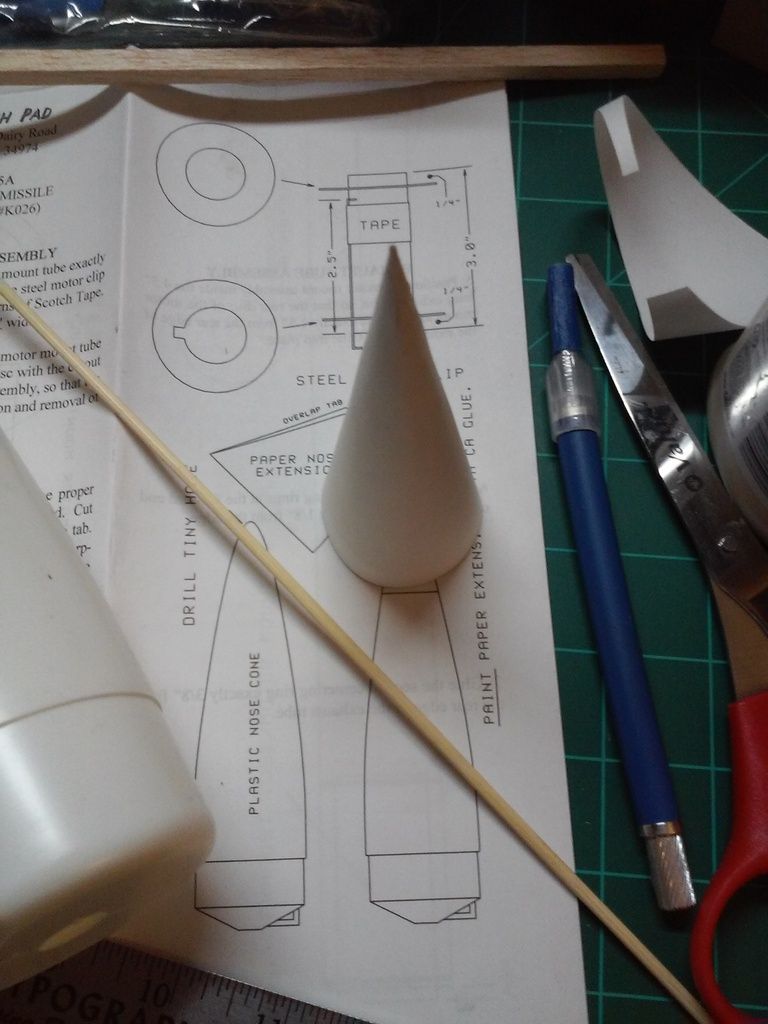
Step 6: Test fit the PNE
Check to see if it looks good and how it fits on the nose cone. I also mark the bottom onto the nose cone as well as the line where the nose cone tip reaches inside the PNE (this way I can fill with epoxy later if I want...may be a substitute for some of the clay weight and also strengthens the tip - this is my own mod here since TLP says to "paint the entire paper cone using CA").
Step 7:
TLP instructions note to drill a hole into the tip of the nose cone, so don't forget this step (I'm assuming it serves as a pressure relief so the tip doesn't pop off due to lower pressure at higher altitudes).
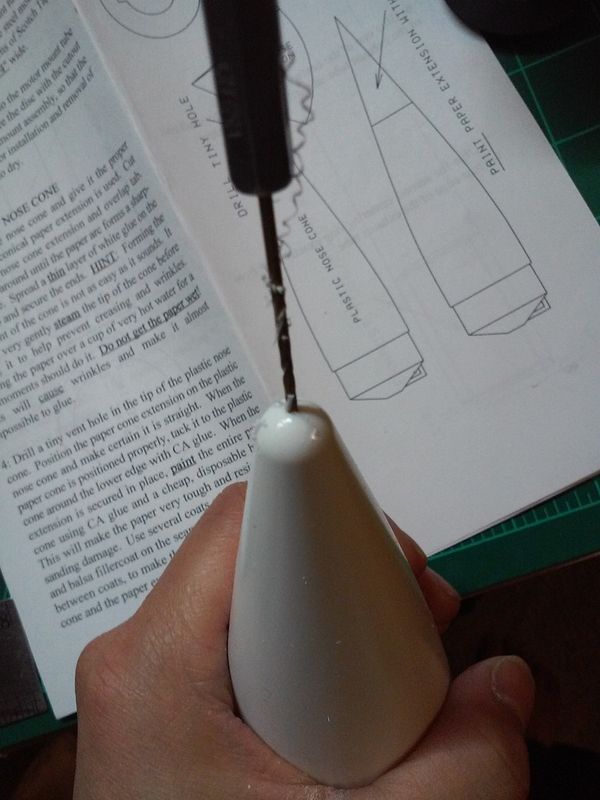
For the rest, you can follow the TLP directions for mounting, etc.
Other opinions/methods welcome!
First off, TLP kits are made to be "builder's kits", so if you're a beginner, you should understand that they require a lot more work to build compared to the common Estes kit. Fins will have to be traced and cut out from balsa sheets. Nose cones may have to be weighted. Some require a paper nose extension to be added. Additionally, they're built to be lightweight so that a 2.6" wide nearly 4' rocket can launch off a D12-3. They also make a great basis for mods once you learn more techniques; however keep in mind that some mods add weight, so you may no longer be able to launch off the smallest motor. Regardless, they have GREAT missile designs at what I consider to be a low price - which is the reason you may have to modify the nose cone since custom nose cones are very pricey (it can cost about half of the price of the kit or more!).
Secondly, TLP already explains how to do this in their instructions (short story is they say to just form the cone shape and that you can use steam to help form the tip - along with a few cautions about that); however my personal method differs somewhat and works for me, so I'm relaying here. Feel free to try both methods since you'll be making copies of the template if you follow my instructions first.
So assuming you have a kit with the PNE (Paper Nose Extension)...
Step 1: Make a copy of the PNE template.
You can scan and save the file or make a copy. Regardless, you want some fallback in case you mess up the PNE. This also makes it less worrisome to commit to doing it and it's a good thing to have another in case you drop your nicely finished pointy nose cone on the floor and have to replace it.
Step 2: Curve the PNE template before cutting it out.
I like to precurve the PNE before cutting it out since it gives you a lot more paper surface to grip and work with. I like to first pull it against the edge of a table which has a sharp edge, then do it more with the edge of a metal ruler - pull downwards about perpendicular to the edge or slightly more than that. Note that you should also be pulling the PNE in an arc to simulate/create the shape you're aiming for (more paper pulling on the wide part and less movement on the pointy part). This curling action is similar to how people curl ribbons for gift embellishment. You're basically stretching the outer side of the paper and compressing the inner side to form the curvature. If you haven't done this before, try it on strips of paper of varying thickness until you get a feel for what is happening and how it's working. Fun stuff.
Step 3: Cut out the PNE
Self explanatory...if you need help or a pic here, get off TRF and buy a RTF rocket. :wink:
Step 4: Test shape the PNE and fine tune the tip.
You should have a decent curl on the PNE now...more is probably better than less; however you have to be careful to not crease the paper, so there is a balance. Check the shape by putting the two bottom parts together (overlapping on the glue strip area/overlap tab) and see how the rest of the cone feels as you try to carefully squeeze it into shape (be careful of the tip if it seems too stiff since you don't want any crease/fold).
If the tip seems too stiff/flat, try shaping just that around some pointed object like a bamboo skewer or similar.
Step 5: Go for the Glued!
Okay, time for the big show! I like using Elmer's Carpenter's Wood Glue; however white glue works fine too. Note that you'll have to work somewhat quickly once glue is down and parts put together since glued paper dries fairly quickly. Add a line of glue to the glue strip area/overlap tab and start pulling the sides together. Holding the bottom area together during the process makes it a bit easier (I've used a binder clip the previous time) and start getting those edges together. As you get to the tip, be a bit more careful since it starts to get a bit soft.
I found a dowel inserted and held under the glue line is helpful to make sure the seam is glued down well once you have most of it in place (supports the other side as you press the glued paper seam down).
There will likely be a small gap at the very tip...no problem at all. Just fill with glue and continue to shape/squeeze until the glue dries. Blow the glue into the seam if you need to. Once the glue is dried, it also covers the seam.
Don't worry too much if there are very slight wrinkles or slight creases since you'll be hardening/filling later.
Step 6: Test fit the PNE
Check to see if it looks good and how it fits on the nose cone. I also mark the bottom onto the nose cone as well as the line where the nose cone tip reaches inside the PNE (this way I can fill with epoxy later if I want...may be a substitute for some of the clay weight and also strengthens the tip - this is my own mod here since TLP says to "paint the entire paper cone using CA").
Step 7:
TLP instructions note to drill a hole into the tip of the nose cone, so don't forget this step (I'm assuming it serves as a pressure relief so the tip doesn't pop off due to lower pressure at higher altitudes).
For the rest, you can follow the TLP directions for mounting, etc.
Other opinions/methods welcome!
Last edited:

