TLP Seawolf

The Rocketry Forum

Help Support The Rocketry Forum:

This site may earn a commission from merchant affiliate links, including eBay, Amazon, and others.

foose4string

Well-Known Member
Joined
Jan 17, 2009
Messages
2,853
Reaction score
8
Seems like the TLP rockets are always caught somewhere between low power and mid power and will generally cause debate of it's true identity. Since I don't plan on flying this on anything lower than an E18, I will put it here.

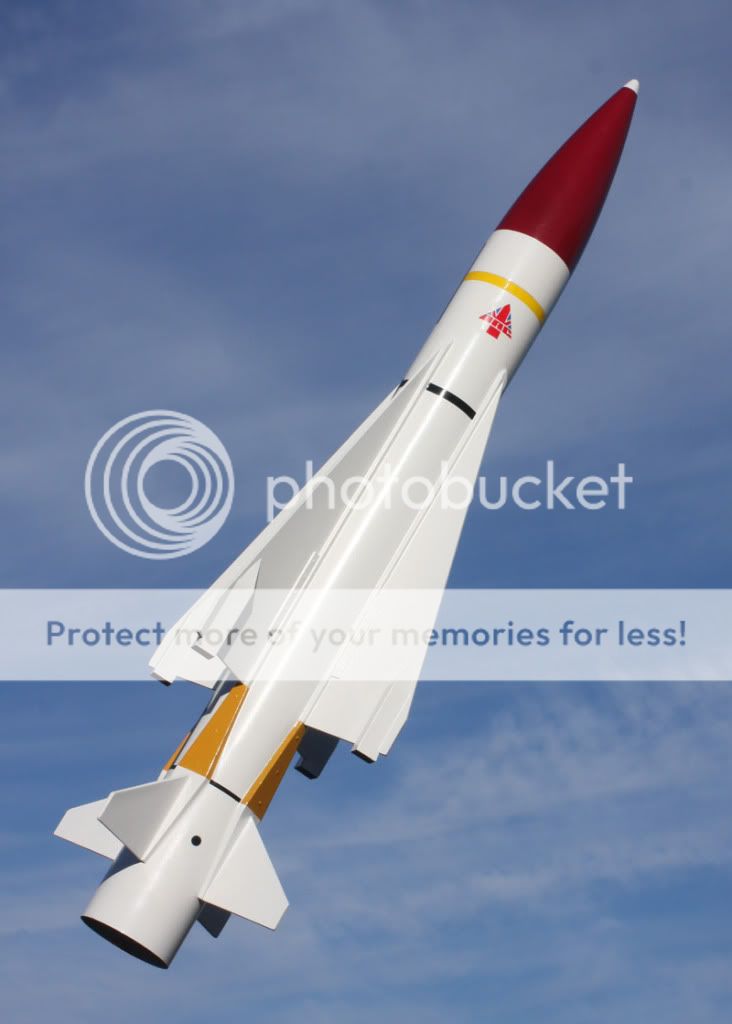
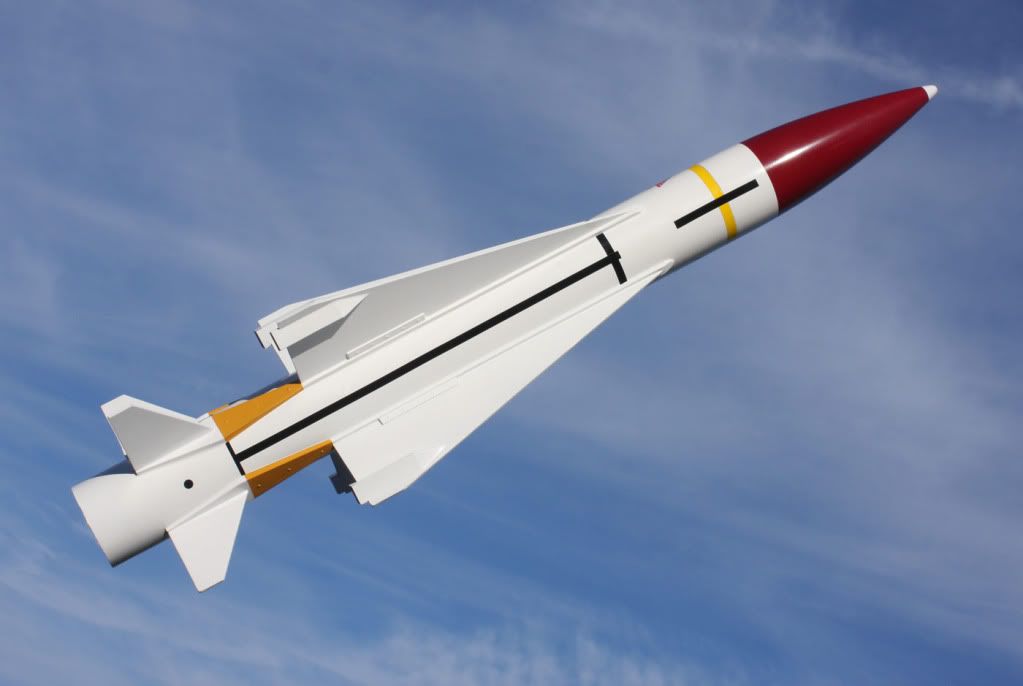
After seeing the rebirth of Stymye's Seawolf after his ill fated launch, I became interested in this kit and began building one of my own. As with most of my rocketry projects, I go like gangbusters for about 2/3 of the way and then move on to something else. It's usually about the time some sanding is involved. :eek: This rocket was no exception. Finally, a year later, I have it finished.

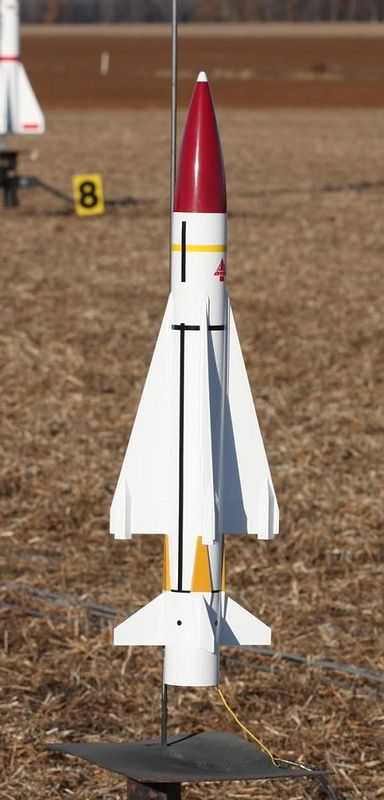
I did some minor mods, but nothing too extravagant or anything that added substantial weight. The balsa fins were laminated with full sheet label paper and the edges sealed with CA. I scrapped the included 3/16" lug and added 1/4" lugs. Kevlar leader.
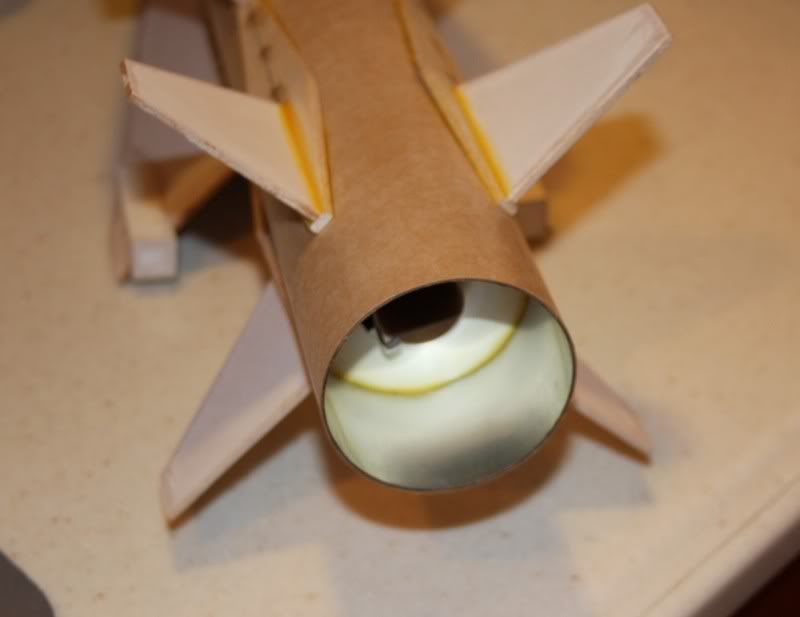
The instructions will have you install the motor mount so that it is recessed quite a bit (to help with stability, I assume). The tail end has a coupler that reinforces the main body tube below the mount, seemingly to beef up that area for motor exhaust and recovery impact. I used an idea from Stymye about lining that coupler with aluminum to help reflect some of that motor heat an hopefully avoid some charring. Where he used aluminum shim stock(flashing), I cut an aluminum soda can to size and epoxied it in place. This added almost no weight compared to the aluminum flashing that I had installed first.
seawolfheatshield.jpg

There would have been a 1/4 inch gap between the lower motor mount ring and the reinforcement coupler if I had installed the motor mount according to the instructions. I slid the mount rearward so it was flush with the coupler. I planned on adjusting the nose weight anyway, and I once checked the position in Rocksim, it really didn't make a huge impact on stability.

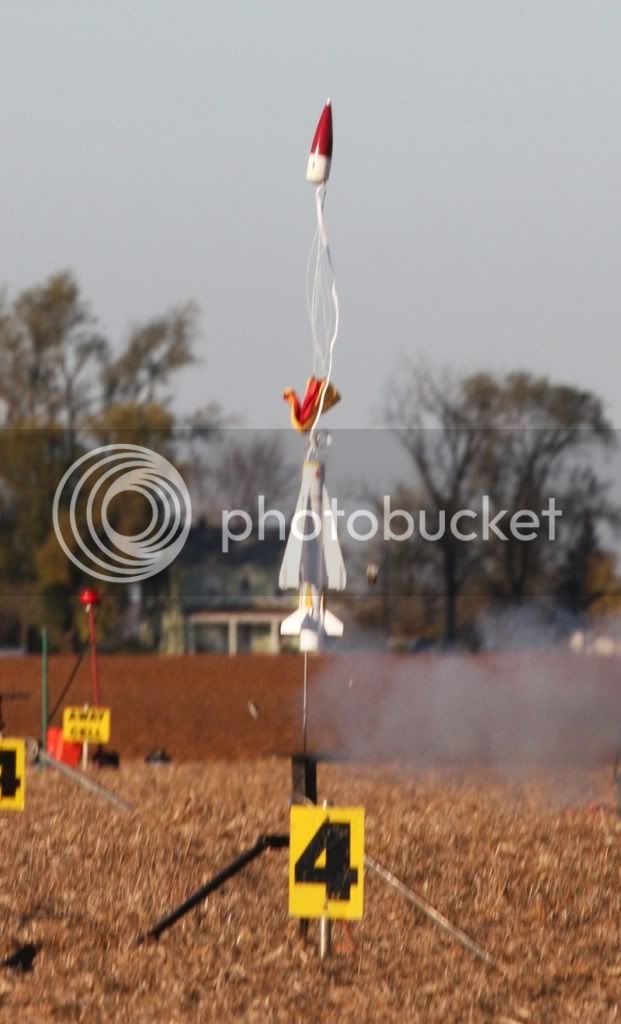
It's obvious from the start that this bird needed nose weight and the dried up clay that came with the kit was also a good indicator. Folks who have built this with the stock nose weight have noted the marginal stability of the rocket. It obviously needed more weight, and trying to soften up the potter's clay that came with the kit was more trouble than it was worth. It became a sloppy mess. BB's and Gorilla glue to the rescue. According the the Rocksim file I made and Stymye's experience, it needed at least 1 1/2 ounces to be comfortably in the green. I added that much.

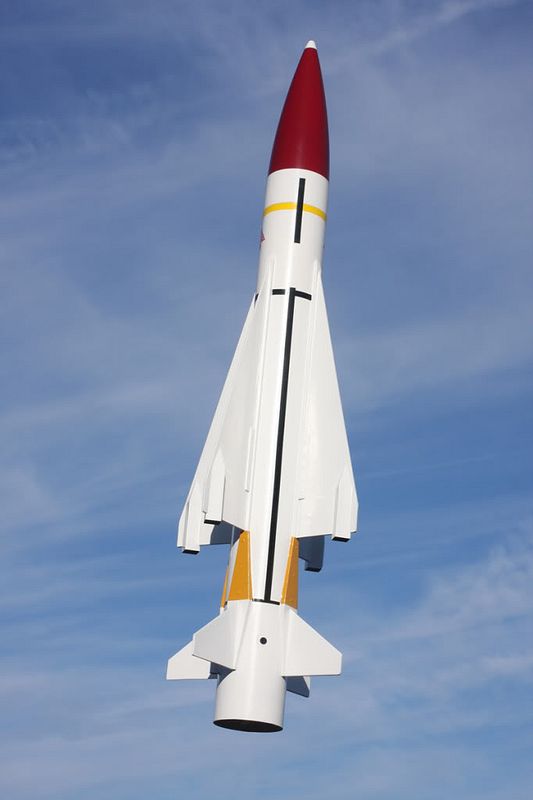
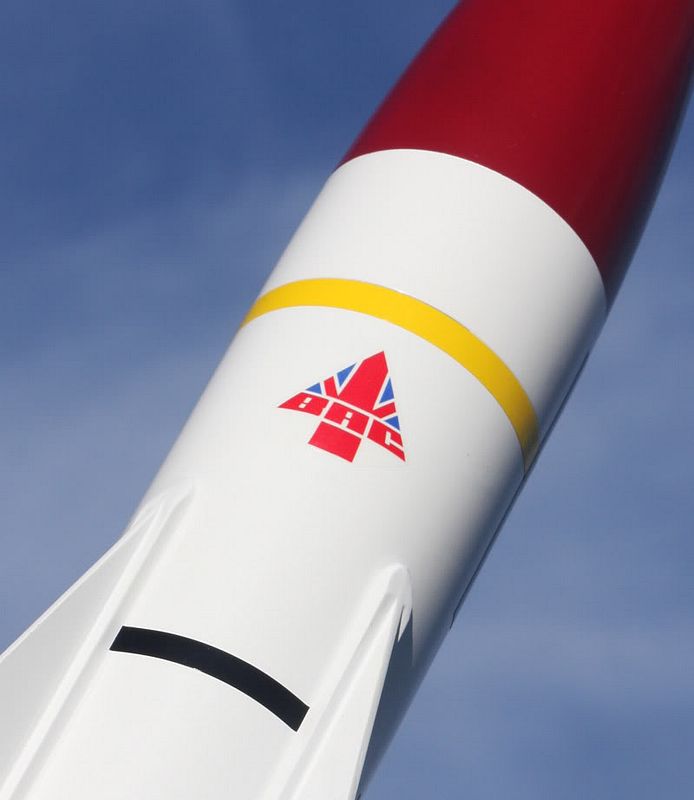
The finishing and details took a while, but I feel the end result was worth it. Stymye was kind enough to send me the artwork he made in Adobe Illustrator for the BAC insignia and I made decals from that file. I enlarged them a little and also printed the little circles on the same sheet. Yellow stripe is trim monokote and the black stripes are automotive pin striping.

Seawolf-stripes2.jpg

Seawolf-BAC.jpg

Seawolf-stripes.jpg

Seawolf-BAC-closeup.jpg

Sea-wolf-large.jpg
 
Last edited:
Well smack my butt and call me Sally! It just so happens that I dug deep into my unbuilt kit stash on Sunday night, after trying to digest the Ravens loss to the Bengals, and pulled out an old TLP Seawolf! I've alwasy found that building a rocket is great therapy after a loss.

Foose, I found that pic of the RN sailors loading a real Seawolf on the RN website. I like that color scheme better than the one suggested in the kit. Fantastic build job and photos! I am thinking of your suggestion of paper-covering the fins instead of going to basswood - weight/balance [that CP/CG thingee again] is always critical on Launch Pad kits. I can only hiope mine comes out as nice as yours!! :cheers:
 
Craig that looks outstanding!

Can I ask you though, I remember you mentioning it once, do you still throw the rockets in the air to catch a picture? If so, how in the heck do you manage to toss it and snap the picture at the same time, centered-even?
 
Foose, what color is that on the nose cone? On the forward portion of the aft fin mounts?
 
Thanks all!

Looks kickass :)
What motor for first launch ?


Probably E18...not sure which delay. I'll have to run the sim again.

Craig that looks outstanding!

Can I ask you though, I remember you mentioning it once, do you still throw the rockets in the air to catch a picture? If so, how in the heck do you manage to toss it and snap the picture at the same time, centered-even?

...and you believed me? :D
Photoshop is my friend. They are held up(usually by an assistant) on a dowel or stiff wire coming from the motor mount. The stick is then Photoshopped out of the pic. If it's not centered, it can be cropped so that it is. BTW- that's the only alterations I ever do to the pics.


Foose, what color is that on the nose cone? On the forward portion of the aft fin mounts?

The nose is old formula Krylon- Burgundy. Also note, the lower portion of the cone was masked with Tamiya tape and painted white to give the illusion of a shorter cone. The base of the cone is really at the yellow stripe. I should have started with a white base coat to begin with and shot the Burgundy over it. I think painting the cone two tone really helps the scale appearance.

Aft fin mounts are hand painted with Model Master-Trainer Yellow


Crab- pm me your mailing address. I have some leftover decals that you might be able to use. They are scaled slightly smaller than what I used, but I think they'll still work.
 
Last edited:
My time for flying was limited this weekend, but I managed to get an hour or so on the field at the club launch this weekend. I only took one rocket with me as this was going to be the only flight of the day. I prepped the motor at home knowing there would probably be some wind to deal with on site. The E18 went together smoothly but I still had the instructions close by, double checking each step. I'm getting close to a dozen flights on this 24/40 case and was thinking to myself as I was building, "this is getting much easier now". I was feeling confident in my ability at this point and wasn't feeling like the novice anymore as I normally do when flying the RMS motors.

After waiting for fires to get put out due to numerous sparky flights preceding my spot on the flight line, it was time to launch. When the launch was pressed there was a pause and then flash below the rocket, and a second or two later the cone popped off. I remember tightening both the forward and aft closers and can't figure figure out what went wrong. The forward closer was still intact. The delay and ejection powder hadn't burned. The grain and liner was spit from the casing and found about 8-10 ft away from the pad. The propellant was still mostly intact, only a small portion of it had burned.

Several of us looked and never found the rear closure. Somehow it was thrown from the casing as well.

The motor mount assembly came loose was pushed forward into the rocket. I'll have to rebuilt the mount. Luckily, the rest of the rocket remained intact and didn't suffer any damage.

I've removed and inspected the casing and can't seem to find anything wrong with it. I tried threading the forward closure on both ends of the case and everything fits together smoothly with no visible damage to the threads. Nothing feels stripped or jagged when it is screwed on and the threads seem to be grabbing just fine. But, I'm a little worried about this case now. :(

Once I get a new case or rear closure, I'll try again.

seawolf-pad.jpg

seawolf-casing-problem.jpg


You can see the grain and lining after bounces off the deflector. I think I see the aft ring too, but it's hard to tell.
 
Last edited:
FWIW, I had a very similar incident back in the summer. I never found the aft ring either. I suspected then, and still do, that the age of the reload had something to do with it. It was a White Lightning F24, and the grain slot had swollen. Even though I had worked it open, I think the ignitor [not a Copperhead] may have overpressurized in the grain causing the aft closure failure. Further, I suspect that the nozzle failed, because it was in three pieces. But because this could have happened when it hit the blast deflector, I can say with 100% certainty thats what happened. But I can't figure out any other reason.
 
Fill out a mess report. Most likely cause is either a large void or crack in the propellant (shine a light in the core to see if you can see a void, sometimes they are hard to see, even in C-slot motors), or the wrong nozzle was included in the reload. I have seen several failures caused by wrong nozzles, and even saved a couple flights by detecting the wrong nozzle was in a case before the user flew it. It happens. Do you have any other loads from that pack, if so can u measure the throat diameter of the nozzles you got left?
 
FWIW, I had a very similar incident back in the summer. I never found the aft ring either. I suspected then, and still do, that the age of the reload had something to do with it. It was a White Lightning F24, and the grain slot had swollen. Even though I had worked it open, I think the ignitor [not a Copperhead] may have overpressurized in the grain causing the aft closure failure. Further, I suspect that the nozzle failed, because it was in three pieces. But because this could have happened when it hit the blast deflector, I can say with 100% certainty thats what happened. But I can't figure out any other reason.

We never found the nozzle. The grain was getting some oxidation, but I sanded and scraped it and was able to remove most of it. I didn't use a copperhead either. Sounds like the same exact scenario. Have you used that case since?
 
We never found the nozzle. The grain was getting some oxidation, but I sanded and scraped it and was able to remove most of it. I didn't use a copperhead either. Sounds like the same exact scenario. Have you used that case since?

I think so. I have two, and I bought the replacement aft ring from Valuerockets right before or after NARAM. I'm just not sure which one I have used. :blush:
 
I've never had a cato like that, but I've seen several. All of them were using igniters other then copperheads. IMHO it's the igniter wires bunching up and clogging the small nozzles. No data, just a feeling.
 
How did you get the color changes on the tip of the nose to look so good? Please describe what you used and how you used it. Your seawolf looks great.
 
Finally had the chance to resume work on my Sea Wolf over the Thanksgiving weekend. Prior to that, I'd installed the motor mount and a baffle in place of the centering ring used to keep the parachute forward. I did that for a couple of reasons, among them to fix a slightly flattened body tube. Over the weekend I did my least favorite task in any building process - filling the tube spirals. I only bother with this on scale-type models, I hate it so much. So, out came the trusty Bondo!
 
Craig that looks outstanding!

Can I ask you though, I remember you mentioning it once, do you still throw the rockets in the air to catch a picture? If so, how in the heck do you manage to toss it and snap the picture at the same time, centered-even?

That's what they make 1/2A6-2's for... :roll::roll::roll: OL JR :)
 
Absolutely beautiful rocket!! You've inspired me to build this one. Any chance you would share the decal file with me?
 
I really like the 18mm & 24mm RMS.
I'll probably catch some flack for saying this, but..
I've used them over and over with thier included copperhead ignitors, never had an ignition problem.
 
How did you get the color changes on the tip of the nose to look so good? Please describe what you used and how you used it. Your seawolf looks great.

For the color changes I used my calipers to measure and mark several points from the tip around the cone. For the lower color change I did the same thing except I measured from the lower lip of the cone. I played connect the dots with Tamiya masking tape and sort of used my eyeball to make it right. I highly recommend Tamiya tape.
 
I've always finished fins before mounting them to the rocket. The LP instructions say to attach the fins and then apply thin CA to them for sanding. Is this the method you used on your beautiful rocket? I've not used CA to seal fins before. Anything advice on doing this? Thanks for your help
 
stunning rocket Foose !

Marlin , I would consider papering the fins on this rocket.
the CA trick can be very messy, sticky and stinky!
I papered the balsa sheets first, than cut out all the parts when I built mine.

as a bonus ,I found it to make much lighter parts with no need for filling
 
I'm using the papered fin method on mine. Just covered the lower fins this morning, they're still under a box full of weight while they dry. :hohoho:
 
Thanks. I've papered fins and think I will take that suggestion. Have you ever had problems with the edges peeling off?
 
Back
Top