TLP Maverick build thread

The Rocketry Forum

Help Support The Rocketry Forum:

This site may earn a commission from merchant affiliate links, including eBay, Amazon, and others.

luke strawwalker

Well-Known Member
Joined
Jan 18, 2009
Messages
9,147
Reaction score
40
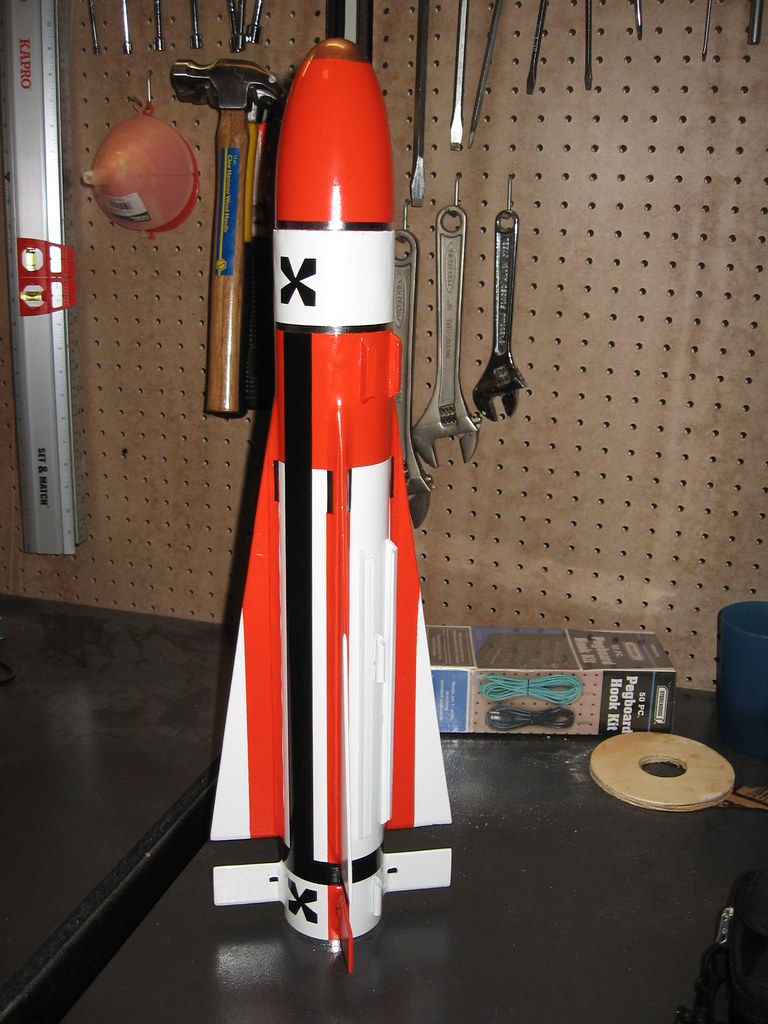
Well, while waiting for the ground to dry this week, I've been working on the TLP Maverick I picked up at Red Arrow Hobbies last month when I was in Indiana. It's a pretty neat kit, so far, and very simple, for the most part.

I've been working on it off and on all week, among other things, and I've got it just about done construction wise.

To start off, you build the motor mount. Standard fare-- two BT-80 centering rings, a BT-50 motor tube for 24mm motors, a standard "D" engine hook (which you should trim the upper end shorter if you want to fly reloads at some point, so it will clear the ejection cap of the reload) Tape the hook to the tube, and glue the centering rings on. Voila.

Next, we cut the fin templates out and trace the outlines onto the balsa sheet, and cut the fins out. The rectangular rear fins get notched for short bits of balsa dowel to be glued in to simulate the steering pins the fins rotate on in the real missile. These bits of dowel are cut from a ~1 inch piece of dowel included in the kit. Cutting such a short piece is fun, but is done fairly quickly. The four main delta fins/wings of the missile are cut out of the balsa sheet. I left the edges square for simplicity and to make it look more 'missile-ish' and papered all the fins with white glue and printer paper. They turned out pretty well, but the leading edges weren't quite as smooth as they usually end up when papering over rounded leading edges... there was a little trapped glue in places and the paper didn't lay down REAL tight on the leading edges in some places. That's my fault. Those BIG delta fins/wings have a LOOOONNNNGGGG leading edge! Live and learn... The paper makes them all a LOT stronger, though. I've heard iffy things about TLP's balsa sometimes being VERY soft, but the stuff I had seemed to be VERY good quality.

The forward delta wing fins also have strips of balsa glued onto their sides at the root edge. The kit comes with 8 LONG strips of balsa for the task. I decided to paper these too, to simplify finishing more than for strength. I applied glue to one side of each one individually and applied them at a slant on a sheet of printer paper, placing the rest of them parallel across the sheet. Once dry, I cut them out and trimmed the paper down to the edges of the balsa strips. These were then glued paper side out to the finished and trimmed delta wing fins along the sides next to the root edge with wood glue, and then trimmed down flush with the fin outlines after they dried. A bit of finish sanding and fins were all ready to go. I applied the first coat of glue to the root edges for a double glue joint and set all the fins aside to dry. I then marked the tube for the fin placement according to the instructions and lightly scarred the tube with 220 grit sandpaper to promote adhesion, and applied a thin layer of wood glue to establish a base for the double glue joint, and set the tube aside to dry.

The kit also includes some thicker strips of balsa for "launch rails" used to attach the missile to aircraft launchers. I papered the thick "rail bases" to cover their grain, and then cut them to shape. I then glued the much thinner (stir stick size) balsa strips to the inside top edge of the rail bases to make the launch rail "slides". I didn't bother papering those, because they were very small and I figured would give a lot of trouble trying to paper them.

The motor mount gets glued in, recessed about 1.5 inches up into the BT-80 to help shift the CG forward. A tube coupler is included and was glued in next to help stiffen the rear of the body tube and help prevent tube erosion from hot gases recirculating back there in flight. I also coated the rear face of the centering ring and the inner surface of the coupler with wood glue to help protect against heat.

More to come! OL JR :)

paperedstrips.jpg
 
Last edited:
The kit comes with a spare centering ring which is glued 6 inches down the rocket to prevent the wadding and chute from shifting aft under thrust and upsetting the rocket's CG, and causing it to go unstable. The instructions state this is "in no way meant to be a baffle-- use recovery wadding to protect the chute." I decided since it was there, it was begging to be made into a baffle. I glued a 1 inch piece of BT-50 into the top of the ring, and coated it and the underside facing the motor with a few layers of wood glue to help protect from heat. I traced the ring onto some thin balsa, and cut a duplicate bulkhead ring to fit the BT-80 tube, and papered it with white glue and printer paper. WHen dry, I trimmed the paper back and sanded it to a good fit in the BT-80. I had a spare 1 inch piece of BT-60 laying about, so I did a "test fit" to see how it would work over the BT-50 to make a 'reverser" for the baffle... it looked to work quite well. I centered the BT-60 piece and traced it's outline on the papered bulkhead disk, and ran over to the shop and drilled fifteen 1/4 inch holes in the periphery of the bulkhead, surrounding the BT-60 outline. I returned to the house and cleaned up the holes with the hobby knife and a small rat tail file. Once satisfied, I glued the 1 inch BT-60 to the bottom side of the bulkhead, and using some scrap bits of balsa, made three 1.5 inch "standoffs" for the baffle, and glued them evenly spaced around the BT-60. These will ensure that the BT-50 and BT-60 are both centered in each other, and have a 1/2 inch gap between the top of each and their opposite bulkhead, allowing the gases free passage while containing the ejection particles. The gases then pass straight up through the 15 holes surrounding the BT-60 to eject the parachute.

The lower centering ring and BT-50 piece were glued into the rocket, half the thickeness of the baffle below the 6 inch mark (roughly 7 inches) indicated in the instructions. THis left plenty of room for the recovery device after the top half of the baffle is glued in. I would have loved to install a Kevlar shock cord built into the baffle, but had no kevlar cord, so I settled on the kit's stock Estes "tea bag" trifold shock cord mount and elastic ribbon, to be installed later. Once the lower baffle ring was glued in and filleted and had dried, the upper baffle ring with it's BT-60 and standoffs, all suitably coated in a couple coats of wood glue to resist heat and allowed to dry, were installed in the body tube and pushed down until they seated against the lower ring, and then it was filleted as well.

The fins were glued on using double glue joints, which REALLY helps here to get the fins lined up, applied, and they grab and set up VERY quickly! I installed the rear 'steering fins' first, gluing them two at a time on opposite sides of the tube and clamping them with an inverted "V" shaped piece of wood and clothespins to ensure the fins stayed square with each other. Once all four fins were installed, then I glued the forward fins on, using the rear fins as guides, clothepinning a steel ruler to the delta wing fins and to the rear fin to ensure they were all properly aligned to each other. I then filleted all fins with wood glue when they were dry. The launch rails were then glued on with double glue joints, and filleted with wood glue when dry.

The nosecone comes with a ball of clay in a sealed plastic baggie. It was as dry and hard as a rock. I weighed it in at 16 grams. I've read that most builders have to reconstitute the clay with a little water, so I cut a slit in the baggie, and dripped a few drops of water into the baggie. This seemed to soften the outer layers overnight, but the clay was still hard, so I smashed it to bits inside the bag with a pair of pliers, and then dripped in more water and worked it up. I used a bit too much water, as it's pretty pasty, but I slit the bag a little more to allow it to dry out some and thicken. I reweighed it and got 20.2 grams. The nosecone is 36.8 grams, for a total nosecone weight with clay of 57 grams. I'll probably add a little more noseweight to offset any shifts caused by the baffle installation in the rocket, though the baffle is installed centered on the 6 inch mark that the single centering ring was to be installed at and shouldn't affect the CG.

The kit comes with a nice octagonal 18 inch mylar chute. I applied the tape dots and some small bits of duct tape reinforcement to the other side of the parachute opposite the tape dots, since mylar is rather brittle, then used a hole-punch to make neat smooth round holes in the mylar, since cuts or irregular holes can tear very easily in mylar. The shroud line bundle is then cut into 4 equal lengths, and tied onto the chute, and evened up and the snap swivel is installed, and the lines locked to the swivel with a drop of white glue to ensure they don't slip.

Next will be a final finish filleting of everthing with Titebond Moulding and Trim Glue, if needed, to make sure everything is nice and smooth. Then a little detail sanding and she'll be ready for primer.

Next question is, does anybody make decals for these kits?? I certainly can't do them justice...

Later! OL JR :)

bafflenfins.jpg

bafflefins2.jpg

bafflecloseup.jpg

fingluing.jpg

launchguidegluing.jpg
 
I've been searching but I haven't found a good picture with all the designation info yet.

This is the best one I found so far but I can't make out much.

Anybody else have a better pic?

Maverick.JPG
 
Well, let's see... Here are a few...

I used the second one as the inspiration for my "not-so-correct" TLP Maverick:

4865564821_4f2fdf5aac_b.jpg


AGM-65_b.jpg

agm-65a.jpg

Electronics hatch AGM-65_Maverick2.jpg

Maverick in flight.jpg

Maverick versions.jpg
 
Thanks... I appreciate it.

I've always liked the Maverick too... nice clean lines and TV guidance to boot! (which they've since added infrared and laser guidance too). It was my favorite weapon back when I was in high school and lived, eat, and breathed playing "F-119 Stealth Fighter" on the computer-- fired about a million of them over Libya, Iran, and the Warsaw Pact... :D

DANG! I guess I'm in trouble now-- if Gordy don't have the decals probably NOBODY does! Any links anybody knows of would be much appreciated!

Thanks! OL JR :)

PS... Nice pics you guys! I like the red and black scheme... is that West German?? Nice rocket!
 
red & black was back during the testing phase, for camera purposes. dunno if I would care for the subdued paint scheme.
 
Thanks... I appreciate it.

I've always liked the Maverick too... nice clean lines and TV guidance to boot! (which they've since added infrared and laser guidance too). It was my favorite weapon back when I was in high school and lived, eat, and breathed playing "F-119 Stealth Fighter" on the computer-- fired about a million of them over Libya, Iran, and the Warsaw Pact... :D

DANG! I guess I'm in trouble now-- if Gordy don't have the decals probably NOBODY does! Any links anybody knows of would be much appreciated!

Thanks! OL JR :)

PS... Nice pics you guys! I like the red and black scheme... is that West German?? Nice rocket!

I'm working on 'em!

Show some patience!:mad: Let the paint dry!
 
Dude! What's up with that??? :y:

Just some joking around and leg pulling. Hopefully I can have the decals finished before the paint cures.

Now does anybody have close up pics of what it says on the side of the Maverick?
 
I may have a real good lead on Maverick details...check back later.
 
Thanks Gordy...

Leg pulling accepted... I'm not usually (too) touchy about such things... LOL:)

Later! OL JR :)
 
Cool missile. I'm anxious to see Sandman's decals. May have to build one of those myself
 
Cool missile. I'm anxious to see Sandman's decals. May have to build one of those myself

Rather than reinvent the wheel, old founding forum member Carl Tulanko did a whole bunch of scale missile decals (he did the HARM decals I just finished) I'm waiting to hear back from him since he has all of the decal files for a bunch of scale missiles!

Unfortunately all of the links in the archives don't seem to take me anywhere, I only hope Carl still has them!

Gordy,
Could you whip up a roll pattern and red stripes for my PAC-3?
https://www.rocketryforum.com/showthread.php?t=13931
 
Great news!!!

I just got a phone call from Carl Tulanko and he is sending me all of his decal files.
 
... Now does anybody have close up pics of what it says on the side of the Maverick?

I used to load Mavs on A-10s. The practice munition was designated a TGM-65. Most of the ones we loaded in the late '70s and early '80s were a semi-gloss white with black stenciling.

So sad that I was so close to these so many times and never bothered to take a picture. Sigh.

Greg
 
I just got my new Maverick TLP kit in the mail. I'd sure like to hear how yours is going.
 
I just got my new Maverick TLP kit in the mail. I'd sure like to hear how yours is going.

Been awhile since I worked on her, actually... she's sitting on the table, about 90% complete. All the construction is actually done, but I need to paint.

Course, then the holidays interrupted, and now the weather in TX has been butt-freezing cold this week and will likely be drizzly/rainy this weekend, and I have to haul calves to the auction sale barn on Monday which is my last Monday off for awhile... (guess made-up holidays DO come in handy!) :D

Anyway, hope to get back to work on her real soon-- got two waiting on primer/sanding/painting.

Wonder how Gordy and/or anybody else has come along with the decals for this one yet??

Later! OL JR :)
 
When the Indiana ANG came to Alpena CRTC from Fort Worth some years ago to train in ground attack on the nearby Air-To-Ground Gunnery range, we had a chance to see the AGM-65 training rounds they hung on their F-16s. Some were white, some were pewter gray, but I don't recall seeing any in olive green.

My TLP Maverick is painted with Krylon Pewter Gray with a gloss black guidance head window rimmed in red and black pinstriping tape. Blue bands fore and aft of the wings of vinyl tape signify a training round. "U.S. AIR FORCE" and "USAF" markings are of black 1/2" vinyl peel-and-stick lettering.

The model had flown sucessfully many times on C6-3, C11-3, and D12-5 motors. The tail fins have all been broken off and re-attached. Two minor body tube zippers were repaired and the original metallized mylar parachute has been replaced with a thin-mil nylon 'chute by Sentell Chutes. The bird was also repainted.

It is a veteran of many demos--even making the front page of a local newspaper.
 

Latest posts

Back
Top